

You may have seen the release of .NET Core and ASP.NET Core 1.0 was announced at DevNation recently.
During the KeyNote presentation Scott Hanselman demonstrated deploying a .NET Core application to a Red Hat Linux server using Octopus Deploy (Scott takes the stage at 48:15 and demonstrates Octopus Deploy integration at 1:02:00).
We were honored to get a mention during Scott's presentation. And we're excited about the possibilities for .NET Core.
Scott understandably skipped the gory details. For those interested, this post will dive deeper into what a real-world-ish deployment of an ASP.NET Core application to a Linux server might look like.
Disclaimer: IANALG (I Am Not A Linux Guy). But I think that's the point. Most .NET developers are (at least currently) most familiar with Windows. For many of us, Linux is a strange (and if we're honest, scary) new world. Come on, let's hold hands...
Best Before
The problem with writing a technical procedure post is that it's often obsolete by the time you finish writing it (a problem very apparent when following posts regarding .NET Core).
Wherever possible I have referenced official documentation, which is far more likely to be maintained.
Ingredients
Obviously we will require an Octopus Deploy Server. If you don't have one handy, download a trial instance or spin one up from the Azure Marketplace.
A Linux server to deploy to. Following Mr Hanselman's lead, we will use a server running Red Hat Enterprise Linux 7.2. You can easily create a RHEL VM in Azure.
An ASP.NET Core application to deploy. We will use a demonstration project created for this purpose: https://github.com/MJRichardson/aspnetcoredemo
It is trivial, but contains two relevant features:- It uses configuration settings from
appsettings.json(into which we will substitute Octopus variables) - It contains some configuration files under the
\confdirectory which we will use to configure our Linux server.
- It uses configuration settings from
Create a Package
If you want to skip creating the package, you can download the zip file from the Releases page on the GitHub repository.
If you haven't already, clone the sample application repo:
git clone https://github.com/MJRichardson/aspnetcoredemo.git
Move to the directory you cloned the project into. The following commands will be run from there.
Note: We have a saying at Octopus HQ: "Friends don't let friends right-click-publish". In a .NET Core world we may have to update it to: "Friends don't let friends dotnet publish". Creating your package and pushing it to Octopus should be performed by your Build Server. Plugins are available for most popular Build Servers (e.g. Team City, Jenkins, TFS).
See here for our official documentation on publishing ASP.NET Core applications to Octopus.
Restore the NuGet packages:
dotnet restore src
Publish the application to a directory:
dotnet publish src --output published
The contents of the \published directory will be the contents of our package. You can use your favorite archiving tool (I recommend 7-Zip) to archive the contents of \published (not the directory) into a file named aspnetcoredemo.1.0.0.zip.
Now upload the package to Octopus Deploy.

You should now see your published package:

Create an SSH Target in Octopus
Octopus Requirements
There are a couple of requirements the Red Hat Linux server must satisfy in order to be added as an SSH Target in Octopus:
Mono
Mono must be installed. The most up-to-date instructions can be found in the Mono docs. For a RHEL server, follow the 'CentOS and derivatives' section.
In a root shell, execute:
yum install yum-utils
rpm --import "http://keyserver.ubuntu.com/pks/lookup?op=get&search=0x3FA7E0328081BFF6A14DA29AA6A19B38D3D831EF"
yum-config-manager --add-repo http://download.mono-project.com/repo/centos/
yum intall mono-complete
SSH Key
Octopus will authenticate with the RHEL server using an SSH Key Pair. A guide for creating a key-pair can be found here.
In your Linux shell, generate an SSH key-pair:
ssh-keygen -t rsa
Add the public key to the authorized keys:
cat ~/.ssh/id_rsa.pub >> ~/.ssh/authorized_keys
Ensure correct ownership of the SSH directories:
chmod 700 ~/.ssh
chmod 600 ~/.ssh/authorized_keys
Other Requirements
.NET Core
Obviously we need .NET Core. Instructions for installing .NET Core on RHEL can be found here. For full disclosure, this author followed the CentOS instructions rather than using subscription-manager.
NGINX
For our little demonstration application, there is no reason we couldn't have Kestrel directly serving requests. But the consensus seems to be that best-practice is to use a production-grade web server as a reverse-proxy in front of your ASP.NET Core application. On Windows this would be IIS.
We'll use NGINX. Following the instructions found at https://www.nginx.com/resources/wiki/start/topics/tutorials/install/#
I create a file /etc/yum.repos.d/nginx.repo, and edited it to contain:
[nginx]
name=nginx repo
baseurl=http://nginx.org/packages/rhel/7/$basearch/
gpgcheck=0
enabled=1
I also modified /etc/nginx/nginx.conf to include the line:
include /etc/nginx/sites-enabled/*.conf;
and we should also create that directory:
mkdir /etc/nginx/sites-enabled
This will be important when we deploy our application.
So the http section appears as:
http {
    include       /etc/nginx/mime.types;
    default_type  application/octet-stream;

    log_format  main  '$remote_addr - $remote_user [$time_local] "$request" '
                      '$status $body_bytes_sent "$http_referer" '
                      '"$http_user_agent" "$http_x_forwarded_for"';

    access_log  /var/log/nginx/access.log  main;

    sendfile        on;
    #tcp_nopush     on;

    keepalive_timeout  65;

    #gzip  on;

    include /etc/nginx/sites-enabled/*.conf;
    include /etc/nginx/conf.d/*.conf;
}
Supervisor
An ASP.NET Core application is run by executing the dotnet utility. Executing it directly via the terminal is fine when you are testing locally, but for deploying to a server we need:
- To be able to start and stop the service
- For the service to start automatically on server restarts
So we'll use Supervisor.
Following the install instructions:
yum install python-setuptools
easy_install supervisor
And we will create a Supervisor configuration file using default settings, as per here:
echo_supervisord_conf > /etc/supervisor/supervisord.conf
Now we will create a directory to hold our application-specific supervisor config:
mkdir -p /etc/supervisor/conf.d
And edit /etc/supervisor/supervisord.conf and add at the end:
[include]
files = /etc/supervisor/conf.d/*.conf
Note: Installing Supervisor using easy-install does not appear to register Supervisor with SYSTEMD. This seems like something you would certainly want to do. A nice walk-through of the complete supervisor setup can be found here.
Security
By default your RHEL server will likely be rather locked down (as it should be). Since we are going to be using it as a web server, we need to loosen the chains.
I can't state strongly enough that I am not qualified to provide Linux security advice. Please consult your local sysadmin. And apologize in advance.
We need to open port 80:
firewall-cmd --zone=public --add-port=80/tcp --permanent
firewall-cmd --reload
By default, SELinux was preventing NGINX from proxying HTTP requests to Kestrel. Information regarding this can be found here.
Running the following should allow connections to be made:
setsebool httpd_can_network_connect on -P
Create an Environment
Since all Targets need to belong to an Environment, let's create an Environment first.

Create the SSH KeyPair Account
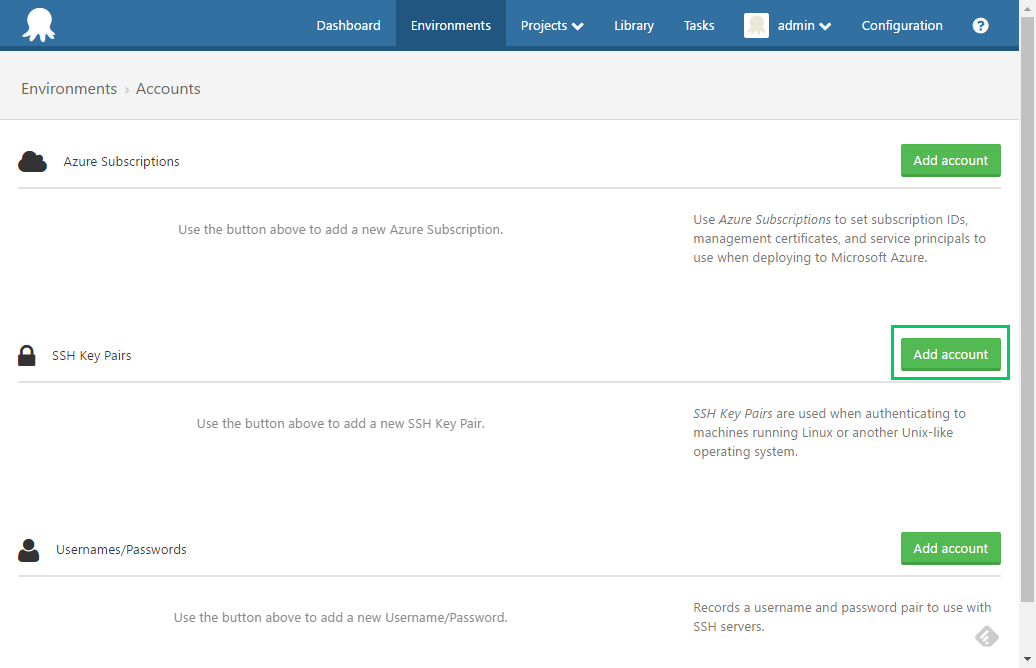
The private key can be obtained by:
cat ~/.ssh/id_rsa
You will need to save the text into a file, which will then be supplied for the 'Private key' field as shown below.

Create the SSH Target


Once you have created the target you can run a health-check to ensure connectivity.
Create a Project in Octopus
Now we will create a project to deploy our ASP.NET Core Demo application.

Add Deploy a Package Step
Add a Deploy a Package step to your Project.

It will reference the package we previously uploaded.

We will enable two features for this step:

JSON Configuration Variables
We will use the JSON Configuration Variables feature to transform our appsettings.json file.
In this case we are simply changing the rendered message, but this demonstrates how Octopus can transform hierarchical variables in your JSON configuration files.
Substitute Variables in Files
We will also use the Substitute Variables in Files feature to supply variables to our NGINX and Supervisor configuration files.
If you view these files (located in src\aspnetcoredemo\deployment), you will see they contain placeholders for Octopus variables. For example, the nginx.conf file contains the #{IPAddress} variable:
server {
 listen 80;
 server_name #{IPAddress};
 location / {
     proxy_pass http://localhost:5000;
     proxy_http_version 1.1;
     proxy_set_header Upgrade $http_upgrade;
     proxy_set_header Connection keep-alive;
     proxy_set_header Host $host;
     proxy_cache_bypass $http_upgrade;
 }
}
Configure NGINX
Next we will add a Run a Script Step to move our NGINX configuration file to /etc/nginx/sites-enabled and tell NGINX to reload.

The script source is:
installed=$(get_octopusvariable 'Octopus.Action[Deploy Pkg].Output.Package.InstallationDirectoryPath')
nginxConf='/conf/nginx.conf'
dest='/etc/nginx/sites-enabled/aspnetcoredemo.conf'
echo "Moving $installed$nginxConf to $dest"
sudo mv -f $installed$nginxConf $dest

echo 'Reloading NGINX'
sudo nginx -s reload
The first line gets the path to the extracted package.
Being able to drop files into the sites-enabled directory saves us from having to modify the existing nginx.conf.
Apparently a common approach is to have both a sites-available and sites-enabled directories. The actual configuration files are deployed to sites-available and symlinks are added to sites-enabled. It is then sites-enabled which is included in nginx.conf. I'll leave this for homework.
Run Supervisor
Now we will add another Run a Script Step to move our Supervisor configuration file to /etc/supervisor/conf.d/aspnetcoredemo.conf and tell Supervisor to reload.

The script source is:
installed=$(get_octopusvariable "Octopus.Action[Deploy Pkg].Output.Package.InstallationDirectoryPath")
supervisorConf='/conf/supervisor.conf'
dest='/etc/supervisor/conf.d/aspnetcoredemo.conf'
echo "Moving $installed$supervisorConf to $dest"
sudo mv -f $installed$supervisorConf $dest

echo 'Reloading supervisor'
sudo supervisorctl reload
Variables
And finally we need to add the variables which will be substituted into our configuration files.

Deploy
At this point your deployment process should appear similar to:

What are you waiting for? Create a Release, and Deploy!

If all has gone well, you have just deployed an ASP.NET Core application to a Red Hat Enterprise Linux server.

Note to self: Add balloons.png to sample app home-page ;)
XPlat
Although it's beyond the scope of this post, it's worth mentioning that with very little effort, we can take that same package and deploy it to also both a Windows 2012 R2 Server and an Azure Web App.

The Future
.NET Core provides a great opportunity for us to improve our story for deploying to Linux targets.
Sans Mono
The fact that you currently have to install the Mono framework on your Linux server in order for it to be an Octopus Deployment Target is awkward in many cases. We are moving towards making our deployment tasks execute using .NET Core, removing the Mono dependency completely.
Sans Script
A major focus for us is to provide the capability to deploy what you want, to where you want, without having to script it yourself. Octopus has historically been targeted at .NET, and .NET has historically been targeted at Windows. .NET Core has breached the Linux wall. We should be able to march through and implement some more Linux-focussed deployment steps.
Feedback
If you are using Octopus (or even thinking of using it) to deploy .NET Core applications to Linux, we would love to hear from you.
Please tell us what works, what doesn't, and how we can make your deployments easier and more reliable.
Happy (cross-platform) deployments!


