In this section, we will walk through our recommendations for configuring your environments to better prepare you to scale your Octopus Deploy instance up and out as you add more projects.
Environment terminology
We recommend configuring your environments to match your company’s terminology. Try to keep naming as general as possible. Sometimes it helps to consider how you would phrase it during a conversation with a colleague:
“I’m pushing some code up to Dev”
or
“I’m deploying my app to Production”
These are clearer than:
“I’m pushing to Dev Omaha 45.”
Without context, it’s not clear what Omaha refers to, or what the significance of 45 is.
A good sign that you have well-modeled environments is that the names don’t need an explanation. You should consider changing a name if it is not clear.
Keep environment numbers low
In general, try to keep the number of environments under ten. Having fewer environments makes configuring and maintaining your Octopus Server easier.
We recommend creating a standard set of environments. For example, Dev, Test, Staging, and Production. If you have dynamic infrastructure, you might also need SpinUp, TearDown, and Maintenance.
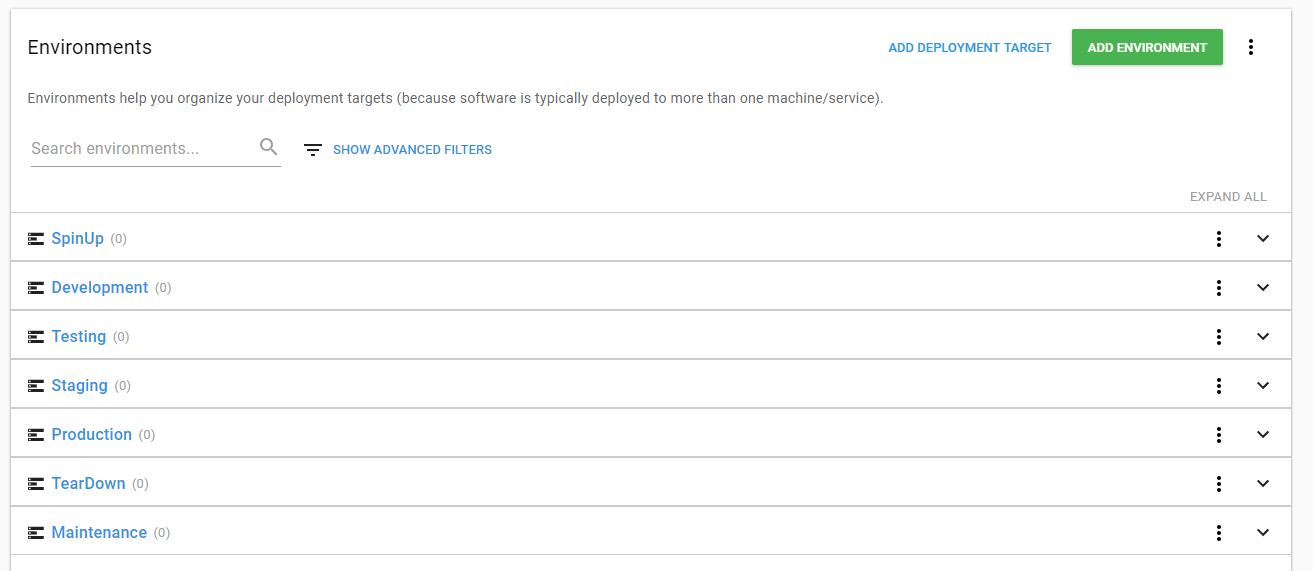
If you need to change the order of your environments later, you can use the sort option.
Deployment targets and environments
Octopus will choose the targets to deploy to based on the environment, target roles, and if configured, tenants. This guarantees that the release is deployed to the appropriate targets. Sharing the same environments across projects ensures a consistent and maintainable Octopus experience.
Common environment scenarios
In this section, we walk you through some common scenarios we’ve seen with environments and how to work through them.
Multiple Data Centers
Cloud providers such as Azure, AWS, and Google Cloud make deploying to many data centers commonplace. You might need to deploy the software at specific intervals or in a specific order. For example, you might deploy to a data center in Illinois before deploying to one in Texas.
It can be tempting to name environments to match a data center location. For example Production [Data Center] or Production Omaha. This is convenient as you can deploy to an individual data center at a time. You can also see what version of code is deployed in each data center.
Unfortunately, this doesn’t scale very well. Every time you add a new data center, your infrastructure and Octopus configuration will need modification, such as:
- Adding a new environment.
- Updating lifecycles.
- Updating any variables with environment scoped values.
One scenario we’ve seen is customers deploy to an on-premises data center for dev and test. Separate data centers host staging and production environments in say Illinois and Texas. Before promoting code to production, they perform sanity checks in the staging environment. If you create an environment per data center, you’d have seven environments when you actually only need four.
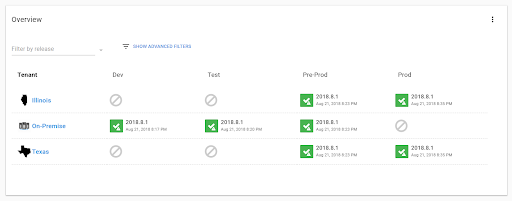
Creating seven environments like this doesn’t scale. A better solution is using the multi-tenancy feature in Octopus. With multi-tenancy, each data center is modeled as a tenant. To add a new tenant, follow our instructions on how to create a tenant.
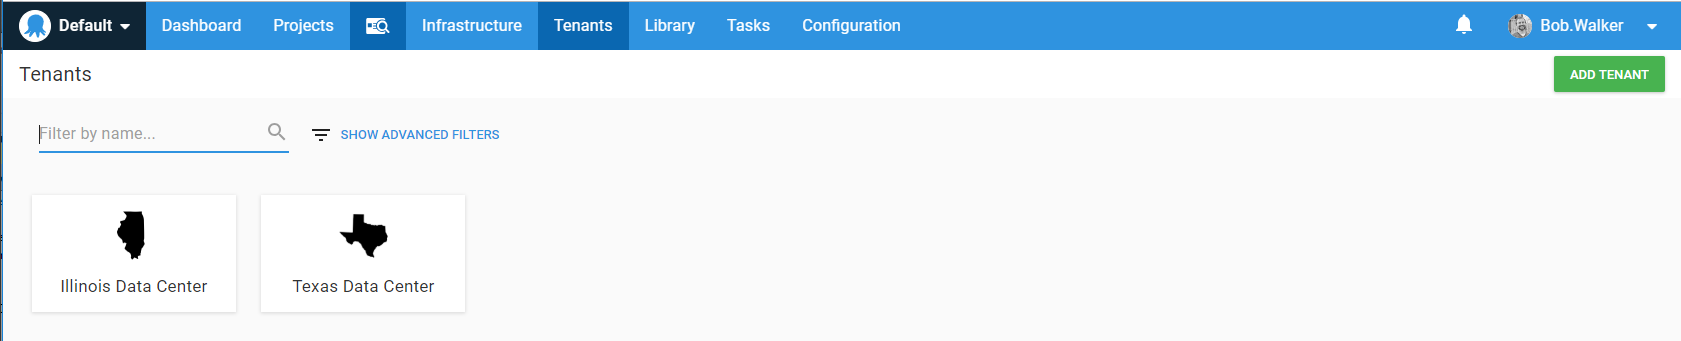
Tip: Adding images to your tenants makes them easier to find. You can do this by clicking on the tenant and choosing Settings, and you can choose an image to upload in the Logo section.
Once added, connect each project and any deployment targets you wish them to be linked to.
When choosing a release, select which data center tenant to deploy to. In this example, Illinois or Texas.
Multiple Customers
We also see customers deploy the same project to multiple clients.
Each of their customers gets their own set of machines and other resources. It’s possible to configure a unique set of environments for each customer. You could create:
- Dev [Customer Name]
- Staging [Customer Name]
- Production [Customer Name]
This will work for the first few customers, but again, it doesn’t scale very well. Imagine if you had five clients:
- An internal testing customer
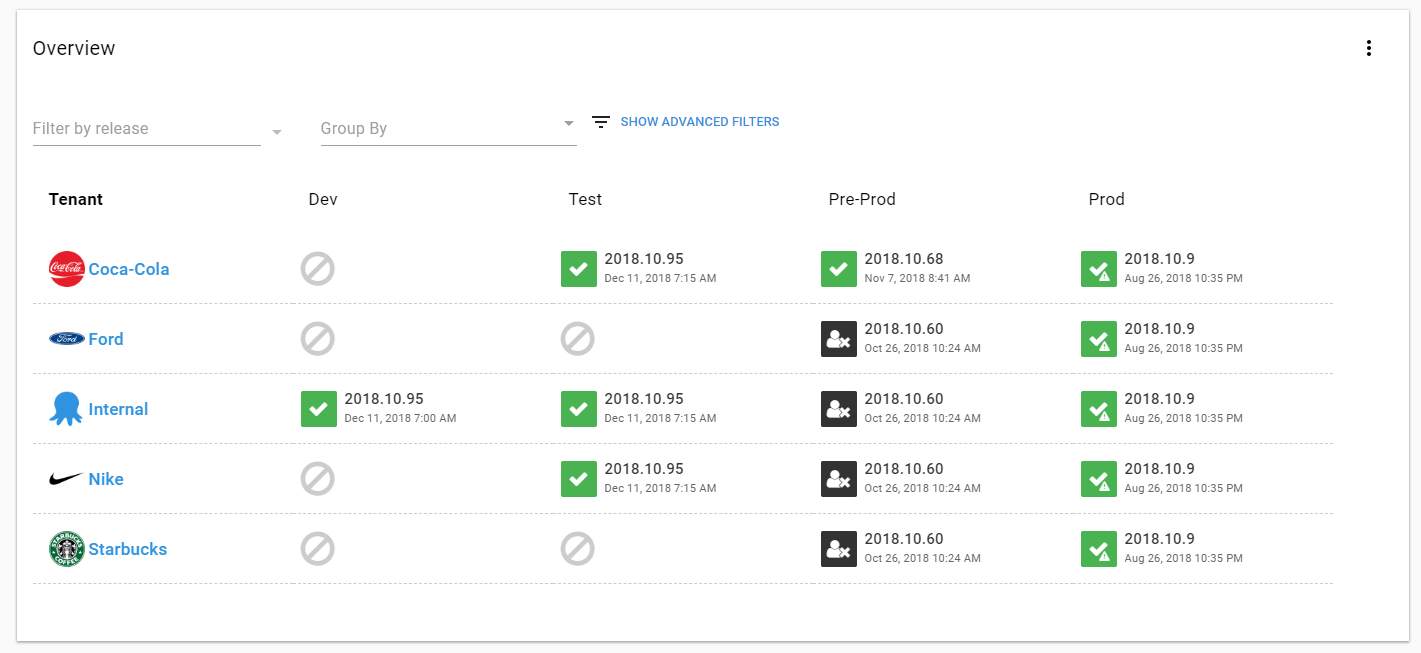
- Coca-Cola
- Ford
- Nike
- Starbucks.
The internal customer deploys to all environments, dev, test, staging, and production. Coca-Cola and Nike deploy to test, staging, and production. Ford and Starbucks only deploy to staging and production.
If you create an environment per tenant, you’d have fourteen environments. And that is only for five customers.
This is where the multi-tenancy feature in Octopus again shines. It allows you to keep the number of environments low while creating a unique workflow per client.
Conclusion
In summary, the thing to remember is to keep the number of Octopus environments you create low. Leverage tenants to handle deployments to different data centers or customers.
Help us continuously improve
Please let us know if you have any feedback about this page.
Page updated on Sunday, January 1, 2023