Connection Agent is currently in Preview, available to select customers. Contact our support team to request access.
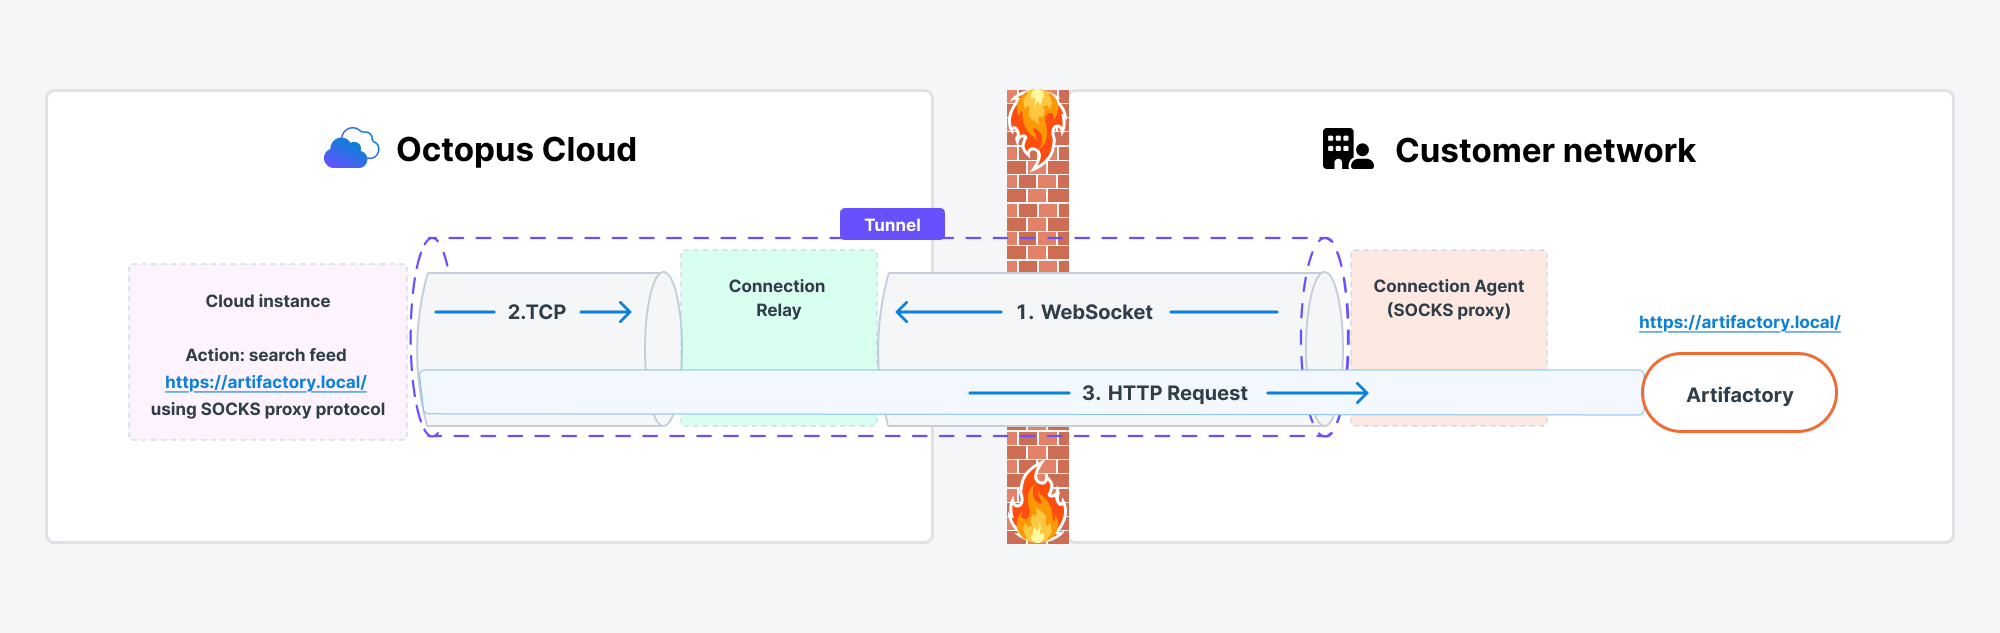
Connection Agent lets your Octopus Cloud instance connect to privately hosted internal applications such as Git repositories, package feeds, and SMTP servers without requiring inbound firewall rules or a VPN.
A Connection Agent is a container image you deploy within your private network. It establishes outbound WebSocket connections to your Octopus Cloud instance and acts as a proxy, forwarding traffic between Octopus Cloud and your internal applications.
Supported applications
Connection Agent supports the following application types:
- Git repositories (e.g. GitHub Enterprise, Bitbucket)
- SMTP servers
- External feeds:
- Artifactory Generic Feed
- Azure Container Registry
- Docker Container Registry
- GitHub Repository Feed
- Helm Feed
- Maven Feed
- NPM Feed
- NuGet Feed
- OCI Container Registry
Prerequisites
Only users with ConfigureServer permission (e.g. belonging to the Octopus Managers team) can register new Connection Agents. Make sure you’re a member of this team, or a team with ConfigureServer permission, before proceeding.
1. Connection Agent registration
By default, you can register up to 5 Connection Agents per instance. Contact our support team if you need more.
-
Decide on a meaningful
Agent Namethat will assist in identifying where the Connection Agent is deployed. Octopus uses this to route configured applications to the right Connection Agent. Agent Names can be up to 200 characters and may include alphanumeric characters, hyphens (-), and periods (.). -
Decide on a meaningful
Key Namethat will assist in identifying the private key credential the Connection Agent will use for authentication. Key Names can be up to 200 characters and may include alphanumeric characters, hyphens (-), and periods (.). -
Generate an RSA key pair to be used to authenticate the Connection Agent. Ensure a minimum key size of
2048.Run the following command, substituting in the desired Agent Name:
BashAGENT_NAME=<Agent Name> openssl genrsa -out ConnectionAgent-$AGENT_NAME.pem 2048 openssl rsa -in ConnectionAgent-$AGENT_NAME.pem -outform PEM -pubout -out ConnectionAgent-$AGENT_NAME.pem.pubIMPORTANT - Protect your Private Key: The generated
.pemfile is your private key and must be kept secret. It lets Connection Agent authenticate and proxy requests from Octopus Cloud. If the private key is compromised, immediately rotate your private key. -
Create an API key with a short expiry date on your Octopus Cloud instance. This API key will only be used to register the Connection Agent, and must have
ConfigureServerpermission (the same permission required for all Connection Agent actions - see Prerequisites). -
Register the Connection Agent with your Octopus Cloud instance. This command doesn’t need to be run on the same infrastructure you intend to run the Connection Agent on.
Run the following command, substituting the values:
SERVER_URL- This will be in the formathttpswhere: / /<dns-prefix> .octopus .app <dns-prefix>is the hostname of your Cloud instanceOCTOPUS_API_KEY- The API key created above
BashSERVER_URL=<Server URL> OCTOPUS_API_KEY=<API Key> KEY_NAME=<Key Name> PUBLIC_KEY=$(cat ConnectionAgent-$AGENT_NAME.pem.pub) docker run --rm \ octopusdeploy/connection-agent \ register --server-url $SERVER_URL --server-api-key $OCTOPUS_API_KEY --agent-name $AGENT_NAME --key-name $KEY_NAME --public-key "$PUBLIC_KEY"Make a note of the returned values. You’ll need to apply them as environment variables when you deploy the Connection Agent:
AUTH_SERVER_DOMAINAUTH_SERVER_CLIENT_IDAPI_AUDIENCECONNECT_URL
-
Configure forwarding rules to map fully qualified domain names (FQDNs) for the applications that are to be accessed via the Connection Agent. This command doesn’t need to be run on the same infrastructure you intend to run the Connection Agent on.
Run the following command, substituting the values:
FQDN- The fully qualified domain name of the application (e.g.nuget).internal .example .com
BashFQDN=<FQDN> docker run --rm \ octopusdeploy/connection-agent \ add-fqdn --server-url $SERVER_URL --server-api-key $OCTOPUS_API_KEY --agent-name $AGENT_NAME --fqdn $FQDNIf an application uses an internal CA-issued or self-signed HTTPS certificate, add the
--ignore-certificate-validation-errorsoption.
2. Connection Agent deployment
Deploy the octopusdeploy/connection-agent container into your desired private network, specifying the environment variables you received when you registered the Connection Agent.
AUTH_SERVER_DOMAINAUTH_SERVER_CLIENT_IDAPI_AUDIENCECONNECT_URL
Additionally, specify your private key (the PEM-encoded Private Key generated previously) as either the environment variable AUTH_SERVER_PRIVATE_KEY_PEM, or as the path to your private key as AUTH_SERVER_PRIVATE_KEY_PEM_PATH.
IMPORTANT - Protect your Private Key: The AUTH_SERVER_PRIVATE_KEY_PEM value must be kept secret. It lets Connection Agent authenticate and proxy requests from Octopus Cloud. If the private key is compromised, immediately rotate your private key.
Running the Connection Agent in Docker
For example, you can use the following approach to quickly test the Connection Agent using Docker:
AGENT_NAME=<Agent Name>
PRIVATE_KEY_PATH=ConnectionAgent-$AGENT_NAME.pem

docker run --interactive --rm \
--name ConnectionAgent  \
--env 'AUTH_SERVER_DOMAIN=m2m.auth.octopus.com' \
--env 'AUTH_SERVER_CLIENT_ID=<PROVIDED_CLIENT_ID>' \
--env "AUTH_SERVER_PRIVATE_KEY_PEM=$(cat $PRIVATE_KEY_PATH)" \
--env 'API_AUDIENCE=<PROVIDED_API_AUDIENCE>' \
--env 'CONNECT_URL=<PROVIDED_CONNECT_URL>' \
'octopusdeploy/connection-agent' \
runRunning the Connection Agent in Kubernetes
To deploy the Connection Agent in Kubernetes, here is an example Deployment YAML:
apiVersion: apps/v1
kind: Deployment
metadata:
  name: connection-agent
  namespace: connection-agent
spec:
  selector:
    matchLabels:
      app: connection-agent
  template:
    metadata:
      labels:
        app: connection-agent
    spec:
      containers:
        - name: connection-agent
          image: octopusdeploy/connection-agent
          args:
            - run
          env:
            - name: AUTH_SERVER_DOMAIN
              value: "m2m.auth.octopus.com"
            - name: CONNECT_URL
              value: <PROVIDED_CONNECT_URL>
            - name: AUTH_SERVER_CLIENT_ID
              value: <PROVIDED_CLIENT_ID>
            - name: API_AUDIENCE
              value: <PROVIDED_API_AUDIENCE>
            - name: AUTH_SERVER_PRIVATE_KEY_PEM
              valueFrom:
                secretKeyRef:
                  name: connection-agent-secret
key: AUTH_SERVER_PRIVATE_KEY_PEM3. Connection Agent management
The Connection Agent Docker image can be run as a CLI:
docker run --rm octopusdeploy/connection-agent --helpThe following commands are available:
| Command | Purpose |
|---|---|
| run | Long-running proxy process - establishes WebSocket tunnels to Octopus Cloud |
| register | Create the Connection Agent on your instance and authorize its first public key |
| unregister | Delete the Connection Agent and all its keys |
| list-agents | Show every Connection Agent registered on your instance |
| add-key | Authorize an additional public key for an existing Connection Agent |
| remove-key | Revoke a public key |
| list-keys | Show the public keys currently authorized for a Connection Agent |
| add-fqdn | Create or update a forwarding rule for an FQDN |
| remove-fqdn | Delete a forwarding rule |
| list-fqdn | Show all forwarding rules and which Connection Agent they map to |
For full flag listings, append --help to any command.
View registered Connection Agents
You can view the registered Connection Agents by navigating to Configuration ➜ Connection Agents.
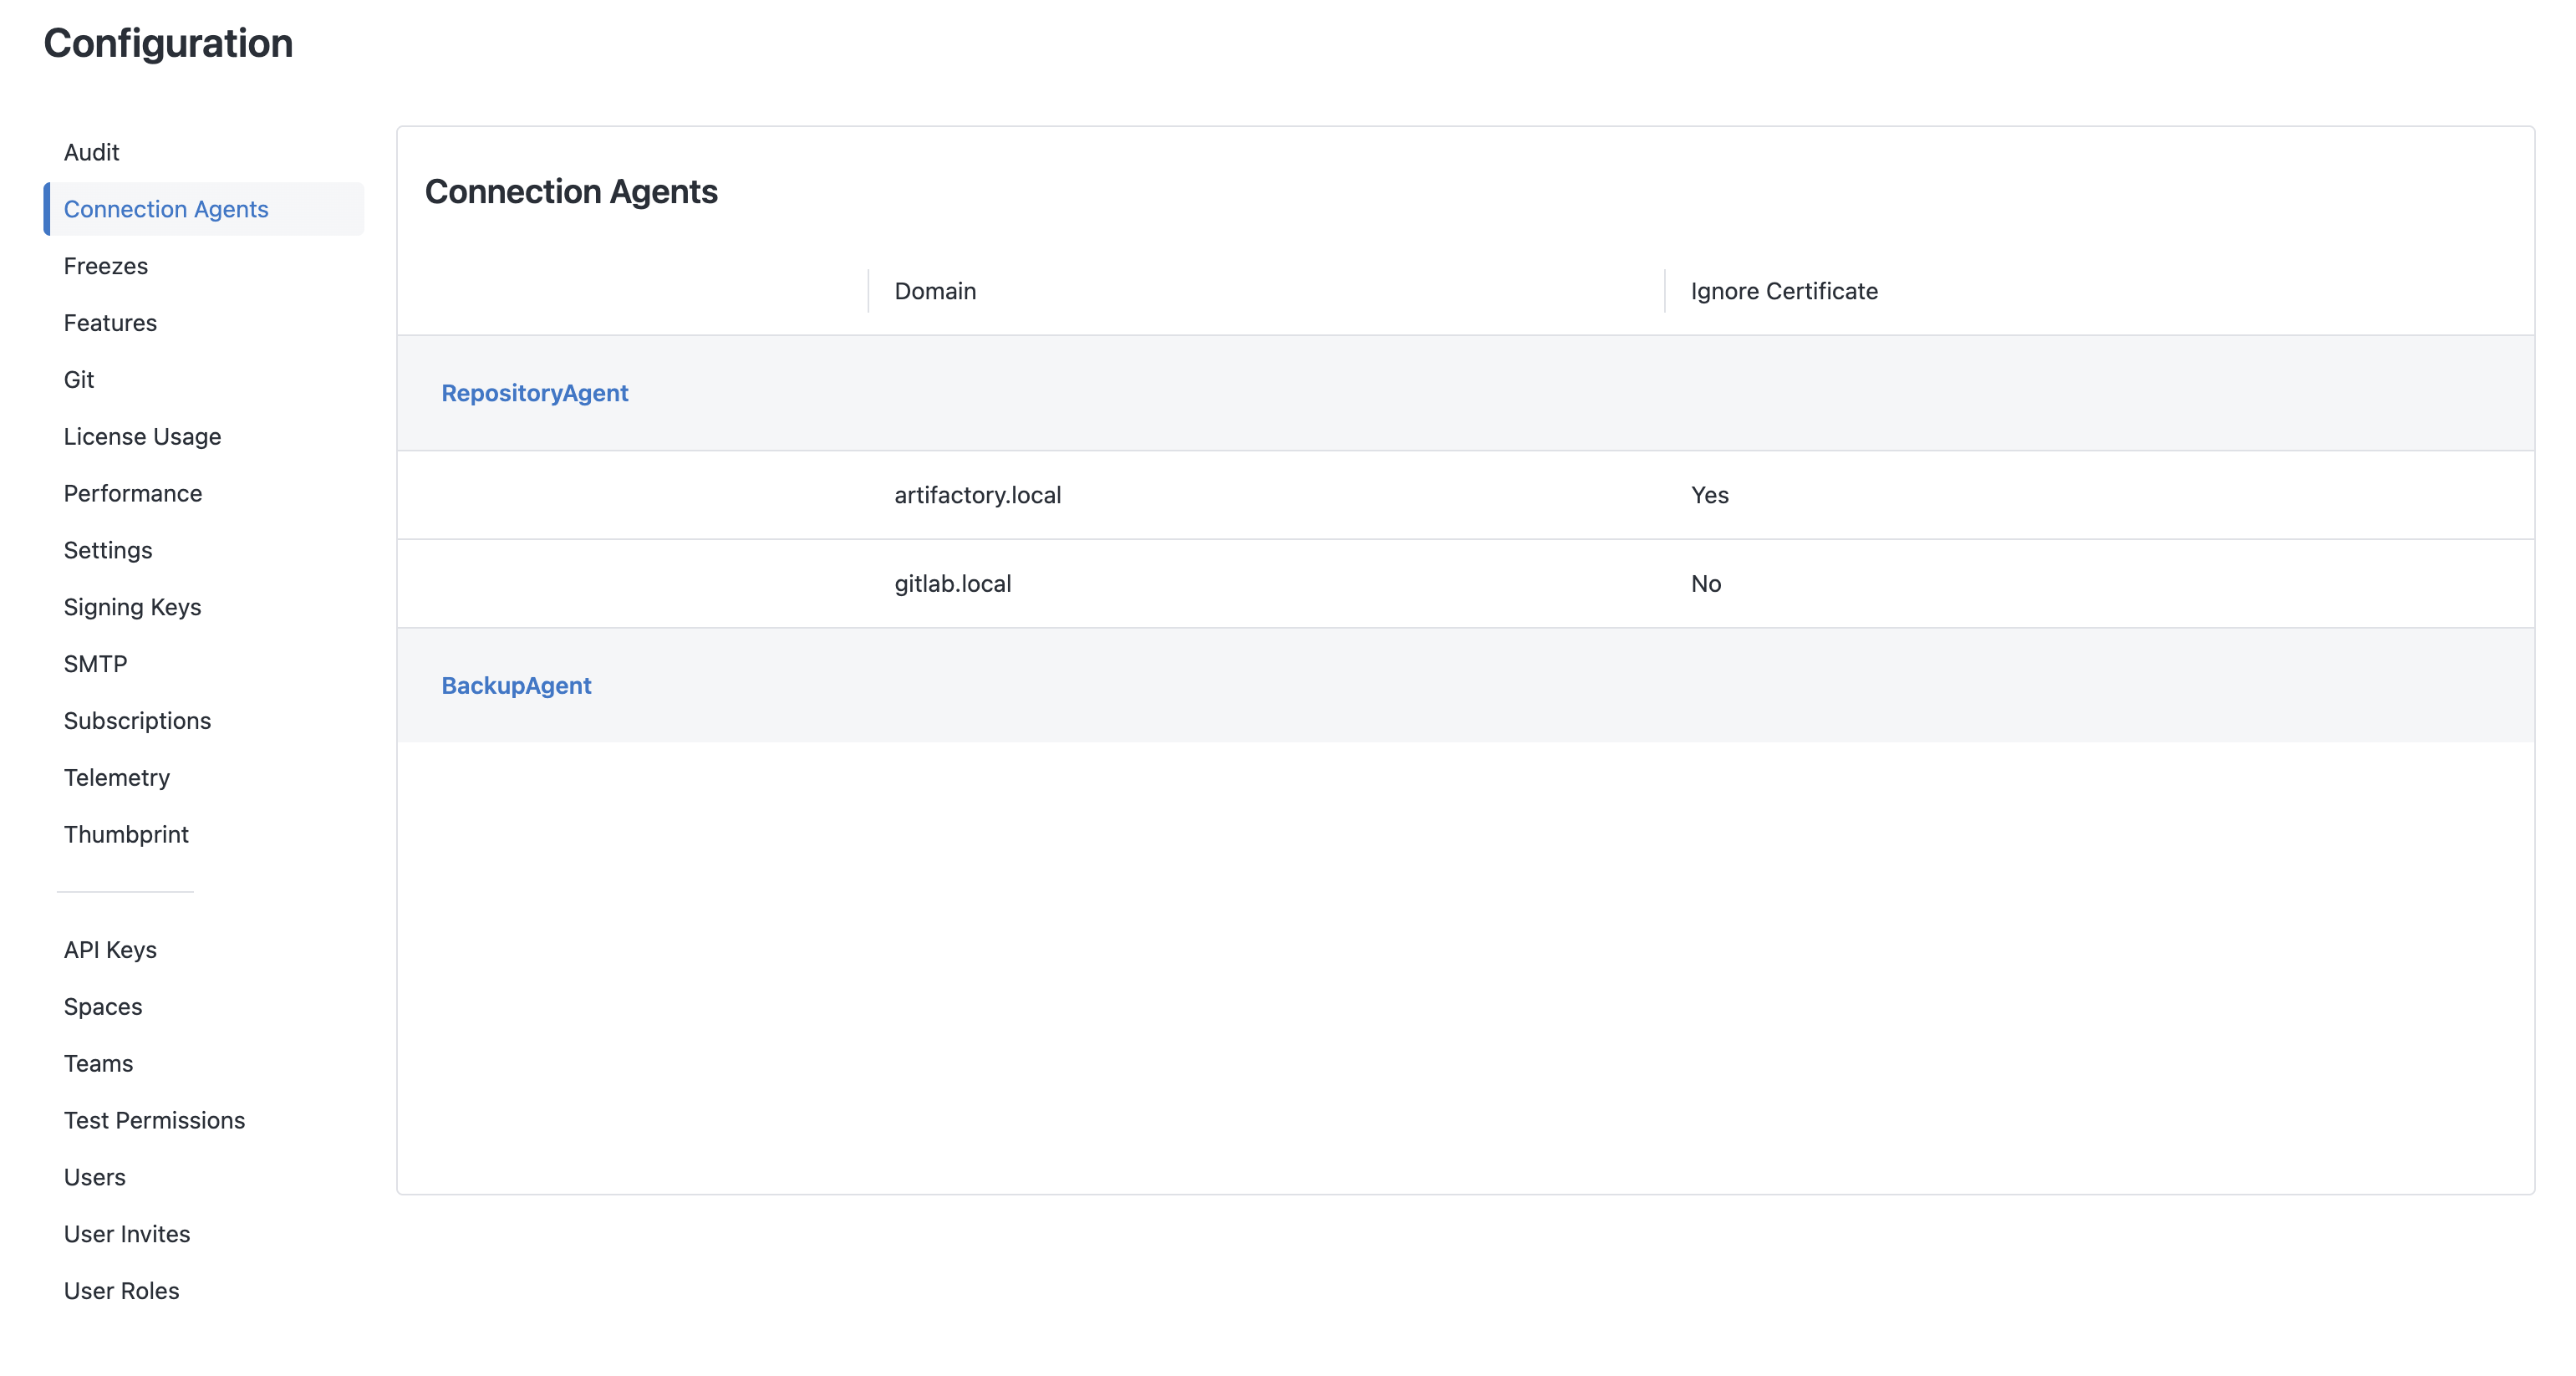
This is a read-only view, and you won’t be able to make any changes to the configuration of your Connection Agents via the UI.
Rotate the Connection Agent’s key
To rotate a Connection Agent’s private key, add a new key first, then remove the old one. This avoids downtime as the agent can authenticate with either while the rotation happens.
# 1. Generate a new key pair
openssl genrsa -out ConnectionAgent-$AGENT_NAME.pem 2048
openssl rsa -in ConnectionAgent-$AGENT_NAME.pem -outform PEM -pubout -out ConnectionAgent-$AGENT_NAME.pem.pub

# 2. Authorize the new public key
docker run --rm \
octopusdeploy/connection-agent \
add-key --server-url $SERVER_URL --server-api-key $OCTOPUS_API_KEY --agent-name $AGENT_NAME --key-name $KEY_NAME --public-key "$(cat ConnectionAgent-$AGENT_NAME.pem.pub)"

# 3. Restart the agent pointing at the new private key and verify it's connected

# 4. List keys to confirm both are present
docker run --rm \
octopusdeploy/connection-agent \
list-keys --server-url $SERVER_URL --server-api-key $OCTOPUS_API_KEY --agent-name $AGENT_NAME

# 5. Remove the old key
docker run --rm \
octopusdeploy/connection-agent \
remove-key --server-url $SERVER_URL --server-api-key $OCTOPUS_API_KEY --agent-name $AGENT_NAME --key-name $OLD_KEY_NAME