
Managing disconnected user databases is a major pain-point, not to mention a security hole, for any piece of infrastructure in an organization. Kubernetes is no exception because, by default, the users of the system are specific to Kubernetes itself.
A common solution to this problem is to allow users to authenticate with Kubernetes via OAuth, which means existing login providers like Google or Microsoft can be used to verify user credentials.
In this blog post, we’ll look at how to integrate Minikube with Google to provide browser-based logins in Kubernetes.
See the post Installing Minikube on Windows to learn how to install and configure Minikube.
Create the OAuth client
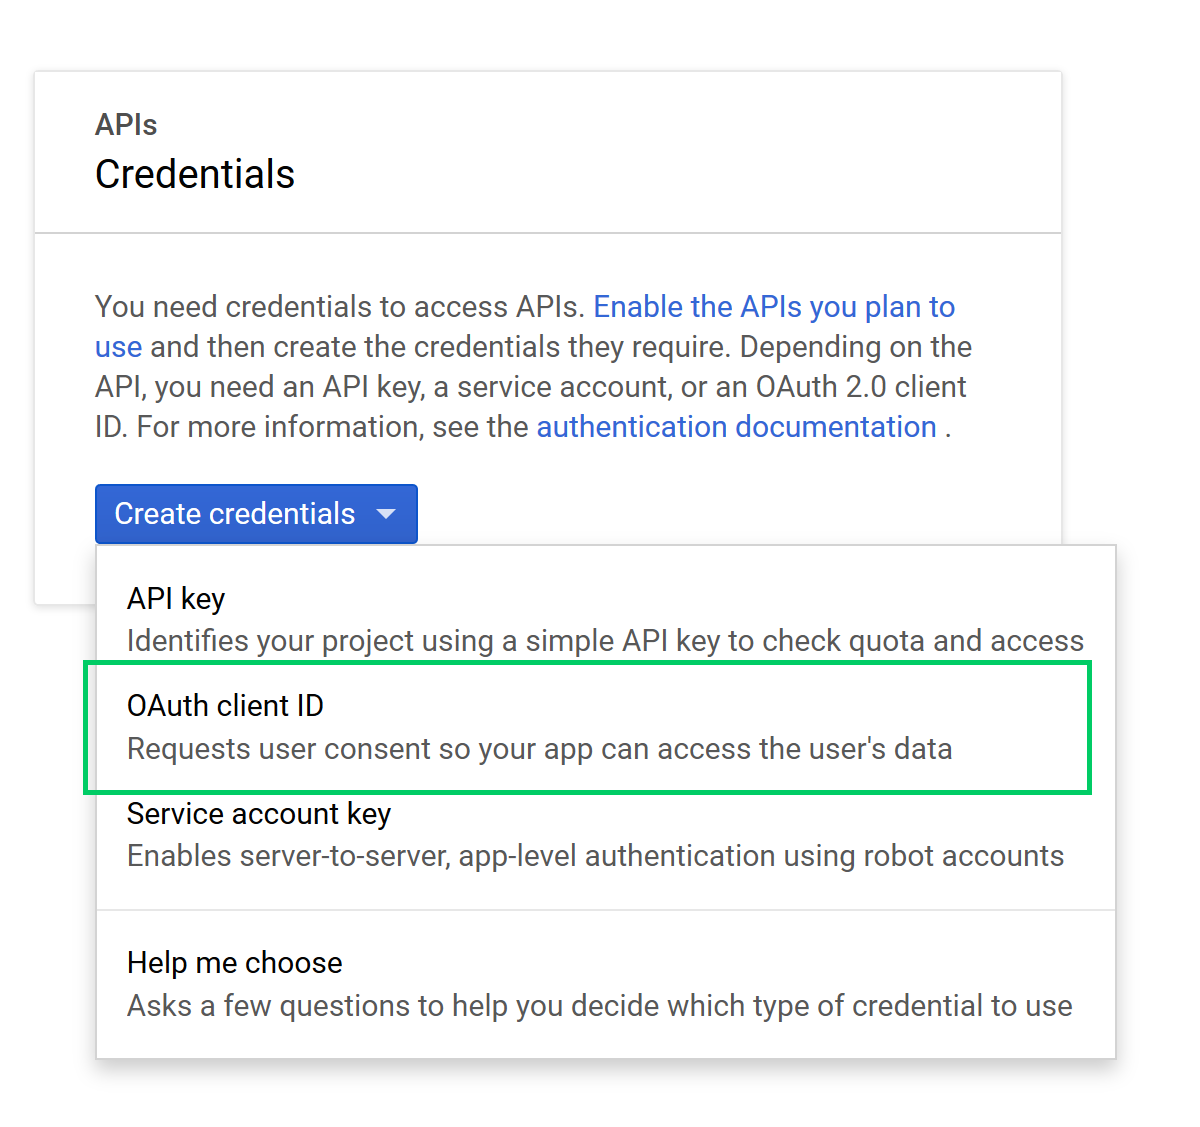
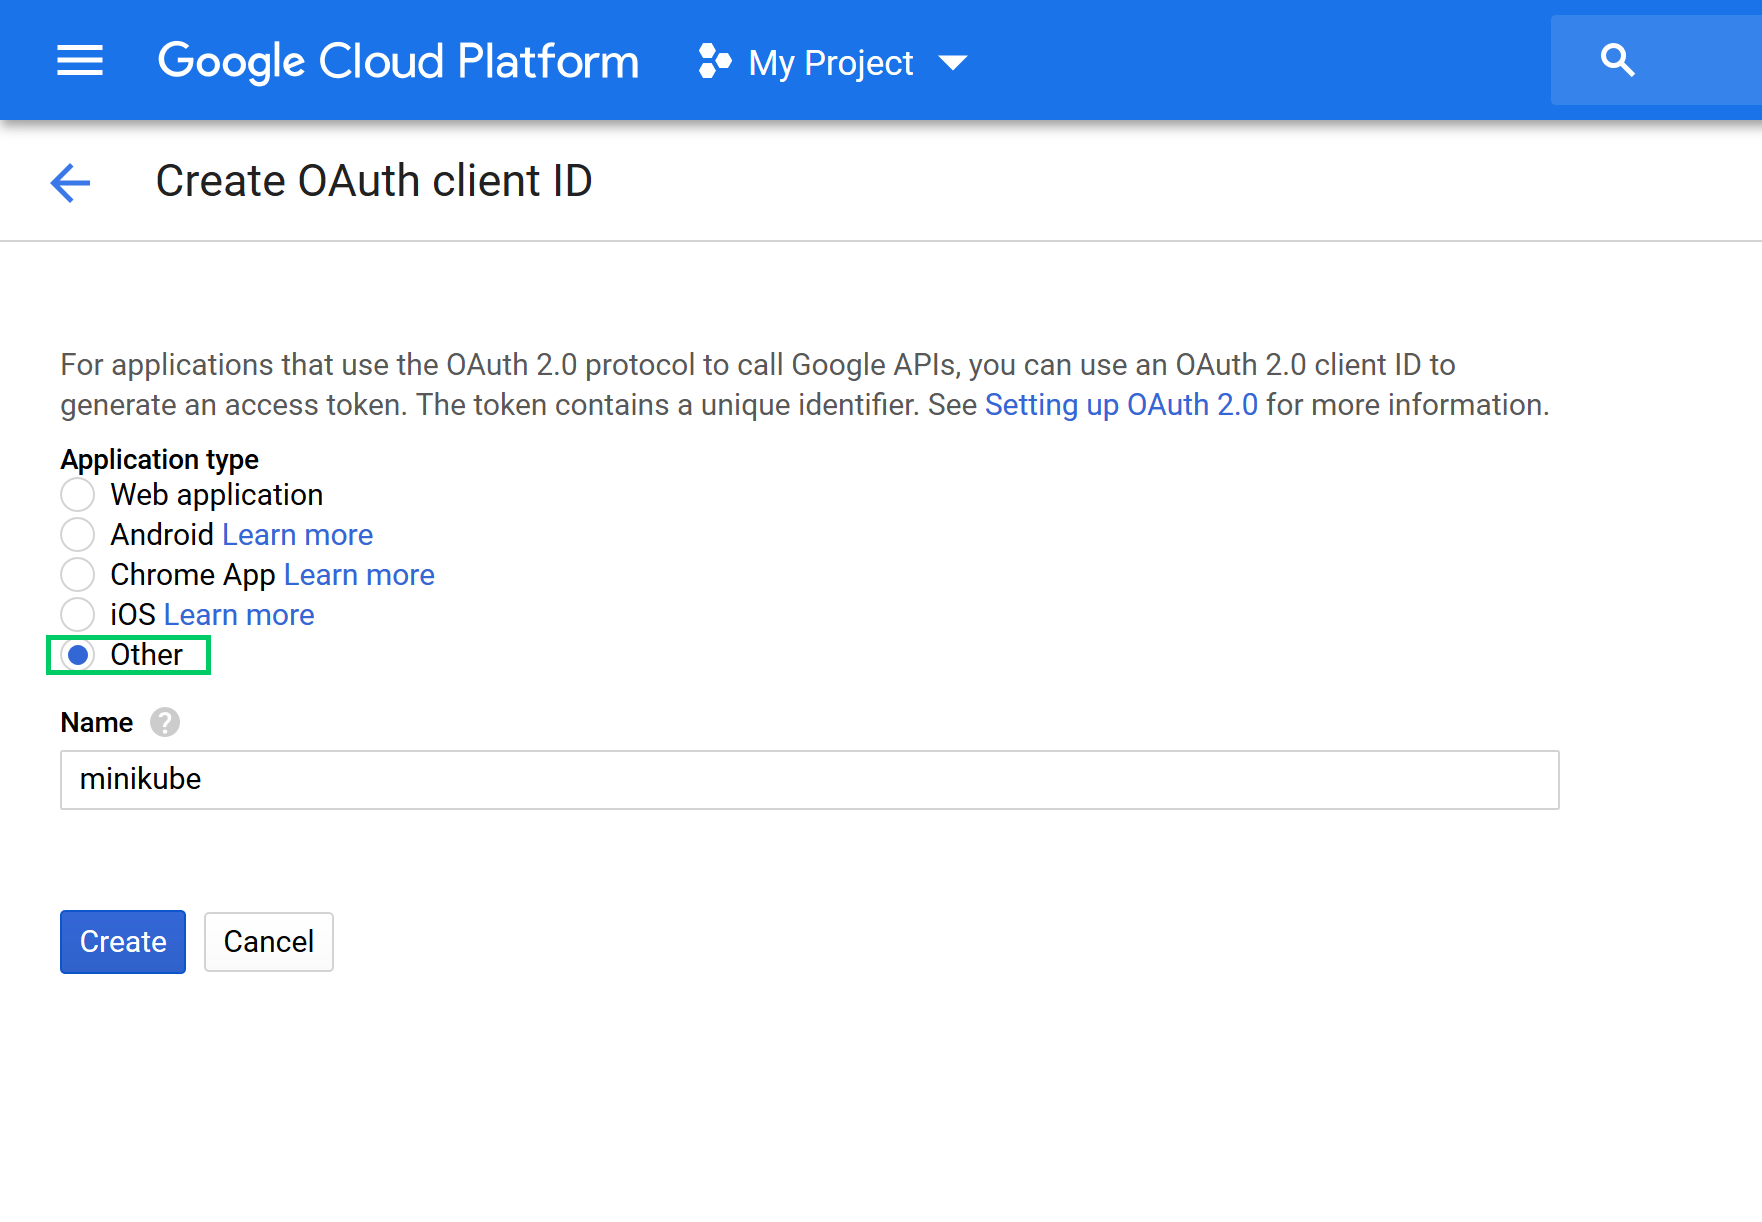
The first step is to create an OAuth client in Google. Open Google Cloud and select a project from the drop-down list, or create a new project. Next, from the Create Credentials drop-down select the OAuth Client ID option:
Select the Other option, and set the name of the client to minikube:
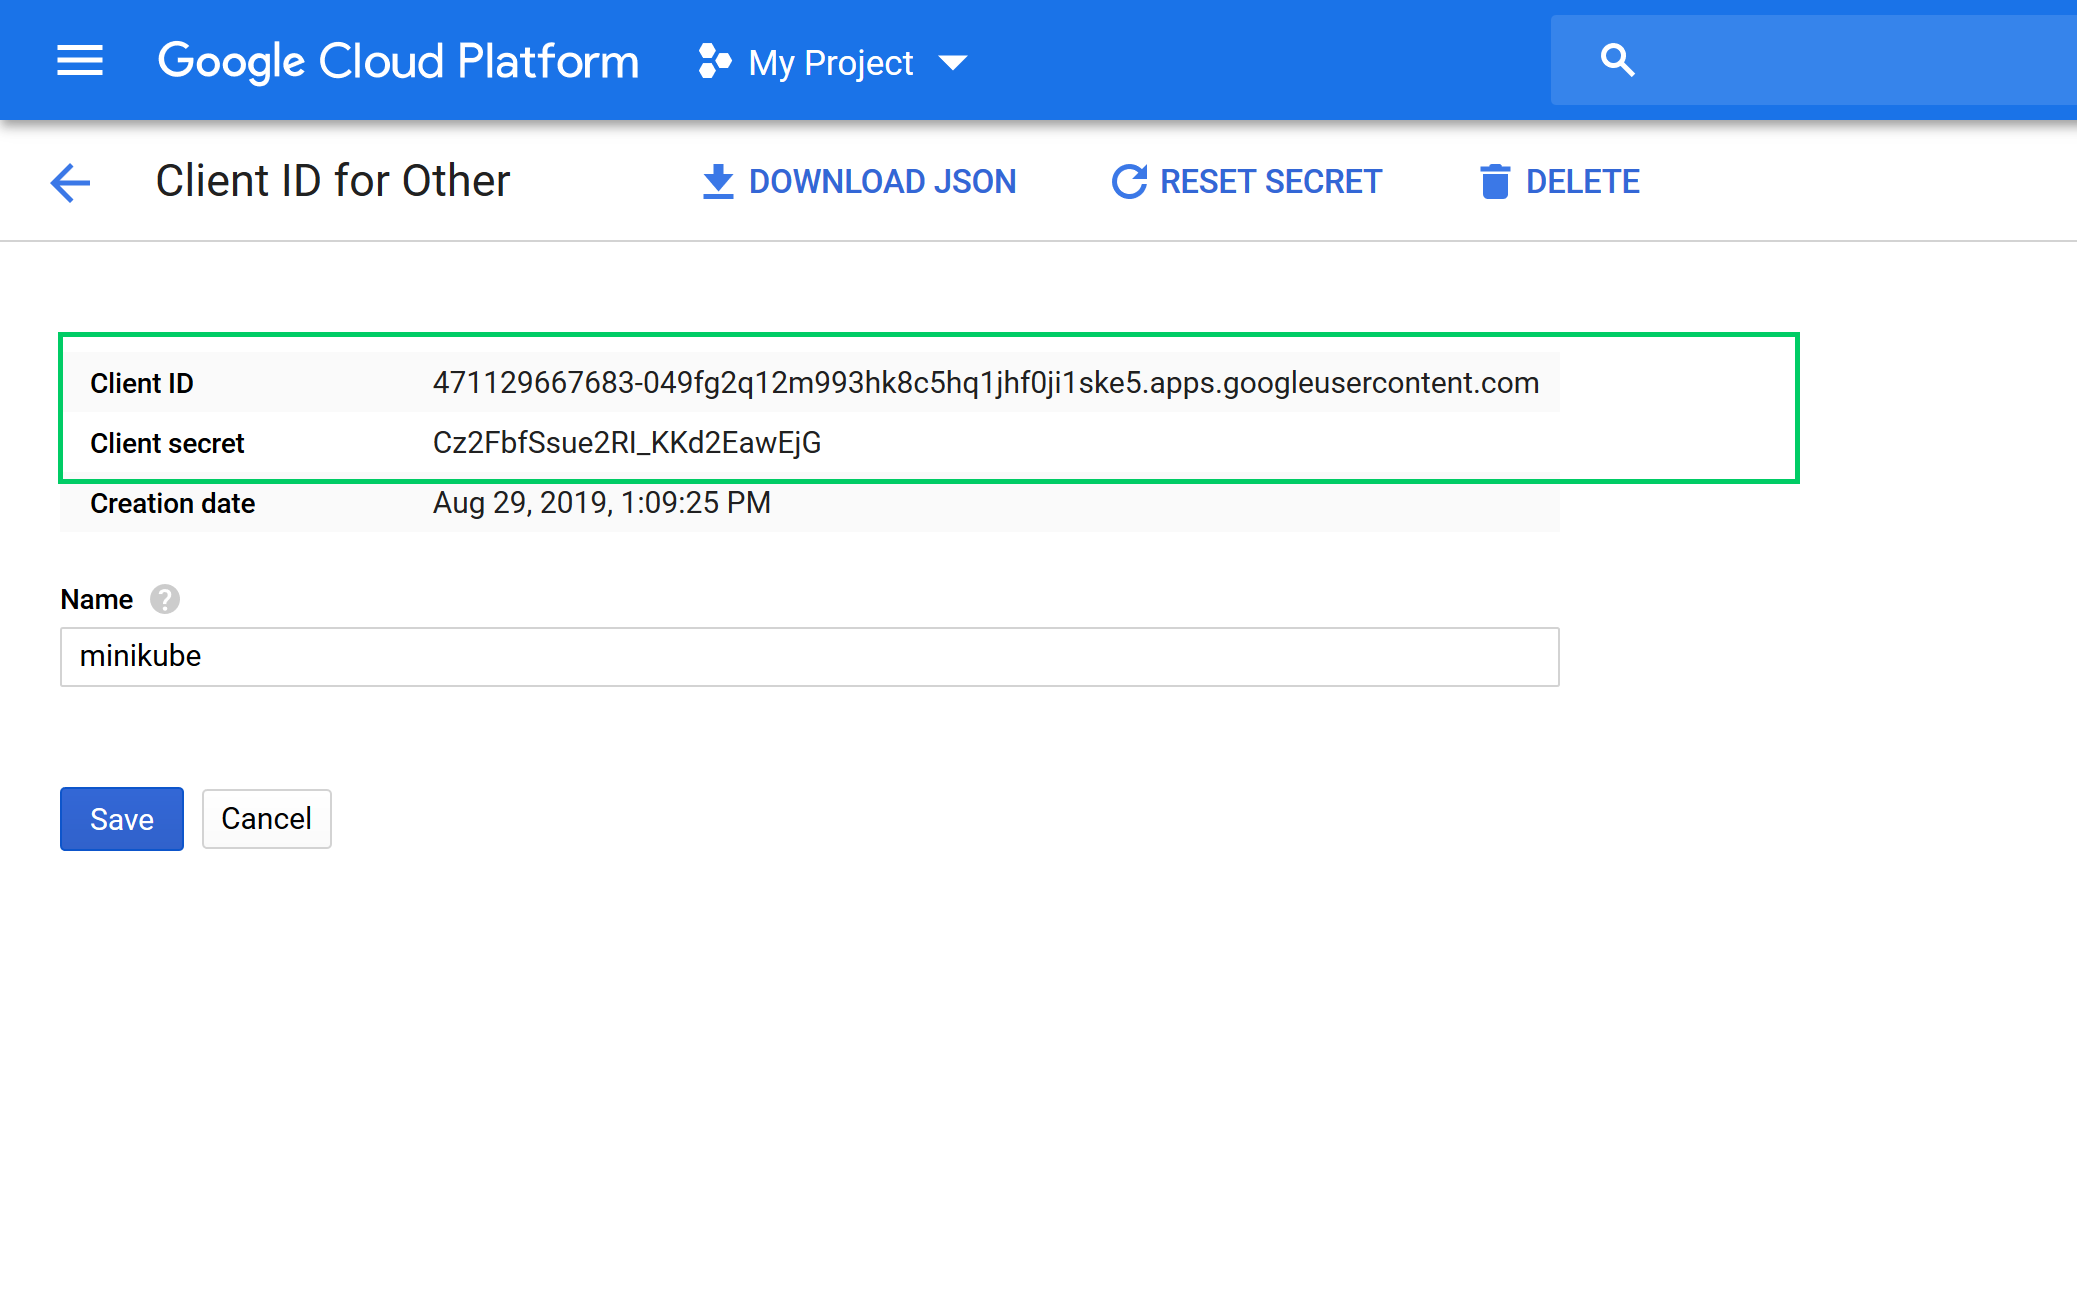
You will now see two codes: the Client ID and the Client secret. Make a note of both of these codes, as we’ll need them later on:
With these codes generated, we can boot up Minikube.
Configure Minikube with the OAuth details
To allow Minikube to accept Google logins we need to pass the following parameters:
--extra-config=apiserver.authorization-mode=RBAC--extra-config=apiserver.oidc-issuer-url="https://accounts.google.com"--extra-config=apiserver.oidc-client-id=<Client ID>--extra-config=apiserver.oidc-username-claim=email
These values enable RBAC security, configure the OAuth Client ID we just created, and specify that the email address of the Google user becomes their Kubernetes username.
Because I am running Windows and PowerShell, my Minikube start command looks like this:
minikube start `
--extra-config=apiserver.authorization-mode=RBAC `
--extra-config=apiserver.oidc-issuer-url="https://accounts.google.com" `
--extra-config=apiserver.oidc-client-id=471129667683-049fg2q12m993hk8c5hq1jhf0ji1ske5.apps.googleusercontent.com `
--extra-config=apiserver.oidc-username-claim=email `
--vm-driver hyperv `
--hyperv-virtual-switch "External Switch"
You should see output something like the following:
PS C:\Users\Matthew> minikube start --extra-config=apiserver.authorization-mode=RBAC `
>> --extra-config=apiserver.oidc-issuer-url="https://accounts.google.com" `
>> --extra-config=apiserver.oidc-client-id=471129667683-049fg2q12m993hk8c5hq1jhf0ji1ske5.apps.googleusercontent.com `
>> --extra-config=apiserver.oidc-username-claim=email `
>> --vm-driver hyperv `
>> --hyperv-virtual-switch "External Switch"
* minikube v1.3.1 on Microsoft Windows 10 Pro 10.0.18362 Build 18362
* Creating hyperv VM (CPUs=2, Memory=2000MB, Disk=20000MB) ...
* Preparing Kubernetes v1.15.2 on Docker 18.09.8 ...
  - apiserver.authorization-mode=RBAC
  - apiserver.oidc-issuer-url=https://accounts.google.com
  - apiserver.oidc-client-id=471129667683-8bsdnomeq3autchmmvut6949hrh74mpg.apps.googleusercontent.com
  - apiserver.oidc-username-claim=email
* Downloading kubeadm v1.15.2
* Downloading kubelet v1.15.2
* Pulling images ...
* Launching Kubernetes ...
* Waiting for: apiserver proxy etcd scheduler controller dns
* Done! kubectl is now configured to use "minikube"
At this point, Minikube has configured a local ~/.kube/config file with administrator credentials, so we can use kubectl straight away. However, any actions will be performed as the local Kubernetes administrator rather than as a Google user. This is OK, though, as we have some additional configuration to do:
PS C:\Users\Matthew> kubectl get nodes
NAME       STATUS   ROLES    AGE     VERSION
minikube   Ready    master   4m49s   v1.15.2
Adding cluster roles
In preparation for our new Google user, we need to define a ClusterRole to give them administrator access and a ClusterRoleBinding to bind the user to the role.
Here is the ClusterRole YAML which gives a user administrator access to the Minikube cluster:
kind: ClusterRole
apiVersion: rbac.authorization.k8s.io/v1
metadata:
  name: admin-role
rules:
- apiGroups: ["*"]
  resources: ["*"]
  verbs: ["*"]
Here is the ClusterRoleBinding YAML which maps the new user (myself as matthew.casperson@octopus.com in this case) to the role we defined above:
kind: ClusterRoleBinding
apiVersion: rbac.authorization.k8s.io/v1
metadata:
  name: admin-binding
subjects:
- kind: User
  name: matthew.casperson@octopus.com
roleRef:
  apiGroup: rbac.authorization.k8s.io
  kind: ClusterRole
  name: admin-role
Save the contents of these files to cluster_role.yaml and cluster_role_binding.yaml, and then apply them with the commands:
kubectl apply -f cluster_role.yaml
kubectl apply -f cluster_role_binding.yaml
Generating the OAuth tokens
You may already be familiar with OAuth logins as they are commonly used to authenticate users in web applications.
However, authenticating users from a console application is a little different. We still need the user to open a web page and verify themselves with Google, but kubectl won’t interact with a web browser by itself, so we need some other way to generate these codes.
This is where k8s-oidc-helper comes in. This tool generates a URL that we can open in a browser. The URL displays the required Google token, which we can then paste back into the console, and k8s-oidc-helper generates the codes that kubectl requires to authenticate the user. Let’s see how this process works.
To install k8s-oidc-user, make sure you have the Go tools installed, and then run:
go get github.com/micahhausler/k8s-oidc-helperOnce installed we can run k8s-oidc-helper with the Client ID and Client secret generated in a previous step:
k8s-oidc-helper --client-id 471129667683-049fg2q12m993hk8c5hq1jhf0ji1ske5.apps.googleusercontent.com --client-secret Cz2FbfSsue2RI_KKd2EawEjGYou will be prompted to open a URL:
PS C:\Users\Matthew\Desktop> k8s-oidc-helper --client-id 471129667683-049fg2q12m993hk8c5hq1jhf0ji1ske5.apps.googleusercontent.com --client-secret Cz2FbfSsue2RI_KKd2EawEjG
Open this url in your browser: https://accounts.google.com/o/oauth2/auth?redirect_uri=urn:ietf:wg:oauth:2.0:oob&response_type=code&client_id=471129667683-049fg2q12m993hk8c5hq1jhf0ji1ske5.apps.googleusercontent.com&scope=openid+email+profile&approval_prompt=force&access_type=offline
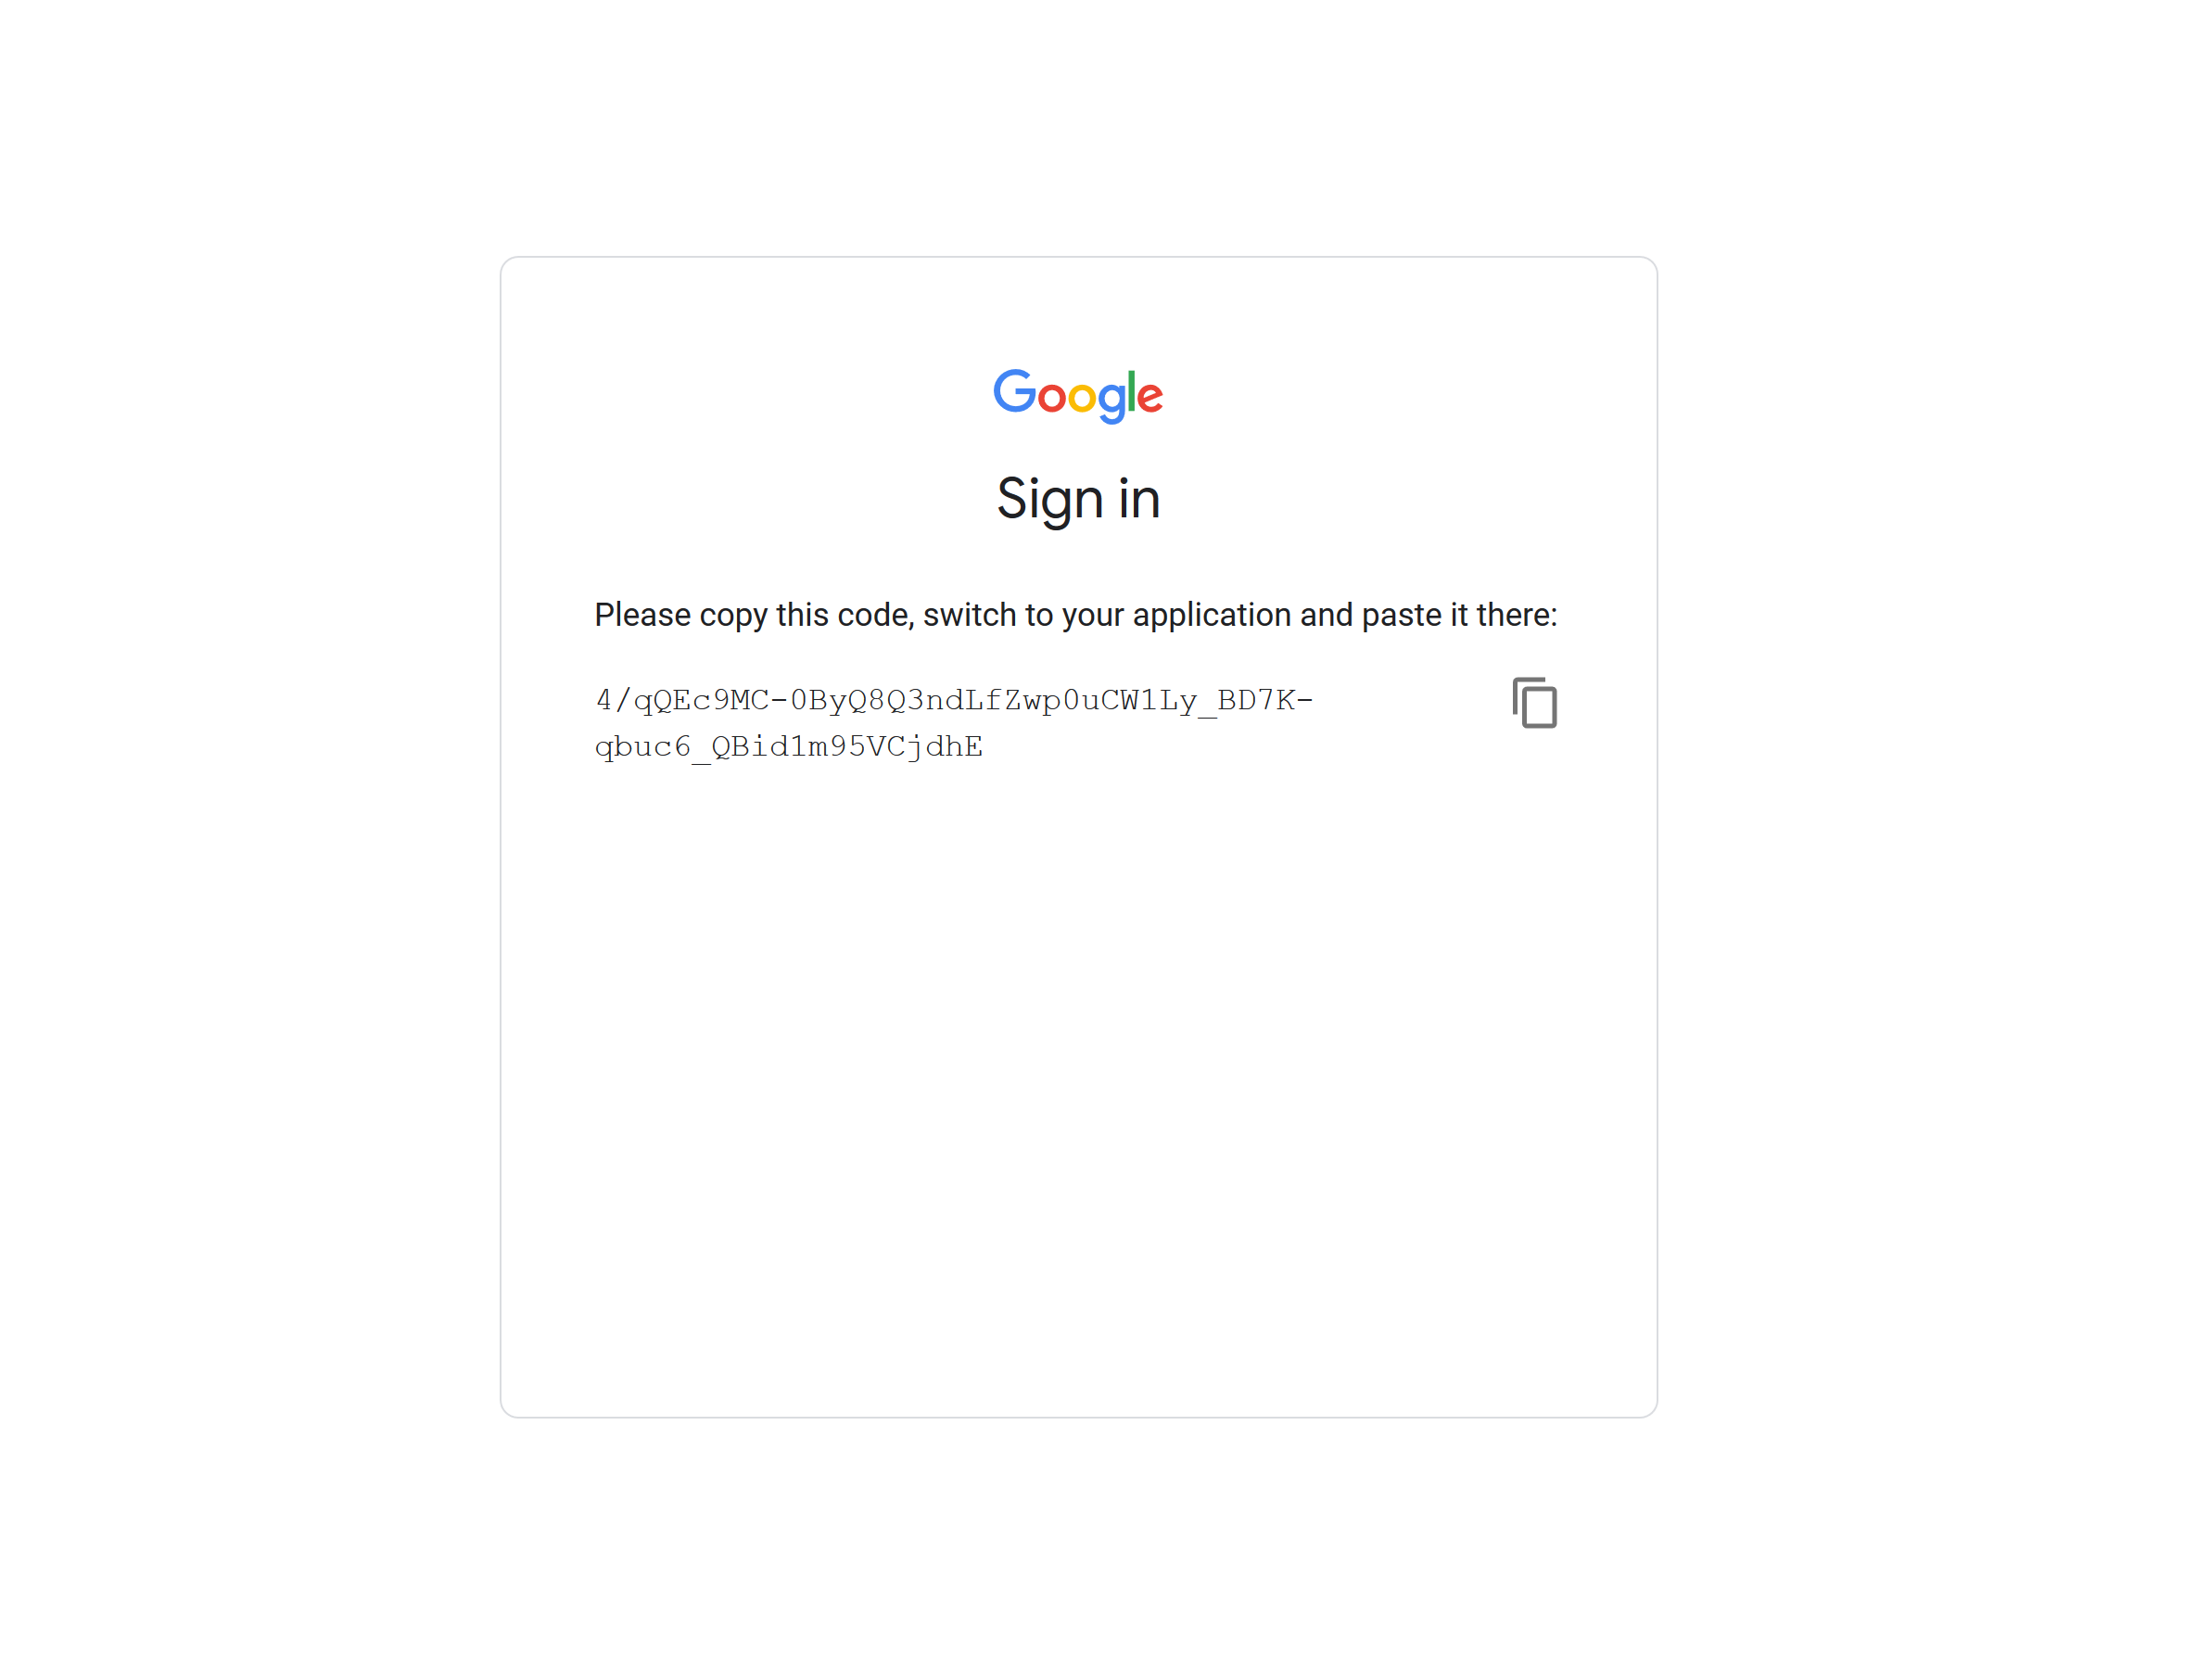
Enter the code Google gave you: Opening the URL presents the familiar Google login page. Once you confirm your account details, Google will provide a code to be pasted back into the console:
k8s-oidc-helper will then give you a partially complete copy of the ~/.kube/config file for you to save locally.
The code under the users section is all we need, so replace the existing users section in the ~/.kube/config file, and change the contexts.user parameter to the new user name. You’ll end up with a ~/.kube/config file something like this:
apiVersion: v1
clusters:
- cluster:
    certificate-authority: C:\Users\Matthew\.minikube\ca.crt
    server: https://10.1.1.94:8443
  name: minikube
contexts:
- context:
    cluster: minikube
    # Make sure this is the same as the user below
    user: matthew.casperson@octopus.com
  name: minikube
current-context: minikube
kind: Config
preferences: {}
users:
# This section came from k8s-oidc-helper
- name: matthew.casperson@octopus.com
  user:
    auth-provider:
      config:
        client-id: 471129667683-049fg2q12m993hk8c5hq1jhf0ji1ske5.apps.googleusercontent.com
        client-secret: [a client secret will be here]
        id-token: [a long id token will be here]
        idp-issuer-url: https://accounts.google.com
        refresh-token: 1/_[a refresh token will be here]
      name: oidc
At this point, when you use kubectl you will be authenticated as the Google user.
Note that potentially any Google user can generate codes to use with kubectl, but without a corresponding ClusterRoleBinding, these users will be effectively unauthorized to do anything.
Conclusion
Integrating Kubernetes with OAuth providers removes the need to maintain yet another disconnected user database managed by Kubernetes itself, and it allows you to leverage any existing account providers you may have already configured. The k8s-oidc-user provides a way to generate the required codes, and after that kubectl works as it does for any other Kubernetes account.
Tags: