

At Octopus Deploy, we do a ton of work with IIS. If you add up the deployment telemetry from all of our customers, we’ve done over a million deployments of web sites and services. We’ve learned a lot along the way, about both how to use the PowerShell IIS modules, and how they work under the hood, as well as how to use them reliably. My goal in this post is to share that knowledge and build a single place that we can point people to when they need to use the PowerShell IIS modules.
This post covers:
- The
applicationHost.configfile and how IIS configuration works. - The new
IISAdministrationPowerShell module introduced in Windows Server 2016/Windows 10. - The older
WebAdministrationPowerShell module used since Windows 2008. - What we’ve learned from millions of real-world deployments using the PowerShell IIS modules.
- Lots and lots of practical examples, tested on all Windows Server OS from 2008 to 2016, as well as information about Nano Server.
The source for all of these examples lives in a GitHub repository, and we run the examples automatically against test machines running each of the different versions of Windows Server OS, so I’m fairly confident they work. Of course, if you run into any trouble, post an issue to the GitHub repository’s issue list, or send us a pull request! :smile:
There’s quite a bit of theory at the start of this post before we get into the practical examples. There are plenty of sites that show how to do basic IIS tasks; my goal by the end of this post is to make you an expert at automated IIS configuration and the examples put that into context.
How IIS configuration is stored
If you open up the IIS Manager user interface and browse around any web site or application pool, you’ll find no shortage of knobs and dials you can tweak. There are thousands of potential settings, from what authentication methods to use, to how log files should be written, to how often the application pool that runs your process should recycle.
Where do all of these settings live?
Since IIS 7 (Windows 2008), nearly all of these settings live in one of two places:
- The
web.configfile that is deployed with your application. - An
applicationHost.configfile, which is server-wide.
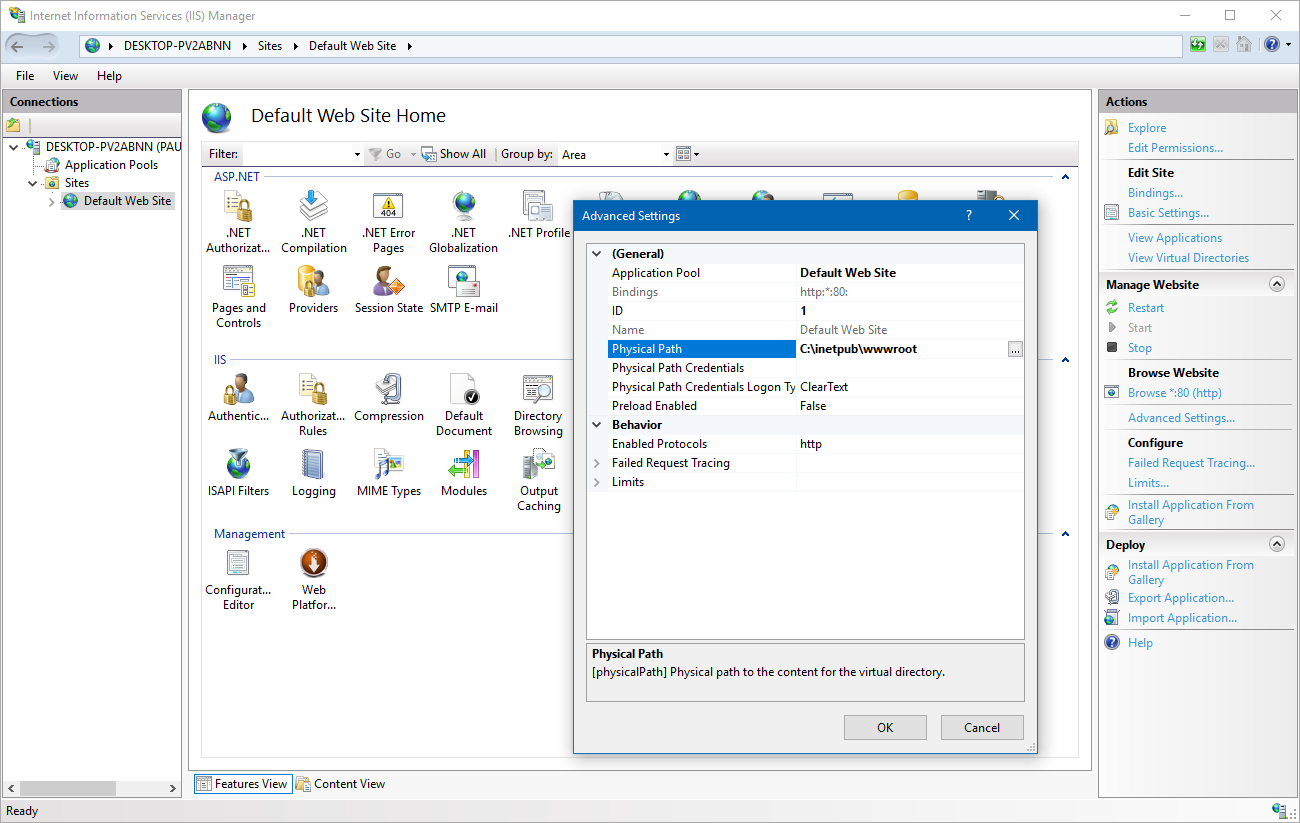
If you are an ASP.NET developer you’re no-doubt familiar with the web.config file, but you might not have seen applicationHost.config before. You’ll usually find it under:
C:\Windows\System32\inetsrv\config\applicationHost.configIf you work with IIS, it’s worth taking the time to really look around this file, as you’ll discover all kinds of interesting settings. For example, here’s how your application pools are defined:
<configuration>
    <!-- snip -->
    <system.applicationHost>
        <!-- snip -->
        <applicationPools>
            <add name="DefaultAppPool" managedRuntimeVersion="v4.0" />
            <add name=".NET v2.0 Classic" managedRuntimeVersion="v2.0" managedPipelineMode="Classic" />
            <add name=".NET v2.0" managedRuntimeVersion="v2.0" />
            <add name=".NET v4.5 Classic" managedRuntimeVersion="v4.0" managedPipelineMode="Classic" />
            <add name=".NET v4.5" managedRuntimeVersion="v4.0" />
            <add name="OctoFX AppPool" autoStart="false" startMode="AlwaysRunning">
                <processModel identityType="LocalSystem" />
            </add>
And the web sites:
<configuration>
    <!-- snip -->
    <system.applicationHost>
        <!-- snip -->
        <sites>
            <site name="Default Web Site" id="1">
                <application path="/" applicationPool="Default Web Site">
                    <virtualDirectory path="/" physicalPath="C:\inetpub\wwwroot" />
                </application>
                <bindings>
                    <binding protocol="http" bindingInformation="*:80:" />
                </bindings>
            </site>
Why is it important to be familiar with applicationHost.config file? Well, it comes down to this:
All of the PowerShell modules for IIS that we discuss below are just fancy wrappers for editing this big XML file.
If you understand this, you’ll find it much easier to understand why the PowerShell IIS modules work the way they do, and you’ll be able to work out how to configure settings that aren’t obvious.
IIS PowerShell modules and OS versions
IIS relies heavily on services provided by the Windows kernel, so each version of IIS has been coupled to a release of Windows. And since each version of IIS brings new features, there have been different attempts at providing the PowerShell modules. The table below outlines each of these combinations:
| Operating System | IIS version | PowerShell modules |
|---|---|---|
| Windows Server 2008 | 7 | Add-PsSnapIn WebAdministration |
| Windows Server 2008 R2 | 7.5 | Import-Module WebAdministration |
| Windows Server 2012 | 8 | Import-Module WebAdministration |
| Windows Server 2012 R2 | 8.5 | Import-Module WebAdministration |
| Windows Server 2016 | 10 | Import-Module WebAdministration or Import-Module IISAdministration |
| Windows Server 2016 - Nano | 10 | Import-Module IISAdministration |
Let’s quickly run through the history.
IIS 7 and the WebAdministration “SnapIn”
IIS 6 supported running ASP.NET applications but was written in unmanaged (non-.NET) code and all modules and extensions were unmanaged. IIS 7 was the first version of IIS to support .NET modules in the pipeline and the new Integrated pipeline mode. IIS 7 shipped with Windows Server 2008, but how is PowerShell installed?
PowerShell 1.0 used SnapIns (modules were introduced in PowerShell 2.0), but most of the supported commands are the same as those used in the later module versions. On Windows 2008 (prior to R2) you’d load the PowerShell IIS support with:
Add-PsSnapIn WebAdministration
# Use commands like: Get-Website, New-Website, New-WebAppPool
What complicated matters is that PowerShell 2.0 is available on Windows Server 2008 as an upgrade, but the PowerShell IIS module isn’t, you still have to use the snap-in.
IIS 7.5+ and the WebAdministration module
Windows Server 2008 R2 shipped in 2011 and included PowerShell 2.0 FC, which meant the IIS commands were now available as a module. You load them using the following command:
Import-Module WebAdministration
# Use commands like: Get-Website, New-Website, New-WebAppPool
IIS 10 and the IISAdministration module
IIS 10, which ships with Windows Server 2016/Windows 10, provides you with two choices. You can continue to use the old module:
Import-Module WebAdministration
# Use commands like: Get-Website, New-Website, New-WebAppPool - same as before
Or you can use the brand new IISAdministration module:
Import-Module IISAdministration
# Use commands like: Get-IISSite, New-IISSite, New-IISAppPool
Why the change? The diagram below explains how each of the modules are built.
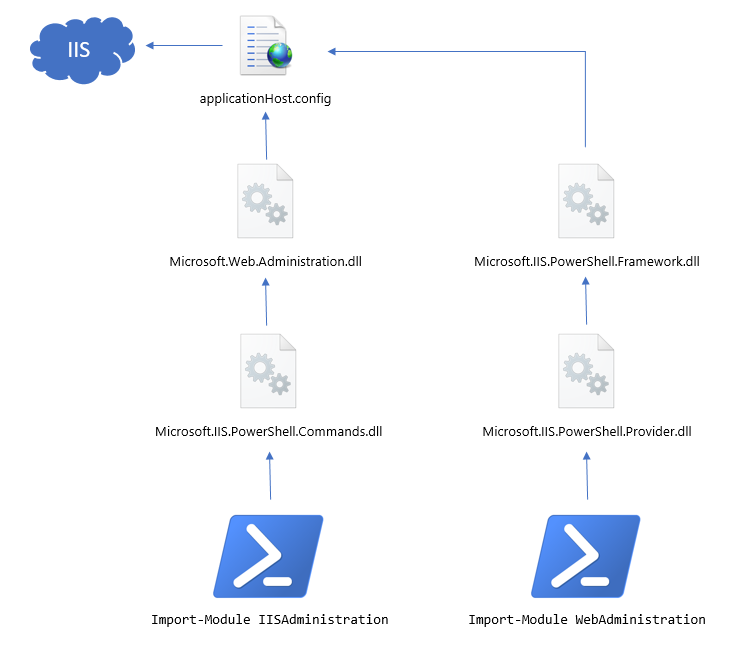
Back when IIS 7 shipped, to make it easier to work with applicationHost.config from managed code, Microsoft created a .NET library called Microsoft.Web.Administration.dll. You’ll find it in the GAC, and you can reference it and use it from C# code:
using (var manager = new ServerManager())
{
    foreach (var site in manager.Sites)
    {
        Console.WriteLine("Site: " + site.Name);
    }
}
If you look through the class library documentation, you’ll see that it’s very much a wrapper around the XML configuration file. For example, the Application class inherits from a ConfigurationElement base class.
For some reason, the WebAdministration PowerShell module never built directly on top of this class library, but instead, duplicated much of it. This duplication is pretty obvious when you look at it in a decompiler.
With the new IISAdministration module, Microsoft have basically:
- Rebuilt it on top of the
Microsoft.Web.AdministrationDLL - Removed the
IIS:\drive PowerShell provider. - Created new
IIS*cmdlets that provide a “jumping point” into theMicrosoft.Web.Administrationclasses.
As users, the IISAdministration version of the module has one big advantage; the types returned by the commands are much more useful. While they are still XML wrappers, they are adorned with useful properties and methods that make the objects much more usable without relying on the commands:
Import-Module IISAdministration
$site = Get-IISSite -Name "Default Web Site"
$site.ServerAutoStart = $true   # Make the website start when the server starts
$site.Applications.Count        # How many applications belong to the site?
$site.Bindings[0].Protocol      # Get the protocol (HTTP/HTTPS) of the first binding
If you’re using the old WebAdministration, you pretty much have to do everything with the PowerShell CmdLets or by embracing the XML. There’s no way to navigate from a site returned by Get-Website to its applications, as one simple example. The new module also works much better with PowerShell pipelining.
Overall, while I think the refactoring Microsoft did in the new module is a good move, I wish it wasn’t such a breaking change. I can imagine this simplifies maintenance for them, but instead of building a first-class PowerShell/IIS experience, they’ve built a handful of cmdlets that return .NET objects, and then you make standard method calls on them.
Nano Server broke everything
Maybe that’s a bit harsh, but there’s some truth to it. It goes like this:
- Nano Server is a very cut-down version of Windows designed for containers or as a VM; it’s a few hundred MB and boots instantly. I’m pretty excited about it.
- Nano Server can’t run the full .NET Framework, it can only run .NET Core.
- PowerShell was built on the .NET Framework.
- To be able to run PowerShell on Nano Server (and Linux!), they rebuilt PowerShell on .NET Core.
- The old
WebAdministrationmodule also required the full .NET Framework. They ported a version ofMicrosoft.Web.Administration.dllto .NET Core (after all, it’s just a big XML wrapper) so theIISAdministrationmodule could work, but they never ported theWebAdministrationmodule. - Microsoft have no plans to port WebAdministration to Nano Server.
This means that if your script needs to run on Nano Server, you’re limited to only using the IISAdministration module, the old WebAdministration module that we’ve come to know and love no longer works.

Writing scripts that run on multiple OSs
At Octopus, our code to deploy IIS websites has to support all of these operating systems. The simplest and most reliable way that we’ve found to load the WebAdministration module is no matter what OS you’re on is:
Add-PSSnapin WebAdministration -ErrorAction SilentlyContinue
Import-Module WebAdministration -ErrorAction SilentlyContinue
# Use commands like: Get-Website, New-Website, New-WebAppPool
If you want to be sure you’ve loaded at least one of the modules (IIS may not be installed), you can see how we do it in Octopus.
A script written this way should be portable between OSs, unless you are running it on Nano Server. In that case, you’ll need to use the new module, and the IIS* CmdLets instead.
Recap IIS theory
Sites, applications, and virtual directories
We’re going to use these terms a lot throughout this post, so I think it’s worth a slight recap. Let’s take this IIS server:

Here we have one IIS server, which serves multiple web sites (Website1 and Website2). Each website has bindings that specify what protocol (HTTP/HTTPS, sometimes others), port (80/443/other), and host headers it listens on.
Website2 also has many applications (App1, App1.1, App1.2, App2) and virtual directories (App.1.1.v_dir1, V_dir1, V_dir1.1, V_dir2).
Don’t let that screenshot from IIS Manager fool you. Under the hood, IIS thinks about the relationship between these sites, applications, and virtual directories quite differently. From the IIS team:
Briefly, a site contains one or more applications, an application contains one or more virtual directories, and a virtual directory maps to a physical directory on a computer.
This may take a few minutes to wrap your head around, but it’s important. IIS Manager presents the tree above because that’s how users think about their sites, apps, and v_dirs, but here’s how IIS actually models the data:
- Site: Website1
- Application: /
- Virtual directory: /
- Application: /
- Site: Website2
- Application: /
- Virtual directory: /
- Virtual directory: /V_dir1
- Virtual directory: /V_dir1/V_dir1.1
- Virtual directory: /V_dir2
- Application: /App1
- Virtual directory: /
- Application: /App1/App1.1
- Virtual directory: /
- Virtual directory: /App1.1.v_dir1
- Application: /App1/App1.1/App1.2
- Virtual directory: /
- Application: /App2
- Virtual directory: /
- Application: /V_dir1/V_dir1.App3
- Virtual directory: /
- Application: /
This is the object model that the Microsoft.Web.Administration .NET assembly presents, but it’s also the model used by the XML in applicationHost.config:
<sites>
    <site name="Website2" id="2">
        <application path="/" applicationPool="MyAppPool">
            <virtualDirectory path="/" physicalPath="..." />
            <virtualDirectory path="/V_dir1" physicalPath="..." />
            <virtualDirectory path="/V_dir1/V_dir1.1" physicalPath="..." />
            <virtualDirectory path="/V_dir2" physicalPath="..." />
        </application>
        <application path="/App1" applicationPool="MyAppPool">
            <virtualDirectory path="/" physicalPath="..." />
        </application>
        <application path="/App1/App1.1" applicationPool="MyAppPool">
            <virtualDirectory path="/" physicalPath="..." />
            <virtualDirectory path="/App1.1.v_dir1" physicalPath="..." />
        </application>
        <application path="/App1/App1.1/App1.2" applicationPool="MyAppPool">
            <virtualDirectory path="/" physicalPath="..." />
        </application>
        <application path="/App2" applicationPool="MyAppPool">
            <virtualDirectory path="/" physicalPath="..." />
        </application>
        <application path="/V_dir1/V_dir1.App3" applicationPool="MyAppPool">
            <virtualDirectory path="/" physicalPath="..." />
        </application>
        ...
Some notes:
- In IIS, the object model isn’t as crazy as the tree in IIS Manager presents. Sites have Applications. Applications have virtual directories. That’s that. Deeply nested relationships are modelled by storing the paths.
- Even though IIS Manager shows VDir1 as having an application inside it, the reality is that the application belongs to the site.
- Website1 is just a site, without any applications or virtual directories, but that’s just IIS Manager making life easy for us again. There’s actually an application and a virtual directory, they just use ”/” as the path.
- The physical path for all these things is actually defined by the virtual directory.
The WebAdministration PowerShell module actually goes to quite some effort to hide this, you navigate IIS similar to IIS Manager. But the new IISAdministration module gives up on that leaky abstraction and presents the world to you this way.
Location sections
One of the confusing behaviors of IIS configuration is that as you make changes in IIS Manager, different settings get stored in different places:
- In the
<sites>element shown above. - In
<location>sections inside applicationHost.config. - In your own web.config file.
For example, when you change the physical path or bindings of a website, that’s stored in <sites>.
When you change settings like whether directory browsing is enabled, that goes to the web.config file in the physical path of whatever virtual directory (and remember, sites and apps all have virtual directories!).
When you change what authentication modes (anonymous, basic, Windows, etc.) should apply, that’s written to a <location> section at the bottom of applicationHost.config:
<location path="Website2/V_dir1">
    <system.webServer>
        <security>
            <authentication>
                <anonymousAuthentication enabled="false" />
            </authentication>
        </security>
    </system.webServer>
</location>
The rule that seems to apply is:
- If it’s a setting that should be local to the thing it applies to, it’s stored in
<sites>. For example, when I change the application pool of Website2, I wouldn’t expect it to also change the application pool assigned to the applications inside it. - If it’s a setting that app developers are likely to want to set themselves, it goes to web.config.
- If it’s a setting that would be set by IIS administrators, and not by app developers, but it is something they would expect to inherit down the paths, then it’s set with the
<location>inapplicationHost.config. For example, if I disable anonymous authentication at the root website, I would expect that to apply to everything underneath it. If I then re-enable it for one virtual directory, I’d expect other apps and virtual directories under that path to inherit the new value.
It’s worth noting that you actually have some control over rule #3. IIS locks certain settings, the authentication settings for example, so that they can’t be overridden by a naughty application developer. But you can unlock them yourself and allow individual apps to override them in their own web.config files.
The easiest thing to do is make the change in IIS Manager, then go looking for whether it was applicationHost.config or your web.config that changed.
IIS:\ drive provider vs. CmdLets
There are two supported paradigms for working with the PowerShell IIS modules:
- The
IIS:\drive PowerShell provider, which lets you work with IIS as if it were a file system. - The task-based helper cmdlets, like
New-Website.
In fact, if you decompile the cmdlets, most of the cmdlets actually wrap the IIS drive approach. When you call New-Website, the cmdlet actually does this:
# When you call this
New-Website -Name "MySite" -Port 8080 -PhysicalPath "C:\Test"

# It actually generates and calls:
New-Item -Path "IIS:\Sites\MySite" -Type Site -Bindings @{protocol="http";bindingInformation="*:8080:"}
Set-ItemProperty -Path "IIS:\Sites\MySite" -name PhysicalPath -value "C:\Test"
At Octopus, we’ve found that while we often start with the cmdlet approach, our scripts generally all turn into using the IIS drive approach, because it allows for more advanced settings. That’s why most of the examples shown below use this approach.
Note that the IIS:\ drive approach is not supported by the IISAdministration module, it’s effectively obsolete.
Retry, retry, retry
As I’ve discussed, all of the PowerShell IIS modules are really just wrappers over the XML file. And files don’t do very well when multiple processes read or write to them. All kinds of things can lock the file, virus scanners, backup solutions, IIS restarting, someone using the IIS Manager UI. For a while at Octopus, one of our most persistent support issues was problems that came up when the file was locked.
In practice, the only solution that has worked for us reliably across millions of customer deployments — and gotten rid of the support complaints — is to retry. Lots. Here’s how we do it. First, we make a function that can execute a block of PowerShell with a retry:
function Execute-WithRetry([ScriptBlock] $command) {
    $attemptCount = 0
    $operationIncomplete = $true
    $maxFailures = 5

    while ($operationIncomplete -and $attemptCount -lt $maxFailures) {
        $attemptCount = ($attemptCount + 1)

        if ($attemptCount -ge 2) {
            Write-Host "Waiting for $sleepBetweenFailures seconds before retrying..."
            Start-Sleep -s $sleepBetweenFailures
            Write-Host "Retrying..."
        }

        try {
            # Call the script block
            & $command

            $operationIncomplete = $false
        } catch [System.Exception] {
            if ($attemptCount -lt ($maxFailures)) {
                Write-Host ("Attempt $attemptCount of $maxFailures failed: " + $_.Exception.Message)
            } else {
                throw
            }
        }
    }
}
Then, each action we perform with IIS is wrapped in this function:
# Start App Pool
Execute-WithRetry {
    $state = Get-WebAppPoolState $applicationPoolName
    if ($state.Value -eq "Stopped") {
        Write-Host "Application pool is stopped. Attempting to start..."
        Start-WebAppPool $applicationPoolName
    }
}
Examples
The rest of this post will be used to show lots of real-world examples of how to use the PowerShell IIS modules.
Creating sites (simple)
Import-Module WebAdministration

New-Website -Name "Website1" -Port 80 -IPAddress "*" -HostHeader "" -PhysicalPath "C:\Sites\Website1"
Import-Module IISAdministration
New-IISSite -Name "Website1" -BindingInformation "*:80:" -PhysicalPath "C:\Sites\Website1"
# Examples of -BindingInformation:
# "*:80:" - Listens on port 80, any IP address, any hostname
# "10.0.0.1:80:" - Listens on port 80, specific IP address, any host
# "*:80:example.com" - Listens on port 80, specific hostnameCreating sites (advanced)
Most likely, you’ll want to specify a few extra settings when you create a real site. To do that, you can get the site after creating it, and add the extra settings. Since we are making multiple changes, we can use delayed commits to write them all to applicationHost.config at once.
Here we’ll add an additional binding, and set the site ID:
Import-Module WebAdministration

New-Item -Path "IIS:\Sites" -Name "Website1" -Type Site -Bindings @{protocol="http";bindingInformation="*:8021:"}
Set-ItemProperty -Path "IIS:\Sites\Website1" -name "physicalPath" -value "C:\Sites\Website1"
Set-ItemProperty -Path "IIS:\Sites\Website1" -Name "id" -Value 4
New-ItemProperty -Path "IIS:\Sites\Website1" -Name "bindings" -Value (@{protocol="http";bindingInformation="*:8022:"}, @{protocol="http";bindingInformation="*:8023:"})

Start-Website -Name "Website1"
Import-Module IISAdministration
$manager = Get-IISServerManager
$site = $manager.Sites.Add("Website1", "http", "*:8022:", "C:\Sites\Website1")
$site.Id = 4
$site.Bindings.Add("*:8023:", "http")
$site.Bindings.Add("*:8024:", "http")
$manager.CommitChanges()Creating applications in virtual directories
Most of the time, when people think of deploying a .NET app to a virtual directory, they mean creating an application underneath a web site. The example below creates an application that would be viewable at http://site/MyApp. We also assign an application pool:
Import-Module WebAdministration

New-Item -Type Application -Path "IIS:\Sites\Website1\MyApp" -physicalPath "C:\Sites\MyApp"
Import-Module IISAdministration
$manager = Get-IISServerManager
$app = $manager.Sites["Website1"].Applications.Add("/MyApp", "C:\Sites\MyApp")
$manager.CommitChanges()Creating application pools
You need to assign each application (website or application in a virtual directory) to an application pool. The application pool defines the executable process in which requests to the application are handled.
IIS comes with a handful of application pools already defined for common options, but I always recommend creating your own application pool for each website or application that you deploy. This provides process-level isolation between applications and lets you set different permissions around what each application can do. The examples below show many of the common application pool settings. For the IIS Administration module, there are no built-in CmdLets to create application pools, so you have to do it with the ServerManager object directly:
Import-Module WebAdministration

New-Item -Path "IIS:\AppPools" -Name "My Pool" -Type AppPool

# What version of the .NET runtime to use. Valid options are "v2.0" and
# "v4.0". IIS Manager often presents them as ".NET 4.5", but these still
# use the .NET 4.0 runtime so should use "v4.0". For a "No Managed Code"
# equivalent, pass an empty string.
Set-ItemProperty -Path "IIS:\AppPools\My Pool" -name "managedRuntimeVersion" -value "v4.0"

# If your ASP.NET app must run as a 32-bit process even on 64-bit machines
# set this to $true. This is usually only important if your app depends
# on some unmanaged (non-.NET) DLL's.
Set-ItemProperty -Path "IIS:\AppPools\My Pool" -name "enable32BitAppOnWin64" -value $false

# Starts the application pool automatically when a request is made. If you
# set this to false, you have to manually start the application pool or
# you will get 503 errors.
Set-ItemProperty -Path "IIS:\AppPools\My Pool" -name "autoStart" -value $true

# What account does the application pool run as?
# "ApplicationPoolIdentity" = best
# "LocalSystem" = bad idea!
# "NetworkService" = not so bad
# "SpecificUser" = useful if the user needs special rights. See other examples
# below for how to do this.
Set-ItemProperty -Path "IIS:\AppPools\My Pool" -name "processModel" -value @{identitytype="ApplicationPoolIdentity"}

# Older applications may require "Classic" mode, but most modern ASP.NET
# apps use the integrated pipeline.
#
# On newer versions of PowerShell, setting the managedPipelineMode is easy -
# just use a string:
#
#   Set-ItemProperty -Path "IIS:\AppPools\My Pool 3" `
#      -name "managedPipelineMode" `
#      -value "Integrated"
#
# However, the combination of PowerShell and the IIS module in Windows
# Server 2008 and 2008 R2 requires you to specify the value as an integer.
#
#  0 = Integrated
#  1 = Classic
#
# If you hate hard-coding magic numbers you can do this (or use the string
# if 2008 support isn't an issue for you):
#
#   Add-Type -Path "${env:SystemRoot}\System32\inetsrv\Microsoft.Web.Administration.dll"
#   $pipelineMode = [Microsoft.Web.Administration.ManagedPipelineMode]::Integrated
#   Set-ItemProperty -Path "..." -name "managedPipelineMode" -value ([int]$pipelineMode)
#
# If this DLL doesn't exist, you'll need to install the IIS Management
# Console role service.
Set-ItemProperty -Path "IIS:\AppPools\My Pool" -name "managedPipelineMode" -value 0

# This setting was added in IIS 8. It's different to autoStart (which means
# "start the app pool when a request is made") in that it lets you keep
# an app pool running at all times even when there are no requests.
# Since it was added in IIS 8 you may need to check the OS version before
# trying to set it.
#
# "AlwaysRunning" = application pool loads when Windows starts, stays running
# even when the application/site is idle.
# "OnDemand" = IIS starts it when needed. If there are no requests, it may
# never be started.
if ([Environment]::OSVersion.Version -ge (new-object 'Version' 6,2)) {
    Set-ItemProperty -Path "IIS:\AppPools\My Pool" -name "startMode" -value "OnDemand"
}
Import-Module IISAdministration
$manager = Get-IISServerManager
$pool = $manager.ApplicationPools.Add("My Pool")
# Older applications may require "Classic" mode, but most modern ASP.NET
# apps use the integrated pipeline
$pool.ManagedPipelineMode = "Integrated"
# What version of the .NET runtime to use. Valid options are "v2.0" and
# "v4.0". IIS Manager often presents them as ".NET 4.5", but these still
# use the .NET 4.0 runtime so should use "v4.0". For a "No Managed Code"
# equivalent, pass an empty string.
$pool.ManagedRuntimeVersion = "v4.0"
# If your ASP.NET app must run as a 32-bit process even on 64-bit machines
# set this to $true. This is usually only important if your app depends
# on some unmanaged (non-.NET) DLL's.
$pool.Enable32BitAppOnWin64 = $false
# Starts the application pool automatically when a request is made. If you
# set this to false, you have to manually start the application pool or
# you will get 503 errors.
$pool.AutoStart = $true
# "AlwaysRunning" = application pool loads when Windows starts, stays running
# even when the application/site is idle.
# "OnDemand" = IIS starts it when needed. If there are no requests, it may
# never be started.
$pool.StartMode = "OnDemand"
# What account does the application pool run as?
# "ApplicationPoolIdentity" = best
# "LocalSystem" = bad idea!
# "NetworkService" = not so bad
# "SpecificUser" = useful if the user needs special rights
$pool.ProcessModel.IdentityType = "ApplicationPoolIdentity"
$manager.CommitChanges()Assigning application pools
Once you’ve defined your application pool, you must assign applications to it. The examples below show you how to assign websites or applications in a virtual directory to your new application pool:
Import-Module WebAdministration

# Assign the application pool to a website
Set-ItemProperty -Path "IIS:\Sites\Website1" -name "applicationPool" -value "My Pool"

# Assign the application pool to an application in a virtual directory
Set-ItemProperty -Path "IIS:\Sites\Website1\MyApp" -name "applicationPool" -value "My Pool"
Import-Module IISAdministration
$manager = Get-IISServerManager
# Assign to a website
$website = $manager.Sites["Website1"]
$website.Applications["/"].ApplicationPoolName = "My Pool"
# Assign to an application in a virtual directory
$website = $manager.Sites["Website1"]
$website.Applications["/MyApp"].ApplicationPoolName = "My Pool"
$manager.CommitChanges()Check whether sites, virtual directories, or application pools already exist
You’ll re-deploy your application to IIS many times over the course of a project, so you can’t assume the script is being run for the first time. The examples below show a pattern for checking whether a site, application, or application pool already exists before making a change:
Import-Module WebAdministration

# The pattern here is to use Test-Path with the IIS:\ drive provider

if ((Test-Path "IIS:\AppPools\My Pool") -eq $False) {
    # Application pool does not exist, create it...
    # ...
}

if ((Test-Path "IIS:\Sites\Website1") -eq $False) {
    # Site does not exist, create it...
    # ...
}

if ((Test-Path "IIS:\Sites\Website1\MyApp") -eq $False) {
    # App/virtual directory does not exist, create it...
    # ...
}
Import-Module IISAdministration
$manager = Get-IISServerManager
# The pattern here is to get the things you want, then check if they are null
if ($manager.ApplicationPools["My Pool"] -eq $null) {
# Application pool does not exist, create it...
# ...
}
if ($manager.Sites["Website1"] -eq $null) {
# Site does not exist, create it...
# ...
}
if ($manager.Sites["Website1"].Applications["/MyApp"] -eq $null) {
# App/virtual directory does not exist, create it...
# ...
}
$manager.CommitChanges()Change physical path of a site or application
When deploying a new version of an application, my preference (and the way Octopus Deploy works) is to deploy to a fresh new folder on disk, then update IIS to point to it. So you begin with:
C:\Sites\Website1\1.0 <--- IIS points hereYou deploy the new version:
C:\Sites\Website1\1.0   <--- IIS points here
C:\Sites\Website1\1.1
You can then make any necessary changes to configuration files, etc. and then update IIS to point to it:
C:\Sites\Website1\1.0
C:\Sites\Website1\1.1   <--- Now IIS points here
Should you ever need to roll back in a hurry, you can leave the old folder on disk and point back to it:
C:\Sites\Website1\1.0   <--- IIS points here (we rolled back manually)
C:\Sites\Website1\1.1
Import-Module WebAdministration
# The pattern here is to use Test-Path with the IIS:\ drive provider
Set-ItemProperty -Path "IIS:\Sites\Website1" -name "physicalPath" -value "C:\Sites\Website1\1.1"
Set-ItemProperty -Path "IIS:\Sites\Website1\MyApp" -name "physicalPath" -value "C:\Sites\Website1\1.1"Import-Module IISAdministration
$manager = Get-IISServerManager
# Remember, in the IIS Administration view of the world, sites contain
# applications, and applications contain virtual directories, and it is
# virtual directories that point at a physical path on disk.
# Change for a top-level website
$manager.Sites["Website1"].Applications["/"].VirtualDirectories["/"].PhysicalPath = "C:\Sites\Website1\1.1"
# Change for an app within a website
$manager.Sites["Website1"].Applications["/MyApp"].VirtualDirectories["/"].PhysicalPath = "C:\Sites\Website1\1.1"
$manager.CommitChanges()Changing authentication methods
IIS supports a number of authentication methods. As described above, these are locked to applicationHost.config by default, if you want to automatically enable them, the examples below show how to enable/disable:
- Anonymous authentication
- Basic authentication
- Digest authentication
- Windows authentication
IIS Manager also shows ASP.NET impersonation and Forms authentication as settings at the same level, but these are actually set in your app’s web.config file so I’ve left them out here:
Import-Module WebAdministration

# The pattern here is to use Test-Path with the IIS:\ drive provider.

Set-WebConfigurationProperty `
    -Filter "/system.webServer/security/authentication/windowsAuthentication" `
    -Name "enabled" `
    -Value $true `
    -Location "Website1/MyApp" `
    -PSPath IIS:\    # We are using the root (applicationHost.config) file

# The section paths are:
#
#  Anonymous: system.webServer/security/authentication/anonymousAuthentication
#  Basic:     system.webServer/security/authentication/basicAuthentication
#  Windows:   system.webServer/security/authentication/windowsAuthentication
Import-Module IISAdministration
$manager = Get-IISServerManager
# ServerManager makes it easy to get the various config files that belong to
# an app, or at the applicationHost level. Since this setting is locked
# to applicationHost, we need to get the applicationHost configuration.
$config = $manager.GetApplicationHostConfiguration()
# Note that we have to specify the name of the site or application we are
# editing, since we are working with individual <location> sections within
# the global applicationHost.config file.
$section = $config.GetSection(`
"system.webServer/security/authentication/windowsAuthentication", `
"Website1")
$section.Attributes["enabled"].Value = $true
# The section paths are:
#
# Anonymous: system.webServer/security/authentication/anonymousAuthentication
# Basic: system.webServer/security/authentication/basicAuthentication
# Windows: system.webServer/security/authentication/windowsAuthentication
# Changing options for an application in a virtual directory is similar,
# just specify the site name and app name together:
$section = $config.GetSection(`
"system.webServer/security/authentication/windowsAuthentication", `
"Website1/MyApp")
$section.Attributes["enabled"].Value = $true
$manager.CommitChanges()Changing logging settings
HTTP request logging is provided by IIS and can be specified server-wide or at the individual site level. Applications and virtual directories can disable logging, but they can’t do any logging of their own. The examples below show how to set logging at the site level.
Logging settings are stored in applicationHost.config underneath the site:
<system.applicationHost>
    <!-- ... -->
    <sites>
        <site name="Default Web Site" id="1">
            <bindings>
                <binding protocol="http" bindingInformation="*:80:" />
            </bindings>
            <logFile logFormat="IIS" directory="%SystemDrive%\inetpub\logs\LogFiles1" period="Hourly" />
        </site>
        <siteDefaults>
            <logFile logFormat="W3C" directory="%SystemDrive%\inetpub\logs\LogFiles" />
            <traceFailedRequestsLogging directory="%SystemDrive%\inetpub\logs\FailedReqLogFiles" />
        </siteDefaults>
        <!-- ... -->
Import-Module WebAdministration
$settings = @{ `
logFormat="W3c"; ` # Formats: W3c, Iis, Ncsa, Custom
enabled=$true; `
directory="C:\Sites\Logs"; `
period="Daily"; `
}
Set-ItemProperty "IIS:\Sites\Website1" -name "logFile" -value $settingsImport-Module IISAdministration
$manager = Get-IISServerManager
$site = $manager.Sites["Website1"]
$logFile = $site.LogFile
$logFile.LogFormat = "W3c" # Formats: W3c, Iis, Ncsa, Custom
$logFile.Directory = "C:\Sites\Logs"
$logFile.Enabled = $true
$logFile.Period = "Daily"
$manager.CommitChanges()Running application pools as a specific user
You can usually get by running your application pools as the ApplicationPoolIdentity accounts. This creates a virtual account for each different application pool automatically, isolating them from each other. On the local machine, you can grant access to resources like the file system to each separate application pool. For remote resources (like a SQL Server on a different machine), the application pool identities act as Network Service, so you can grant access at the machine level. Learn more about application pool identities.
For more control over what the application pool can do, you should run it under a specific, custom user account. You’ll want to use aspnet_regiis to give your custom account all the permissions it needs to run as an application pool and execute ASP.NET requests. You can then set your application pool to run as that user:
Import-Module WebAdministration

New-Item -Path "IIS:\AppPools" -Name "My Pool" -Type AppPool

$identity = @{  `
    identitytype="SpecificUser"; `
    username="My Username"; `
    password="My Password" `
}
Set-ItemProperty -Path "IIS:\AppPools\My Pool" -name "processModel" -value $identity
Import-Module IISAdministration
$manager = Get-IISServerManager
$pool = $manager.ApplicationPools.Add("My Pool")
$pool.ProcessModel.IdentityType = "SpecificUser"
$pool.ProcessModel.Username = "My User"
$pool.ProcessModel.Password = "Password"
$manager.CommitChanges()Summary
If you’re setting out to automate your IIS deployments for the first time, I hope you’ll find the background information and the examples in this post useful. As I mentioned, the examples are in a GitHub repository, and we run them against Windows 2008 R2 up to Windows Server 2016. If you find any problems or have ideas about other examples this post should include, let me know in the comments or send a pull request!
Learn more
- Using Octopus output variables in subsequent deployment steps.
- How to invoke an executable from PowerShell with a dynamic number of parameters.
- Tips and tricks for dealing with PowerShell exit codes.
- Configuration Management with Octopus and PowerShell DSC.
- Documentation: Running an Azure PowerShell script step.
Tags:


