We recently posted an introduction to our new capability for packaging .NET Core applications on .NET Core. In this post, we’re going to get our hands dirty and dig into how to put together a build pipeline for a .NET Core application.
The concepts we’re going to cover apply equally regardless of whether the build machine itself has full .NET Framework or .NET Core. They can also apply to many full framework scenarios, so even if you’re not doing .NET Core, there might be something here for you.
Along the way we’re going to build the pipeline a few times over, using different build servers and tools.
Before We Dive In
The focus in this post is to illustrate the build setup, so I’m going to assume that you are familiar with everything required to get you to the point of building. I’m using a Git repo with a simple ASP.NET Web application for illustration, but the content and mechanics of the application aren’t important to the overall story.
The Three Steps to Success
So when you’re putting together a build pipeline for .NET Core, what is important? First and foremost for me is, don’t fight the tooling. I mentioned in the last post that the way OctoPack does things doesn’t fit with the .NET Core world, so we have to change our thinking to suit that world.
To that end, in all of the following examples there is one underlying pattern being used that entails three core steps:
- Publish the application to a folder.
- Package the application.
- Push the package to a feed that can be used by Octopus.
Now OctoPack also uses these same three conceptual steps it just does them internally, so it isn’t necessarily obvious. The issue with OctoPack is that it has its own way of doing the publish, rather than deferring to the Microsoft tooling that’s built to handle all of the newer application types you could be packaging.
TeamCity
All right, without further ado, let’s get into our first example. Here’s a sneak peek at what our build steps are going to look like when we’re finished.
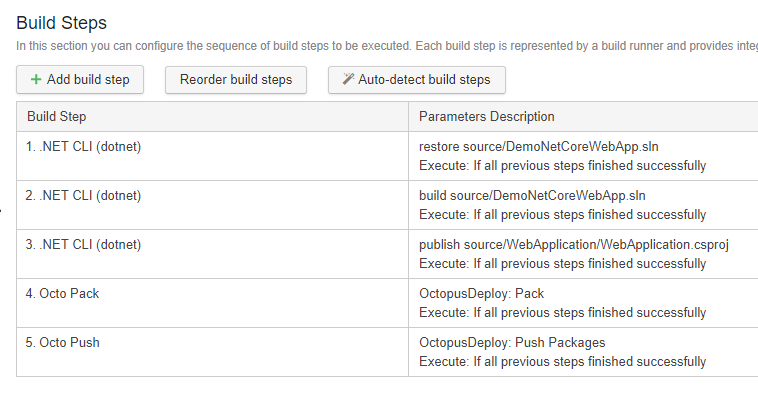
TeamCity can set up a fair bit of this for you. Once you’ve created your project and configured your VCS root, go to the Build Steps and let TeamCity have a stab at creating the build steps based on what it can see in the repo, and it should come up with steps 1-3 for you.
Now let’s fine tune the publish step a little by setting a specific Output directory that’s easier for the following step to find. Note that the output directory is relative to the csproj folder location. I like to use a folder off the root level of the repo, thus the ../../.
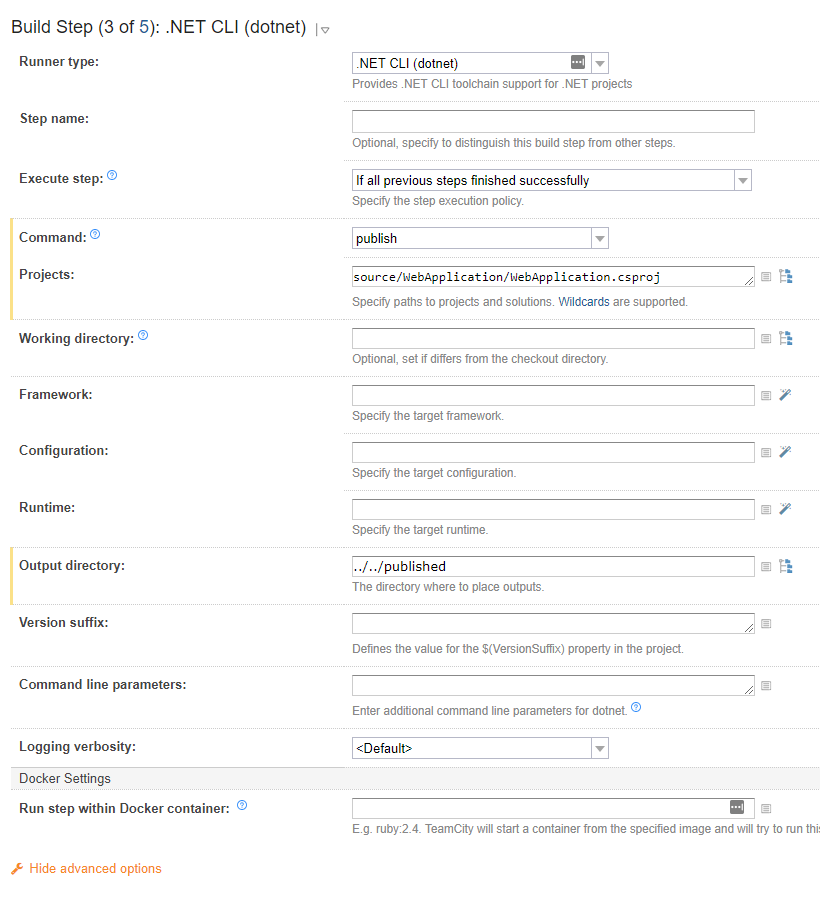
This gets us the application contents published. Next we package it.
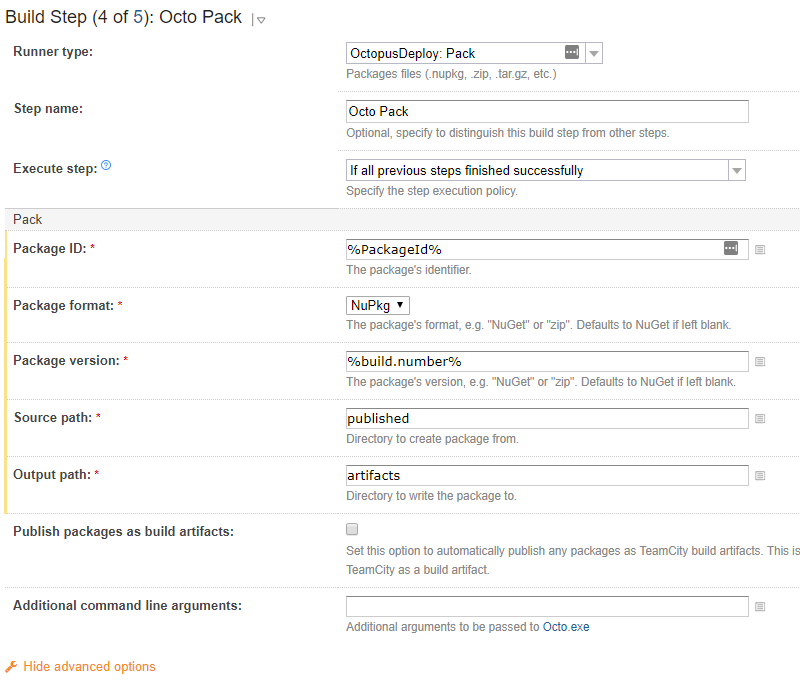
This step is a recent addition to our TeamCity extension, so if you can’t see it, you’ll need to update the extension. The Package ID is declared as a TeamCity variable because we’re going to use it again in the Push step shortly, the actual value isn’t important for our illustration.
The Source path is the folder we published to in the previous step (noting that, this time it’s relative to the root checkout folder) and the Output path is where we’re going to put the resulting package.
Just to reiterate, the actual values used for almost all of these fields aren’t particularly important, so long as you understand which fields on each step need to align. The Package version is generally always going to be %build.number% though :)
Ok, we’re on the home stretch, let’s push the package to a feed Octopus can use. You have two options at this point, depending on whether you want to use TeamCity’s feed as an external feed from Octopus or if you want to use Octopus’ internal feed. For the former, you just tick the Publish packages as build artifacts and you are done.
For the latter, you add an OctopusDeploy: PushPackages step.
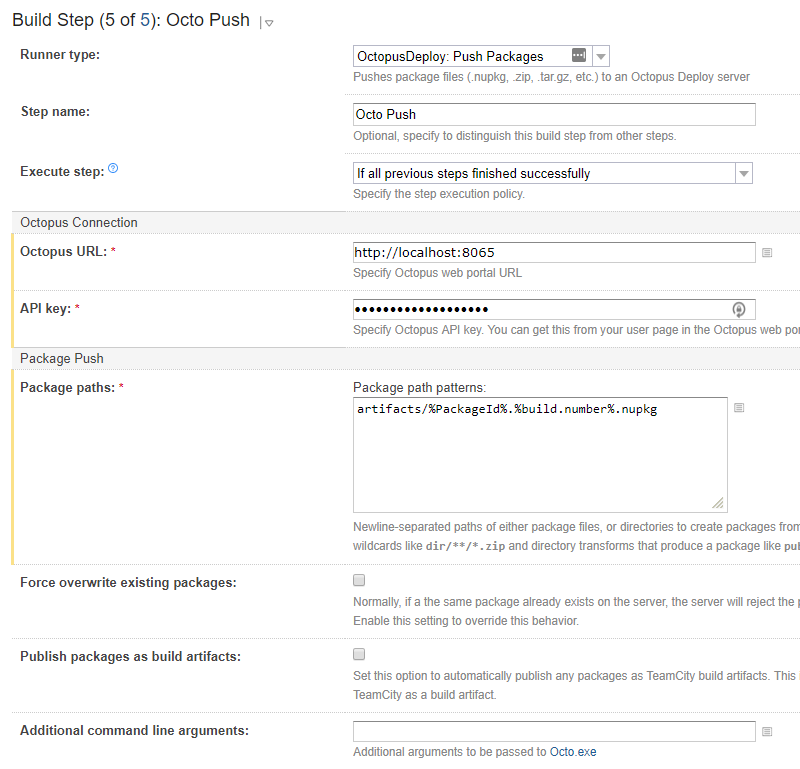
The Package paths here is built up from the folder that was used as the Output path in the pack step, along with the specific filename of the package. You can wildcard the filename (e.g. artifacts/*.nupkg), but we don’t tend to recommend that. If the folder doesn’t get cleaned up reliably between builds, you’ll end up trying to push packages from previous builds.
So that’s it, you’ve packaged you’re .NET Core application, and it’s in a feed where Octopus can use it. Time to add an OctopusDeploy: Create release step and sit back and watch the deployments roll out. Well, maybe… ;)
Build Chains
There can be a catch if you are using the TeamCity feed as an external feed to Octopus. Before we explain the details, let’s have a look at the create release step:
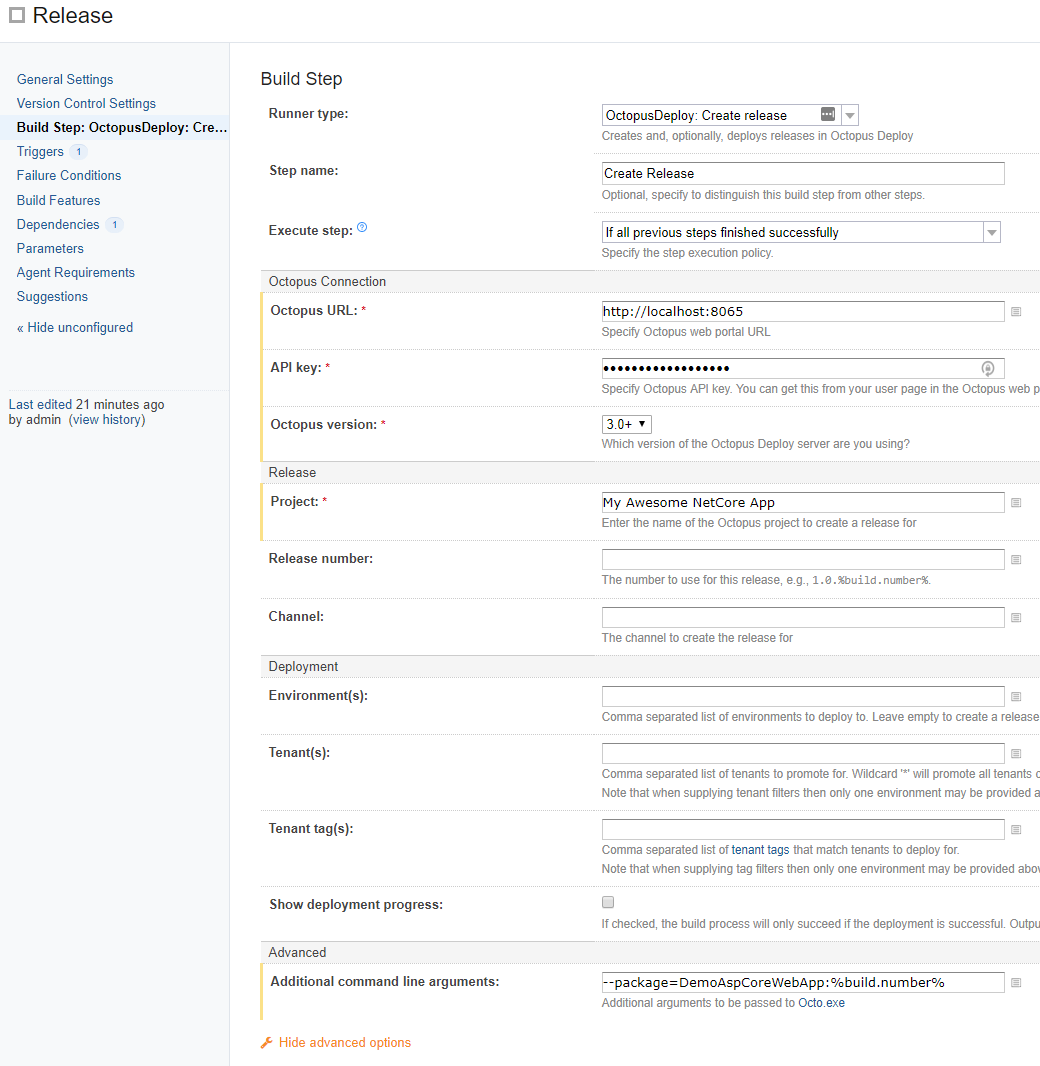
There are two things I’ve done quite deliberately in setting up this step to make sure things do go bang if the TeamCity and Octopus worlds aren’t correctly aligned. The first is to leave the Release number blank in TeamCity and configure the project settings in Octopus to use the package version, in the Release Versioning setting. The second is to explicitly specify the exact package version that we just pushed to the feed as the package version the release must use, which we do through the additional arguments (yes, in hindsight this might have been better as a first-class field, and we might look at that in the future).
Which brings us to the catch, if you trigger the release the package may not be available in the feed yet, and Octopus won’t be able to find it. By providing the specific version of the package, we will force a build failure here if the package isn’t available. Without this, the release creation will default to auto-selecting the most recent package, and everything will look hunky dory until you realize some fix you thought had been released isn’t actually there. Many hours of head scratching will ensue until you happen to notice the single digit difference in the package version to the release version.
So why did I also leave the Release number blank in TeamCity when you’d often see it set to %build.number%? Well if I forget to set the version explicitly via the additional parameters then the release in Octopus will end up with the version of the older package that got auto-selected (I have the project in Octopus set to use the package for the release versioning), this will either hard fail if that release already exists or will standout when you look at the project overview. I.e., an incorrect release number is big and bold and much easier to spot in the UI than an incorrect package version within the release.
Ok, now those are good countermeasures to have in place, but they just warn us if it all goes wrong, how do we make sure it doesn’t all go wrong? The best way we’ve found is Build chains. I’ll leave most of how to deal with build chains as homework for you, but here’s the setup I’ve used for a “Release” Build Configuration in my demo project.
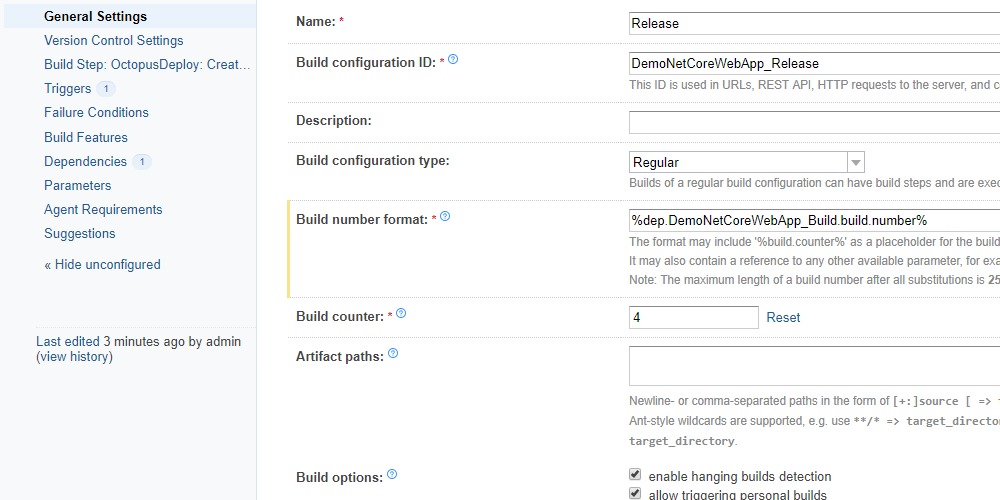
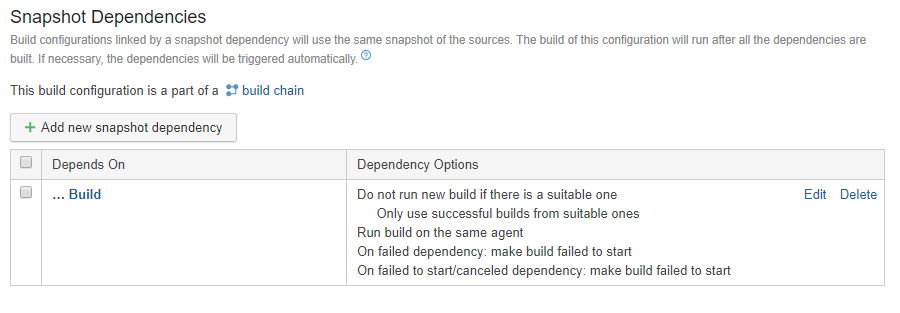

This build configuration depends on the “Build” build configuration and is triggered when that succeeds. This build’s version number is also directly set to the build number from its dependency, and it will not start until its dependency has completed, and the resulting artifacts are published and indexed.
VSTS
Ok, round two here we come. I’ve used the same source code for this setup, so it’s literally the same app. The only real difference in setup is I decided to use a different ID for the package I created, just to make sure I didn’t get version conflicts when I pushed the packages to my Octopus server.
Like before, here’s the sneak peek at the pipeline and then we’ll dig into details.
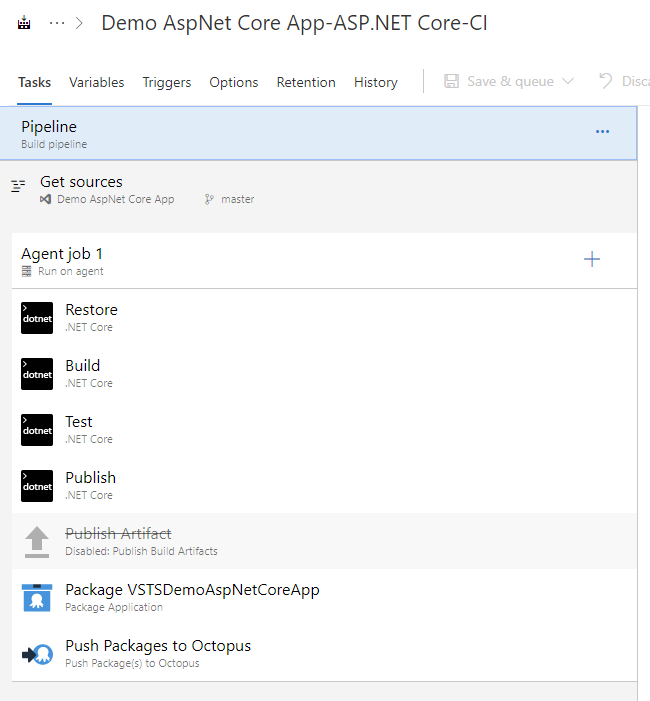
I’ve mentioned a couple of times now that the .NET tooling knows the right way to do this stuff. In the pipeline above all I did was ask for a new pipeline and select the .NET Core template from the list. It created the first five steps, the fifth being the one I’ve disabled. I disabled this step rather than deleting it to illustrate the pattern again. By default, VSTS wants you to publish to a folder and then use that as the basis for what to move to the target of the deployment, just like we’ve been talking about. All we’re doing here is replacing the Publish Artifact step with the Pack and Push steps from the Octopus VSTS extension, which package the folder content and push the package to Octopus just like we saw in the TeamCity example.
Here’s what’s in the Publish step. I haven’t changed anything in this step; I’m showing it here because the output folder it’s using is important for Source Path in the next step.
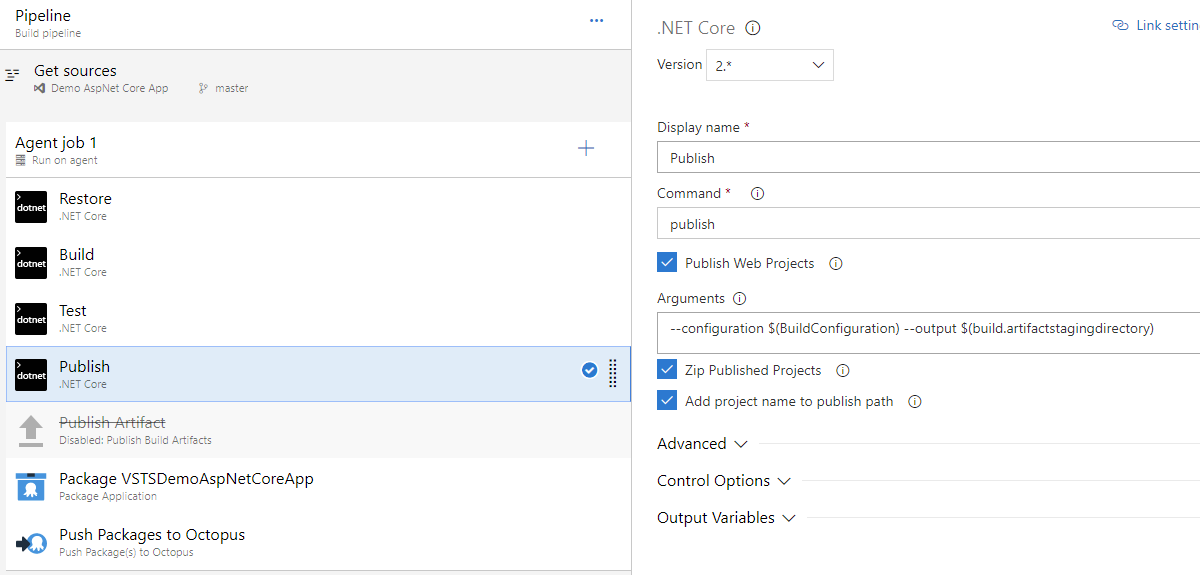
Once we’ve got the output folder, then it’s time to set up the packaging step.
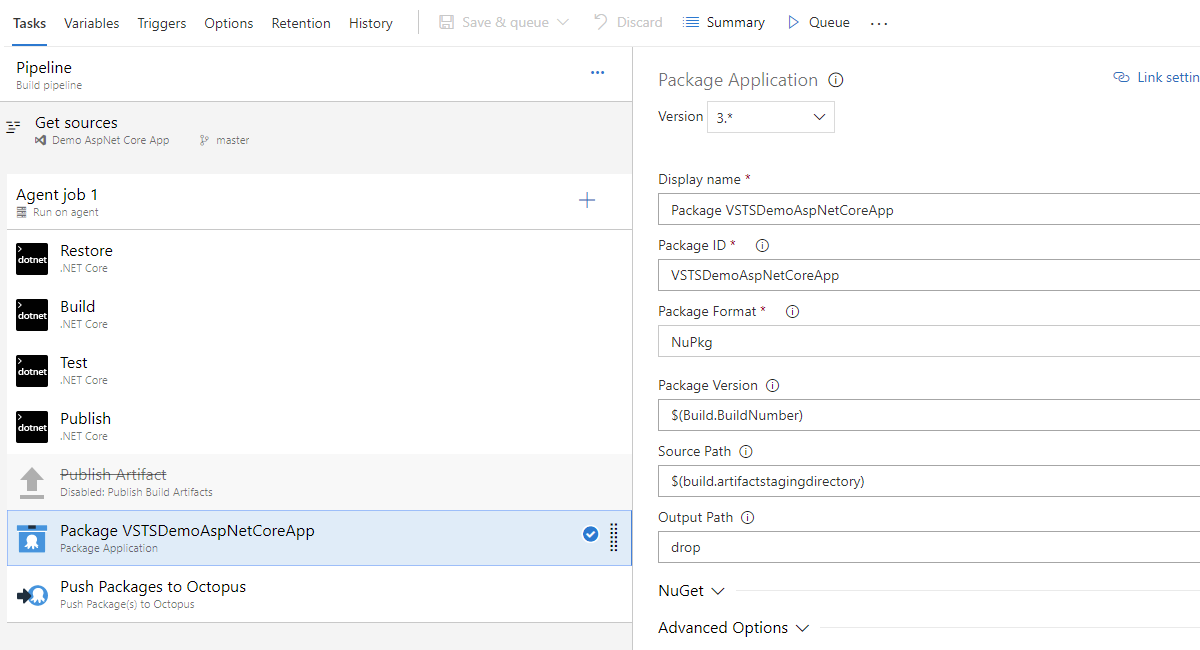
The Publish Artifact step that I disabled was using a folder called drop for its output, so I followed suit for simplicity.
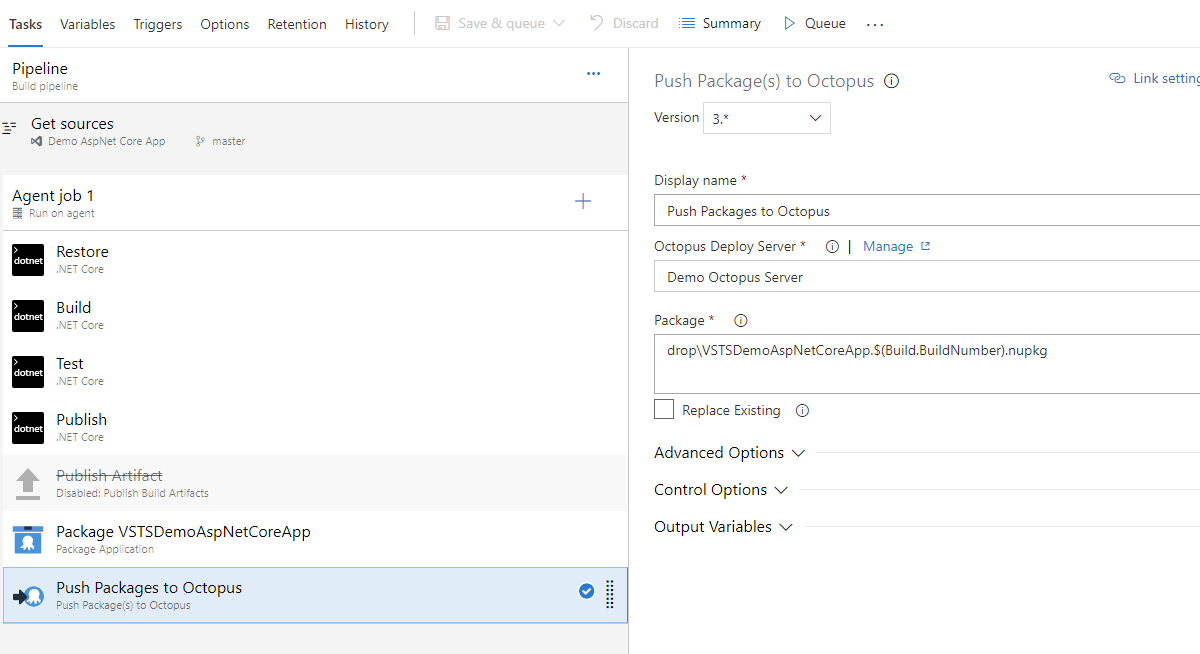
This then feeds into the final step, to push the package to Octopus. The Octopus URL and API key are taken care of using a service connection in VSTS, which you select from the dropdown on the step.
The only other point to note is the $(Build.BuildNumber). This is a built-in variable, but you can control its format (using the Options tab that you can see up near the top left). I’ve changed from the default to 1.0.0$(rev:.r) for this demo. The default scheme works, but I tend to use it with caution. It creates SemVer versions with a major based on the current date, which isn’t really in the spirit of SemVer. Do you make breaking changes every day? It’s ok, you don’t need to answer that ;) The other catch is that if you ever decide to move off this scheme the existing major numbers will be really big, so almost any other scheme would result in versions that Octopus would interpret as older than the existing ones.
Cake Script
Ding, ding, round three! In the previous examples, we used tooling that is built around defining your build process as a series of steps in the tool itself. What if we wanted to be a bit more tool agnostic though? What about if we wanted to be able to run the build locally on our development machine to test it? Cake is a great option for both of these scenarios. Again, let’s start by having a look at an example script:
#tool "nuget:?package=GitVersion.CommandLine&prerelease"
#tool "nuget:?package=OctopusTools"

using Path = System.IO.Path;
using IO = System.IO;
using Cake.Common.Tools;

var target = Argument("target", "Default");
var configuration = Argument("configuration", "Release");
var octopusServer = Argument("octopusServer", "");
var octopusApiKey = Argument("octopusApiKey", "");

var isLocalBuild = string.IsNullOrWhiteSpace(octopusServer);

var packageId = "CakeDemoAspNetCoreApp";

var publishDir = "./publish";
var artifactsDir = "./artifacts";
var localPackagesDir = "../LocalPackages";

var gitVersionInfo = GitVersion(new GitVersionSettings {
    OutputType = GitVersionOutput.Json
});

var nugetVersion = gitVersionInfo.NuGetVersion;

Setup(context =>
{
    if(BuildSystem.IsRunningOnTeamCity)
        BuildSystem.TeamCity.SetBuildNumber(gitVersionInfo.NuGetVersion);

    Information("Building v{0}", nugetVersion);
});

Teardown(context =>
{
    Information("Finished running tasks.");
});

Task("__Default")
    .IsDependentOn("__Clean")
    .IsDependentOn("__Restore")
    .IsDependentOn("__Build")
    .IsDependentOn("__Publish")
    .IsDependentOn("__Pack")
    .IsDependentOn("__Push");

Task("__Clean")
    .Does(() =>
{
    CleanDirectory(artifactsDir);
    CleanDirectory(publishDir);
    CleanDirectories("./source/**/bin");
    CleanDirectories("./source/**/obj");
});

Task("__Restore")
    .Does(() => DotNetCoreRestore("source", new DotNetCoreRestoreSettings
    {
        ArgumentCustomization = args => args.Append($"/p:Version={nugetVersion}")
    })
);

Task("__Build")
    .Does(() =>
{
    DotNetCoreBuild("source", new DotNetCoreBuildSettings
    {
        Configuration = configuration,
        ArgumentCustomization = args => args.Append($"/p:Version={nugetVersion}")
    });
});

Task("__Publish")
    .Does(() =>
{
    DotNetCorePublish("source", new DotNetCorePublishSettings
    {
        Framework = "netcoreapp2.0",
        Configuration = configuration,
        OutputDirectory = publishDir,
        ArgumentCustomization = args => args.Append($"--no-build")
    });
});

Task("__Pack")
    .Does(() => {

    OctoPack(packageId, new OctopusPackSettings{
        BasePath = publishDir,
        Version=nugetVersion,
        OutFolder=artifactsDir
        });
});

Task("__Push")
    .Does(() => {

    var packageFile = $"{artifactsDir}\\{packageId}.{nugetVersion}.nupkg";

    if (!isLocalBuild)
    {
        OctoPush(octopusServer, octopusApiKey, new FilePath(packageFile), new OctopusPushSettings());
    }
    else
    {
        CreateDirectory(localPackagesDir);
        CopyFileToDirectory(packageFile, localPackagesDir);
    }
});

Task("Default")
    .IsDependentOn("__Default");

RunTarget(target);
I’m not going to walk through this script line by line. Hopefully, it’s clear enough from a read through that it’s following exactly the same flow we’ve been using in the other examples. What I will go through is a couple of gotchas that the script shows how to deal with and a pattern that we use a bit here at Octopus that I’ve found really useful.
I’ll start with the pattern. You’ll see up near the top there’s a variable called isLocalBuild being calculated, then in the __Push task we use that to switch between actually doing an octo push and simulating a push by copying the files to a local folder. Doing this lets us do two things. Firstly, we can run the script repeatedly while testing it and not have to worry about forcing overwrites of packages etc. The second and more important thing is that it lets us build local versions of the packages that can then be consumed and tested without having to wait for a build server. This is typically more useful when building library packages than application packages, but I’ve included it here because we’ve found it really useful and I wanted to share it :)
Now for the gotchas. The first relates to the restore task and isn’t really required for an application package build. It will catch you out if you are doing a library package build though and you have multiple projects in your solution that refer to each other. The difference in that scenario is that you would also probably want to use dotnet pack rather than dotnet octo pack, and it will produce a NuGet package per library project file vs a single package file. The dependencies between the multiple packages will end up with the wrong version numbers if you don’t include the version number when you do the dotnet restore. This is a behavior of dotnet not Cake.
The second gotcha relates to the --no-build parameter being passed in the __Publish task, and this one does relate to application packages and will catch you out silently. If you don’t pass this parameter the dotnet publish will run the build again, just to be sure, but won’t include the version parameter that you passed to the original build. So it’s wasted time and energy building again, and lost things along the way :( If you get this wrong you will still get a package that has the correct version, but the binaries inside it will have the wrong version, and you probably won’t notice this until something goes wrong down the track.
In this example, I’ve used GitVersion and included an example of how to push the derived version back to TeamCity, if that’s where it happens to be running. To achieve this in VSTS, your best bet is to grab the GitVersion task from the Marketplace and add it as the first step in your pipeline (also set the Build number format to $(GITVERSION_FullSemVer), there’s more info about this in the GitVersion docs). The setup in either TeamCity or VSTS is then simplified down to a step that invokes Cake to run your script. If you’ve followed Cake’s guide to getting started you’ll have the bootstrapping scripts you need, and your step will just have to end up executing something like:
build.ps1 -octopusServer=http://yourserverurl -octopusApiKey=your-api-keydotnet octo Installation
I said right back at the start of this post:
The concepts apply equally regardless of whether the build machine itself has full .NET Framework or .NET Core.
And this is true. The concepts are the same. There’s a mechanical piece though that I know is going to catch people out, the Octo .Net CLI extension installation.
If you’re using the TeamCity or VSTS steps, you don’t need to worry about this; our extension makes sure the installation is taken care of for you.
When you’re using Cake though, you have to make sure you install dotnet octo yourself. Depending on your scenario you have a couple of options on how to do this.
One option is to install globally (dotnet tool install Octopus.DotNet.Cli -g). This works if you can pre-install on either pet agents or cattle agent images and are comfortable that builds sharing the agents (cattle agents can still hang around and service multiple builds while they’re alive) won’t need conflicting versions of the CLI extension.
Another option is to install to a folder relative to the build working folder (e.g. dotnet tool install Octopus.DotNet.Cli --tool-path octoTools). The trick to this method is that the folder (octoTools) has to end up in the path too or dotnet can’t see it.
Wrapping Up
Woohoo! You stuck with me to the end, thank you! This did turn out to be a much bigger post than I had originally expected, but it’s something we get asked about a bit, so hopefully, this will be something that will help a number of you out there.
As always, if you have any questions or feedback, please let us know below.
UPDATE 2019-02-11: Not long after this post was released the wonderful folks who look after the Cake Octopus tooling released an update so it uses the Octopus dotnet CLI extension. The Cake script example has been updated to use OctoPack and OctoPush.
