When deploying new versions of modern software, like web applications and services, it’s still common for some teams to take their entire website down while they do deployments.
If the majority of your customers only use your application during business hours, then this big-bang approach is probably acceptable, but what happens if your customers are using your applications 24-7?
Today, users expect applications to be available all the time, and there are a few deployment patterns you can use to achieve zero-downtime. In this post, I’ll discuss one of these patterns in more depth; rolling deployments. I’ll also provide you with some practical examples of how to implement rolling deployments with different tooling.
What are rolling deployments?
A rolling deployment is a deployment pattern (also known as an incremental deployments, batched deployments, or ramped deployment) where new software is delivered, usually to one or more deployment targets at a time, until all of the targets have the updated version of the software rolled out.
A typical process looks something like this:
-
With two nodes running
v1.0of your application, drain the first node to be updated, take it out of the load-balancer pool, and leave the remaining node online to serve traffic: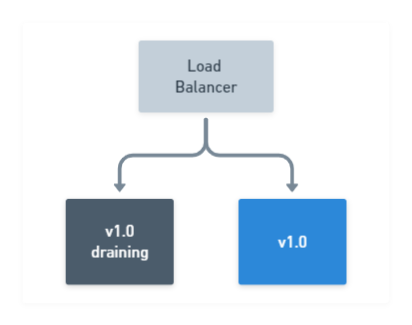
-
Stop the
v1.0application from running on the drained node, then deploy the newv1.1version. Optionally, verify the deployment was successful by running tests on your newly deployed application. All the while, maintaining at least one node runningv1.0of your application: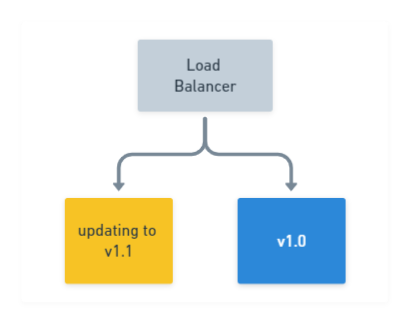
-
After the first node has updated successfully, proceed with draining the remaining node still running
v1.0of your application, while your newv1.1version is now online serving traffic: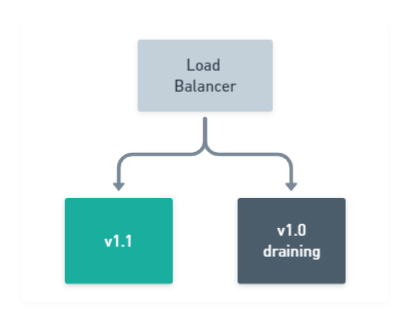
-
Stop the
v1.0application on the remaining node from running, deploy the newv1.1version. Again, optionally verify the deployment was successful: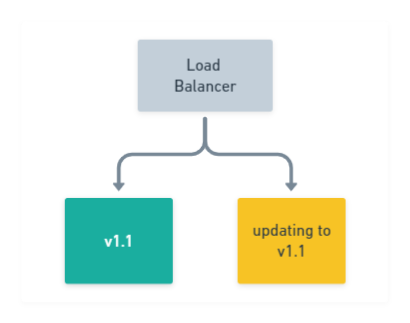
-
Finally, after
v1.1of your application has been deployed successfully to all of your nodes, your rolling deployment is complete!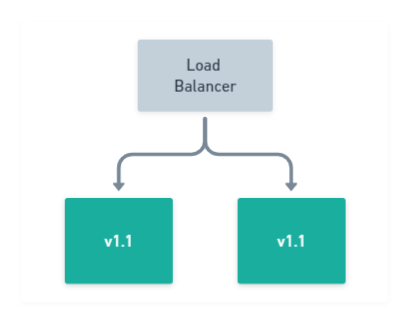
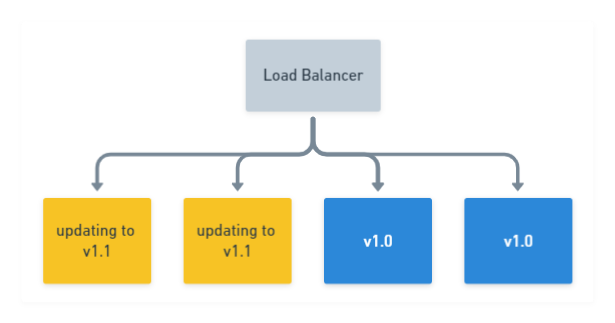
If you want to ramp up your rolling deployment and deliver a new version to more than one node simultaneously, say two for example, then it would look like this:
This incremental approach is often favored in web applications which sit behind a load balancer, as most load balancers support a concept known as Connection draining. This allows connections to a service to finish naturally and prevents new connections from being established.
By performing this action, instances which are selected to be updated, can be removed from the available pool after they have finished their work, while others remain online serving traffic.
Although the scenario above describes a web application rolling deployment, it’s possible to achieve rolling deployments for other types of applications, providing they are built in a way that supports ending their process safely.
For example, Octopus Deploy’s High Availability configuration also has a drain option, which prevents any new tasks from executing, and finishes up any tasks it’s currently executing until idle. Features like draining, allow for the safe termination of a process, which can then be updated and brought back online.
Why are they useful?
So why use rolling deployments over other patterns such as canary or blue/green? Well, rolling deployments offer the following benefits:
Incremental update
New versions of your application are rolled-out incrementally. This allows you to verify it’s working, for example, by running health checks or tests before moving on to the next batch of updates.
In the event that you need to initiate a rollback, you can also do this in a safe and controlled manner.
Keeping the lights on
While you go about updating a small number of your application instances, the rest continue to serve requests. This means there is no downtime for your application, and it’s available for your users throughout the deployment.
Parallelism
You can usually control the number of concurrent instances that are deployed to at any one time. Further deployments won’t start until a previous deployment has finished.
You can use the Window size option within an Octopus rolling deployment to control how many deployment targets can be deployed to at once.
Rolling deployment patterns in practice
To demonstrate the different approaches to rolling deployments, we have a very simple .NET Core 3.1 application which will display a web page.
The HTML for the section I’m interested in is shown below:
<div class="text-center">
<h1 class="display-4">Welcome</h1>
<p>If you are seeing this, then <strong>Congratulations!</strong> <br/> You've got the example application running. </p>
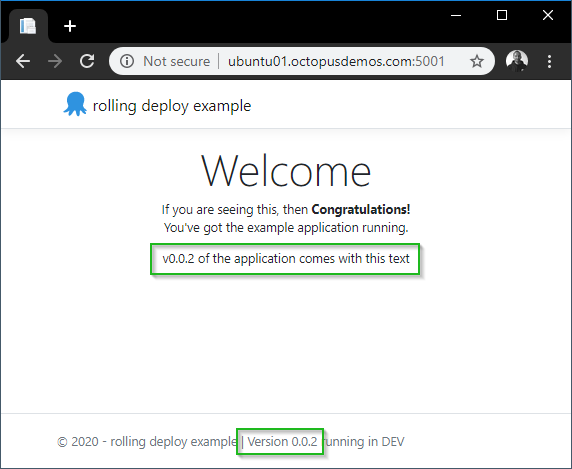
@if(Settings.Value.AppVersion == "0.0.2") {
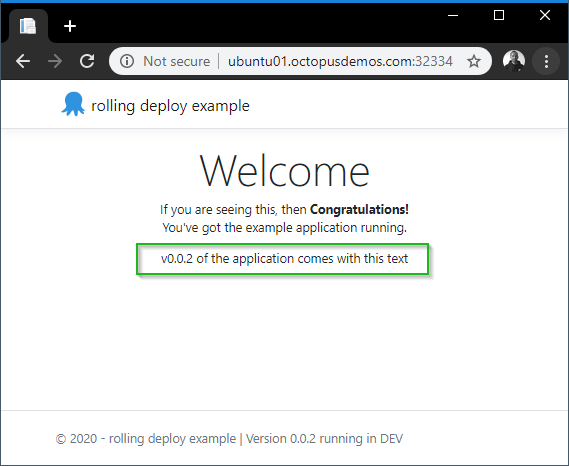
<p>v0.0.2 of the application comes with this text </p>
}
@if(Settings.Value.AppVersion == "0.0.3") {
<p>But don't miss out on v0.0.3 of the application which comes with this text! </p>
}
</div>The code for the application is available on GitHub and has a Tag corresponding to the three different AppVersion values. A Docker image has also been published as octopusdeploy/rolling-deploy-web-example.
I wanted to see just how easy it would be to perform a rolling deploy of this application using some popular technologies and tools, so I’ll demonstrate rolling deployments with:
Docker rolling application updates
Docker has become the de facto container technology to use in the last few years. It will come as no surprise therefore, that it natively supports rolling deployments with its concept of a Docker service. Typically, a service is a small piece of a much larger architectural picture and is popular with microservices.
Services support a number of different options, including a rolling update policy as well as the ability to rollback.
Docker containerized application
I’m running Docker on an Ubuntu server and using our pre-built container image. There are a couple of ways to install Docker on Ubuntu:
- Use the Ubuntu repository by running:
sudo apt-get install docker.io. - Use the Official Docker guide.
I opted for the Ubuntu repository as it seemed quicker and easier, but your mileage may vary. Whichever method you choose, it’s worth ensuring you meet the installation prerequisites.
For the sake of simplicity, I’ll be interacting with Docker in an SSH terminal session to my Linux box. There are production-ready setups to automate this, which feature the definition of your services in a Docker Compose file, including sections to control automatic updates and rollback settings.
Permissions requirement:
Most of the commands in this demonstration make use of sudo. By default, the Docker daemon runs as the root user and requires elevated permissions to execute commands. If you prefer not to use sudo when executing your commands, be sure to follow the Docker post-install instructions.
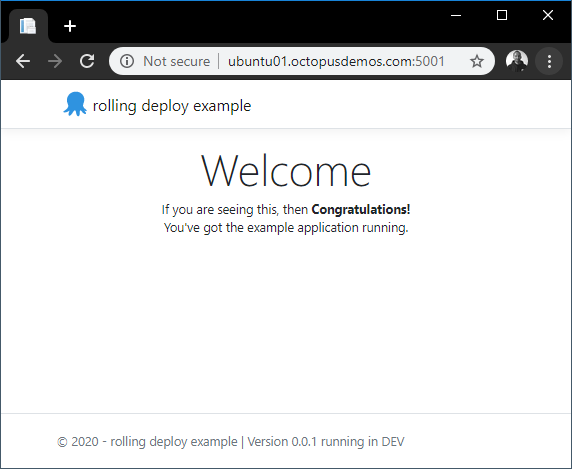
Firstly, to see the Docker image of this running standalone, we’ll run it with the following command:
markh@ubuntu01:~$ sudo docker run -d -p 5001:5001 octopusdeploy/rolling-deploy-web-example:0.0.1Unsurprisingly, running this Docker image displays the web page:
I don’t explain how to build a container image in this post. If you are new to Docker, my colleague Shawn has written an excellent series on how to containerize a real world application, instead of another “Hello World” example.
Container clean-up
A quick-tidy up is needed next. To delete the container we created using the run command above, we need to stop it, and then remove it using the rm command. We can do this in a condensed one-liner:
sudo docker rm $(sudo docker stop $(sudo docker ps -a -q --filter ancestor=octopusdeploy/rolling-deploy-web-example:0.0.1 --format="{{.ID}}"))This locates our container by the image name octopusdeploy/rolling-deploy-web-example:0.0.1 and passes that to the stop command, and finally passes that to the rm command.
To deploy more than one instance of our container, we need to create our Docker service. This uses Docker Swarm as its orchestrator under the hood.
Docker Kubernetes orchestrator
Docker also supports Kubernetes as an orchestrator when deploying containers using the Docker stack command, but it’s not possible to specify the orchestrator when using service create.
So let’s see what our command to create a service looks like:
markh@ubuntu01:~$ sudo docker service create --name rolling-deploy-svc --replicas 3 --publish published=5001,target=5001 --update-delay 10s --update-parallelism 1 octopusdeploy/rolling-deploy-web-example:0.0.1There’s quite a lot going on in that command, so let’s unpick what we are asking of Docker here:
- The
--nameis self explanatory. - The
--replicasflag controls the number of containers we want (3). - The
--publish published=5001,target=5001specifies the service to be accessed on port 5001, using Swarm’s routing mesh which acts essentially like a software load-balancer. - The
--update-delayconfigures the time delay (10s) between updates to a service task. - The
--update-parallelismcontrols the maximum number of tasks that Docker will schedule simultaneously (1). - Lastly, we specify the image to use:
octopusdeploy/rolling-deploy-web-example:0.0.1.
Hint:
When running service create for the first time, you may receive a warning, just as I did: This node is not a swarm manager. To fix this, run either of the following commands:
sudo docker swarm init: This will initialize your current node as a swarm manager.sudo docker swarm join: This will connect your local node to swarm.
Executing this results in our service being deployed to Docker Swarm with three instances:
wxi1w4m7crknaz1f800kr9ztt
overall progress: 3 out of 3 tasks
1/3: running   [==================================================>]
2/3: running   [==================================================>]
3/3: running   [==================================================>]
verify: Service converged
We can also check our service has the correct update configuration by running the service inspect command:
markh@ubuntu01:~$ sudo docker service inspect rolling-deploy-svc --pretty

ID:             bh03s0...
Name:           rolling-deploy-svc
Service Mode:   Replicated
 Replicas:      3
Placement:
UpdateConfig:
 Parallelism:   1
 Delay:         10s
 On failure:    pause
 Monitoring Period: 5s
 Max failure ratio: 0
 Update order:      stop-first
RollbackConfig:
 Parallelism:   1
 On failure:    pause
 Monitoring Period: 5s
 Max failure ratio: 0
 Rollback order:    stop-first
ContainerSpec:
 Image:         octopusdeploy/rolling-deploy-web-example:0.0.1@sha256:4da10d630025bf268b855b0b4afafa7334769ab6d0b3e75e11a3f11949708552
 Init:          false
Resources:
Endpoint Mode:  vip
Ports:
 PublishedPort = 5001
  Protocol = tcp
  TargetPort = 5001
  PublishMode = ingress
The result of this shows we have our desired UpdateConfig which will update one task at a time.
Docker service update
Now we can update the container image for octopusdeploy/rolling-deploy-web-example to v0.0.2 by running the service update command:
markh@ubuntu01:~$ sudo docker service update rolling-deploy-svc --image octopusdeploy/rolling-deploy-web-example:0.0.2Docker runs the update to each container, one task at a time just as we have configured it to:
overall progress: 0 out of 3 tasks
1/3: running   [=============================================>     ]
2/3:
3/3:
After the first task is complete, it moves onto task two:
overall progress: 1 out of 3 tasks
1/3: starting  [==================================================>]
2/3: ready     [=====================================>             ]
3/3:
Until all the tasks to update the containers to v0.0.2 are complete:
overall progress: 3 out of 3 tasks
1/3: running   [==================================================>]
2/3: running   [==================================================>]
3/3: running   [==================================================>]
verify: Service converged
Browsing to the website now shows the text which applies for v0.0.2:
Docker service rollback
Just as it’s straight-forward to roll-out, it’s also possible to manually rollback with a simple command in Docker.
Firstly, we will update to our final version v0.0.3 of the application by running:
markh@ubuntu01:~$ sudo docker service update rolling-deploy-svc --image octopusdeploy/rolling-deploy-web-example:0.0.3We verify the new v0.0.3 version by running the service inspect command, passing in a --format parameter for only the output we want to see:
markh@ubuntu01:~$ sudo docker service inspect --format='{.Spec.TaskTemplate.ContainerSpec.Image}}' rolling-deploy-svc

octopusdeploy/rolling-deploy-web-example:0.0.3@sha256:151a8f2aaed0192bf9f22eaeff487d546e6ff8fec4d0691e6697dede743b187c
Because Docker Swarm knows the versions we deployed, we can revert to the previous one (v0.0.2) using the rollback command:
markh@ubuntu01:~$ sudo docker service rollback rolling-deploy-svc

rolling-deploy-svc
rollback: manually requested rollback
overall progress: rolling back update: 3 out of 3 tasks
1/3: running   [>                                                  ]
2/3: running   [>                                                  ]
3/3: running   [>                                                  ]
verify: Service converged
Once successfully rolled back, it has confirmed the service is running.
Hint:
As I didn’t specify any parameters to the rollback command, Docker will by default, rollback one task at a time with no delays between each one. You can specify different values by passing the following to the command:
--rollback-parallelism--rollback-delay
The Docker documentation has a full list of parameters you can use.
We can verify the rollback was successful using the same command to inspect the service as before:
markh@ubuntu01:~$ sudo docker service inspect --format='{.Spec.TaskTemplate.ContainerSpec.Image}}' rolling-deploy-svc

octopusdeploy/rolling-deploy-web-example:0.0.2@sha256:4843a91ba84ace97cb11a6e3f68827a8c28a628d509159910c868f9ad02c3053
This results in the expected v0.0.2 version in the output.
Database rollbacks When a service in Docker uses a database for storage, it’s important to have a strategy in place to deal with a service rollback, particularly if the database is within a container. Docker won’t rollback database changes for you automatically, and that could leave your database and application in an incompatible state. The Docker storage documentation provides some guidance on the different options for storage in a container.
Docker service clean-up
Finally, to remove our Docker service we just run the rm command:
markh@ubuntu01:~$ sudo docker service rm rolling-deploy-svcDocker summary
As you can see, it doesn’t take much setup to get rolling deployments working in Docker. Coupled with its support for rollbacks makes it an attractive option to consider.
Kubernetes rolling updates
Rolling deployments in Kubernetes is called rolling updates.
A pod’s instances will be updated incrementally with new ones. It supports both a max number or percentage of pods to be unavailable during an update, as well as a max number of new pods that can be created. In addition to this, Kubernetes has a handy built-in feature to allow updates to be reverted to a previous version.
To find out more about Kubernetes, my colleague Shawn continued his container series focussing on Kubernetes.
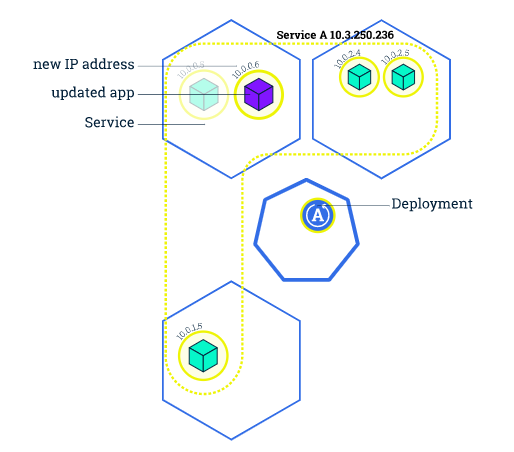
The Kubernetes tutorial on updates includes a nice diagram showing how it works:
Kubernetes cluster setup
Just as before, I’ll re-use our pre-built container image for this demonstration, this time using MicroK8s. I’ll also interact with it primarily in an SSH terminal session.
Canonical, the authors, describe MicroK8s as:
a single package of k8s for 42 flavours of Linux. Made for developers, and great for edge, IoT and appliances.
It’s useful for people like me who want to try out Kubernetes or do some development with it.
One of the benefits of MicroK8s is that it doesn’t require any type of Virtual Machine as with other Kubernetes choices (such as Minikube).
Before you install MicroK8s, it’s worth noting that there are some prerequisites:
- Ubuntu 18.04 LTS or 16.04 LTS (or other OS that supports
snapd). - At least 20G free disk space.
- 4GB of RAM.
- An internet connection.
To install MicroK8s, we run the snap install command:
markh@ubuntu01:~$ sudo snap install microk8s --classic

microk8s v1.17.0 from Canonical✓ installed
Full install output
If you want to see the full install output from snap, run the snap changes command:
markh@ubuntu01:~$ snap changes

ID   Status  Spawn               Ready               Summary
1    Done    today at 10:17 UTC  today at 10:17 UTC  Initialize system state
2    Done    today at 10:17 UTC  today at 10:17 UTC  Initialize device
3    Done    today at 14:38 UTC  today at 14:38 UTC  Install "microk8s" snap
From this, you can then run the command snap change 3, where 3 is the value from the ID column above for the installation of MicroK8s. This will give you a line breakdown of the install steps.
Kubernetes deployments
Now we have MicroK8s installed and running, let’s go ahead and create a Kubernetes deployment using our existing image rolling-deploy-web-example and set it to listen on port 5001.
Google describes Kubernetes deployments as items which:
represent a set of multiple, identical Pods with no unique identities. A Deployment runs multiple replicas of your application and automatically replaces any instances that fail or become unresponsive. In this way, Deployments help ensure that one or more instances of your application are available to serve user requests. Deployments are managed by the Kubernetes Deployment controller.
This sounds perfect for a rolling deployment.
Kubernetes containerized application setup
To set up our deployment for our application, we will use the kubectl binary which is packaged with MicroK8s. This is the command-line interface (CLI) for managing Kubernetes. It’s specially prefixed with microk8s. to avoid any naming conflicts with any other instances of Kubernetes you may have running. If we run the create deployment command:
markh@ubuntu01:~$ sudo microk8s.kubectl create deployment rollingdeploy-microk8s --image=octopusdeploy/rolling-deploy-web-example:0.0.1

deployment.apps/rollingdeploy-microk8s created
MicroK8s will create our deployment and confirm it has been successfully created.
Next, we’ll set the application pods to listen on port 5001. To do that, we run the expose command:
markh@ubuntu01:~$ sudo microk8s.kubectl expose deployment rollingdeploy-microk8s --type=NodePort --port=5001

service/rollingdeploy-microk8s exposed
Kubernetes dashboard
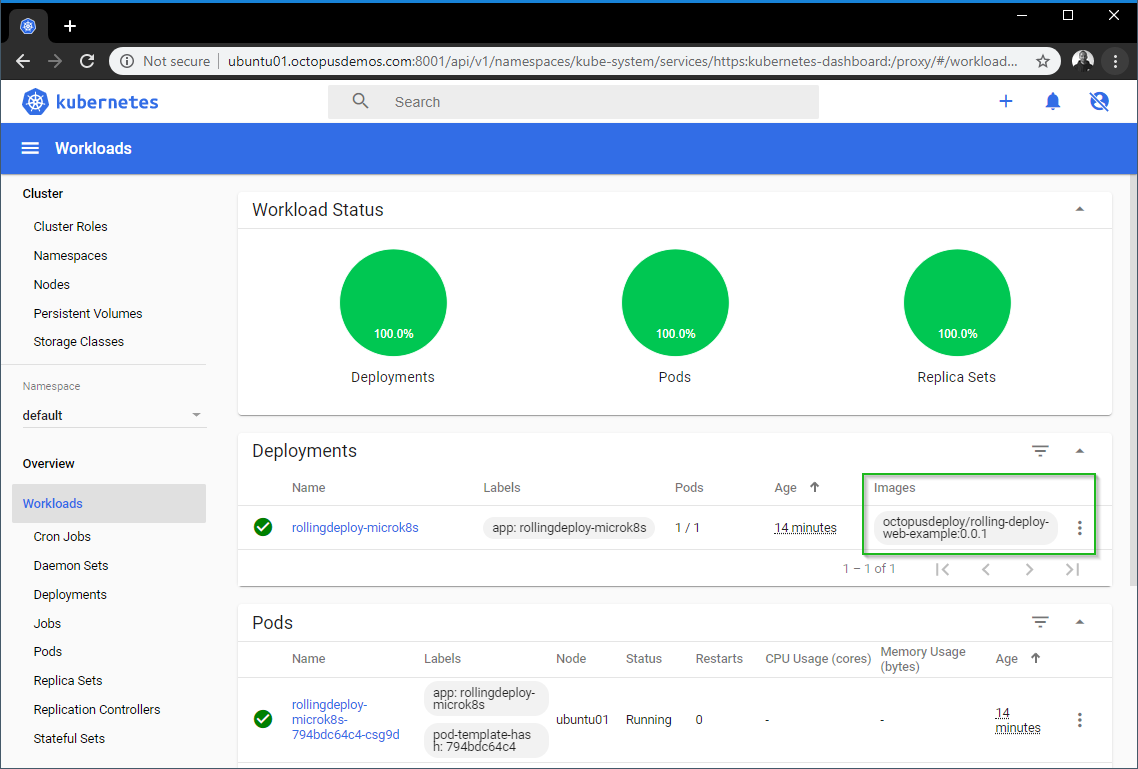
Although the rollingdeploy-microk8s pod has been created, it might not be available immediately. We can check its status by looking at our service using the Kubernetes dashboard, which is included as an add-on in MicroK8s.
Attempting to access the dashboard remotely requires you to jump through a few hoops. After the add-on was enabled, I found the simplest way was to create a proxy from my machine to the server by running the kubectl proxy command:
markh@ubuntu01:~$ sudo microk8s.kubectl proxy --accept-hosts=.* --address=0.0.0.0

Starting to serve on [::]:8001
From there you can access the dashboard on port 8001, but you’ll need either a Kubeconfig file or Token to login. See the MicroK8s Dashboard add-on for further details.
Note: You can skip the login by setting the --enable-skip-login argument for the dashboard container, but this isn’t advised as it goes against security best practices.
Once open, you can use the dashboard to deploy containerized applications, manage and interact with your cluster resources.
In order to perform a rolling update, first we need more than one replica of our application. We can scale our deployment directly from the dashboard by clicking on the three ellipsis on the right hand side of the Deployments section:
For our Kubernetes deployment, I updated the Desired Replicas to 3 so I can perform a rolling update and then hit Scale:
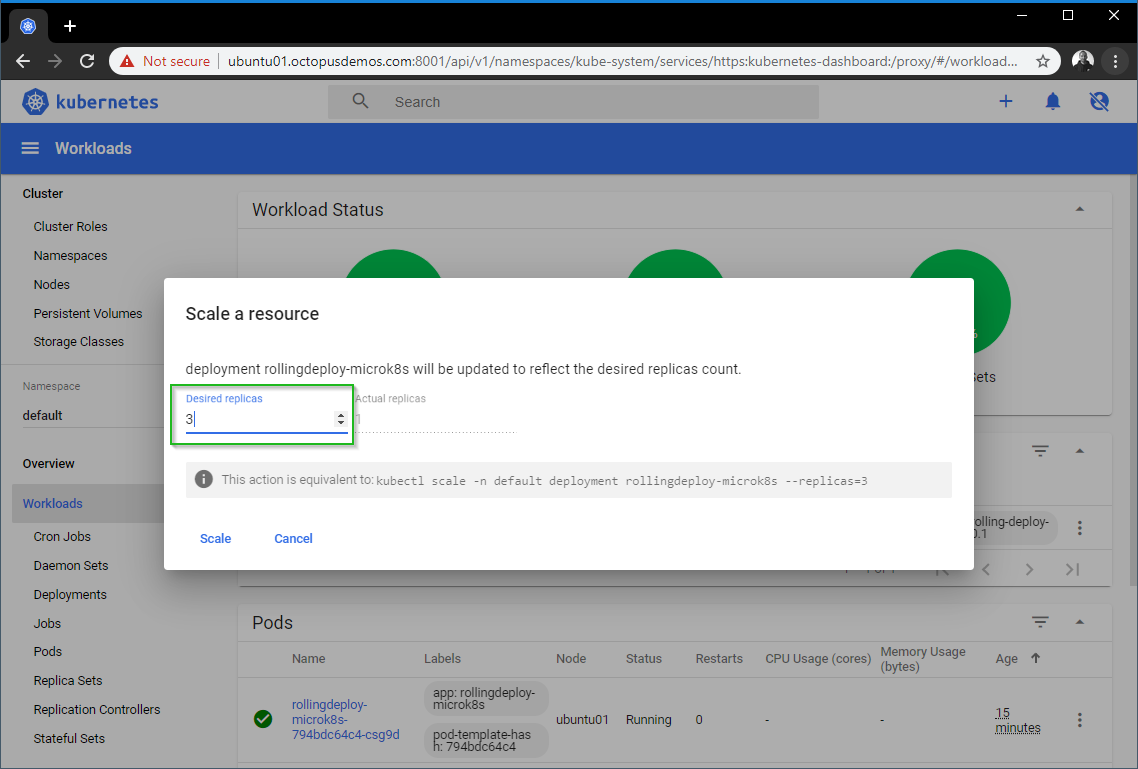
Equivalent kubectl commands You may have noticed the dashboard provides the equivalent command to run for our action. For scaling our resource, that is:
sudo microk8s.kubectl scale -n default deployment rollingdeploy-microk8s --replicas=3After the pods have been provisioned, we can confirm this by querying the pod’s status directly by running the get pod command (names may vary):
markh@ubuntu01:~$ sudo microk8s.kubectl get pod

NAME                                      READY   STATUS    RESTARTS   AGE
rollingdeploy-microk8s-794bdc64c4-fv7zt   1/1     Running   0          76s
rollingdeploy-microk8s-794bdc64c4-t6mh5   1/1     Running   0          76s
rollingdeploy-microk8s-794bdc64c4-trr6f   1/1     Running   0          76s
To verify our application is working, we need to find the port that has been exposed by Kubernetes to the deployment we created at the start by running get service:
markh@ubuntu01:~$ sudo microk8s.kubectl get service rollingdeploy-microk8s
NAME TYPE CLUSTER-IP EXTERNAL-IP PORT(S) AGE
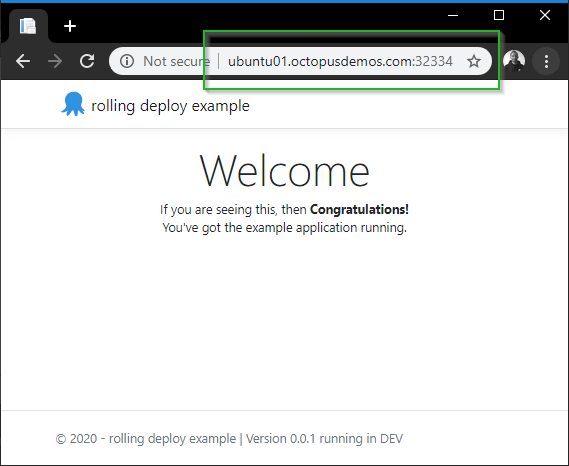
rollingdeploy-microk8s NodePort 10.152.183.39 <none> 5001:32334/TCP 1mIn my case, the port is 32334 so my URL to access my service is:
http://ubuntu01.octopusdemos.com:32334Note:
The port may be different when running this on your own machine. A random port, in the range 30000-32767 (by default) will be assigned by Kubernetes as we chose a NodePort type when we ran the expose command earlier.
Open the URL in a browser, and we can see that we have v0.0.1 for our application running in Microk8s:
Kubernetes rolling update
Let’s go ahead and instruct Kubernetes to update our three pods with v0.0.2 of our image octopusdeploy/rolling-deploy-web-example by running the set image command:
markh@ubuntu01:~$ sudo microk8s.kubectl set image deployment/rollingdeploy-microk8s rolling-deploy-web-example=octopusdeploy/rolling-deploy-web-example:0.0.2 --record

deployment.apps/rollingdeploy-microk8s image updated
Next, we can watch the live progress of our rollout until its complete by running the rollout status command:
markh@ubuntu01:~$ sudo microk8s.kubectl rollout status deployment.v1.apps/rollingdeploy-microk8s

Waiting for deployment "rollingdeploy-microk8s" rollout to finish: 1 out of 3 new replicas have been updated...
Waiting for deployment "rollingdeploy-microk8s" rollout to finish: 1 out of 3 new replicas have been updated...
Waiting for deployment "rollingdeploy-microk8s" rollout to finish: 1 out of 3 new replicas have been updated...
Waiting for deployment "rollingdeploy-microk8s" rollout to finish: 2 out of 3 new replicas have been updated...
Waiting for deployment "rollingdeploy-microk8s" rollout to finish: 2 out of 3 new replicas have been updated...
Waiting for deployment "rollingdeploy-microk8s" rollout to finish: 2 out of 3 new replicas have been updated...
Waiting for deployment "rollingdeploy-microk8s" rollout to finish: 1 old replicas are pending termination...
Waiting for deployment "rollingdeploy-microk8s" rollout to finish: 1 old replicas are pending termination...
deployment "rollingdeploy-microk8s" successfully rolled out
You can see it indicated it was updating one Pod at a time.
Kubernetes deployments ensure that only a certain number of pods are down while they are being updated. It does this by creating a new pod and destroying the old ones after it has completed.
Default pod update control
By default, Kubernetes ensures there are at least 75% of the desired number of pods available. In addition, another default is to create no more than 25% of the overall desired number of pods.
Open the URL in a browser, and we can see we have v0.0.2 of our application running in Microk8s:
The deployment’s rollout was triggered here, as set image caused an update to the underlying deployment pod’s template. A template is a specification document that describes the way a replication controller should create an actual pod.
We can see what the template looks like for our application by running edit:
markh@ubuntu01:~$ sudo microk8s.kubectl edit deployment.v1.apps/rollingdeploy-microk8sThis opens the template file in a text editor. For me, that’s in the terminal itself. You can edit this file interactively. Changing the deployment pod’s template (the section within .spec.template) will result in triggering the deployment’s rollout:
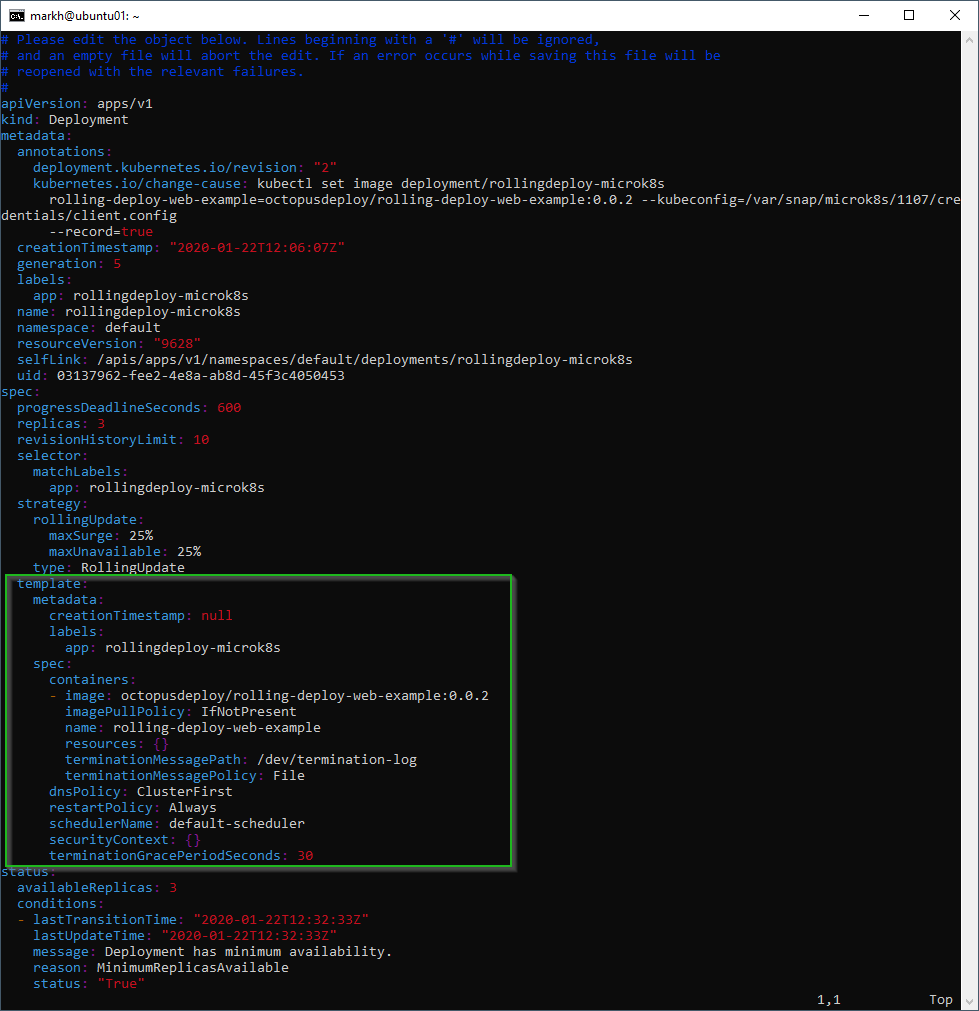
Hint: Other updates to a deployment, like the scaling we did earlier, don’t result in a rollout being triggered.
Kubernetes deployment rollback
A successful rolling deployment is obviously what we all hope for, but it’s inevitable that at some point, you’ll need to initiate a rollback, either part of the way through a rollout itself or some time after.
With Kubernetes, all of a deployment’s rollout history is kept in the system by default. That means, you can rollback anytime you want.
Note: It’s possible to change the amount of history that’s stored for a deployment’s rollout (by modifying the revision history limit), but it’s not generally recommended as this limits your ability to rollback a deployment.
To see the rollout history for our deployment we run the rollout history command:
markh@ubuntu01:~$ sudo microk8s.kubectl rollout history deployment.v1.apps/rollingdeploy-microk8s

deployment.apps/rollingdeploy-microk8s
REVISION  CHANGE-CAUSE
1         <none>
2         kubectl set image deployment/rollingdeploy-microk8s rolling-deploy-web-example=octopusdeploy/rolling-deploy-web-example:0.0.2 --kubeconfig=/var/snap/microk8s/1107/credentials/client.config --record=true
We can choose to revert back to the previously deployed v0.0.1 version by running rollout undo:
markh@ubuntu01:~$ sudo microk8s.kubectl rollout undo deployment.v1.apps/rollingdeploy-microk8s

deployment.apps/rollingdeploy-microk8s rolled back
Hint: You can also choose to revert to a specific revision of your application by running:
markh@ubuntu01:~$ sudo microk8s.kubectl rollout undo deployment.v1.apps/rollingdeploy-microk8s --to-revision=1Where the --to-revision parameter has the revision you wish to go back to.
The Kubernetes documentation has a full list of parameters you can use.
We can confirm we have rolled back, either by looking back in the dashboard, viewing the application in a browser, or by running the describe command:
markh@ubuntu01:~$ sudo microk8s.kubectl describe deployment

Name:                   rollingdeploy-microk8s
Namespace:              default
CreationTimestamp:      Wed, 22 Jan 2020 13:19:30 +0000
Labels:                 app=rollingdeploy-microk8s
Annotations:            deployment.kubernetes.io/revision: 3
Selector:               app=rollingdeploy-microk8s
Replicas:               3 desired | 3 updated | 3 total | 3 available | 0 unavailable
StrategyType:           RollingUpdate
MinReadySeconds:        0
RollingUpdateStrategy:  25% max unavailable, 25% max surge
Pod Template:
  Labels:  app=rollingdeploy-microk8s
  Containers:
   rolling-deploy-web-example:
    Image:        octopusdeploy/rolling-deploy-web-example:0.0.1
    Port:         <none>
    Host Port:    <none>
    Environment:  <none>
    Mounts:       <none>
  Volumes:        <none>
Conditions:
  Type           Status  Reason
  ----           ------  ------
  Available      True    MinimumReplicasAvailable
  Progressing    True    NewReplicaSetAvailable
OldReplicaSets:  <none>
NewReplicaSet:   rollingdeploy-microk8s-794bdc64c4 (3/3 replicas created)
Events:
This shows us the Image is set to octopusdeploy/rolling-deploy-web-example:0.0.1 as we expected.
Database rollbacks As with Docker, it’s important to understand what will happen with any databases you have when you initiate a Kubernetes rollback. Google has a great article discussing running databases on Kubernetes in more depth.
Kubernetes deployment clean-up
To remove all of the resources associated with our Kubernetes deployment, we use the delete command:
markh@ubuntu01:~$ sudo microk8s.kubectl delete services,deployment rollingdeploy-microk8s -n default

service "rollingdeploy-microk8s" deleted
deployment.apps "rollingdeploy-microk8s" deleted
Kubernetes summary
It felt like there was a little more to the setup for a rolling deployment with Kubernetes than with Docker, particularly to gain access to the dashboard, but after it was all configured, it worked excellently.
Rolling deployments with Octopus
Octopus has supported the concept of rolling deployments since Octopus 2.0.
With the use of child steps, we can set-up our deployment process for the rolling-deploy-web-example application in Octopus.
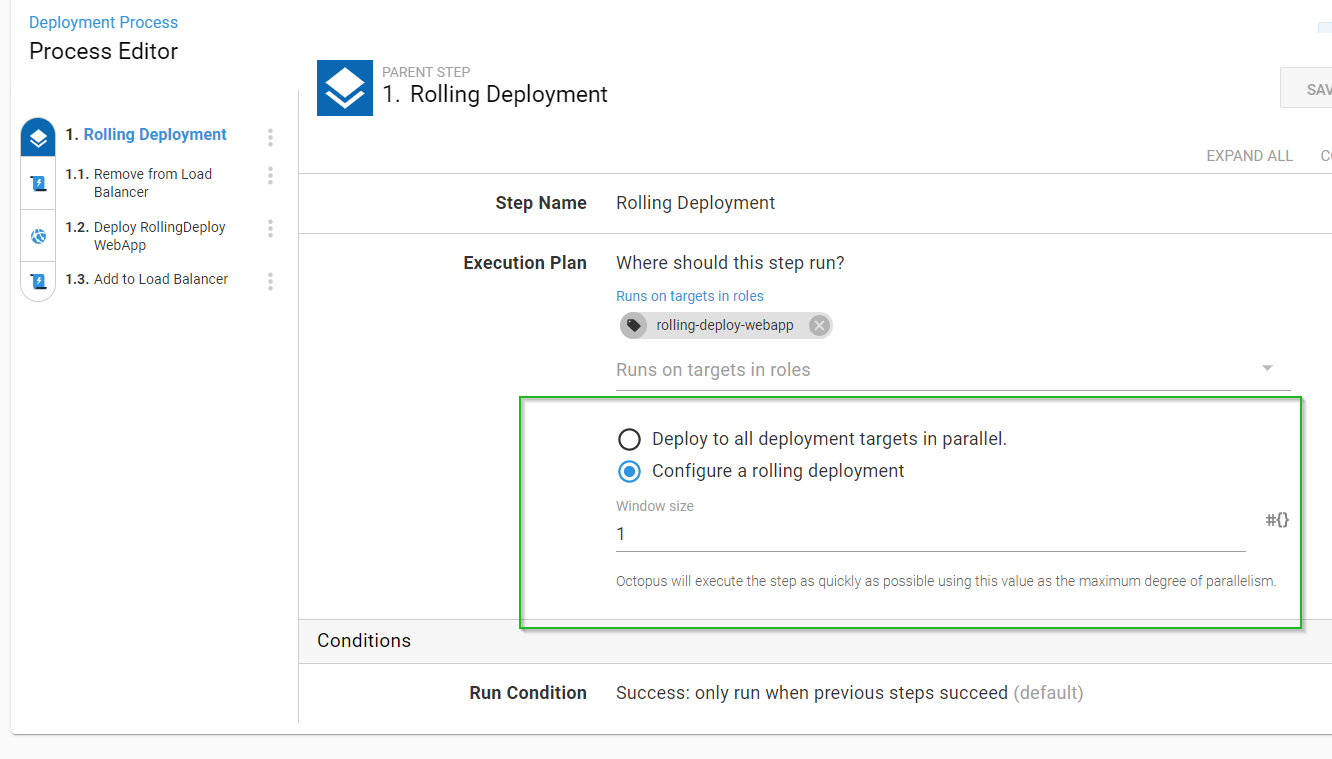
After creating a new project, we configure a rolling deployment with three steps:
- A script to remove the node from the load balancer.
- Deployment of the web application.
- A script to add the node back into the load balancer.
To achieve an incremental release in Octopus, we need to make our Window size lower than the total number of deployment targets. In my example, I set this to 1, as you can see below:
I have two deployment targets configured with the target role: rolling-deploy-webapp.
When I deploy the release to the Test environment, Octopus deploys to one deployment target at a time, as I configured in my deployment process earlier:
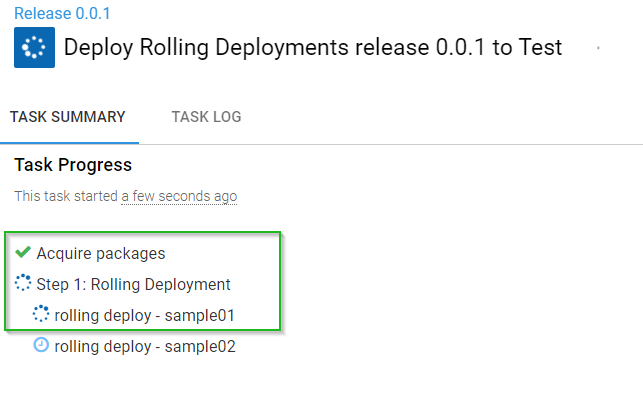
And that’s all there is to it! Check out our docs for a complete reference on rolling deployments in Octopus.
Sample Octopus project You can view this Octopus project setup in our samples instance.
A word on databases
Usually one of the main sticking points with rolling deployments is the database. Performing rolling deployments which involve some kind of persistent storage can be tricky, though not impossible. The devil is always in the detail.
If you want to perform rolling deployments which includes database changes, I recommend deploying the database first. You also want to ensure any changes you make to your database are backward compatible with previous versions of code you have deployed.
Lastly, it’s definitely a good idea to test your rollback strategy frequently.
Conclusion
No matter which tooling you use, rolling deployments is just one pattern available to optimize deployment of your software. But with an incremental approach, it allows you to keep your applications online while rolling out newer versions of your software in a controlled manner, often with native support for rollbacks, making it a firm favorite of mine for minimal disruption.
CI/CD pipeline guides If you need any additional help configuring your CI/CD pipeline, we have created the Octopus Guides which include step-by-step instructions to setup CI/CD pipelines for various technology stacks, including Docker and Kubernetes.
Feel free to leave a comment, and let us know what you think about rolling deployments!
Tags: