In this post, you learn how to build and push the Octopus Deploy underwater app to Amazon Elastic Container Registry (ECR) using Jenkins.
Prerequisites
To follow along, you need:
- An Amazon Web Services (AWS) account
- A Jenkins instance
- A GitHub account
For instructions on installing Jenkins in your chosen environment, you can refer to our guides:
- How to install Jenkins on Windows and Linux
- How to install Jenkins on Docker
- How to install a Jenkins instance with Helm
This post uses the Octopus underwater app repository. You can fork the repository and follow along.
Alternatively, the jenkins-ecr branch contains the template files to complete the steps in this post. You’ll need to replace some values with your own. I’ve included my values in this post as a reference.
Amazon Web Services setup
To set up AWS for Jenkins, you need to create an access key and an ECR repository to store the image.
To create an access key, go to Amazon Console, then IAM, then Users, [your user], Security credentials, and Create Access Key.
Your browser will download a file containing the Access Key ID and the Secret Access Key. These values will be used in Jenkins to authenticate to Amazon.
To create a repository, go to the Amazon Console, then ECR, then Create Repository.
You need to set up an image repository for each image that you publish. Give the repository the same name you want the image to have.
You will see your repository under Amazon ECR, then Repositories. Make a note of the zone it’s in, in the URI field.

Jenkins setup
First, you need to install some plugins to interact with Docker and Amazon.
Go to the Dashboard, then Manage Jenkins, then Manage Plugins.
You need the following plugins:
You can search for these plugins in the Available tab. After they’re installed, they appear in the Installed tab.
You use a Jenkinsfile to compile, build, test, and push the image to Amazon ECR. A Jenkinsfile is a configuration file that defines a Jenkins Pipeline. A Jenkins Pipeline is a series of steps that Jenkins performs on an artifact to achieve the desired result. In this case, it’s the clone, build, test, and push of an image to Amazon ECR.
The power of using a Jenkinsfile is to check it into source control to manage different versions of the file.
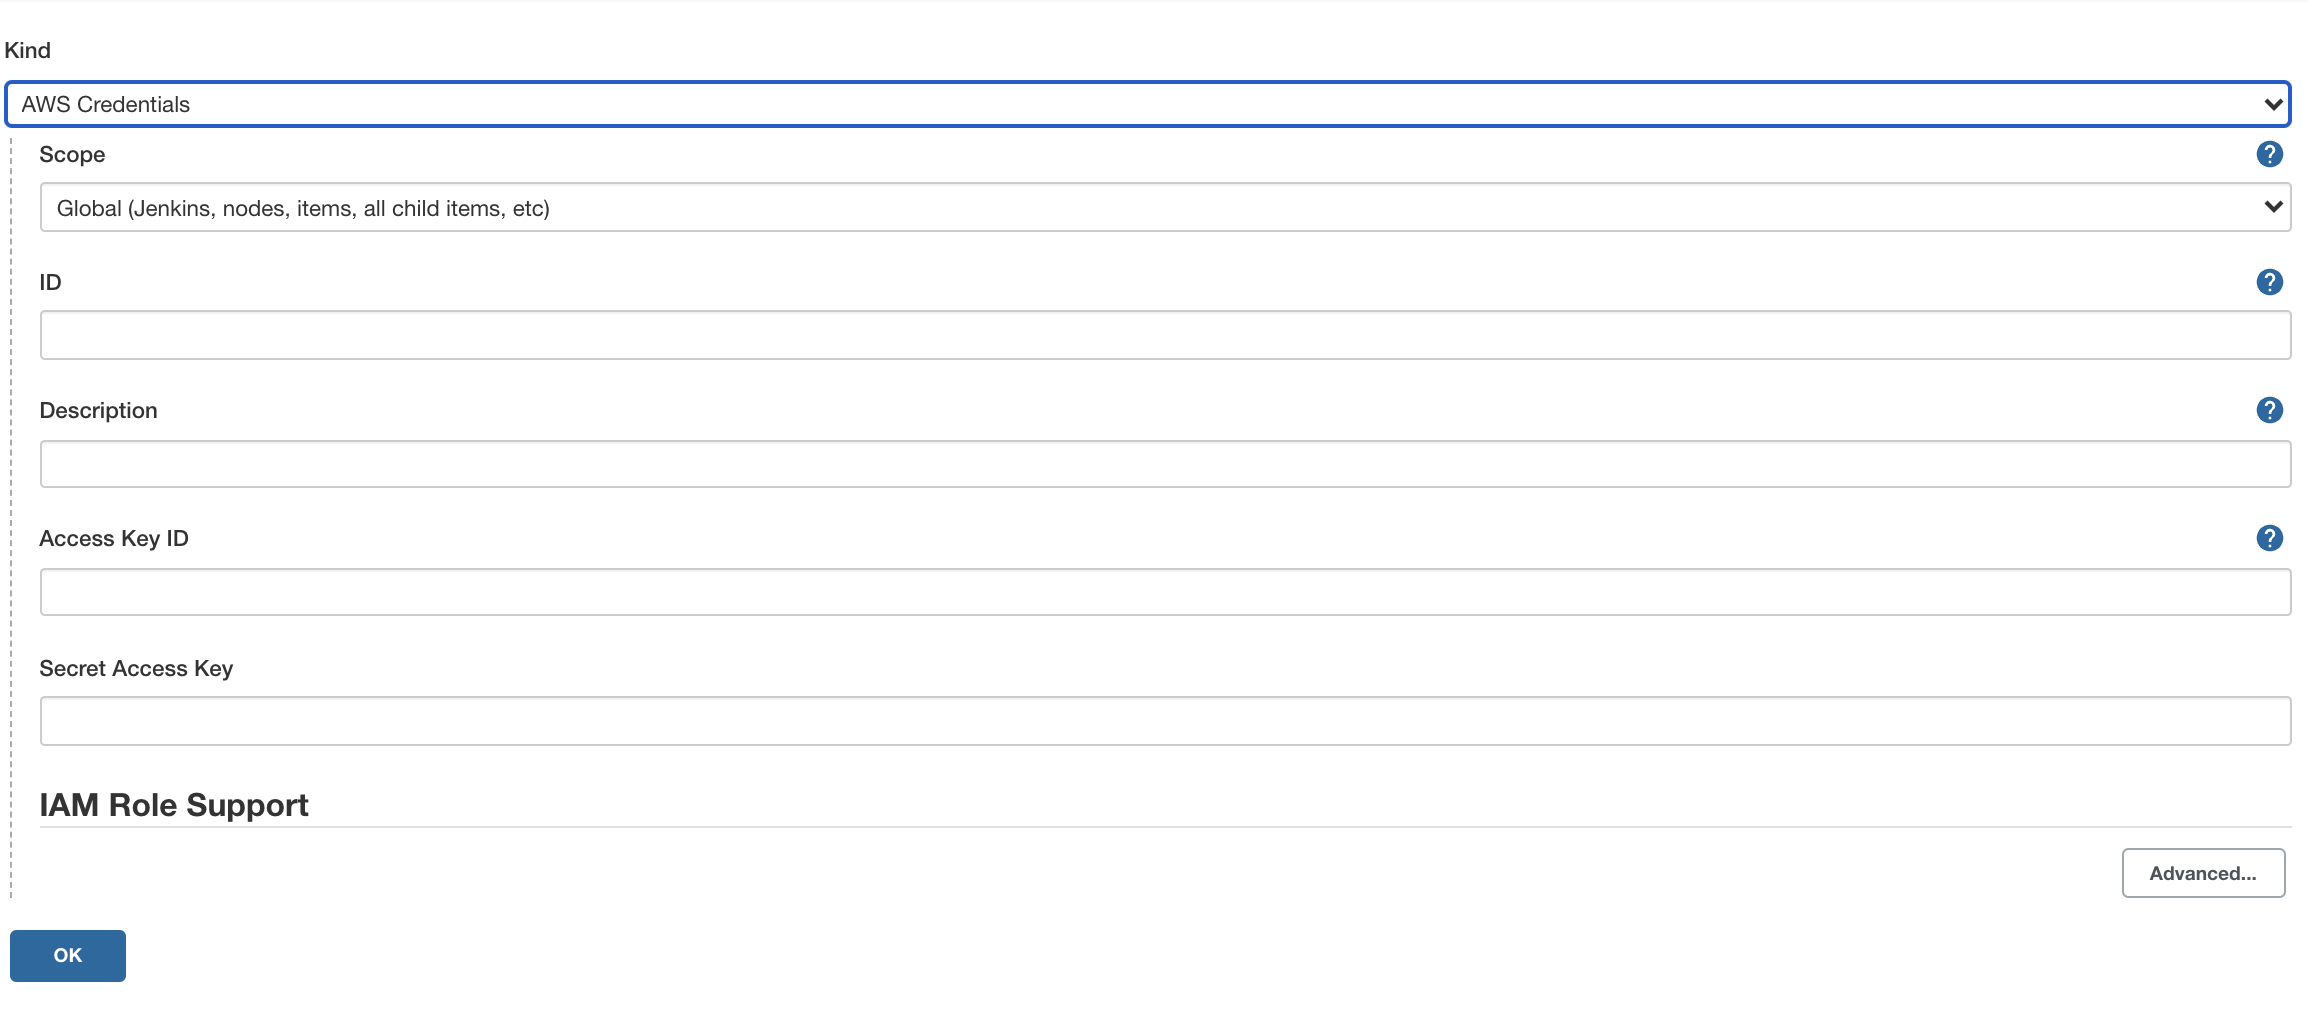
In your Jenkins instance, go to Manage Jenkins, then Manage Credentials, then Jenkins Store, then Global Credentials (unrestricted), and finally Add Credentials.

Fill in the following fields, leaving everything else as default:
- Kind - AWS credentials
- ID - aws-credentials, for example
- Access Key ID - Access Key ID from earlier
- Secret Access Key - Secret Access Key from earlier
Click OK to save.

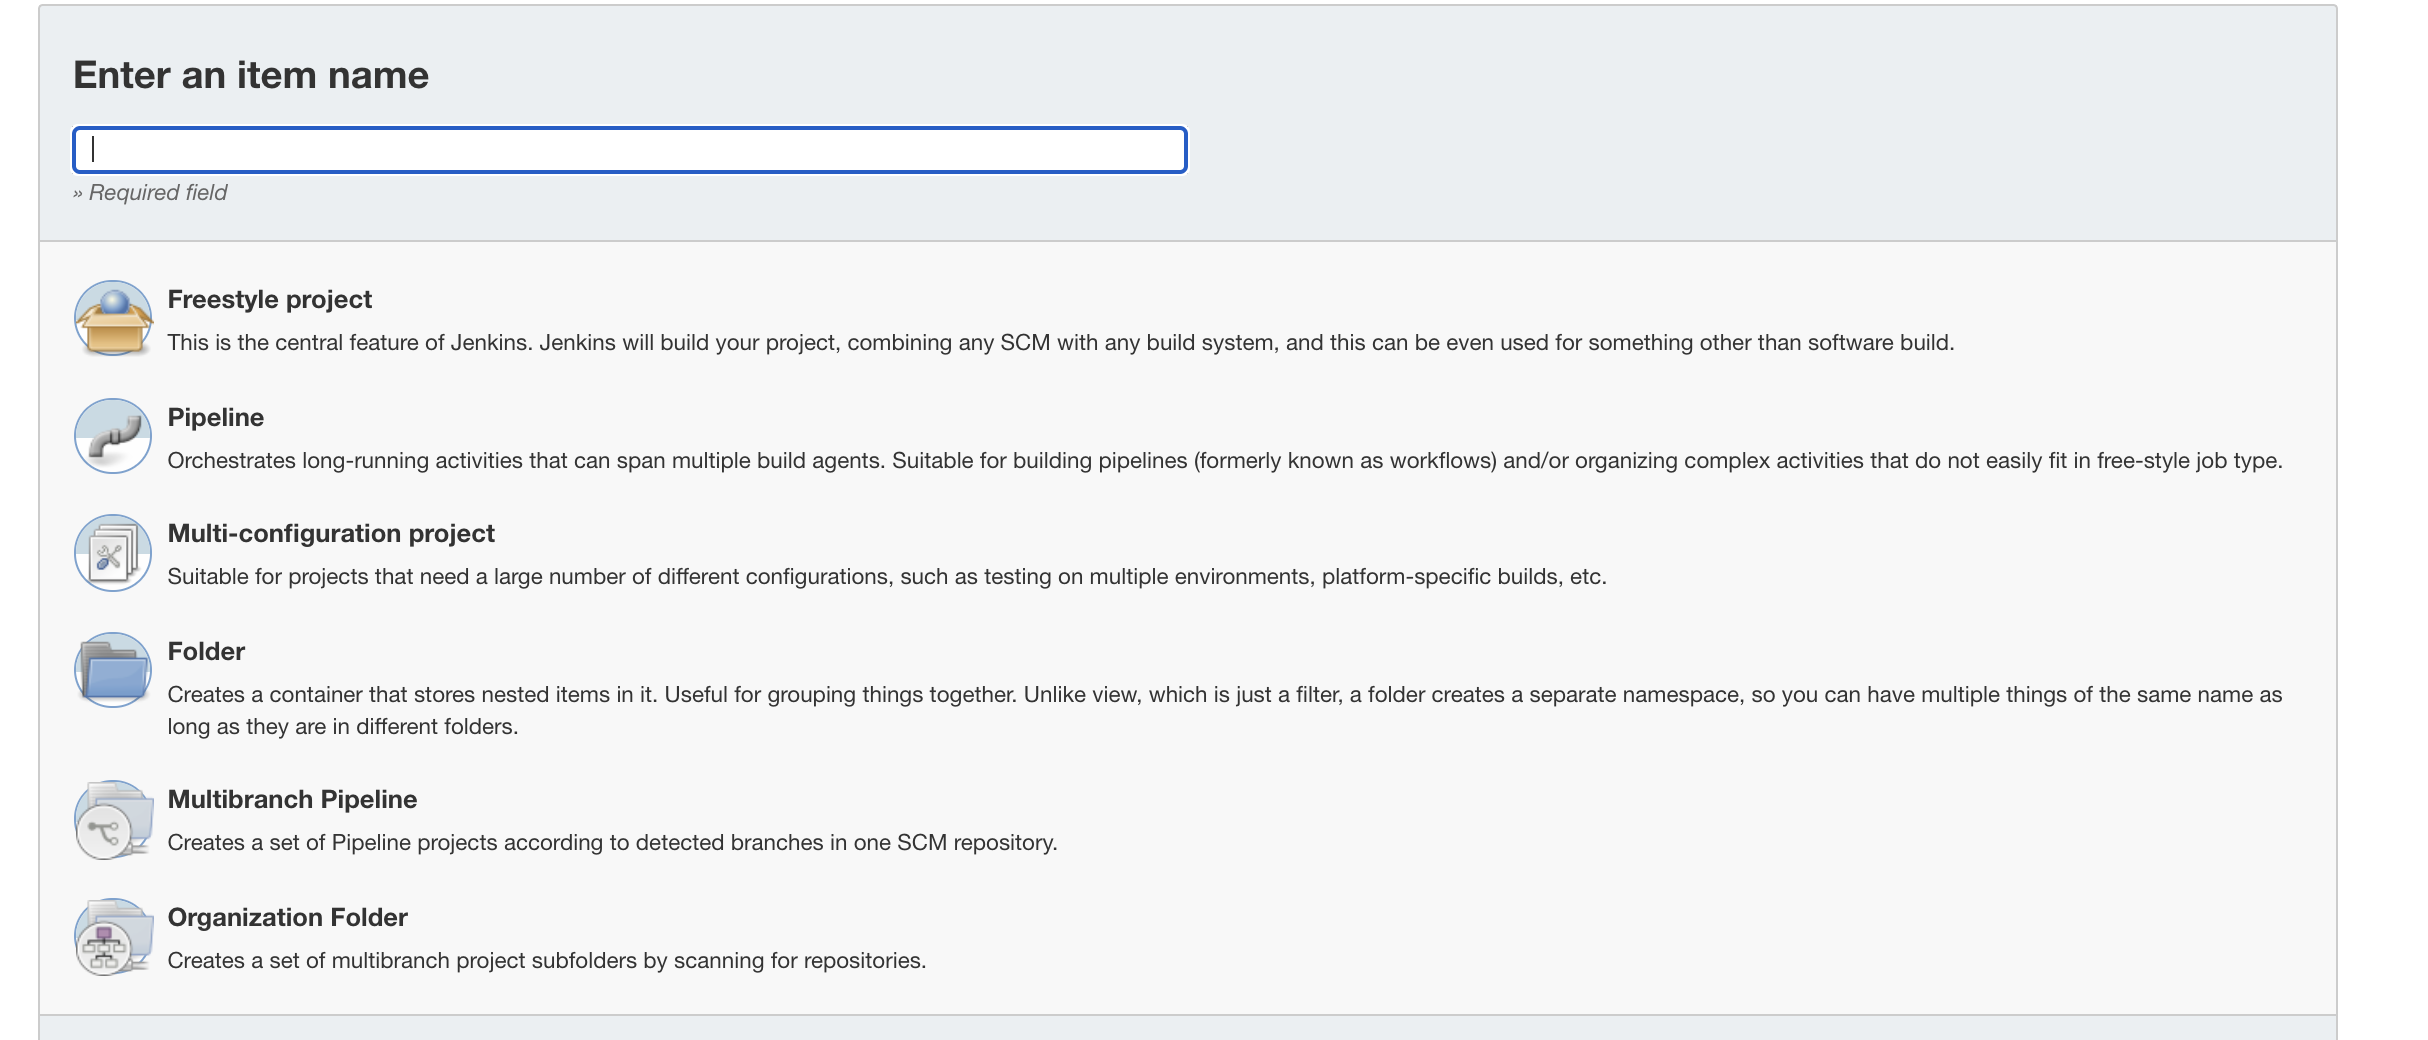
Go to the Jenkins Dashboard, then New Item.
Give your pipeline a name and select the Pipeline item, then OK.

Fill out the following fields for the pipeline, leaving everything else as default:
- GitHub hook trigger for GITScm polling - check the box
- Definition - pipeline script from SCM
- SCM - Git
- Repository URL - the URL of your forked repo and the jenkins-ecr branch
- Credentials - zone of the repository
- Branch Specifier -
*/jenkins-ecr
Click SAVE.
GitHub setup
For this example, you use a sample web application that displays an animated underwater scene with helpful links.
You need to set up a webhook so that Jenkins knows when the repository is updated. To do this, go to Settings, then Webhooks.

Fill out the following fields, leaving everything else as default.
- Payload URL -
http://[jenkins-url]/github-webhook/ - Content type -
application/json - Which events would you like to trigger this webhook?- select Just the push event
Click Add webhook to save.
Add a Jenkins file to the root level of the repository. You need to reference your Amazon ECR repository. Note the following changes required below:
pipeline {
    agent any
    options {
        skipStagesAfterUnstable()
    }
    stages {
         stage('Clone repository') {
            steps {
                script{
                checkout scm
                }
            }
        }

        stage('Build') {
            steps {
                script{
                 app = docker.build("underwater")
                }
            }
        }
        stage('Test'){
            steps {
                 echo 'Empty'
            }
        }
        stage('Deploy') {
            steps {
                script{
                        docker.withRegistry('https://720766170633.dkr.ecr.us-east-2.amazonaws.com', 'ecr:us-east-2:aws-credentials') {
                    app.push("${env.BUILD_NUMBER}")
                    app.push("latest")
                    }
                }
            }
        }
    }
}
The Jenkinsfile consists of different stages. Jenkins will run each of these stages in order, and if the build fails, you’ll see which stage failed.
Commit your code to GitHub. The commit will trigger a build job in Jenkins. Go to your Jenkins instance URL to see the build.
I had to trigger a Jenkins job by clicking the Build now button. After this, the webhook triggers worked on every push.

After the build finishes, go to the Amazon ECR to see a new image built and pushed to the repository. It tags the latest push with the Jenkins build number and latest.

Conclusion
In this post, you set up a Jenkins Pipeline to build a GitHub repository and push it to Amazon ECR. The Jenkinsfile can push to other container registries such as those offered by Google and Microsoft. It can also include additional stages depending on the build requirements.
After the image is pushed, you can use a tool like Octopus Deploy to deploy the image to a target environment. If you’re not already using Octopus Deploy, you can sign up for a free trial.
Check out our other posts about deploying with Jenkins, Kubernetes, and Octopus Deploy:
- Deploying to Amazon EKS with Docker and Jenkins
- Multi-environment deployments with Jenkins and Octopus
Try our free Jenkins Pipeline Generator tool to create a Pipeline file in Groovy syntax. It’s everything you need to get your Pipeline project started.
Watch our Jenkins Pipeline webinar
Getting started with Jenkins Pipeline and Octopus Deploy
We host webinars regularly. See the webinars page for details about upcoming events, and live stream recordings.
Read the rest of our Continuous Integration series.
Happy deployments!


