
When you’re working with any code, whether it’s automation or software code, it should be treated the same way. After-all, functions are still functions and variables are still variables. One of the many things that doesn’t come up as often when you’re automating vs when you’re building application code is testing.
Unit testing and mock testing are extremely important in scripting and automation.
Think about this scenario: I tested the PowerShell function locally and it works! It did the exact thing I need it to do, and now I’m going to store it in GitHub so it can be used later.
It’s good that it was tested locally, but the test you ran is now in the past, and a few things can happen:
- New versions of the code can be created.
- Bugs can be introduced by changing the code.
- New features can be added.
- The code is used on a different system or operating system.
- The PowerShell module that you are using gets updated or changed.
- The API call the PowerShell module is making gets changed.
With the above points, the test you ran locally is no longer valid.
In this blog post, you’re going to learn how to use the most popular testing framework for PowerShell called Pester.
Prerequisites
To follow along in this blog post, you need the following:
- An understanding of unit testing and what it’s used for.
- A beginner to intermediate level knowledge of PowerShell.
- PowerShell Core installed on any operating system.
- Visual Studio Code (VS Code) installed.
Install Pester
If this is the first time you’ve run the Pester framework, depending on your operating system, you will most likely have to install it. The installation process is done with the Install-Module cmdlet, which is native in PowerShell across all operating systems.
To install Pester, run the following cmdlet:
Install-Module -Name PesterAfter you run the cmdlet, you should see output similar to the screenshot below. Accept all the modules and Pester will be installed. To confirm the installation, run the following cmdlet:
Get-InstalledModule -Name PesterTake a look at the PowerShell code to test
Before running any sort of Pester test, you need code for the Pester test to use. To take a first-look at Pester, the test doesn’t have to be complicated. It can be a simple PowerShell function that consists of a couple of lines of code. In this section, you’re going to take a look at the code you’ll use to test.
Open VS Code and create a new file for the PowerShell function to exist in.
The PowerShell function below is doing the following:
- Creates a new function called
Create-Dir - Sets up a
cmdletbinding()[]to turn the function into an advanced function. The advanced function gives you the ability to use Verbose, ErrorAction, etc. - The param block sets up two parameters, the path where you want to create the new directory and the new directory name.
- The cmdlet used to create the path is
New-Item.
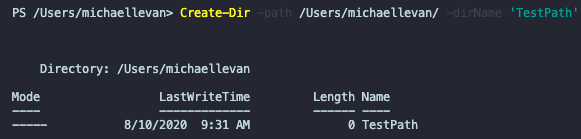
If you run the code below and specify a directory name and path, you will see that a new directory has been created:
function Create-Dir {
    [cmdletbinding()]
    param(
        [string]$path,
        [string]$dirName
    )

    New-Item -Name $dirName -Path $path
}
The screenshot below shows an example of creating a directory called TestPath in the /Users/michaellevan/ directory:
Write the first test
Now that you have the code in place, you can figure out what you want the test to look like. Pester tests vary based on not only length but functionality. In this section, you’ll take a look at a basic Pester test to get you started.
There is a software development practice called Test Driven Development (TTD) where you define the tests first and then write code based on those tests. This blog post isn’t following that methodology, but it’s certainly an interesting topic.
- Within VS Code, open a new file and name it
Tests.ps1. TheTestskeyword lets PowerShell know you’re running a test and VS Code will give some extra capabilities, like being able to run the test from the IDE. - In the
Tests.ps1file, paste in the following code, which is the test itself:
Describe "Directory Creation" {
    Context 'Path' {
        It 'should contain: path_that_you_used_for_the_function'
        $path = 'path_that_you_used_for_the_function'
        $path | Should -Exist
    }

    Context "New Directory" {
        It 'Should create a new directory called TestDir'
        $dir = 'TestDir'
        $dir | Should -Be 'TestDir'
    }
}
Before you run the test, let’s go over it.
- You start out with the
Describeblock. The Describe block defines a group of PowerShell tests. All Pester files have to contain at least one Describe block. - The second block you’ll see is
Context. The Context block defines subgroup tests inside of the Describe block. Context is handy because it allows you to write multiple blocks of tests. - Within the Context block, you’ll see a keyword called
It.Itis used to define a single test case.Itis really great because you can make the code sound like a natural language sentence. For example, anIttest could say It ‘should contain: /Users/michaellevan’. - Where you define the test, you will see
Should. TheShouldcommand is used to define assertions, AKA, what you want the test to do with the information you give it.
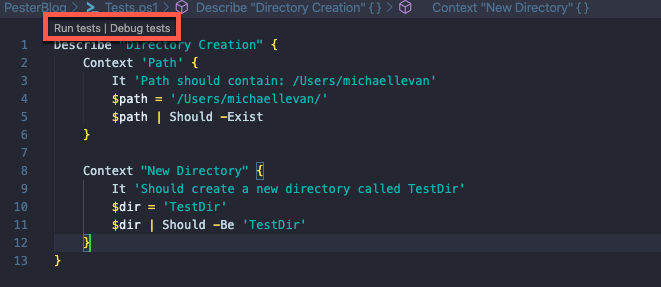
Once the test is in the Tests.ps1 file, you will see some options to run the test, as shown in the screenshot below.
Run a Unit Test
In the previous section, you defined exactly what the test should look like. The test should have two individual tests; one to test the path and the other to test if the new directory is called TestDir.
In this section, you’ll learn how to run the test and what the output should look like.
Within the Tests.ps1 file, click the Run tests button to run the test. After you run the test, you should see an output similar to the screenshot below.
As you can see, the test found the directory and confirmed that the new directory being created is TestDir.

Congrats! You have officially created and run a test using Pester, the PowerShell testing framework.
Conclusion
When you’re writing any type of code, you know what it looks like and how it functions, but in a day, a week, a month, or a year the code could change, and if that happens there’s the possibility of a functionality difference or even bugs being introduced. When you fit testing into any code, you run fewer risk of these things happening.
In this blog post, you learned first-hand what Pester is, why you should use it, and how to use it. If you want to dive more into Pester, I recommend this book by Adam Bertram: The Pester Book.
If you would like to find the code used in this blog post, check out the GitHub repo.
Tags: