
GitHub Actions allows developers to automate software workflows in a GitHub repository. The GitHub community maintains templates that integrate third-party tools and repositories, like Jenkins or Amazon Elastic Container Registry (ECR).
Although GitHub Actions provides a contained solution, combining it with a dedicated Continuous Delivery tool like Octopus Deploy provides you with benefits such as environments, a dashboard to visualize environments, and a standardized step template library for a consistent user experience. It’s why we recommend you build with GitHub and deploy with Octopus.
In this post, I show you how to build a Docker image in a GitHub Actions workflow, publish the image to Amazon Elastic Container Registry (ECR), and use Octopus to deploy the image to a web application on Amazon Elastic Kubernetes Service (EKS).
Getting started
To follow along, you need:
- An Amazon Web Services (AWS) account
- A GitHub account
This post uses the Octopus underwater app repository. You can fork the repository and follow along. Alternatively, the github-octopus branch contains the template files you need to complete the steps in this post. You have to replace some values with your own, but I include my values in this post as a reference.
Amazon Web Services setup
To set up AWS for GitHub Actions, you need to create an access key and an ECR repository to store the image.
To create an access key, go to Amazon Console, then IAM, then Users, [your user], then Security credentials, and then Create Access Key.
Your browser downloads a file containing the Access Key ID and the Secret Access Key. These values are used in Jenkins to authenticate to Amazon.
To create a repository, go to the Amazon Console, then ECR, then Create Repository.
You need to set up an image repository for each image that you publish. Give the repository the same name you want the image to have.
You will see your repository under Amazon ECR, then Repositories. Make a note of the zone it’s in, in the URI field.

AWS cluster setup
Set up the cluster in AWS by following the steps in our post, Creating an EKS cluster in AWS.
GitHub setup
For this example, you use a sample web application that displays an animated underwater Octopus named simple-octo.
Fork the repository at https://github.com/OctopusSamples/octopus-underwater-app.
Go to Settings, then Secrets, and then New repository secret.
- REPO_NAME - the name of the AWS ECR repository you created
- AWS_ACCESS_KEY_ID - the Access Key ID from earlier
- AWS_SECRET_ACCESS_KEY - the Secret Access Key from earlier
- OCTOPUS_SERVER - your Octopus Server URL
- OCTOPUS_APIKEY - your Octopus instance API key
- To create one, go to Your User Name, then Profile, then My API Keys, then New API key
You need to create a workflow file in the repository. A GitHub Actions workflow contains instructions on performing operations on the code repository. Several pre-built step templates allow you to do many different tasks on a code repository. In this example, you use a step template to build and push the code to an AWS ECR repository and deploy it from Octopus.
Create a file named main.yml in the .github/workflow directory of the root folder. Paste the following code in the main.yml file:
on:
  push:
    branches: [ main ]
  pull_request:
    branches: [ main ]

name: AWS ECR push

jobs:
  deploy:
    name: Deploy
    runs-on: ubuntu-latest

    steps:
    - name: Install Octopus CLI
      uses: OctopusDeploy/install-octopus-cli-action@v1.1.1
      with:
          version: latest
    - name: Checkout
      uses: actions/checkout@v2

    - name: Configure AWS credentials
      uses: aws-actions/configure-aws-credentials@v1
      with:
        aws-access-key-id: ${{ secrets.AWS_ACCESS_KEY_ID }}
        aws-secret-access-key: ${{ secrets.AWS_SECRET_ACCESS_KEY }}
        aws-region: us-east-2

    - name: Login to Amazon ECR
      id: login-ecr
      uses: aws-actions/amazon-ecr-login@v1

    - name: Build, tag, and push the image to Amazon ECR
      id: build-image
      env:
        ECR_REGISTRY: ${{ steps.login-ecr.outputs.registry }}
        ECR_REPOSITORY: ${{ secrets.REPO_NAME }}
        IMAGE_TAG: "latest"

      run: |
        # Build a docker container and push it to ECR
        docker build -t $ECR_REGISTRY/$ECR_REPOSITORY:$IMAGE_TAG .
        echo "Pushing image to ECR..."
        docker push $ECR_REGISTRY/$ECR_REPOSITORY:$IMAGE_TAG
        echo "::set-output name=image::$ECR_REGISTRY/$ECR_REPOSITORY:$IMAGE_TAG"

    - name: create Octopus release
      run: octo create-release --project underwater-octo-github --version 0.0.i --server=${{ secrets.OCTOPUS_SERVER }} --apiKey=${{ secrets.OCTOPUS_APIKEY }}

    - name: deploy Octopus release
      run: octo deploy-release --project underwater-octo-github --version=latest --deployto Development --server=${{ secrets.OCTOPUS_SERVER }} --apiKey=${{ secrets.OCTOPUS_APIKEY }}
GitHub Actions creates an action on a push or pull request on the main branch. The steps check out the code, authenticate and log into AWS, then build, tag, and push the image to Amazon ECR. GitHub Actions can use a similar step template to push to other cloud repositories, like Google or Microsoft.
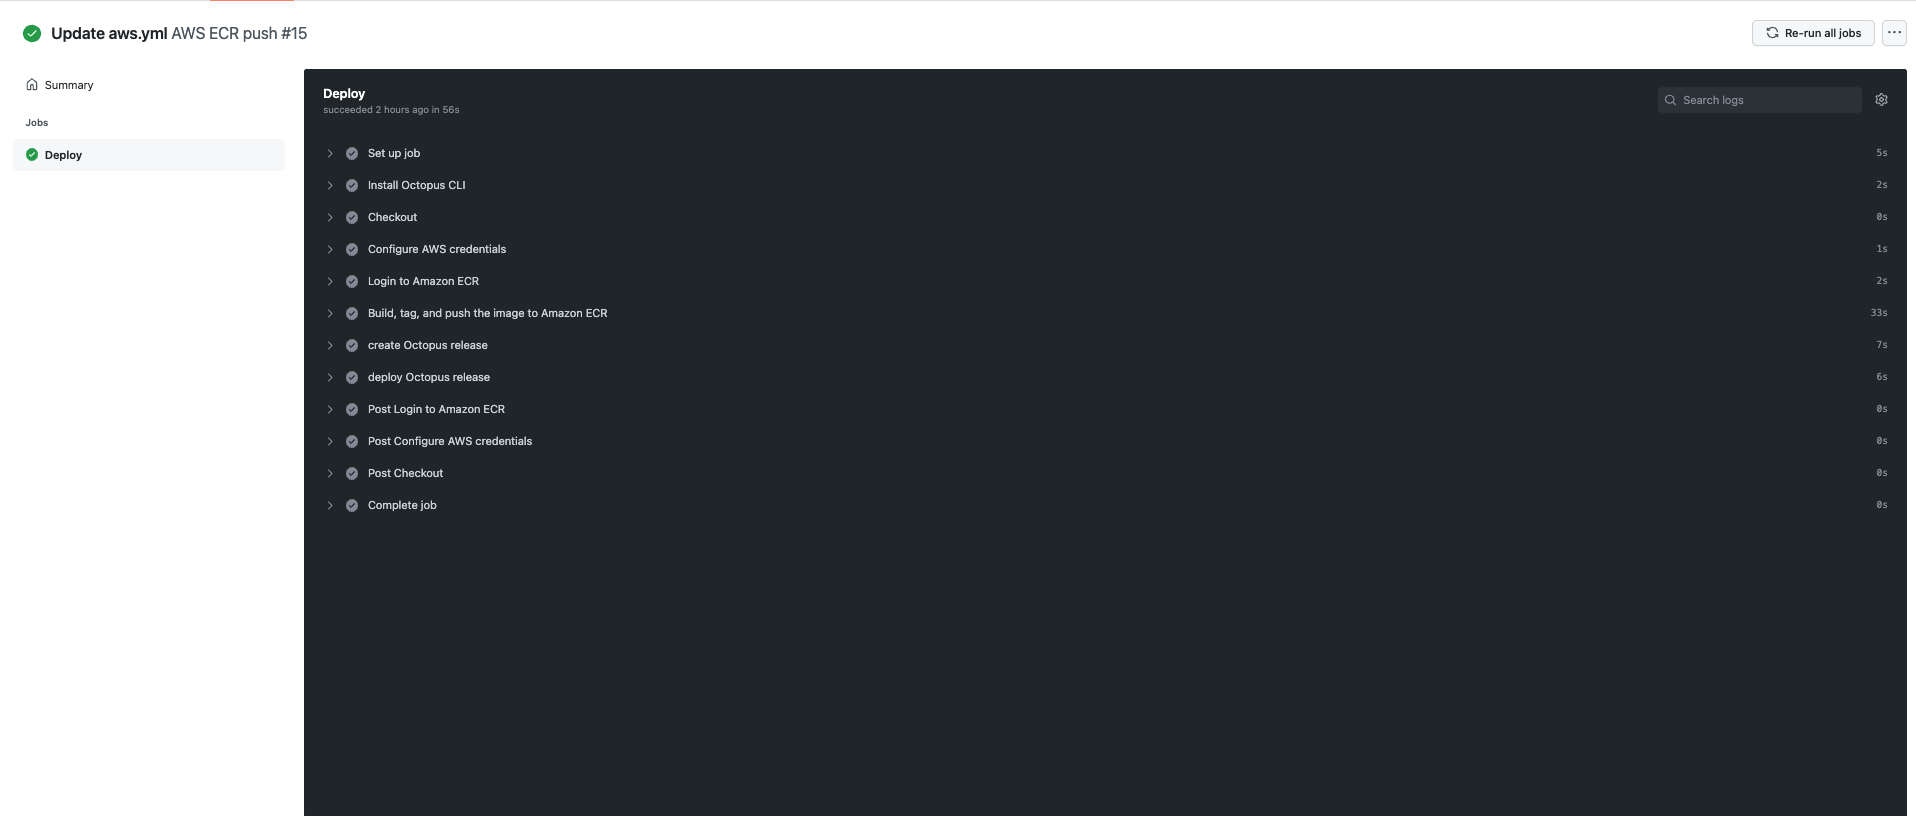
Commit your changes and go to the Actions tab, then click the title of your commit message. You see the various stages of the workflow as it reaches completion.
Go to your Amazon ECR repository to view the image.

Octopus Deploy setup
In your Octopus Deploy instance, create a project by going to Project, then Add Project. Add aws-github as the title and click Save.
Set up a development environment by going to Infrastructure, then Environments, then Add Environment. Give it a name and click Save.
Repeat these steps for test and production environments.
You then need to set up the Amazon account to deploy to EKS.
Go to Infrastructure, then Accounts, then Add Account, then AWS Account. Give it a name and fill out the Access Key ID and Secret Access Key from earlier.
Set up your AWS Kubernetes cluster as a deployment target in Octopus Deploy by going to Infrastructure, then Deployment Targets, then Add Deployment Target, then Kubernetes Cluster, then Add.
You can follow the steps in our docs, which indicate the fields to add to set up the deployment target. In this section you give the deployment target a target role. This will be referenced in the Octopus Deploy step later.
Deploying to EKS step
In your aws-github project, go to Process, then Add deployment step, then Kubernetes, then Deploy Kubernetes Containers. Add the target role that you assigned to your deployment target earlier.
Add the following YAML into the YAML section:
apiVersion: apps/v1
kind: Deployment
metadata:
  name: octopus-underwater-app-github
  labels:
    app: octopus-underwater-app
spec:
  selector:
    matchLabels:
        app: octopus-underwater-app
  replicas: 3
  strategy:
    type: RollingUpdate
  template:
    metadata:
      labels:
        app: octopus-underwater-app
    spec:
      containers:
        - name: octopus-underwater-app
          image: 720766170633.dkr.ecr.us-east-2.amazonaws.com/octopus-underwater-app:latest
          ports:
            - containerPort: 80
              protocol: TCP
          imagePullPolicy: Always
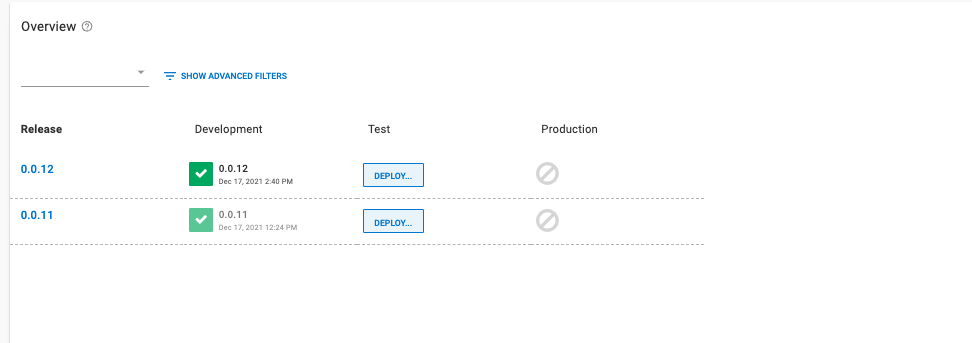
Navigate back to the Octopus instance Project overview to see the release deployed to the Development environment.
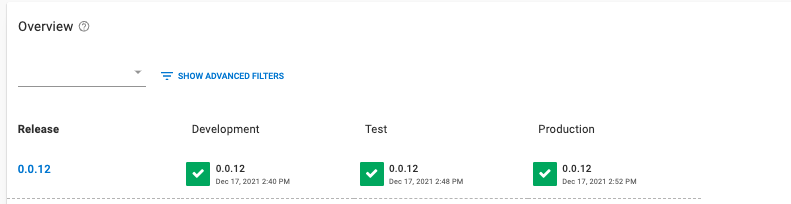
Now you can progress the release to the Test and Production environments when you’re ready. Click Deploy to progress the release.
You need to port forward locally to inspect the service. Use this command to inspect the web application. The port 28015 is chosen based on the example in the Kubernetes documentation:
kubectl port-forward deployment/octopus-underwater-app-github 28015:80Go to the IP address http://127.0.0.1:28021/ in your browser to view your web application.
Conclusion
In this post, you used GitHub Actions and Octopus Deploy to deploy a web application to Amazon EKS. When you use Octopus Deploy in your CI/CD toolchain, you benefit from a dedicated continuous delivery tool.
Octopus Deploy integrates with many cloud repositories and has in-built support for release management. GitHub Actions has community-developed step templates. The experience with these may vary from template to template. Through its UI, Octopus Deploy provides a standardized experience for step templates. Octopus also integrates with different repositories and cloud providers.
Check out the rest of our CI series and our other posts about deploying with GitHub Actions, Kubernetes, and Octopus Deploy:
- Building and publishing a Docker image to ECR using GitHub Actions
- Deploying to Amazon EKS with GitHub Actions
Try our free GitHub Actions workflow tool to help you quickly generate customizable workflows for your GitHub Actions deployments.
You can also learn more about building with GitHub and deploying with Octopus, and use our verified actions in the GitHub Marketplace.
Happy deployments!


