A deployment pattern is important to any development pipeline, helping to reduce downtime and other problems for your teams and customers. There are many approaches to deployment patterns, though, and one might suit your needs more than others.
This post looks at some of the most common deployment patterns and explains how to set them up in Octopus.
Rolling deployments
A rolling pattern delivers releases to one deployment target (or batch of targets) at a time. This reduces downtime and traffic congestion on your environment during deployment.
As one of the simpler options, rolling deployments can be slow but are reliable, low risk, and easy to roll back.
Setting up a rolling deployment pattern in Octopus
By default, a deployment process in Octopus only starts a new step when the previous one ends. However, if a step deploys to a target role with more than one target (a server farm, for example), you hit up to 10 targets at the same time.
Instead, you can force a rolling pattern when defining your deployment process:
-
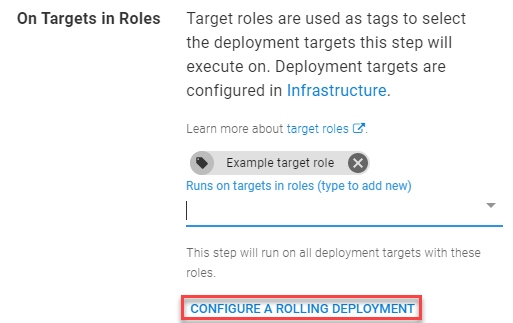
Under the On Targets in Roles section in the Process Editor, click CONFIGURE A ROLLING DEPLOYMENT.
-
In the Rolling Deployment section, set how many machines you want to deploy to at a time with the Window size field. For example:
- A window size of ‘1’ will deploy to 1 machine at a time
- A window size of ‘3’ will deploy to 3 machines at the same time
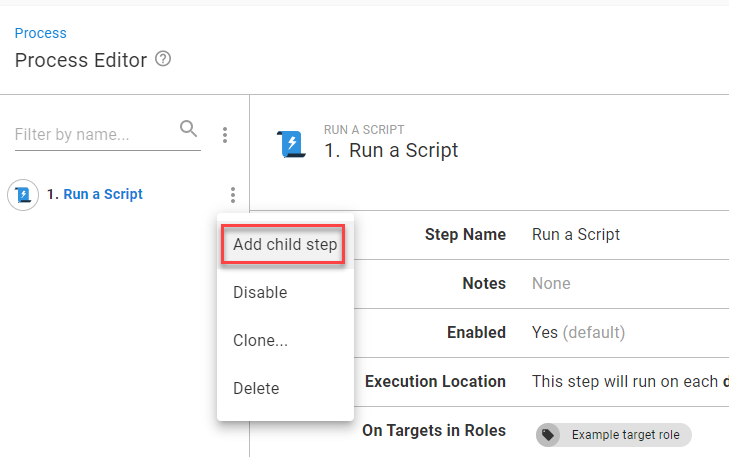
If you need to run a series of steps on a target before deploying to another, use child steps. You also add child steps in the Process Editor:
- Click the 3 vertical dots next to the intended ‘parent’ step and select Add child step.
- Complete the child step as you did with the parent (select the step type and complete the fields) and click SAVE. Repeat for as many steps as you need.
More information on rolling deployments
Take a look at an example rolling deployment setup in our Octopus Samples instance.
Also, check out our rolling deployments documentation for more information, including how to use guided failures and variable run conditions. For even more reading on rolling deployments, take a look at some of our other blog posts:
- The ultimate guide to rolling deployments
- Convert an existing application to use rolling deployments
Blue/green deployments
A blue/green pattern uses 2 production environments that swap roles between ‘live’ and ‘staging’ with each release.
For example, if the live version of an application is on your blue server, you use the green server for staging and testing before redirecting traffic to it. After cutover, the blue server then acts as the new staging area.
The blue/green pattern has the easiest rollback solution on this list - just redirect your traffic back to the original server. Blue/green can be costly and complex though, given the need to clone your entire production environment.
Set up a blue/green pattern in Octopus
You can set up a blue/green pattern in Octopus using environments.
Create 2 production environments with clear labels and assign the needed deployment targets to them.
To create an environment:
- Click Infrastructure in the top menu, then select Environments from the left.
- Click ADD ENVIRONMENT.
- Enter the environment name (
Production – Blue, for example) and click SAVE.
We also recommend creating a new lifecycle (or changing an existing one) so the blue and green environments sit in a shared phase. To create a lifecycle like this:
- Click Library in the top menu, then select Lifecycles from the left.
- Click ADD LIFECYCLE from the top right.
- Enter a name and description for your new lifecycle, then click ADD PHASE.
- If adding your full development pipeline (recommended):
- Enter the name of your earliest phase (
Development, for example). - Click the ADD ENVIRONMENT button and select the related environment from the dropdown. Decide if you want to deploy automatically and click OK.
- Click ADD PHASE to add another and repeat these steps.
- Enter the name of your earliest phase (
- When adding the phase for Production, add both your blue and green environments.
- Click SAVE when happy with your lifecycle.
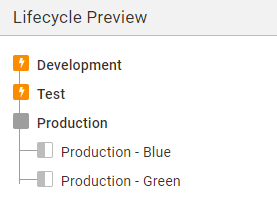
To assign a lifecycle:
- Click PROJECTS in the top menu, select your project from the list, then click Process from the left.
- Click CHANGE on the right, under the Lifecycle heading.
- Select your lifecycle from the dropdown and click SAVE.
When readying a new release for staging, check your Octopus dashboard and deploy to the environment not acting as your live service.

More information on blue/green deployments
Take a look around at an example blue/green deployment setup in our Octopus Samples instance.
For more reading on blue/green deployments, take a look at some of our other blog posts:
- What is the difference between blue/green and red/black deployments?
- Automated blue/green database deployments
Canary deployments
A canary deployment pattern releases updates to a handful of production targets for testing before rolling out to the rest. Named after the old early warning system for miners, it helps detect problems early and without impacting your whole service.
Set up a canary pattern in Octopus
You could perform a canary pattern in Octopus without any special setup. Just manually deploy to your chosen canary targets, test, then continue with the remaining targets when happy.
That said, Octopus is all about automation, and you can build a canary pattern into your deployment process that:
- Deploys to your ‘canary’ targets
- Waits for manual approval with a manual intervention step while you test or invite user feedback
- Deploys to the rest of your production targets once you’re happy
First, you should create target roles to make sure you hit the right deployment targets at the right phases:
- Click Infrastructure in the top menu, then select Deployment Targets from the left.
- Click on a deployment target you intend to act as a canary.
- Click the Target Roles section under the Deployment heading to expand.
- Enter a name in the Roles field (
canary, for example) and click SAVE.
Repeat the steps and create target roles for the remaining deployment targets if they don’t already exist. After you create a target role, you can reuse it for other deployment targets.
Now you can create the deployment process:
- Click PROJECTS from the top menu, select your project from the list, then click Process from the left.
- Click ADD STEP, select the type of step and complete the details for the deployment. Select your canary target role in the On Targets in Roles section. Click SAVE when done.
- Click ADD STEP again and use the Choose Step Template field to search for ‘manual intervention’. Hover your cursor over the Manual Intervention Required box and click ADD.
- Complete the following fields and click SAVE:
- Step Name
- Notes – describe the purpose of the manual step
- Instructions – enter what needs to happen, such as testing or awaiting user feedback
- Responsible Teams – select the team responsible for testing or monitoring feedback
- Block Deployments – select Prevent other deployments while awaiting intervention
- Required – make this a required step
- Complete the other options as needed and click SAVE.
- Click ADD STEP and recreate the first step, but this time deploy to the target roles for the rest of your production targets.
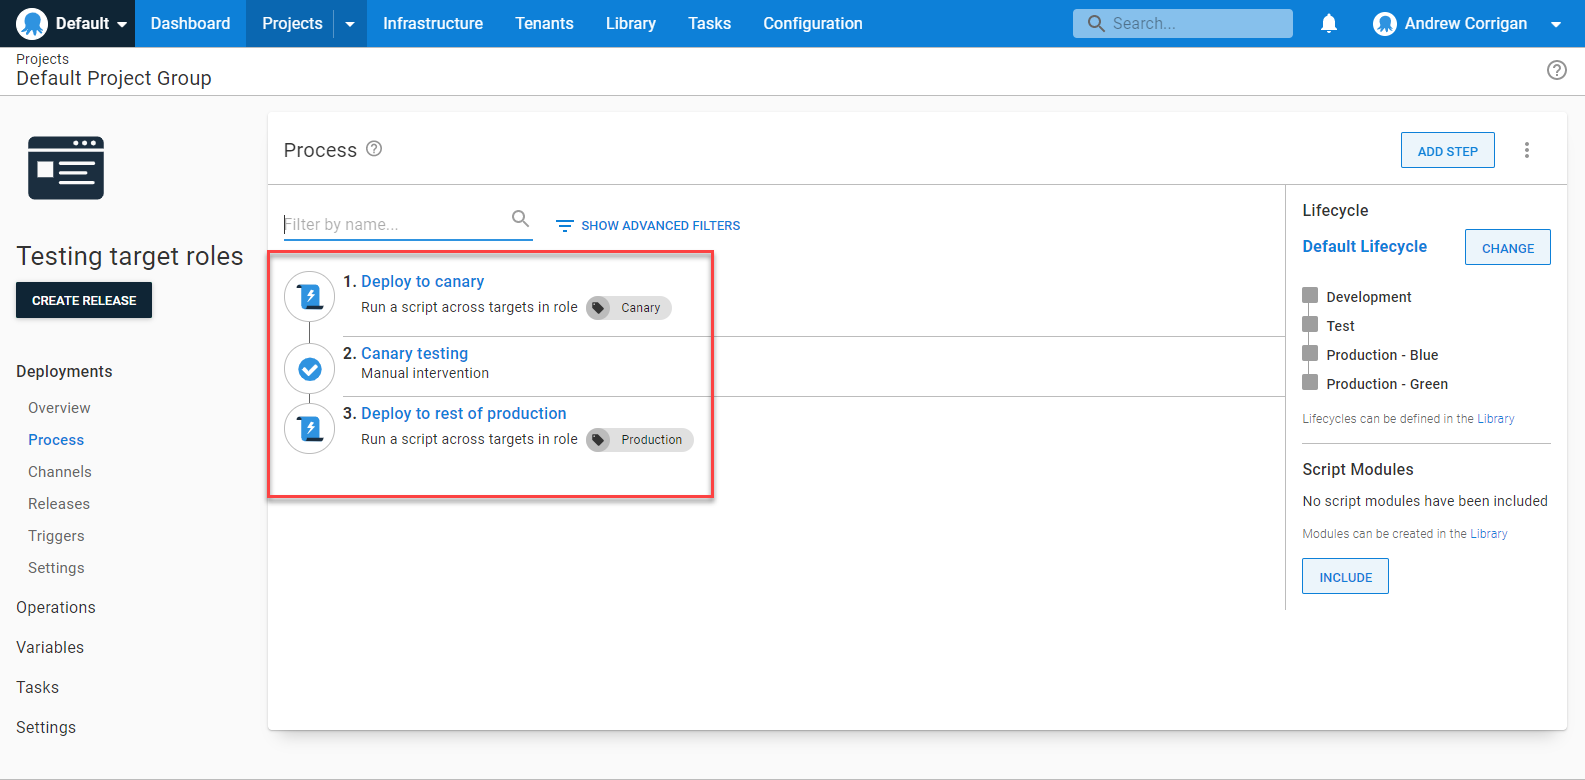
More information on canary deployments
Take a look around at an example canary deployment setup in our Octopus Samples instance.
Multi-region deployments
A multi-region pattern is when you deploy a release to multiple overseas targets, such as servers or data centers. While we consider it a deployment pattern itself, it’s an outlier as it uses other patterns as part of the process.
Set up a multi-region deployment pattern in Octopus
There are 3 ways to set up multi-region deployments in Octopus:
Environments and lifecycles
You can use this solution to force the order of deployments through your regions.
To create an environment:
- Click Infrastructure in the top menu, then select Environments from the left.
- Click ADD ENVIRONMENT.
- Enter the environment name (
US-Westfor example) and click SAVE.
Repeat for each of your worldwide servers.
To create a suitable lifecycle:
- Click Library in the top menu, then select Lifecycles from the left.
- Click ADD LIFECYCLE from the top right.
- Enter a name and description for your new lifecycle, then click ADD PHASE.
- If adding your full development pipeline (recommended):
- Enter the name of your earliest phase (
Development, for example). - Click the ADD ENVIRONMENT button and select the related environment from the dropdown. Decide if you want to deploy automatically and click OK.
- Click ADD PHASE to add another and repeat these steps.
- Enter the name of your earliest phase (
- When adding the phases for Production, add all your regional environments. Here your lifecycle could:
- Deploy to all your environments consecutively
- Deploy to one environment, then the others when you’re ready
- Click SAVE when happy with your lifecycle.
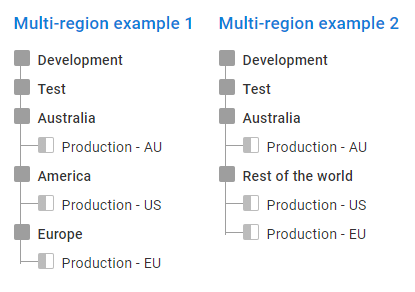
To assign the lifecycle:
- Click PROJECTS in the top menu, select your project from the list, then click Process from the left.
- Click CHANGE on the right, under the Lifecycle heading.
- Select your lifecycle from the dropdown and click SAVE.
You can also use scheduled deployments to deploy during low-usage timeframes:
- Click Projects in the top menu, select your project from the list, then click Releases from the left.
- Click CREATE RELEASE.
- Click the DEPLOY TO… button
- Click When to expand the menu and select Later.
- Choose a date and time that best suits the region and click DEPLOY.
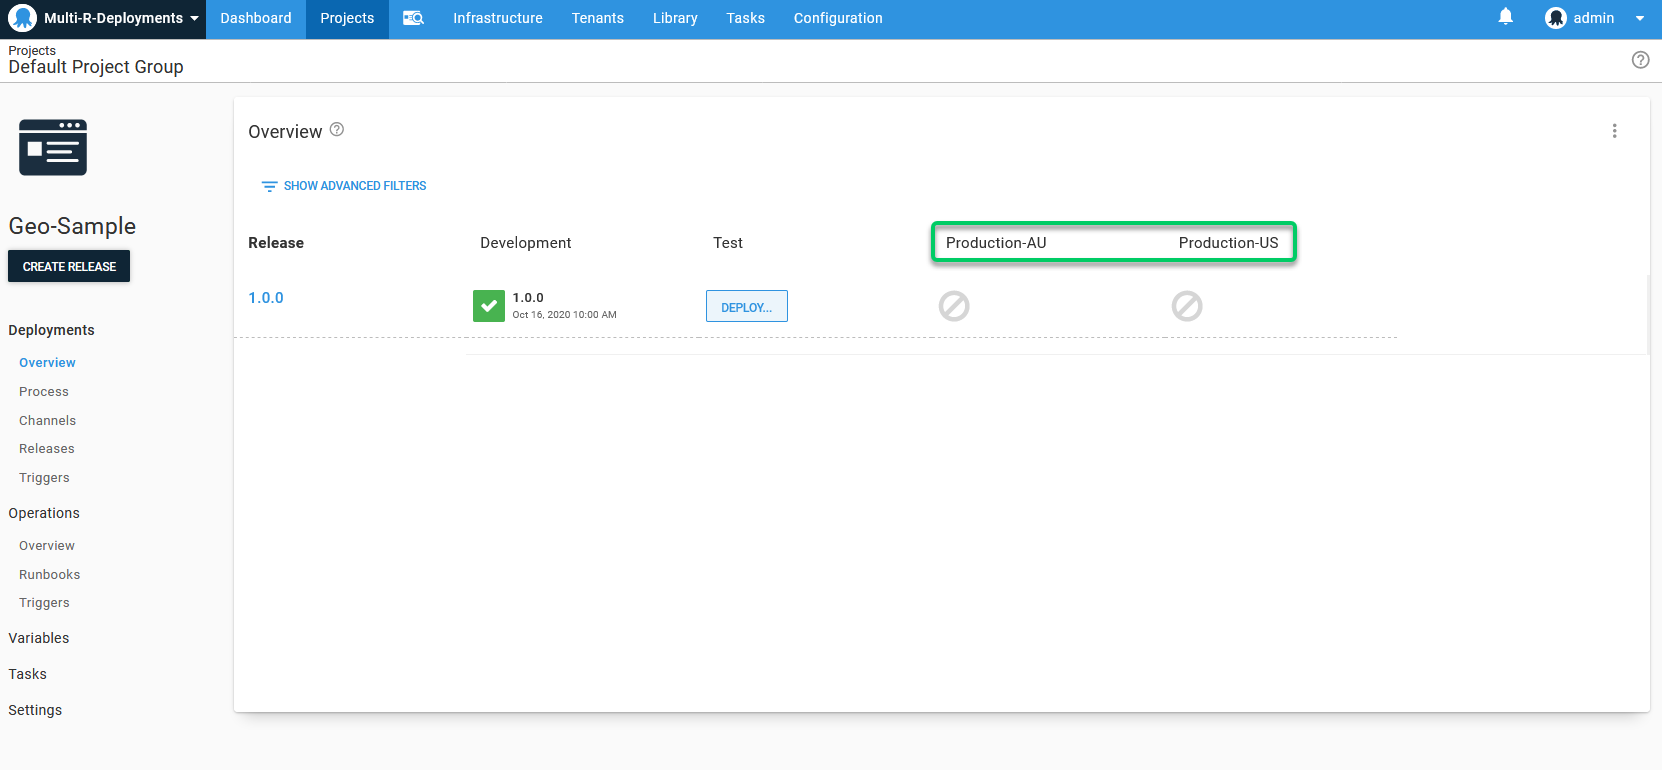
Cloud regions and variables
Cloud regions are perfect if you don’t care about the order you deploy to your regions.
To set up your cloud regions:
- Click Infrastructure in the top menu, then select Deployment Targets from the left.
- Click Add deployment target and select CLOUD REGION.
- Hover your cursor over the Cloud Region box and click ADD.
- Complete the following fields and click SAVE:
- Display name
- Environments
- Target Roles
Repeat for all your cloud regions.
To use the cloud regions, you must use region-specific variables. To set these:
- Click Projects in the top menu, select your project from the list, then click Variables from the left.
- Complete the following columns to enter your first variable:
- Name – you only need this for the first variable
- Value – enter the value that defines your variable
- Scope – click the field and select your cloud region with the Select targets option.
- Click ADD ANOTHER VALUE to add more, creating a value for each cloud region.
- Click SAVE when ready.

Tenants
Though we developed Tenants for those providing Software as a Service (SaaS), you can also use it to manage multi-region deployments. This is a great option for those who want more control and clarity on the Octopus dashboard.
To create your tenants:
- Click Tenants in the top menu, then click ADD TENANT from the top right.
- Give your tenant a name and description and click SAVE.
- Click CONNECT PROJECT, select your project from the dropdown box and click ADD CONNECTION.
- If you haven’t already enabled tenanted deployments for your project, Octopus will prompt you. Click ENABLE TENANTED DEPLOYMENTS, select your environments with the dropdown, and click ADD CONNECTION.
- We recommend adding a logo or icon to tenants to make their purpose clearer. Click Settings from the left menu, upload an image in the Logo section and click SAVE.
- Click Tenants in the top menu and repeat the steps to create your other tenants.
You should also use common variable templates to prompt you for data needed for each region (storage account details, for example). Unlike project variables, you can reuse common variables across all tenants. Plus, they’re not scoped to specific environments.
- Click Library in the top menu, select Variable Sets from the left.
- Click ADD VARIABLE SET, enter a name and description and click SAVE.
- Click the VARIABLE TEMPLATES tab on your new set, then click ADD TEMPLATE.
- Complete the following fields and click ADD (there may be other options depending on what you select for the control type):
- Variable name – enter a name, such as ‘Tenant.Alias’
- Label – what’s shown when prompting for data
- Help text – describe the action needed
- Control type – what type of option the variable will prompt for
- Default value (optional)
- Click SAVE when back on the Variable Sets screen.
Now you can connect the variable to your project:
- Click PROJECTS in the top menu, select your project from the list, then click Variables from the left.
- Click Library Sets from the left and click INCLUDE LIBRARY VARIABLE SETS from the top right.
- Check the box for your new variable set and click SAVE.
Now your tenants will alert you if they’re missing information. To set the values needed:
- Click Tenants in the top menu, select your tenant from the list, then click Variables from the left.
- Click the COMMON VARIABLES tab, complete the information needed and click SAVE.
Now you can see how many tenants a project has deployed to on the Octopus dashboard.

To learn more, you can watch our webinar on multi-tenancy deployments.
Conclusion
As you can see, Octopus can help manage a range of deployment patterns to suit your team, projects, and customers.
Make sure you check out our documentation for more help with deployment patterns, plus everything else Octopus.
Happy deployments!
