
We’re often asked by customers if they should have one Octopus Deploy project per application or one Octopus Deploy project per component (i.e., WebUI, API, Database, etc.). For some projects, it makes sense to deploy one or two pieces, perhaps to fix a small bug, rather than deploying everything at once.
Having an Octopus Deploy project per component solves many problems; the trade-off is, deploying the entire application stack is more complicated.
In this post, I walk through how to use a new step template Deploy Child Octopus Deploy Project to make release management in Octopus Deploy easier.
Why a project per component
The common reasons to use a project per component are:
- Minimize downtime by only deploying what has changed.
- Minimize build time by only building what has changed.
- Minimize the number of decisions a person has to make.
- Single responsibility principle, each project deploys one thing to the best of its ability.
In short, a project per component reduces the time it takes to deploy the software. However, the drawback is that it’s harder to coordinate releases.
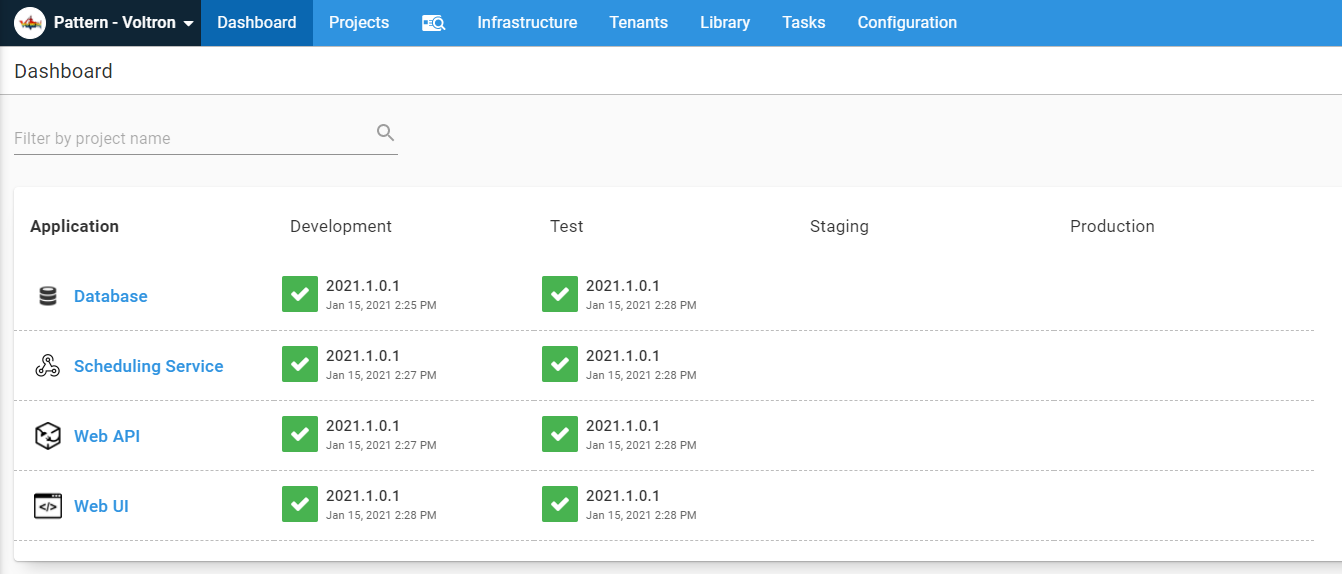
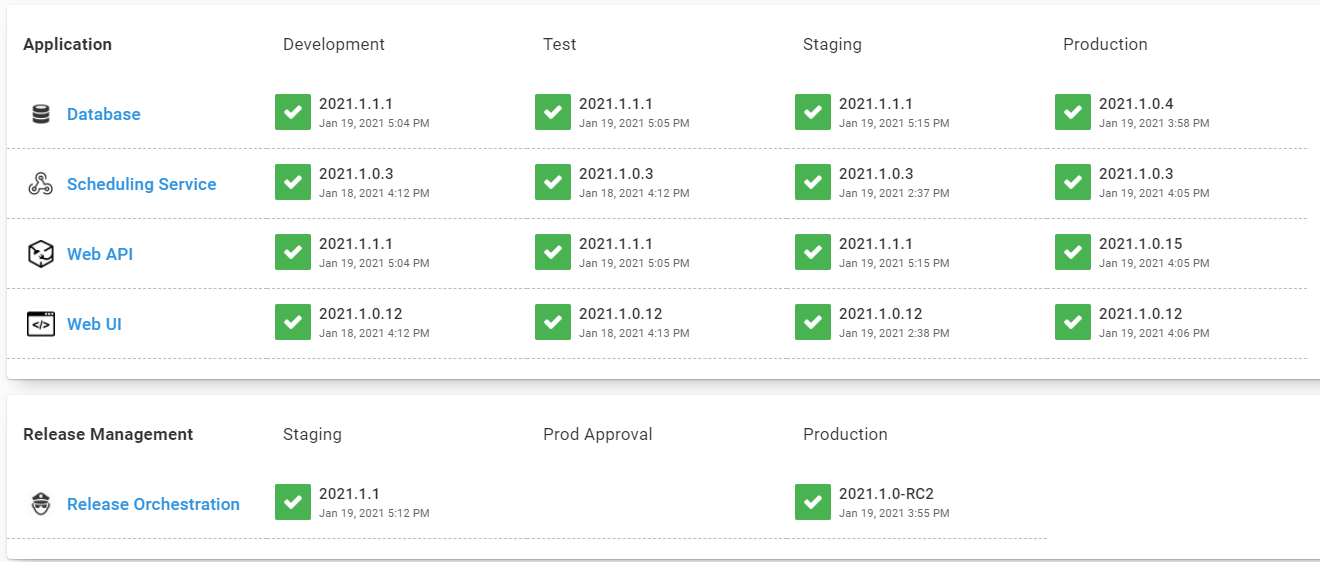
The sample application
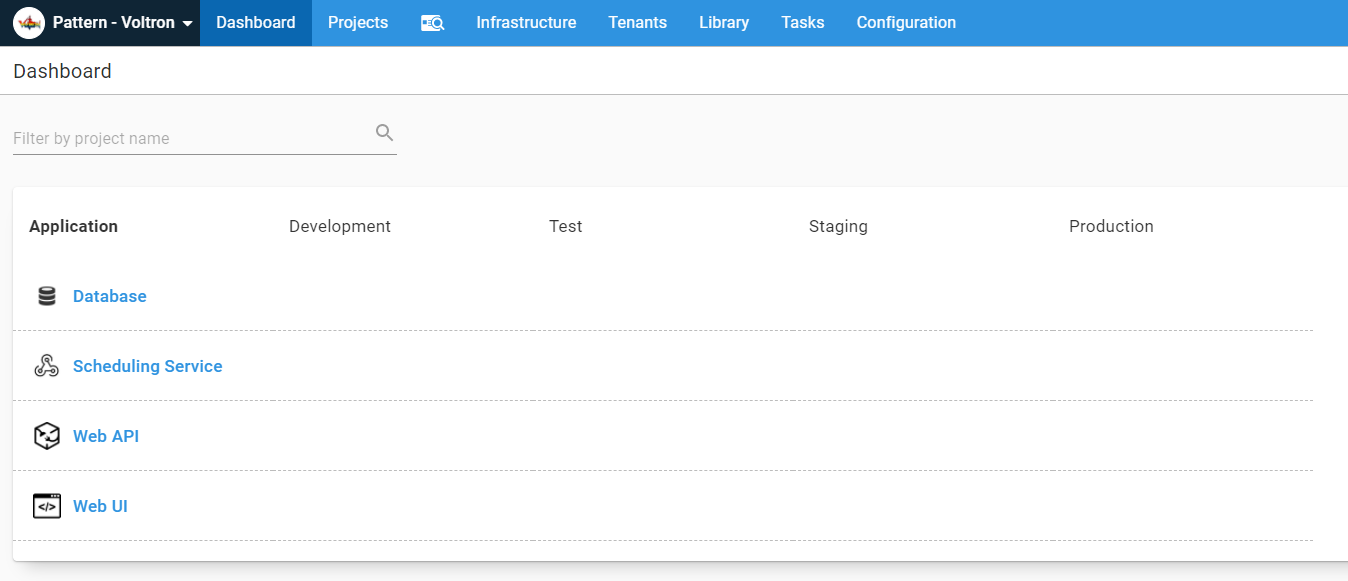
For this article, I’m using a sample application with four components:
- Database
- Scheduling Service
- Web API
- Web UI
You can find it on our samples instance (login as a guest).
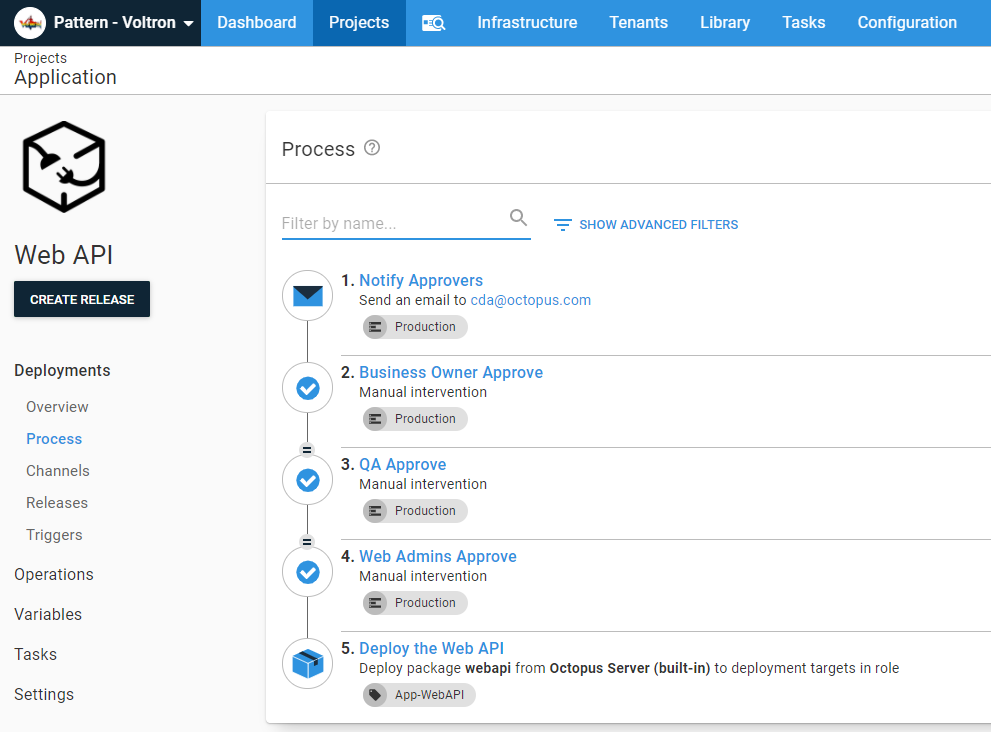
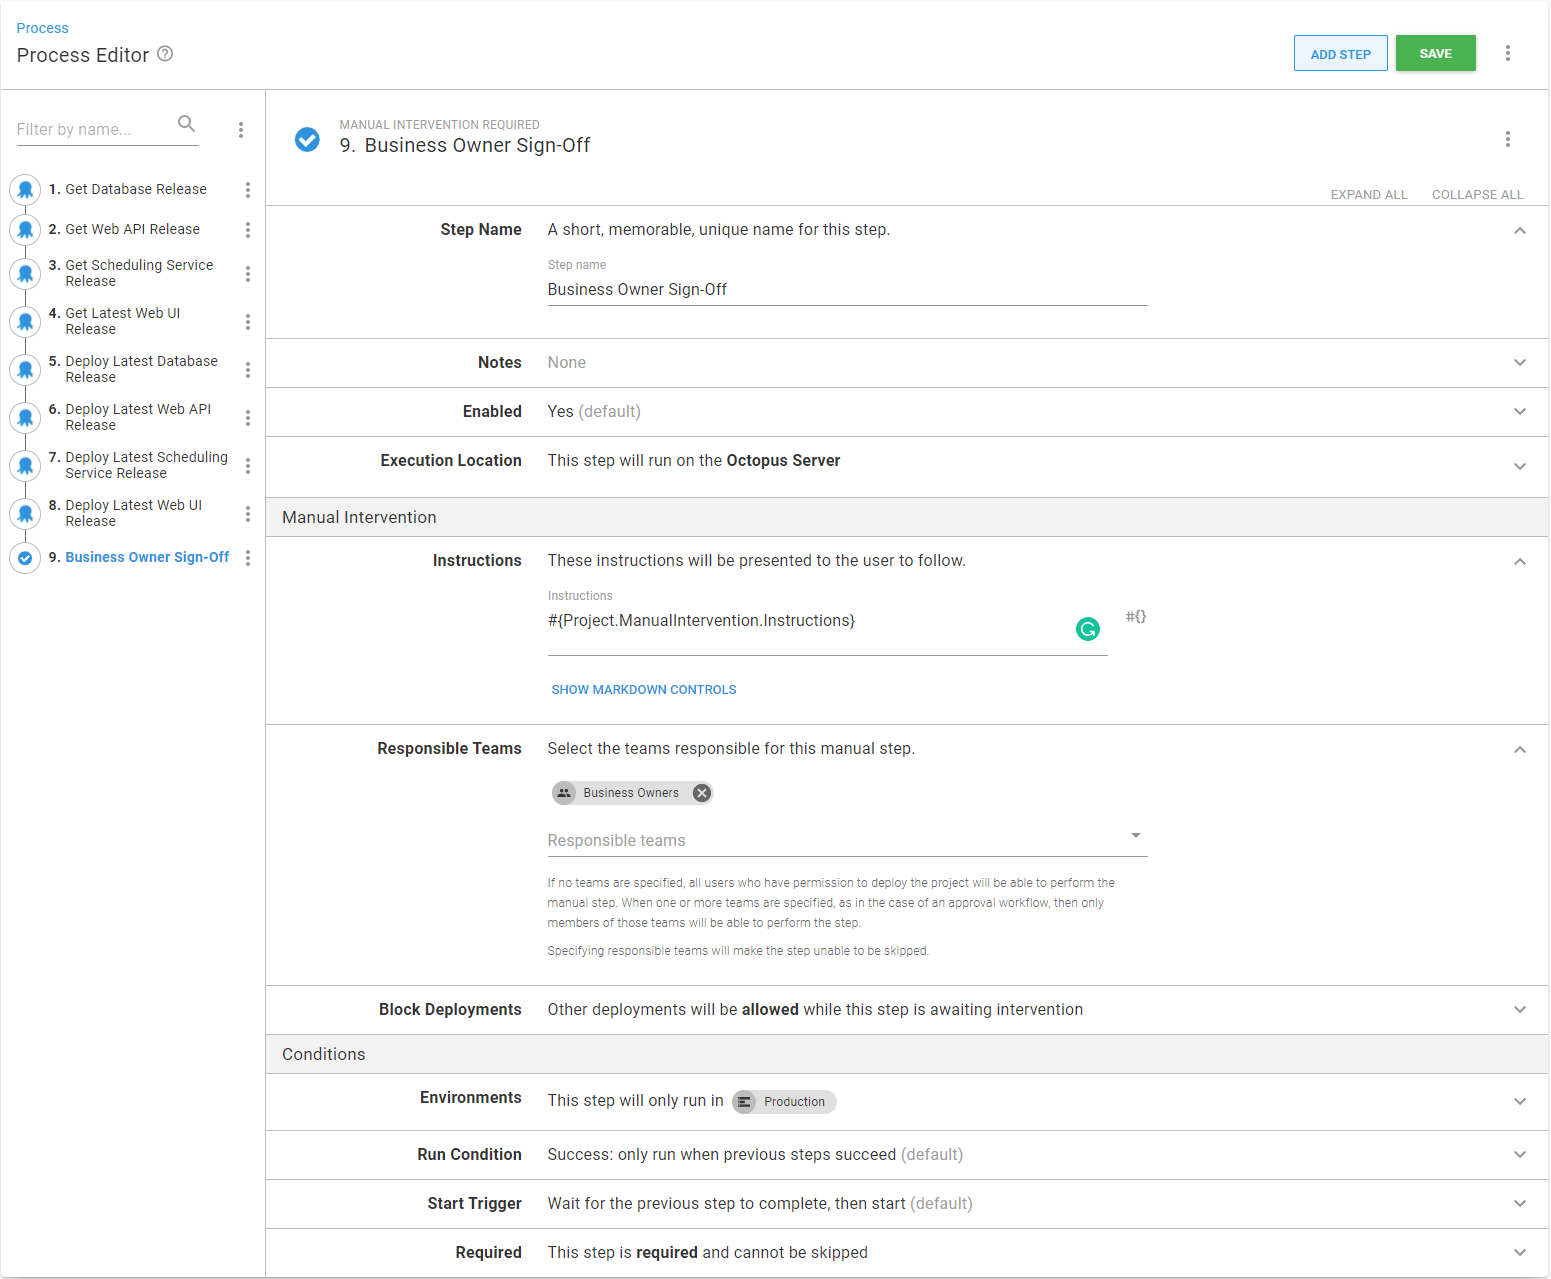
Each project’s design allows it to be deployed independently of the others; so much so, that each project has its own manual intervention.
This example uses a modified version of SemVer for the components, Year.Minor.Patch.Build, or 2021.1.0.1. The orchestration project will be closer to standard SemVer, Year.Minor.Patch or 2021.1.0.
I won’t spend much time discussing source control repository and build configuration. This example should be flexible enough to account for various configurations, be it a single git repo/single build, single git repo/build per component, or a git repo/build per component. There are pros and cons to each approach, but discussing them is out of scope for this article.
For this example, we’ll assume a build server will:
- Build each component.
- Create a release for that component’s project.
- Automatically deploy it to the Development environment.
When that deployment is complete, it will run a batch of integration tests. If the tests pass, it will promote the release to Test.
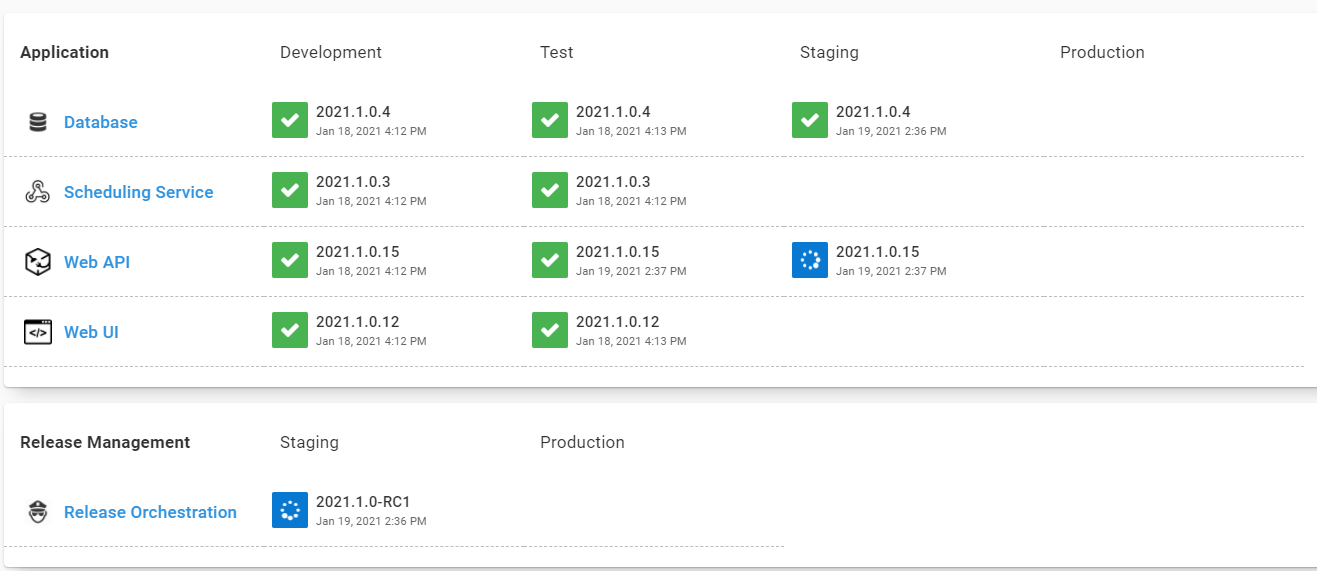
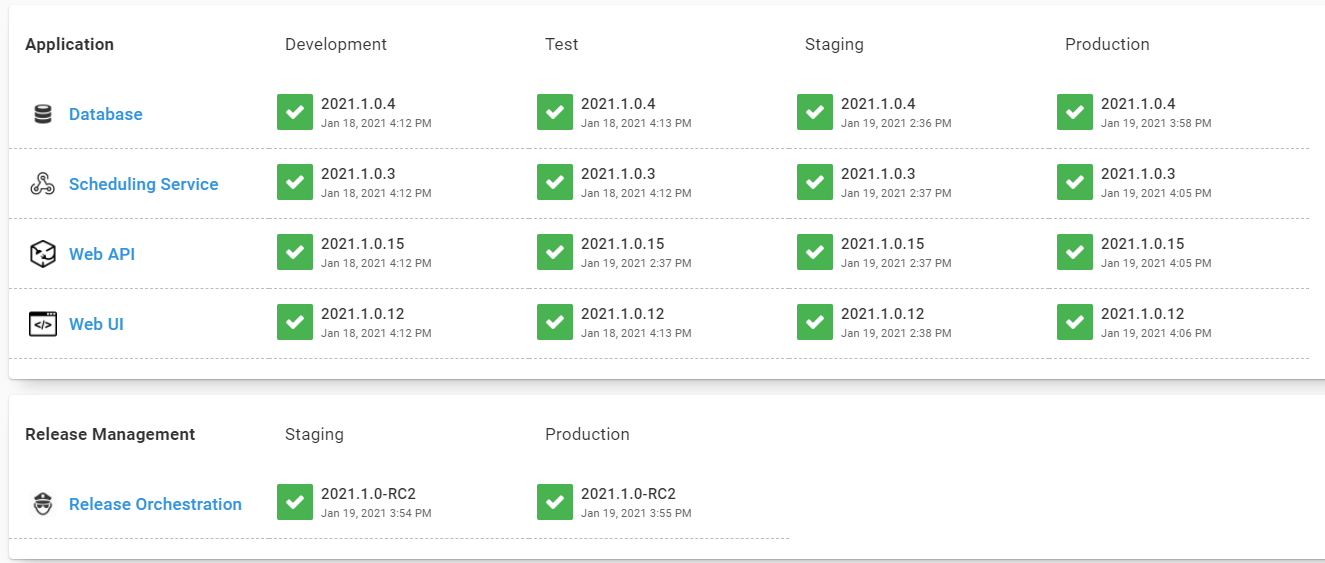
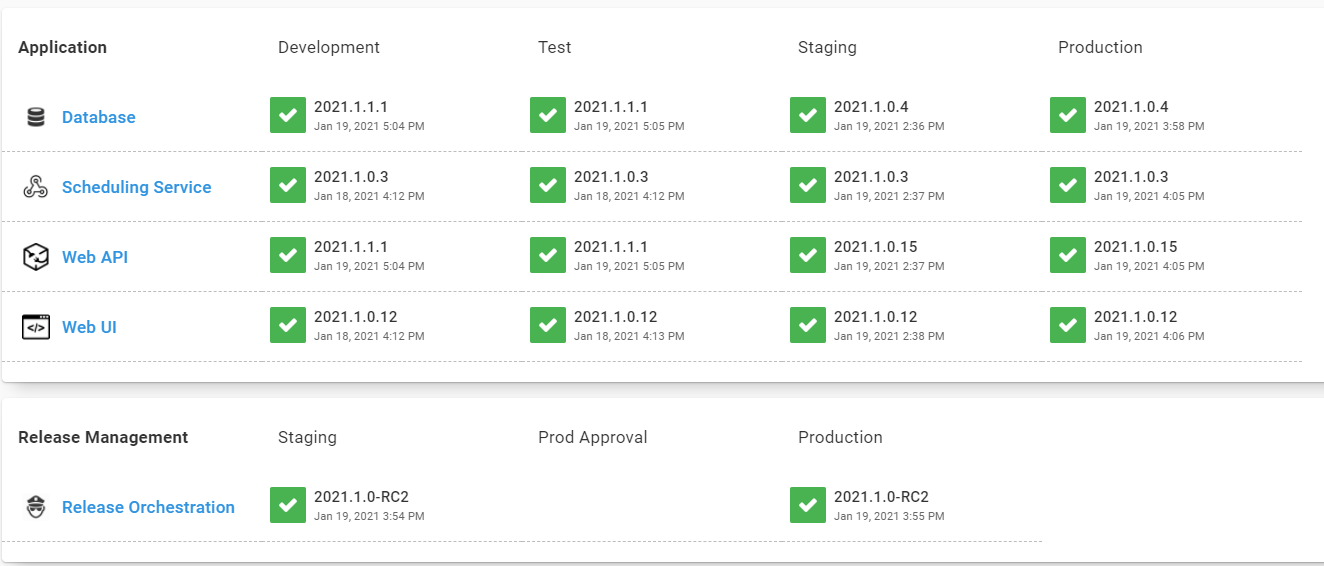
The first batch of work for 2021 will look like this:
The roadblocks
Typically a change will sit in the Test environment for 1 to N days as it goes through the QA process. Bugs are found and resolved, and each component will probably have a different build number.
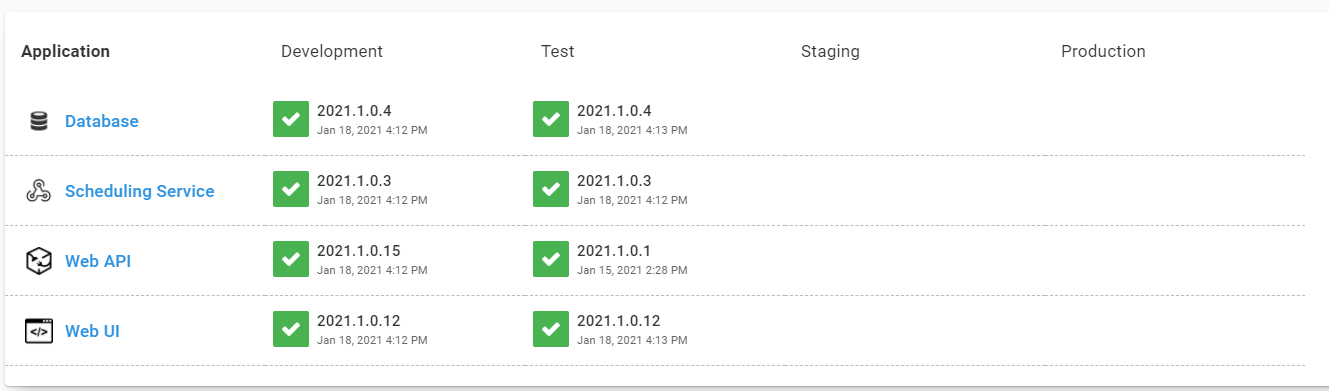
After QA finishes testing the component projects for the 2021.1.0.x release, the promotion to Staging can start.
With the current configuration, that means promoting each release for each project one by one. I’ve done this promotion hundreds of times and although it’s tolerable, it’s tedious.
Promoting all the component projects to Production is when this pattern starts to run into issues. These include:
- If a component has multiple fixes pushed to Test, it will likely need at least one more fix pushed to Staging. Often the release number of the component project to approve isn’t known until the day of approval.
- All the projects require approval from QA.
- Multiple projects require approval from the web admins and business owners.
- Typically, applications need to be deployed in a specific order. Deploy the database first, followed by the API, then the scheduling service, and finally the UI. Any issues during the deployment should stop everything.
- How and when changes are approved vary from company to company. It’s not uncommon for a release’s approval to occur on Tuesday for a Thursday night deployment.
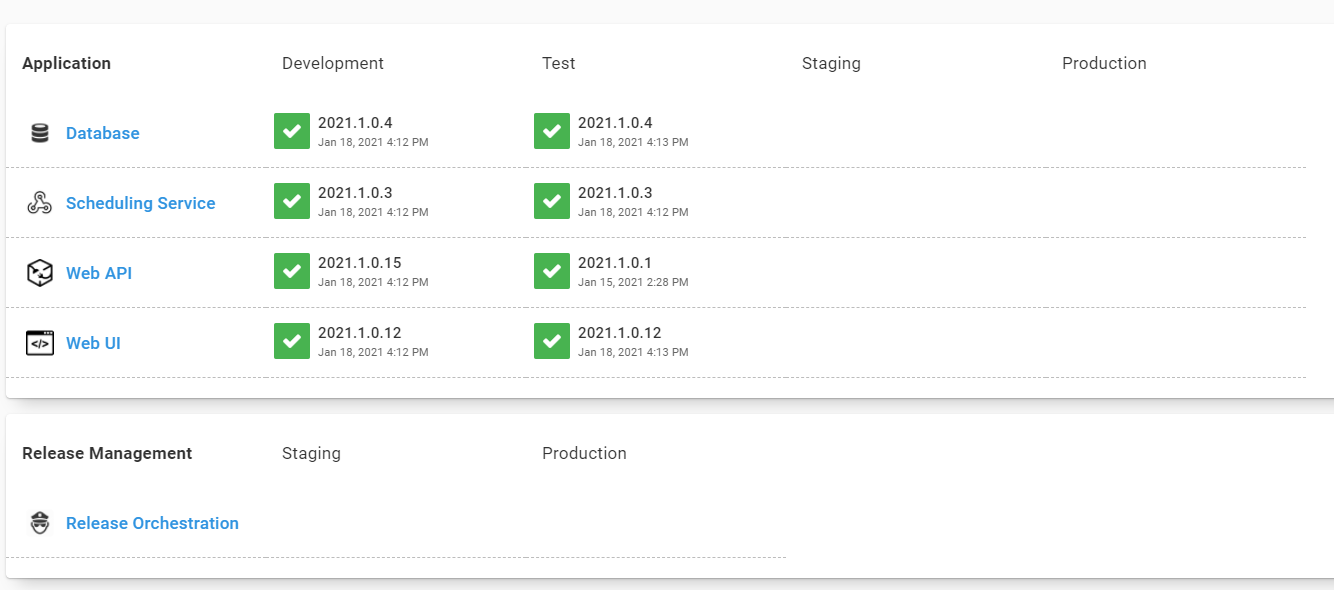
To solve these issues, we need a parent project to coordinate all these child projects. Unlike the child projects, the parent project only needs to deploy to Staging and Production.
Introducing the Deploy Child Octopus Deploy Project step template
The parent project needs a way to invoke the child project’s deployments. This is handled by the new Deploy Child Octopus Deploy Project step template.
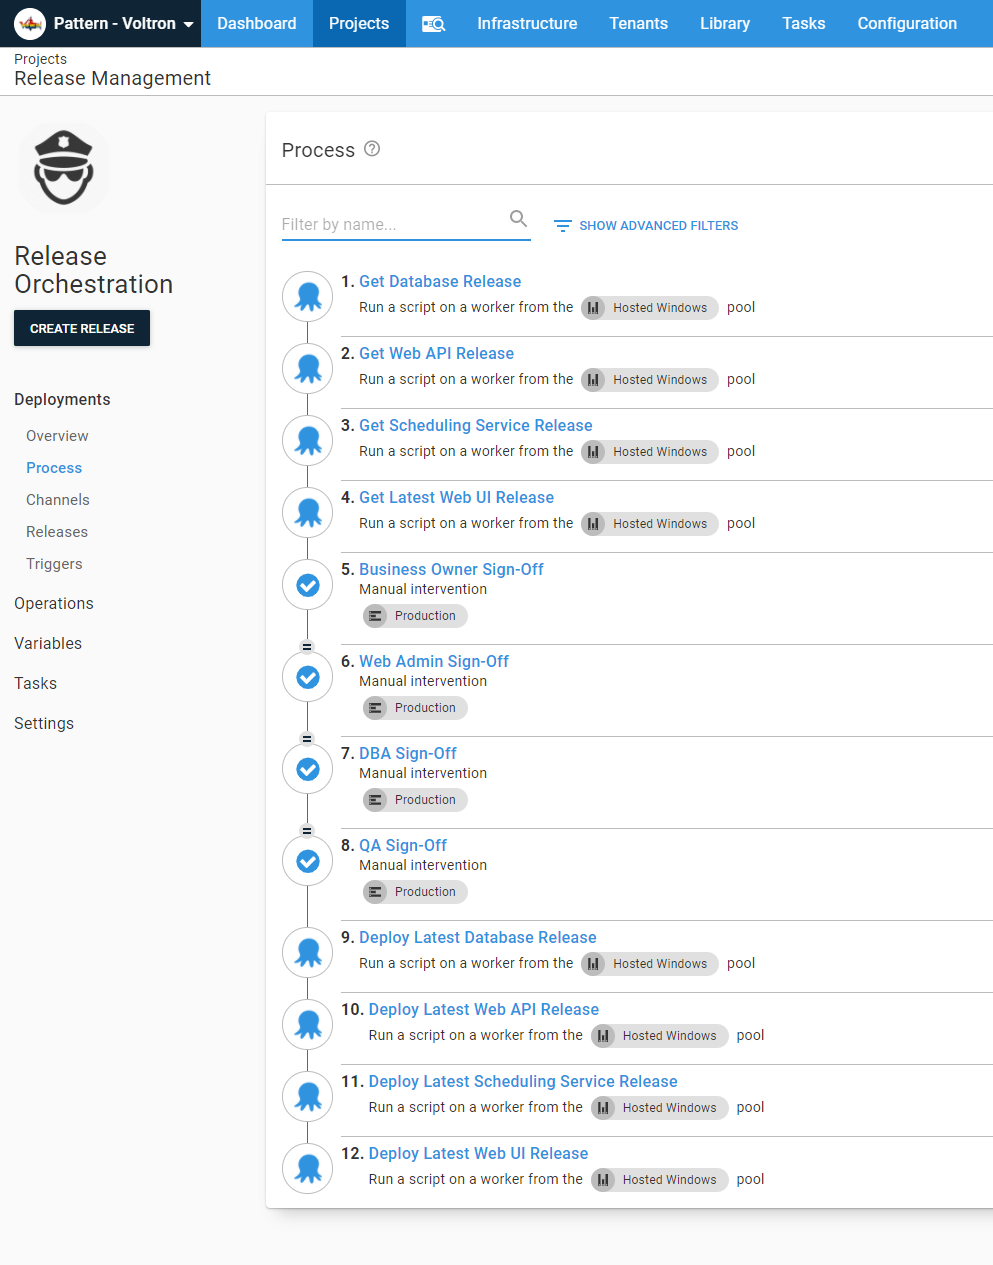
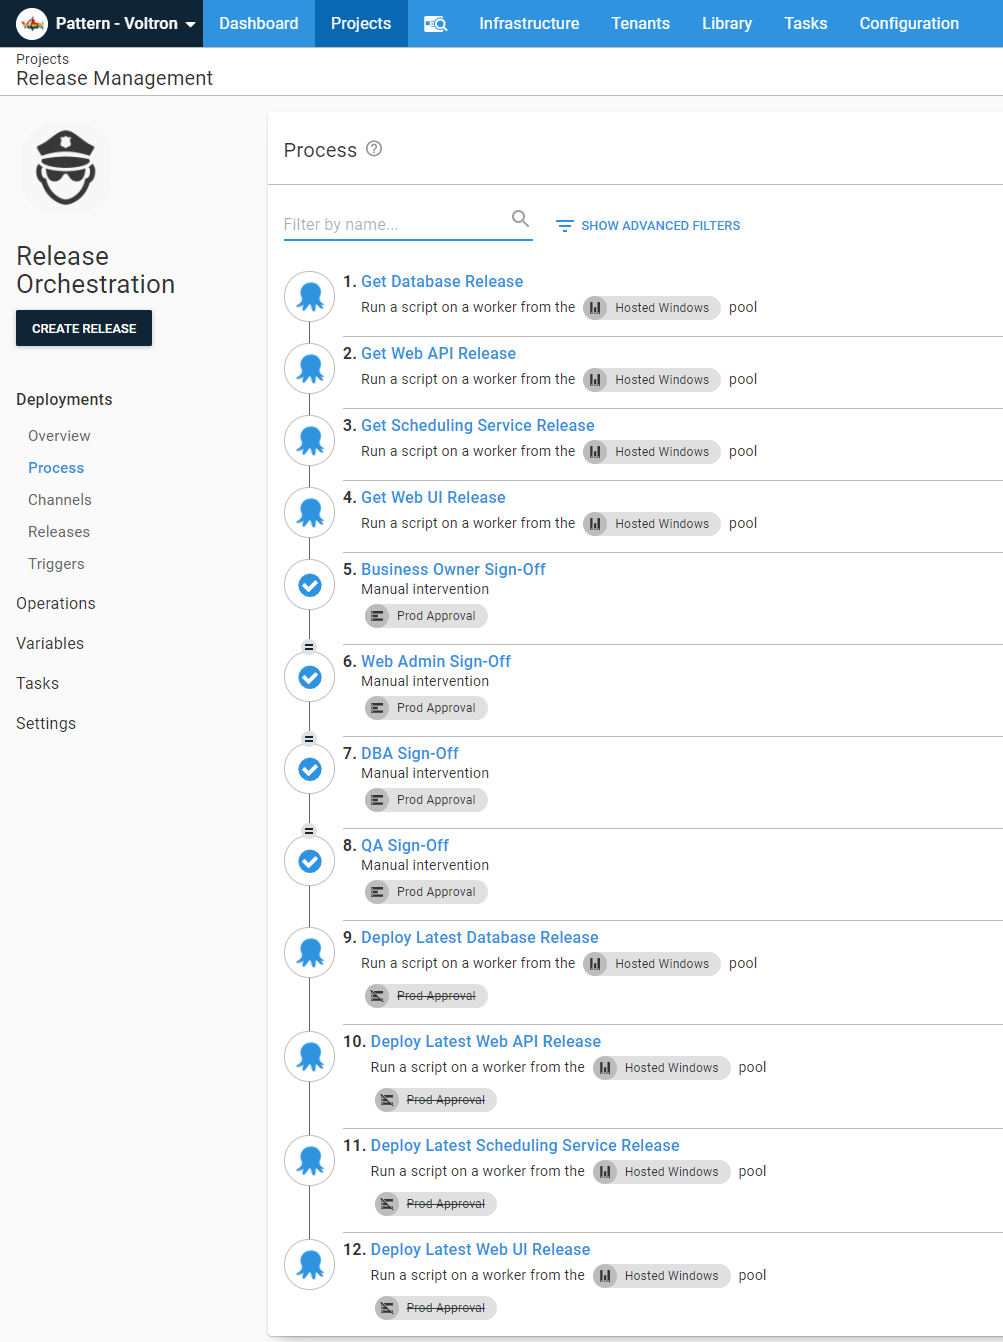
In this example, the parent project is called “Release Orchestration” and uses that step template multiple times.
You can choose any name you like for the parent project, for instance, “Traffic Cop,” the name of the application, or even Voltron.
Before providing usage examples for the step template, I want to demonstrate how the step template works.
How releases are chosen
There are two other options for a parent project to deploy a child project:
- Deploy a release step: A step built into Octopus Deploy designed to solve particular use cases.
- Chain Deployment step template: A community step template that was a pre-cursor to the deploy a release step.
These two steps choose the release to deploy by using the most recently created release for a channel. The Deploy Child Octopus Deploy Project step template chooses releases a different way.
You supply:
- A channel name. When no channel is provided, the default channel is chosen.
- A release number pattern (
2021.1.0.*) or a specific release number (2021.1.0.15). If no release number is provided, it will use the latest release it can find for the channel. - A destination environment.
With those three pieces of data, the step template will:
- Calculate the previous environment(s) based on the channel and destination environment. For example, if you enter Staging as the destination environment, it will pick Test because that is the prior environment to Staging in the channel’s lifecycle.
- Look for all the releases matching the supplied pattern for that channel.
- Find the release that was last successfully deployed to the previous environment; not the most recently created release deployed to the previous environment, but the last successfully deployed release. For example, if you deploy
2021.1.0.15to Test, then realize that release shouldn’t have been pushed, and redeploy2021.1.0.14to Test, the step template will pick2021.1.0.14when it promotes to Staging because that was the last release deployed to Test.
If no release is found, it will exit the step and move onto the next step in the deployment process.
For example, shortly after promoting 2021.1.0 to Production, a bug is reported that requires a fix to the Web API and Web UI projects. You create the 2021.1.1 release with the 2021.1.1.* pattern for the child projects. The database and scheduling service projects don’t have a matching release because they weren’t updated, so they are skipped.
One of the basic design rules of this step template is customization. For example, you can configure the step to throw an error if no release is found rather than exiting from the step and proceeding.
The step template also checks if the selected release has been deployed to the destination environment and skip deploying if it has. However, you can configure it to always redeploy.
Easier approvals
Approvals seem to be most problematic when it comes to parent/child project relationships.
In Octopus Deploy, the manual intervention step is responsible for approvals. You should note with that step, that the deployment has to start for the approval to occur. But often, the approval process occurs hours or days before the release.
Also, child projects have their own approvals to handle the use case of only one child project being deployed. In general, approvers like to approve a release once, not for each child project. When they’re approving a release, it would be useful to have all pertinent release information in one place for approval.
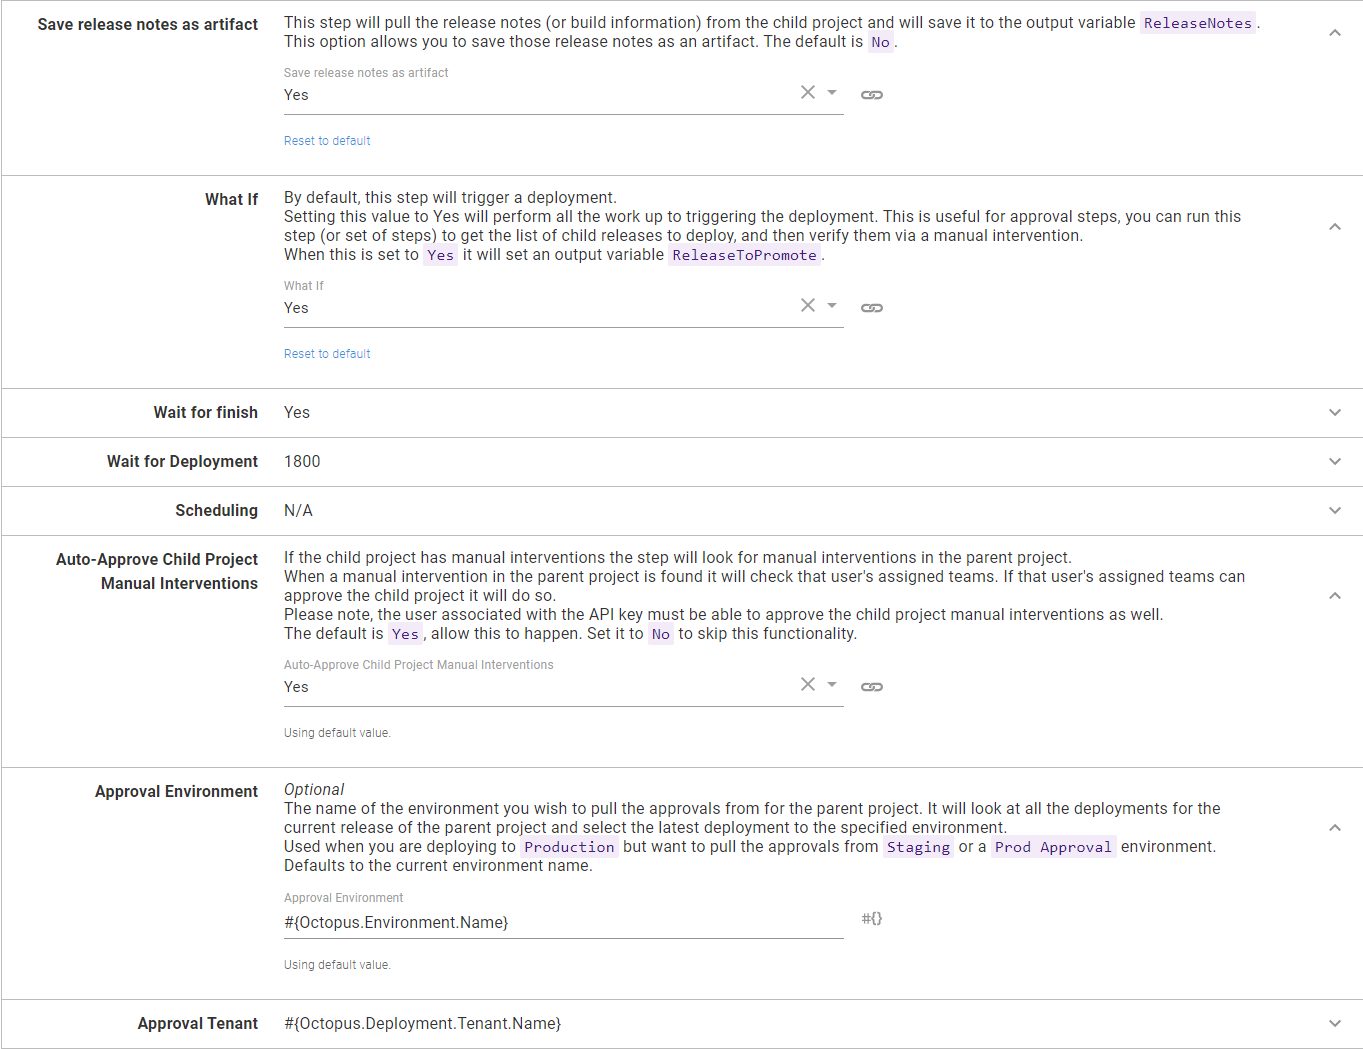
The step template helps the approval process by providing a what-if flag, which exits the step right before it starts the deployment. When that flag is used, the step template will populate the output variable ReleaseToPromote for manual intervention step instructions.
The step template will also gather the release notes for each child project and populate the output variable ReleaseNotes. If you’re using the build information and issue tracker feature in Octopus, the step template will gather the commit and issue information for the release, which includes the rolled up release notes. You can save release notes as an artifact making it easier for approvers, and later auditors, to review the deployment in one place.
How it works:
- The step template will grab all the deployments for the parent project release. It will then filter that list by the desired environment. By default, it will use the current deployment’s environment, but you can supply a different environment, for example, Staging or Prod Approval to pull the approval information.
- The step template pulls all the approvers from the selected deployment.
- The step template stores the approver(s), along with their team membership.
- When the step template is waiting for a deployment to finish, it will look for manual interventions.
- When a manual intervention occurs during the child project’s deployment, it will look at which team(s) have the permission to approve it.
- It will compare the manual intervention team list with the list it created for the user earlier. If a match is found, the step template will submit the approval.
This step template uses the Octopus Deploy API and requires an API key. This particular functionality submits the approval based on the user attached to the API key.
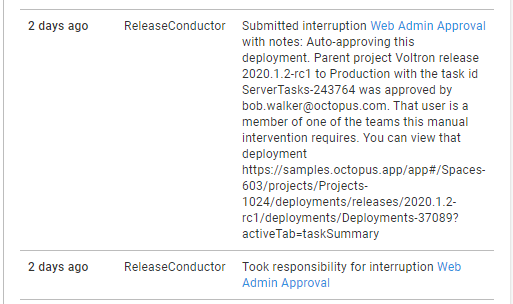
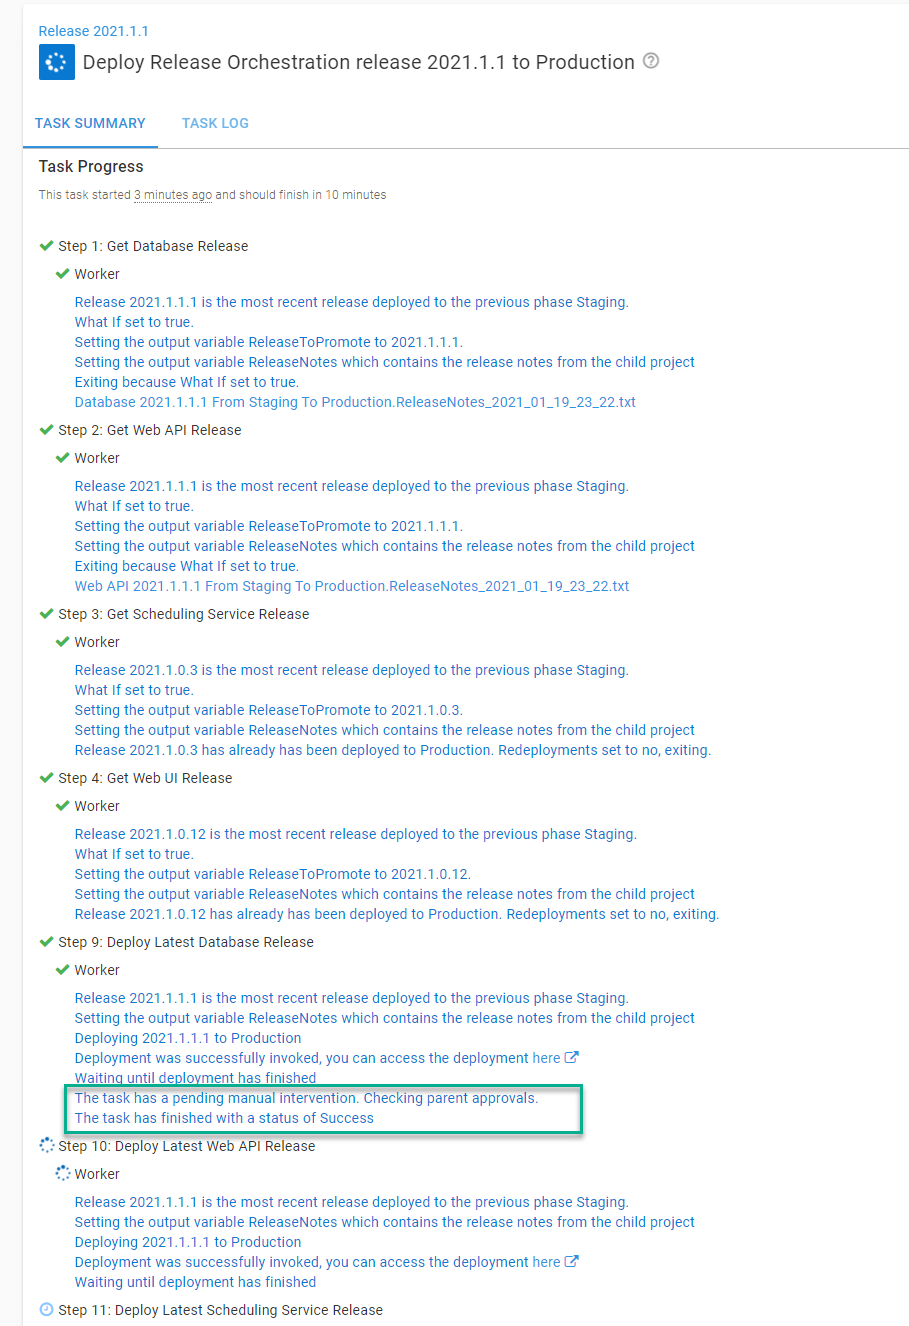
When this step template approves a child project’s manual intervention, you’ll see a message similar to this:
Release scheduling
It’s common to get approval for a Production deployment hours or days before the actual deployment. Part of the approval process is scheduling an outage window. Depending on your application, the order the child projects are deployed might not be necessary, as long as they are deployed within a few minutes of one another.
The step template supports this use case by allowing you to send a future time and/or date as a parameter. It uses .NET’s DateTime. TryParse to parse the date. Supported formats include:
7:00 PMwill deploy at 7 PM today21:00will deploy at 21:00 hours or 9 PM todayYYYY-MM-DD HH:mm:ssor2021-01-14 21:00:00will deploy at 9 PM on the 14th of January, 2021YYYY/MM/DD HH:mm:ssor2021/03/20 22:00:00will deploy at 10 PM on the 20th of March, 2021MM/DD/YYYY HH:mm:ssor06/25/2021 19:00:00will deploy at 7 PM on the 25th of June, 2021DD MMM YYYY HH:mm:ssor01 Jan 2021 18:00:00will deploy at 6 PM on the 1st of January, 2021
You can leverage prompted variables to let a user send in a date/time when deploying to Production.

There are other scenarios in which you can approve a release and then schedule it to deploy later. Please see the section Scenario: Approve Today Deploy Tomorrow later in this article about how to leverage Prod Approval environment.
Parameters
When designing this step template, I tried to make it easy for users to tweak it to match their use cases. Some users will find the auto-approval feature useful and implement it right away, while other users have business rules disallowing that functionality. That is understandable.
I have tried to add as many parameters as possible to tweak the step template to match your use case(s). As you can imagine, there are a lot of parameters in this step template:
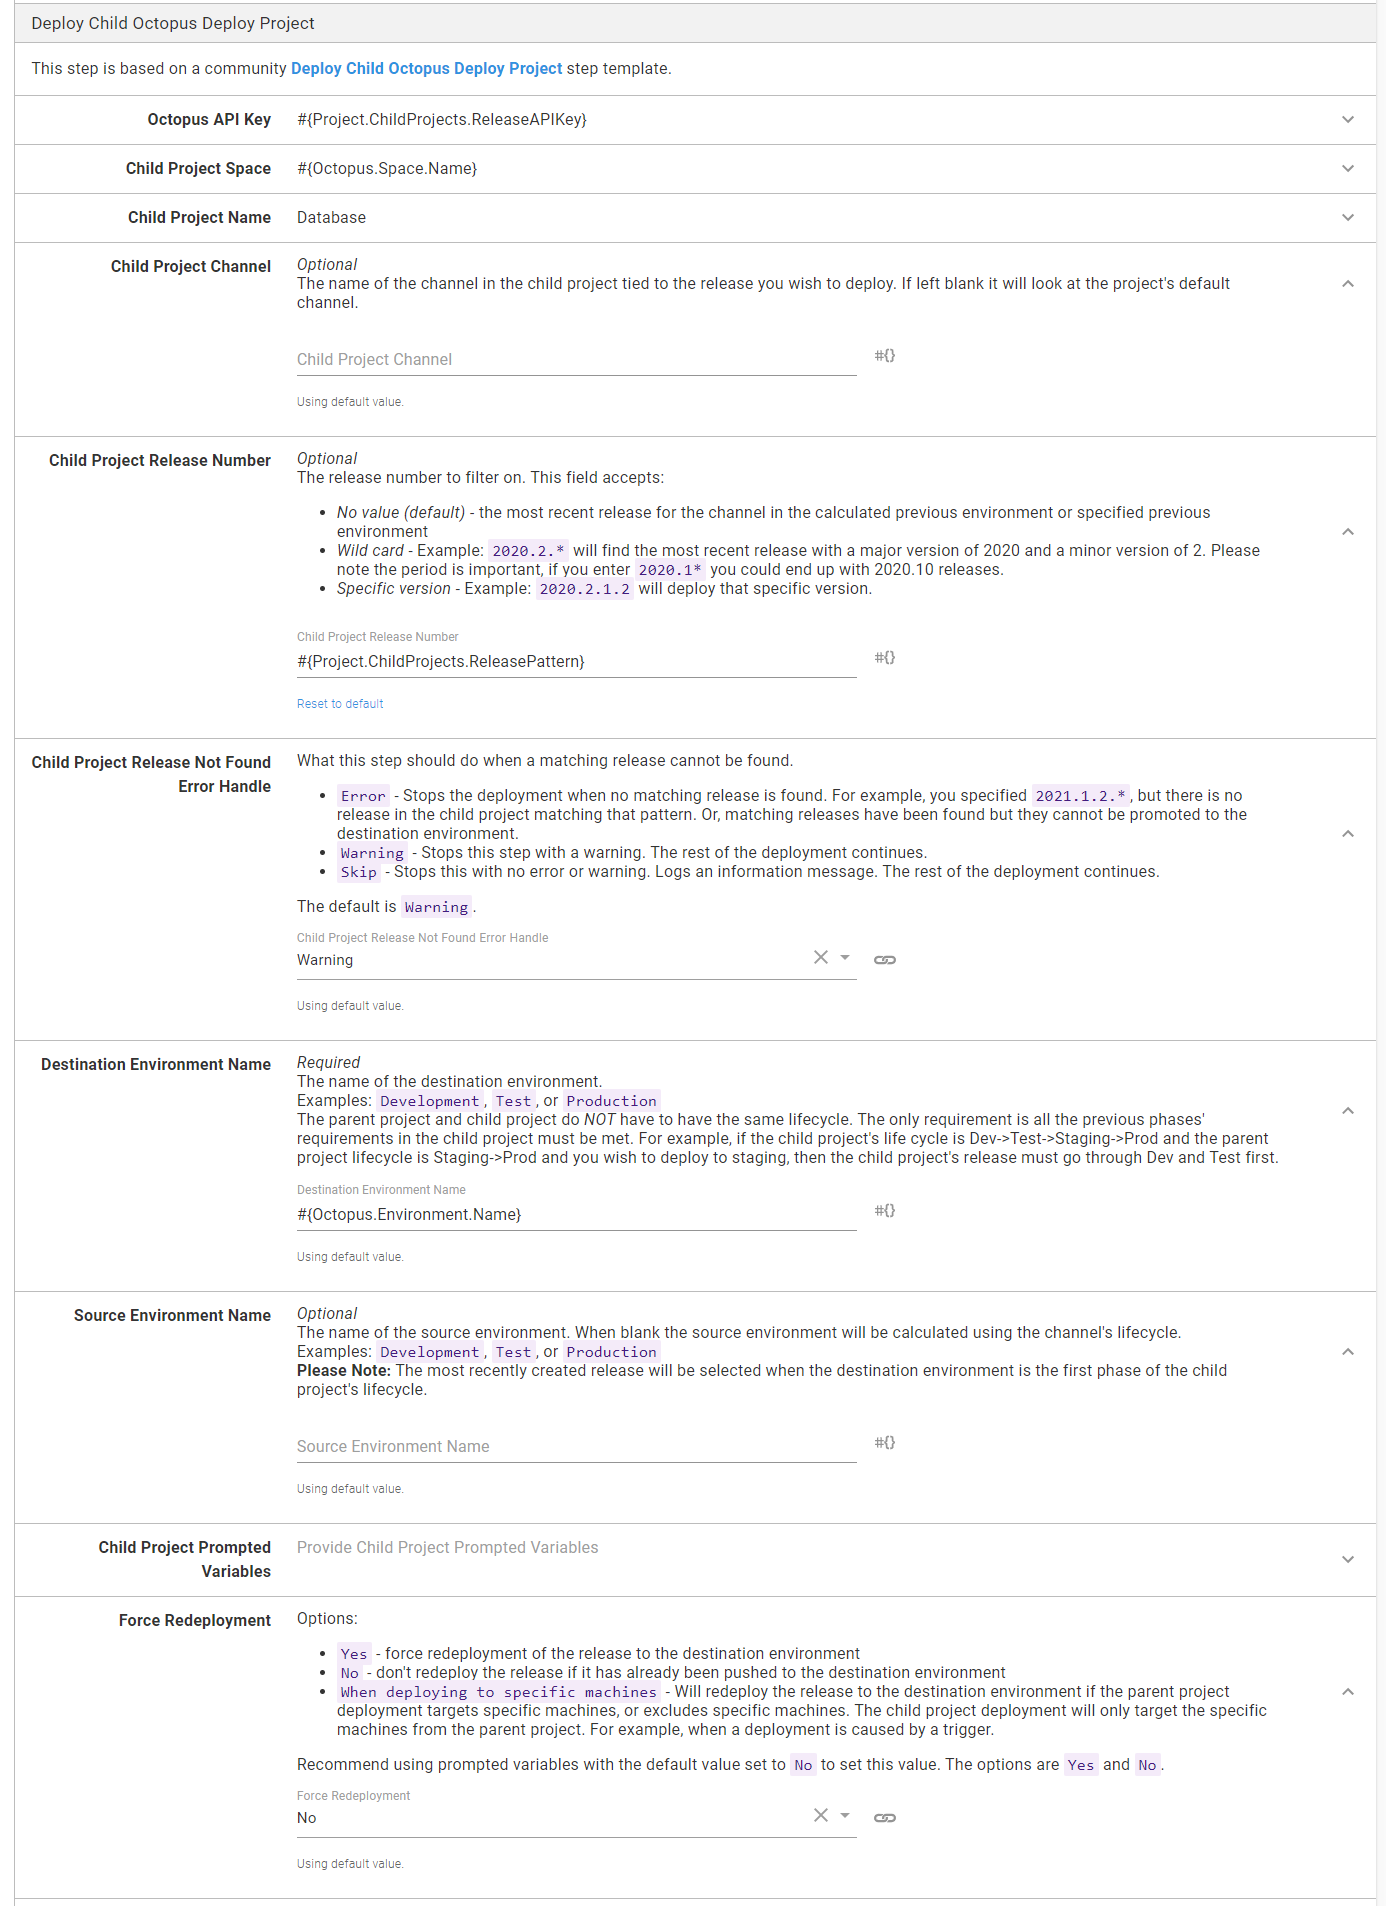
- Octopus API Key: The API Key of a user with permissions to deploy and approve manual interventions when using the automated approval functionality.
- Octopus Child Space: The name of the space where the child project is located. The default is the current space. Unless there is a compelling reason, do not change this.
- Child Project Name: The name of the child project.
- Child Project Channel: The name of a specific channel. If you leave it blank, it will pick the default channel on the child project.
- Child Project Release Number: The release number to deploy. The default is empty; it will pull the latest release in the source environment. You can supply a specific number, for instance,
2021.1.0.14or a pattern, for instance,2021.1.1.*. The.*is important. If the period.isn’t supplied, you could end up with releases from2021.1.10.xor2021.1.15.x. - Child Project Release Not Found Error Handle: What the step should do if the child project doesn’t have a matching release number. By default, it will skip the step and log a warning. You can change it to stop a deployment with an error, or not log a warning. I recommend leaving it as a warning.
- Destination Environment Name: The name of the environment being deployed to, with the default set to the current environment name. I recommend leaving this as is unless you’re implementing an “Approval Only” environment between Staging and Production (more on that later).
- Source Environment Name: The name of the source environment. When left blank, the step template will look at the channel’s lifecycle, determine which phase the destination environment is in, then look for the environment(s) before that. Octopus Deploy lifecycles can have 1 to N environments in a phase. Enter a specific environment if the release has to come from a specific source environment. I recommend you leave this blank.
- Child Project Prompted Variables: Where you supply prompted variable values for the child project.
- Force Redeployment: This tells the step template to either redeploy a release or skip it if it has already been deployed. If you have a deployment target trigger configured for the parent project, you’ll want to change the value to
When deploying to specific machines. Otherwise leave it as is. - Ignore Specific Machine Mismatch: This only comes into account if you deploy to specific machine(s), which happens with a deployment target trigger. This step will determine if the child project is associated with any of those machines and exit when it cannot find a match. I recommend leaving as is unless there’s a particular reason to change it.
- Save Release Notes as Artifacts: The step template will pull all the release notes and build information from the child project and save it in an output variable
ReleaseNotes. Output variables are not easily accessible after a deployment. If you want to persist the gathered release notes in the parent project, set this toYes. - What If: Tells the step template to do everything except the deployment. Set to
Yesto approve a release before actually deploying. - Wait for finish: Wait for the deployment to finish before moving on. Setting the what if parameter set to
Yeswill cause this parameter to be ignored. - Wait for Deployment: The maximum time a step template will wait for the deployment to finish. When the timeout is exceeded, the child project’s deployment is canceled. If a deployment finishes before the limit, it will stop waiting. Leave this parameter at 1800 seconds (30 minutes) unless there’s a compelling reason to change it.
- Scheduling: Allows you to schedule a deployment in the future. Uses DateTime.TryParse to parse the date. I recommend using this with a prompted variable.
- Auto-Approve Child Project Manual Interventions: This uses the parent project’s manual intervention approvals for the child project’s manual intervention.
- Approval Environment: The environment’s name where the parent project’s manual interventions are located. The default is the current environment. Change this if you are implementing a “Prod Approval” environment.
- Approval Tenant: The name of the tenant where the parent project’s manual interventions are located. The default is the current tenant. Change if you are implementing a “Prod Approval” environment for a single tenant.
Using the Deploy Child Octopus Deploy Project step template
This section walks through configuring the step template for different scenarios. These scenarios start simple and slowly add more functionality.
Scaffolding
First, there is some scaffolding to configure.
Create a service account
We have to create a service account and assign that account to a team. This is because the step template uses the Octopus Deploy API.
I recommend naming the service account Release Conductor.
Create an API key for the user and save it in a safe location.
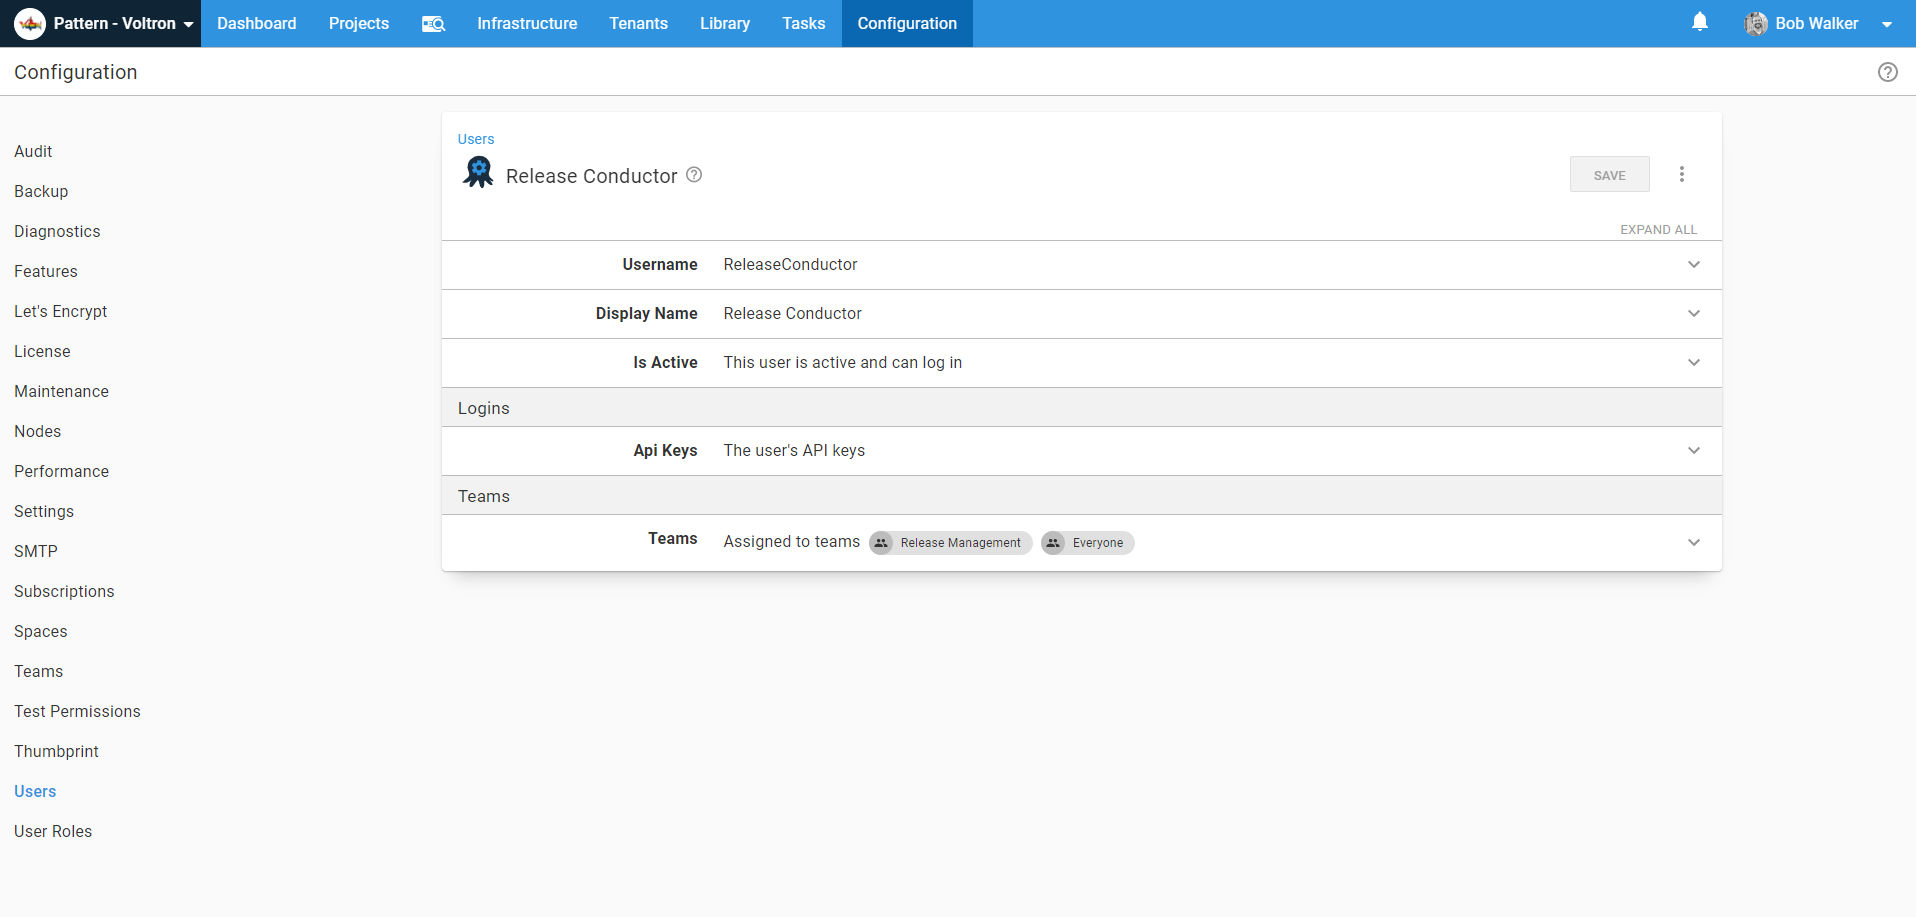
Create a new team called Release Management and assign that user to it.
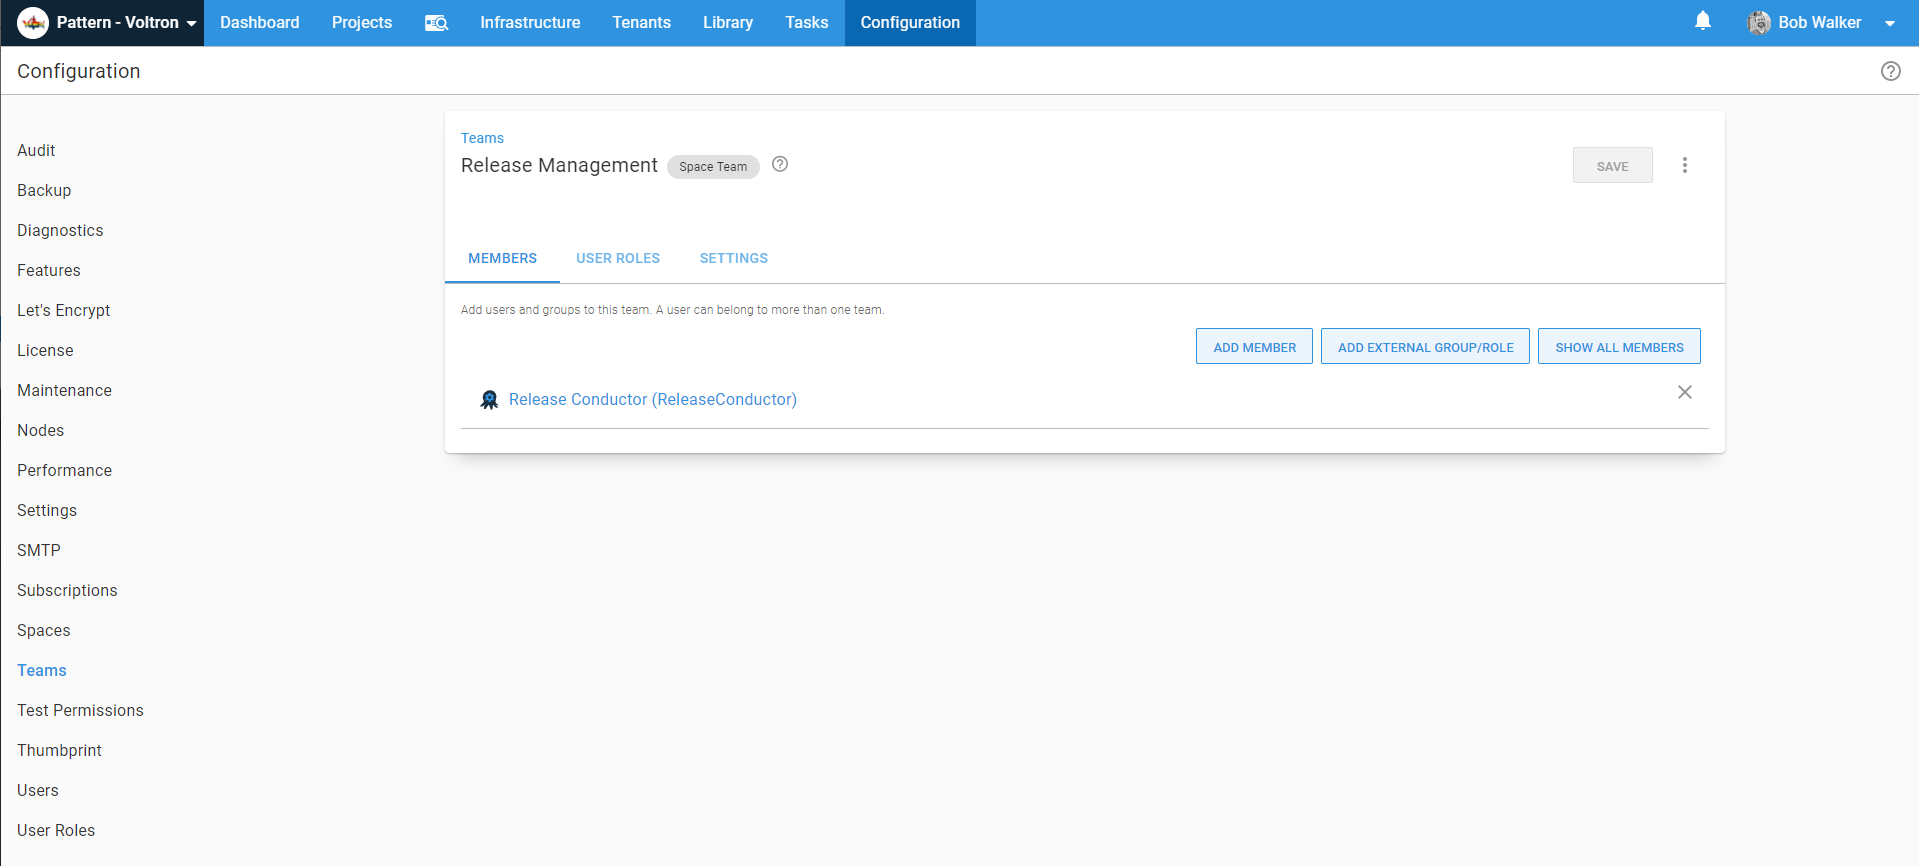
Assign the roles Deployment Creator, Project Viewer, and Environment Viewer to the team. Assigning those roles will allow the service account to create a deployment and see the projects and environments but not edit them.

If you want to leverage the auto-approval functionality, go to each manual intervention in the child projects and add the release management team.

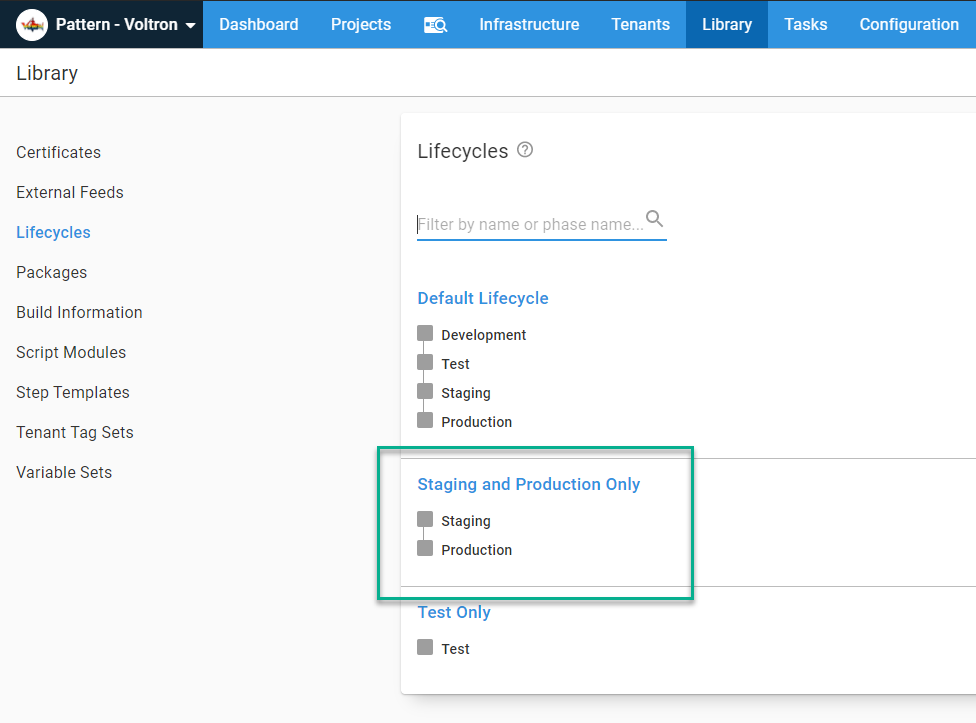
Create a unique lifecycle
The parent project only needs to deploy to Staging and Production. Don’t use the default lifecycle that has all four environments in it. Create a new lifecycle that only includes Staging and Production.
The parent project and child project’s lifecycles and channels do not have to match. The step template will determine if the selected release from the child project can be promoted to the destination environment.
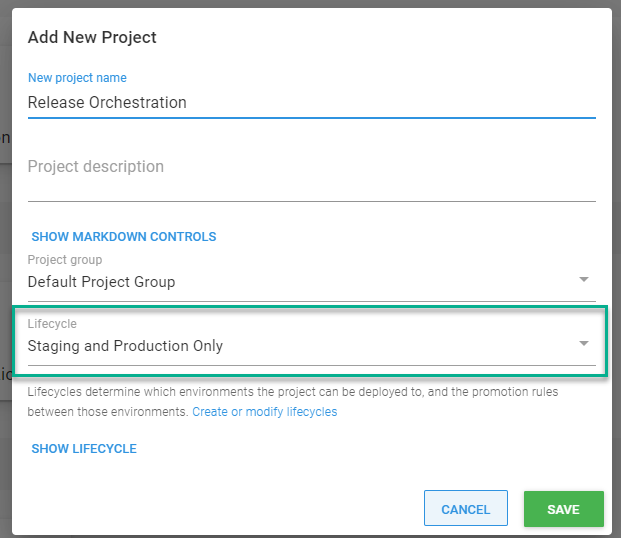
Create the project
Next we create the project. When creating the project, remember to select the new lifecycle you created above.
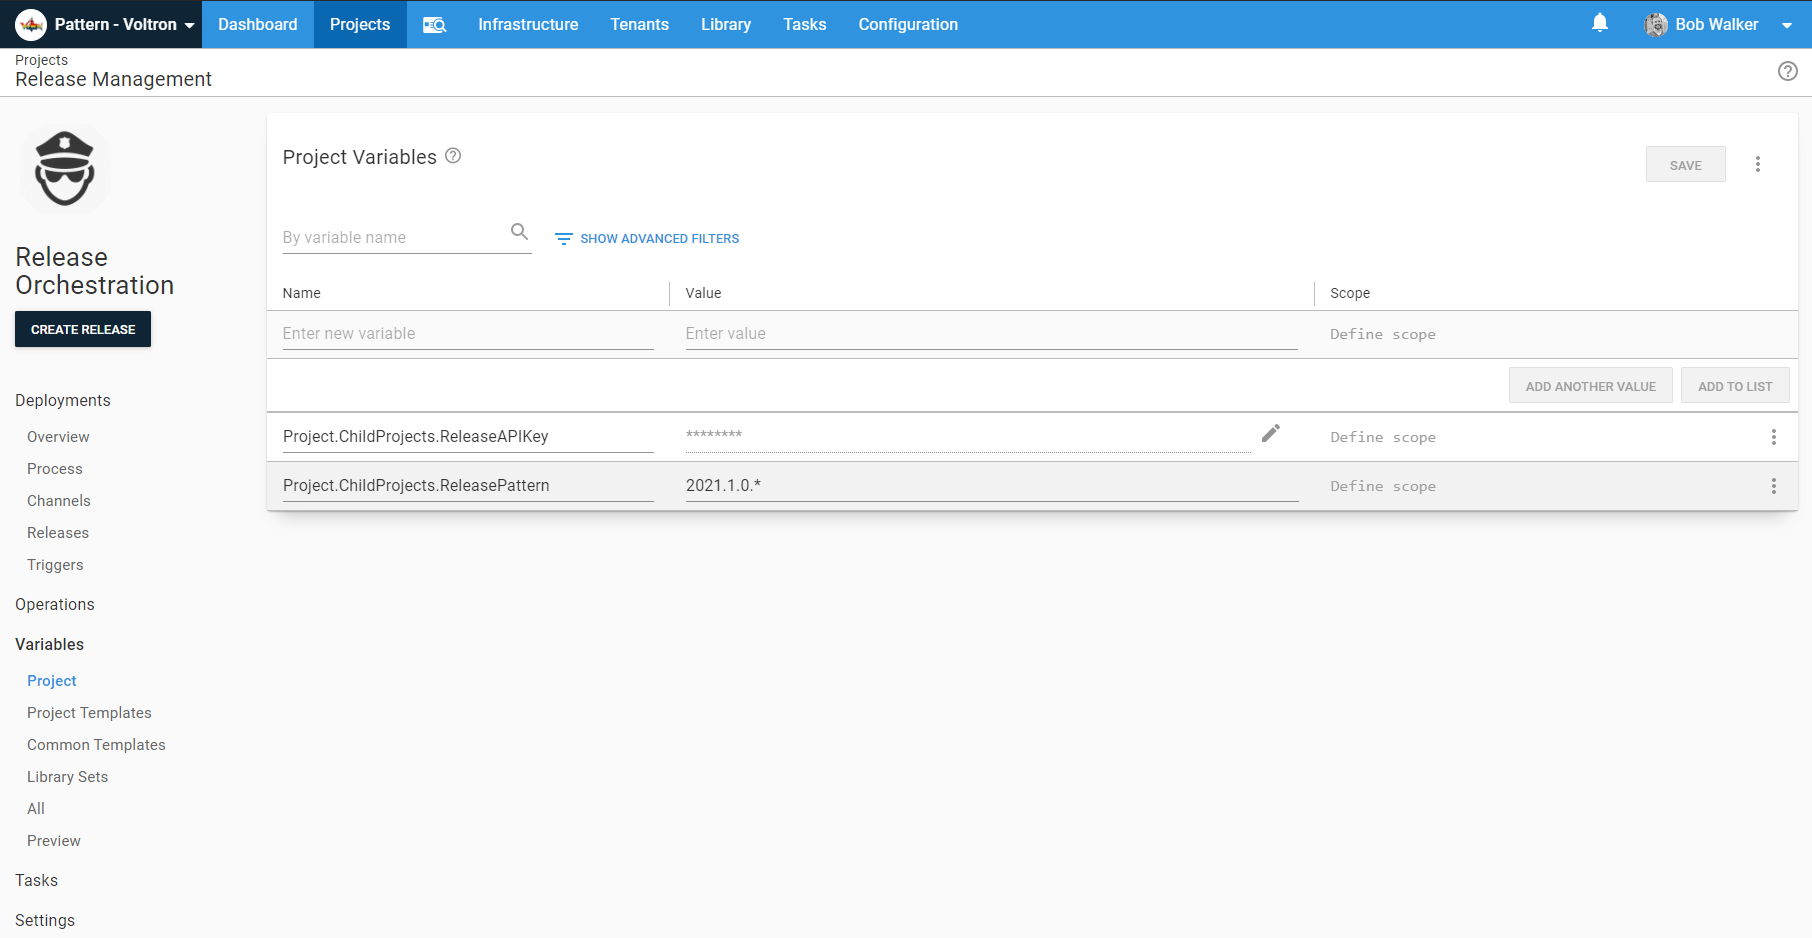
After the project has been created, navigate to the variables screen and add the API key and the release pattern.
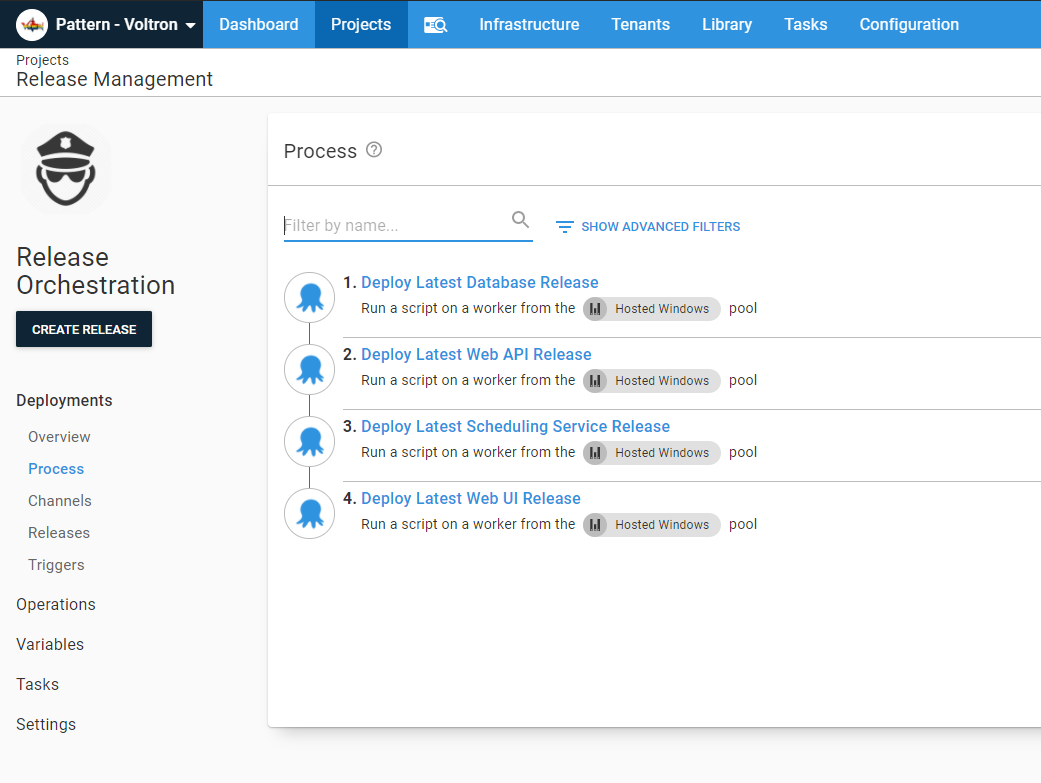
Scenario: Deploying the latest release from Test to Staging
In this scenario, we’re going back to the sample application. If you recall, release 2021.1.0 is ready to be deployed from Test to Staging.
Go to the deployment process in the newly created Release Orchestration project and add a Deploy Child Octopus Deploy Project step for each child project.
You can leave most of the values for the parameters with the default values. Only change the following for now:
- Octopus API Key: The API key variable,
#{Project.ChildProjects.ReleaseAPIKey} - Child Project Name: The name of the child project.
- Child Project Release Number: The release pattern variable,
#{Project.ChildProjects.ReleasePattern}
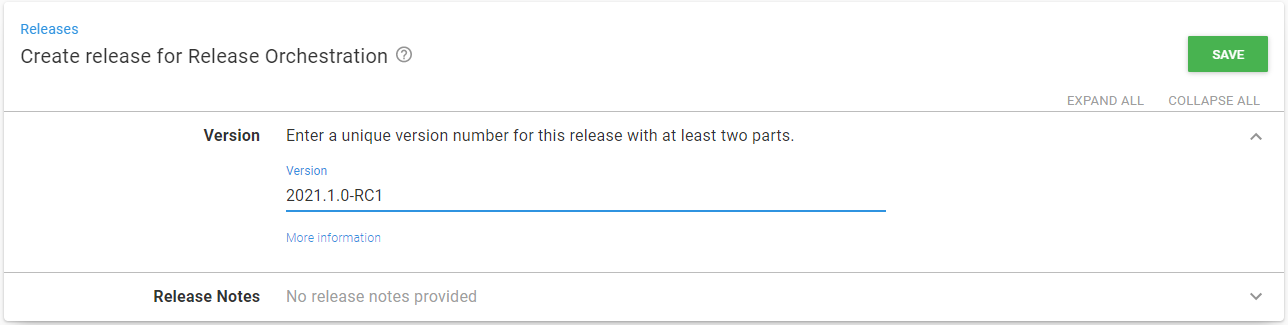
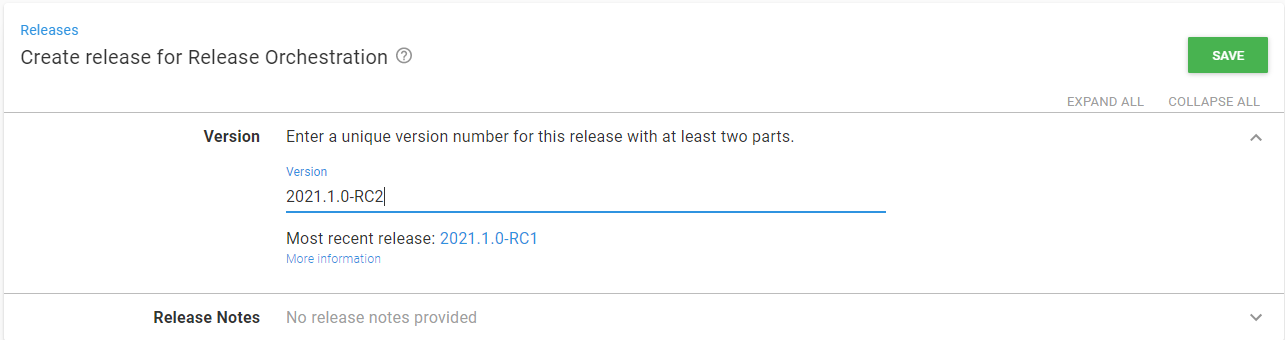
After adding and configuring the steps, it’s time to create a release.
I’ll make many changes to the parent project in this article; you might see 2021.1.0-RCx for the release numbers.
Wait for the deployment to finish deploying all the child projects.
Scenario: Approvals in parent project only
Deploying to Staging is straight forward as no approvals are needed.
Deploying to Production is more involved. One of the key features of this new step template is using approvals from the parent project to auto-approve child projects.
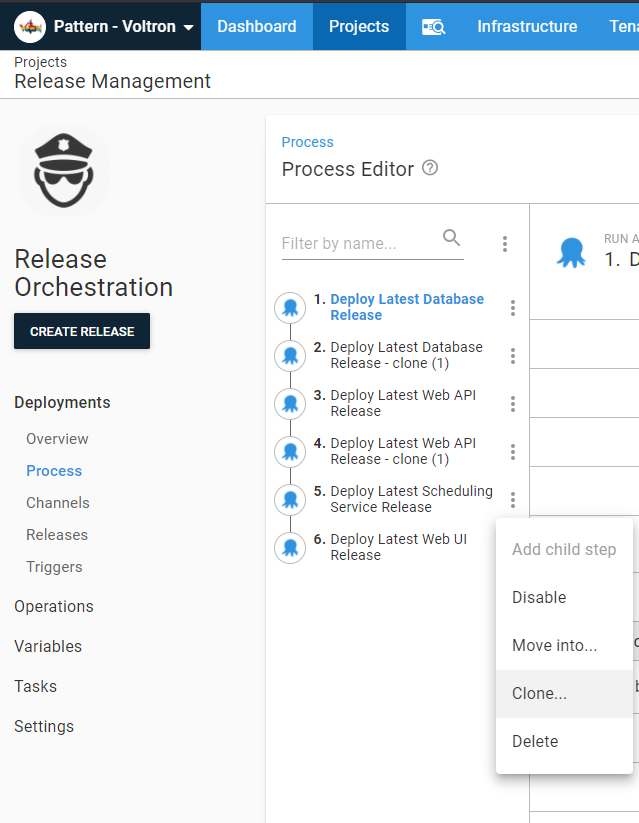
To configure this, you need to clone the four steps. Cloning is accomplished by clicking the overflow menu (three vertical ellipsis points) next to each step and clicking the Clone button.
Rename each of the cloned steps. The parameters in the cloned steps are:
- Save Release Notes as Artifacts: Set to
Yes. - What If: Set to
Yes.
Finally, reorder the steps by clicking the overflow menu (three vertical ellipsis points) next to the Filter by name text box and click Reorder.
Move all the steps you set to do a “whatif” to be above the “non-whatif” steps.

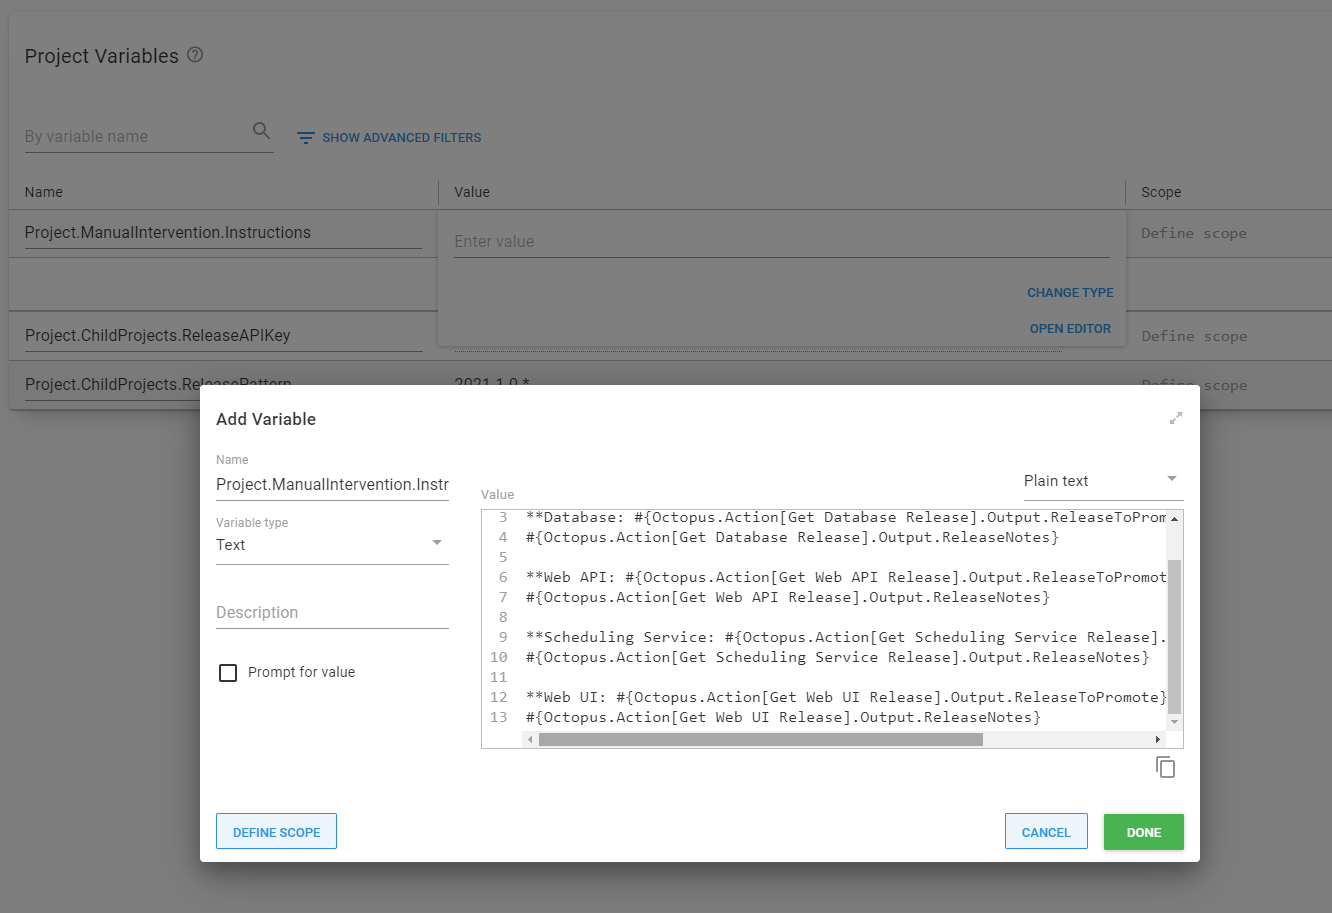
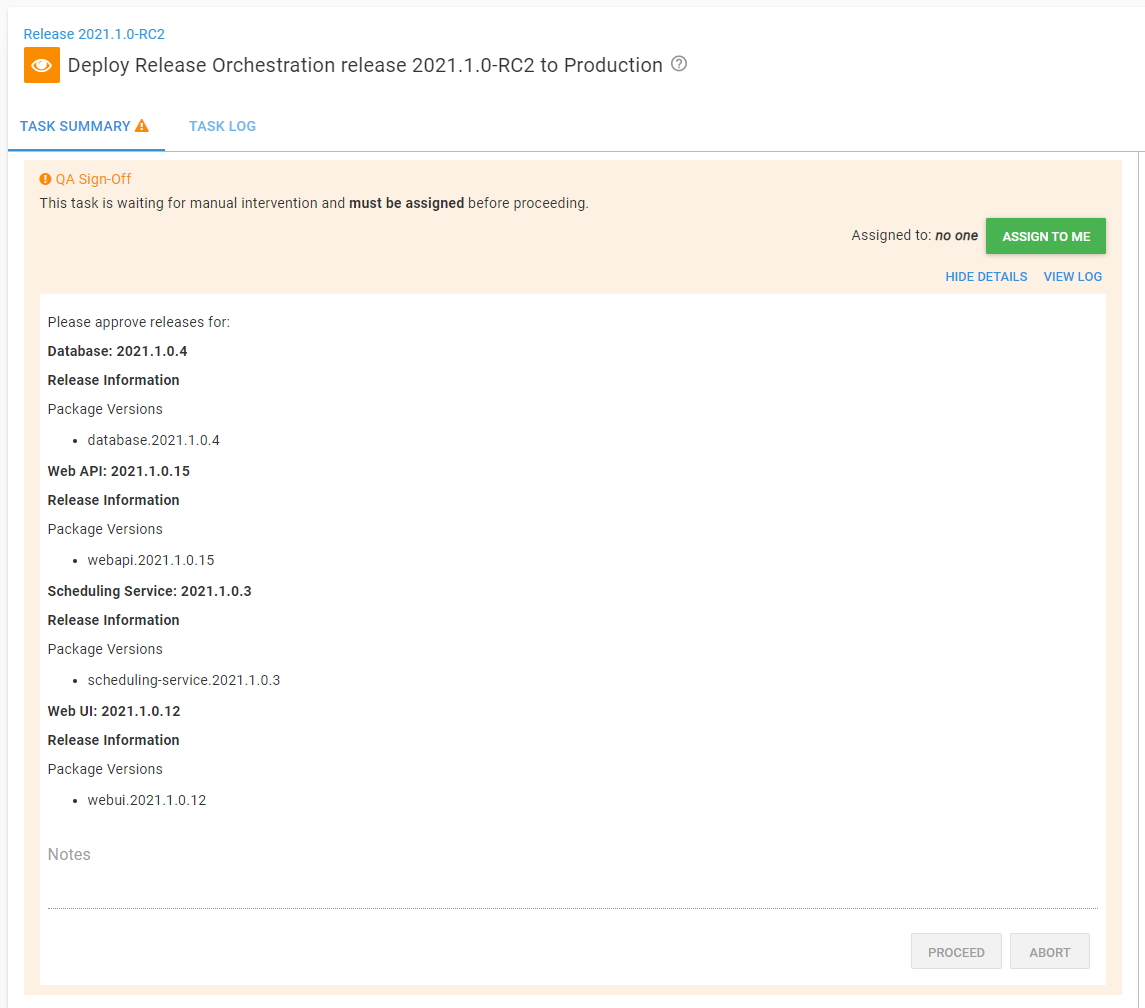
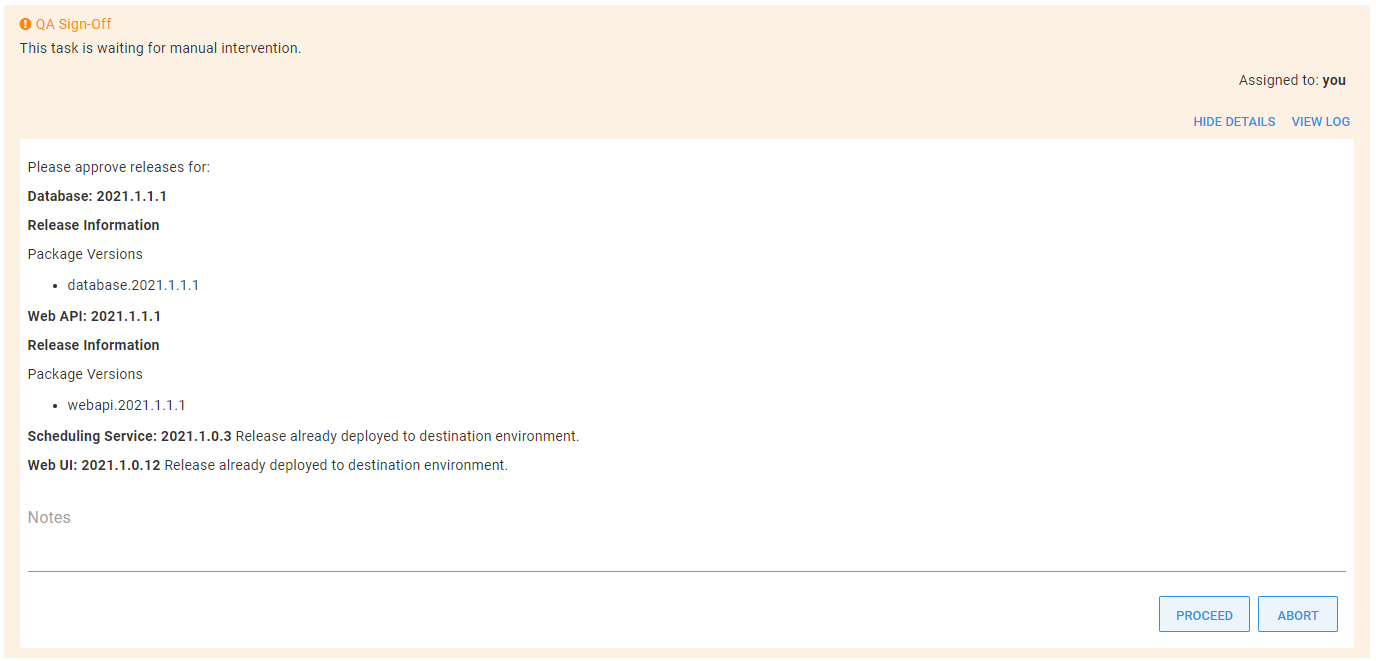
Next, add the manual intervention steps. One of the features of the manual intervention step is the instructions. The new step template will set output variables we can access. For example:
Please approve releases for:

**Database: #{Octopus.Action[Get Database Release].Output.ReleaseToPromote}**
#{Octopus.Action[Get Database Release].Output.ReleaseNotes}

**Web API: #{Octopus.Action[Get Web API Release].Output.ReleaseToPromote}**
#{Octopus.Action[Get Web API Release].Output.ReleaseNotes}

**Scheduling Service: #{Octopus.Action[Get Scheduling Service Release].Output.ReleaseToPromote}**
#{Octopus.Action[Get Scheduling Service Release].Output.ReleaseNotes}

**Web UI: #{Octopus.Action[Get Web UI Release].Output.ReleaseToPromote}**
#{Octopus.Action[Get Web UI Release].Output.ReleaseNotes}
I like to avoid duplicating effort. Let’s add that as a variable.
Now add a manual intervention for each approver group.
Reorder the deployment process once again, so the new steps are between the “what-if” steps and the “non-what-if” steps.
Next, create a new release and deploy it to Staging.
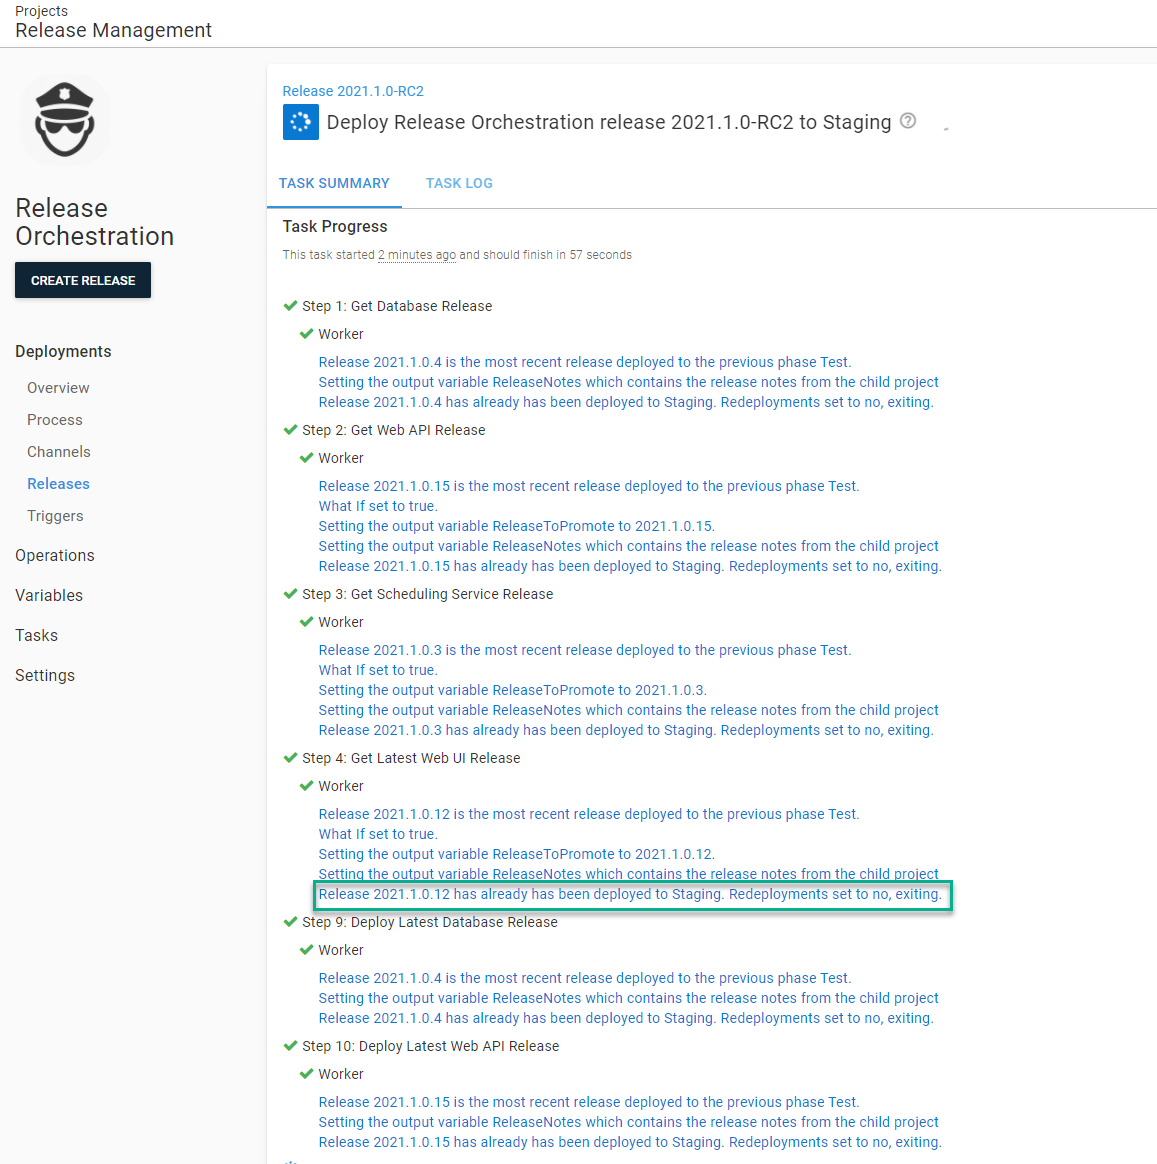
When you deploy to Staging you will see this message. This is expected, especially for this sample project. The redeployment parameter is set to No, and we haven’t created any new releases.
Promote that release to Production. During this deployment, you’ll see the manual interventions and auto-approvals in action.
First, the manual intervention should have the version being deployed along with the release notes.
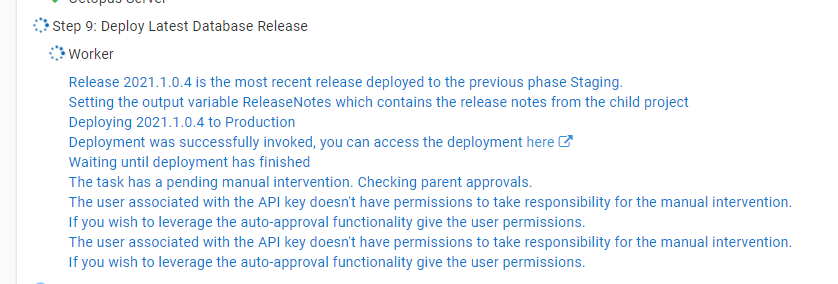
After every group has approved the release, the deployments will begin. If the user associated with the API doesn’t have permission to take ownership of the manual intervention, you will see a warning like this.
You will have 30 minutes to fix this problem, or the deployment will be canceled.
After that’s fixed, you should see a message similar to this in the child projects:

And with that, the release to Production is complete.
Scenario: Approve today, deploy tomorrow
For many of our users, deployments are done during off-hours. Approvers shouldn’t have to be online during deployment if their only task is to approve a deploy. Ideally, the deployment should run automatically off-hours without user intervention and alert the appropriate people if something goes wrong. We can accomplish that functionality by adding in a Prod Approval environment to sit between Staging and Production. This environment will only be used for parent projects.
First, add the Prod Approval environment. You will notice this environment sits between Staging and Production on this page. I click the overflow menu to reorder the environments on this page.

After the new environment has been added, update the lifecycle used by this parent project.

Keep an eye on the Default Lifecycle. By default, that lifecycle doesn’t have explicit phases defined. Instead, it auto-generates the phases using the entire environment list. To remove Prod Approval from the Default Lifecycle you need to add explicit phases.
Next, update the approval steps to only run in the Prod Approval environment. At the same time, configure the non-what-if steps to skip the Prod Approval environment.
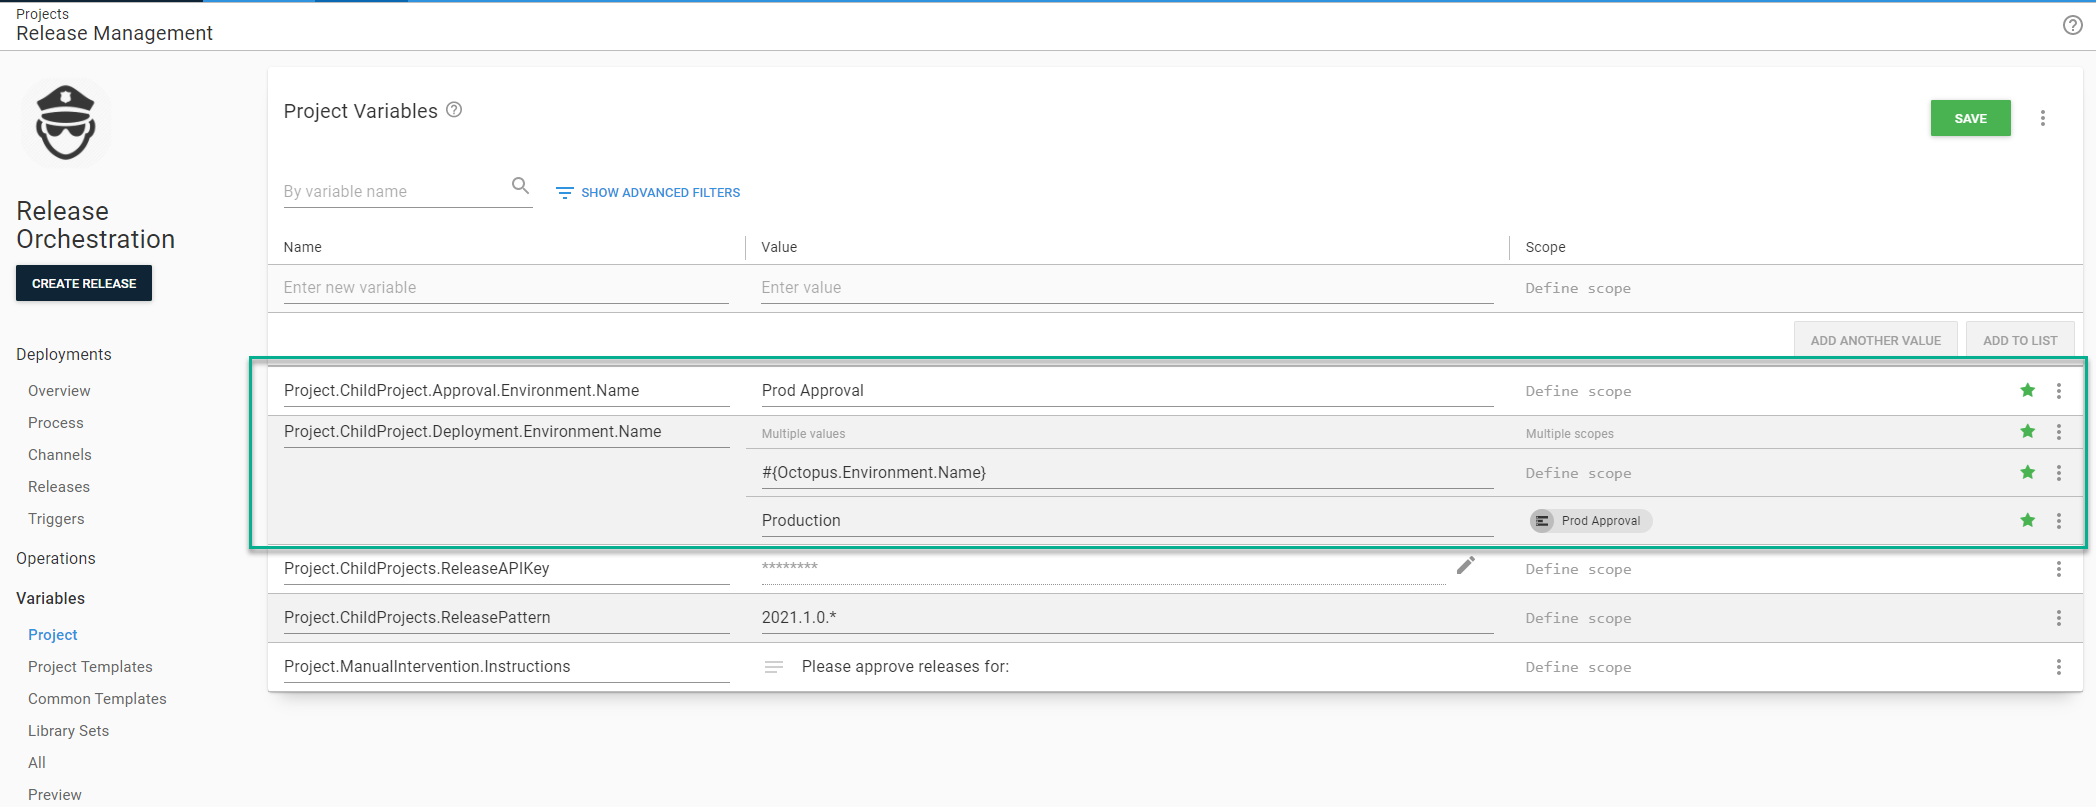
Next, navigate to the variables screen and add in two new variables:
- Project.ChildProject.Approval.Environment.Name: This stores the Prod Approval environment name.
- Project.ChildProject.Deployment.Environment.Name: This stores the name of the environment the child project should be deployed to. For all environments except Prod Approval, the name will match the current environment. When this is run on the Prod Approval environment, the deployment environment name is Production.
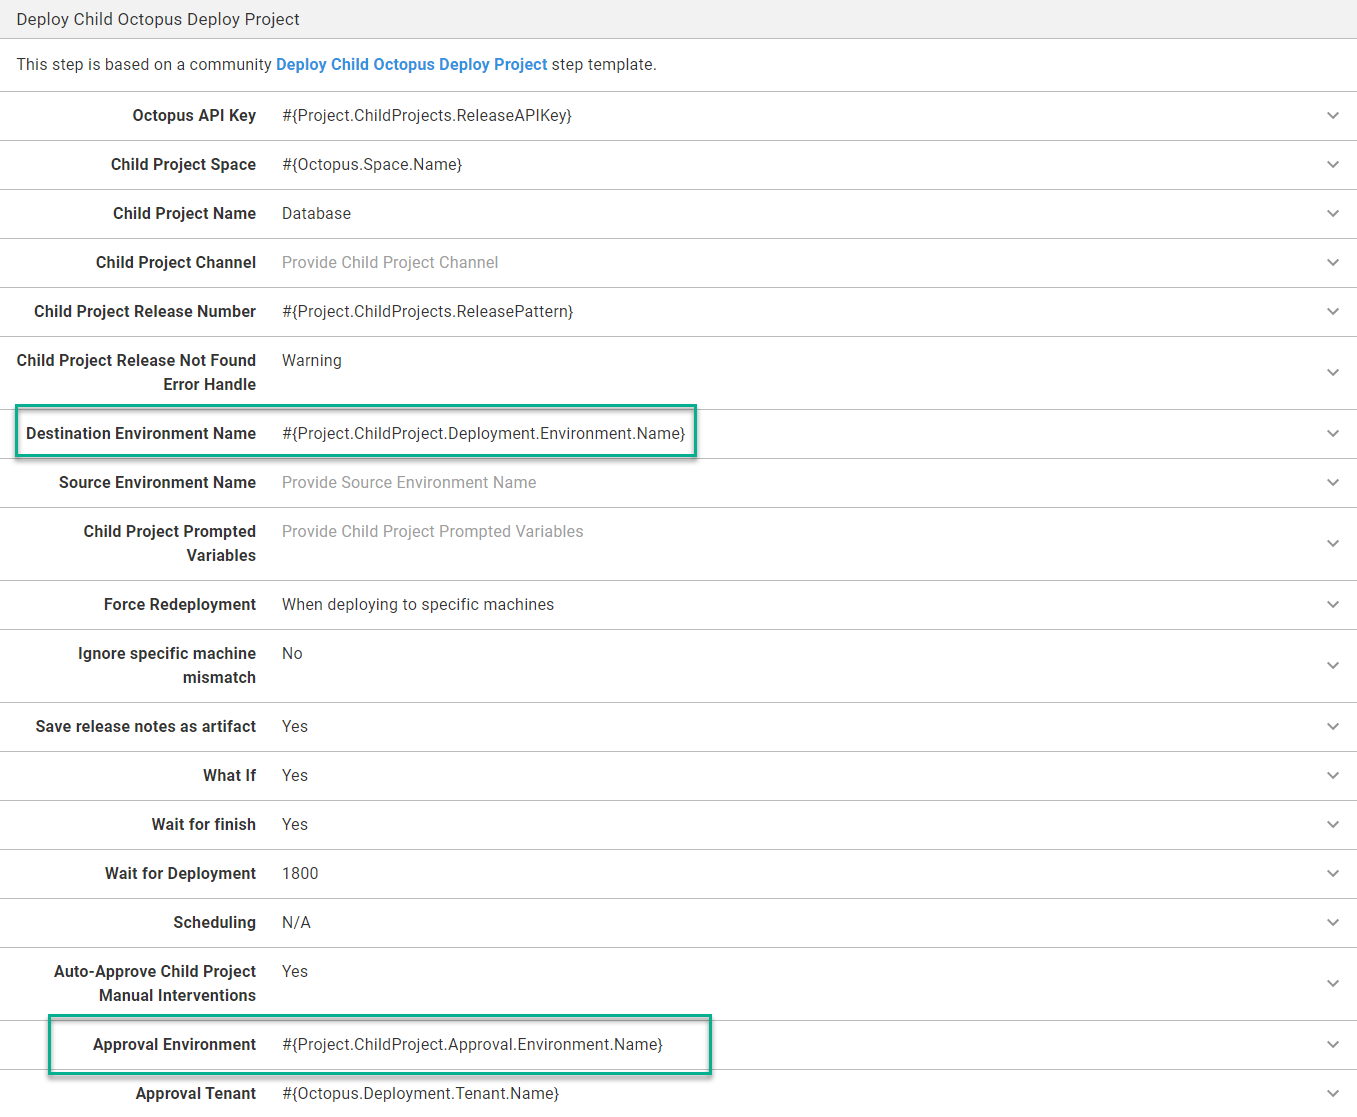
Go into each step that implements the Deploy Child Octopus Deploy Project and update the following parameters:
- Destination Environment Name: Update to
#{Project.ChildProject.Deployment.Environment.Name} - Approval Environment: Update to
#{Project.ChildProject.Approval.Environment.Name}
This tells the step template to pull approvals from the Prod Approval environment rather than the Production environment during a Production deployment. This means we can approve at 11 AM and schedule it to deploy at 7 PM.
Now, let’s see this in action. For the sample application, let’s pretend a bug was found in the API and the database. A patch 2021.1.1.1 is created to fix that bug and deployed to Development and Test.
Let’s assume everything successfully passes QA, and it’s time to promote those two components to Staging.
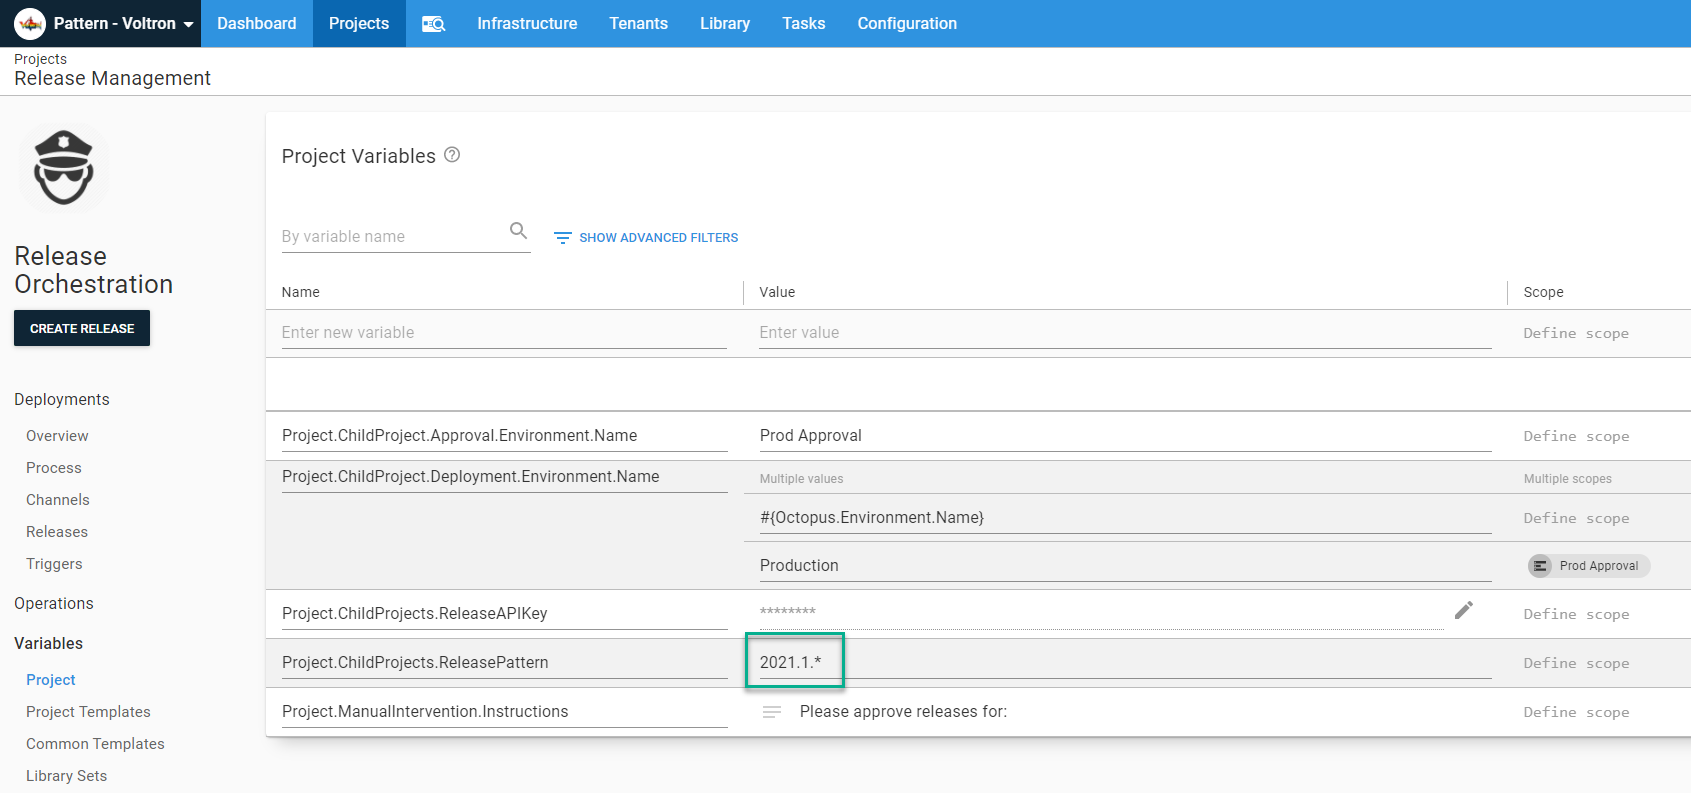
First, we want to update the release pattern to 2021.1.*. You’ll notice it isn’t 2021.1.1.*. On reflection, it makes sense only to update that when a new minor release is created, not for every patch release. And it won’t redeploy existing code, because the step template will skip already deployed releases.
Next, create a new release for the Release Orchestration project and deploy it to Staging.
Promote that release to Prod Approval and go through each of the approval steps. You’ll notice the approval message is slightly different for already deployed releases.
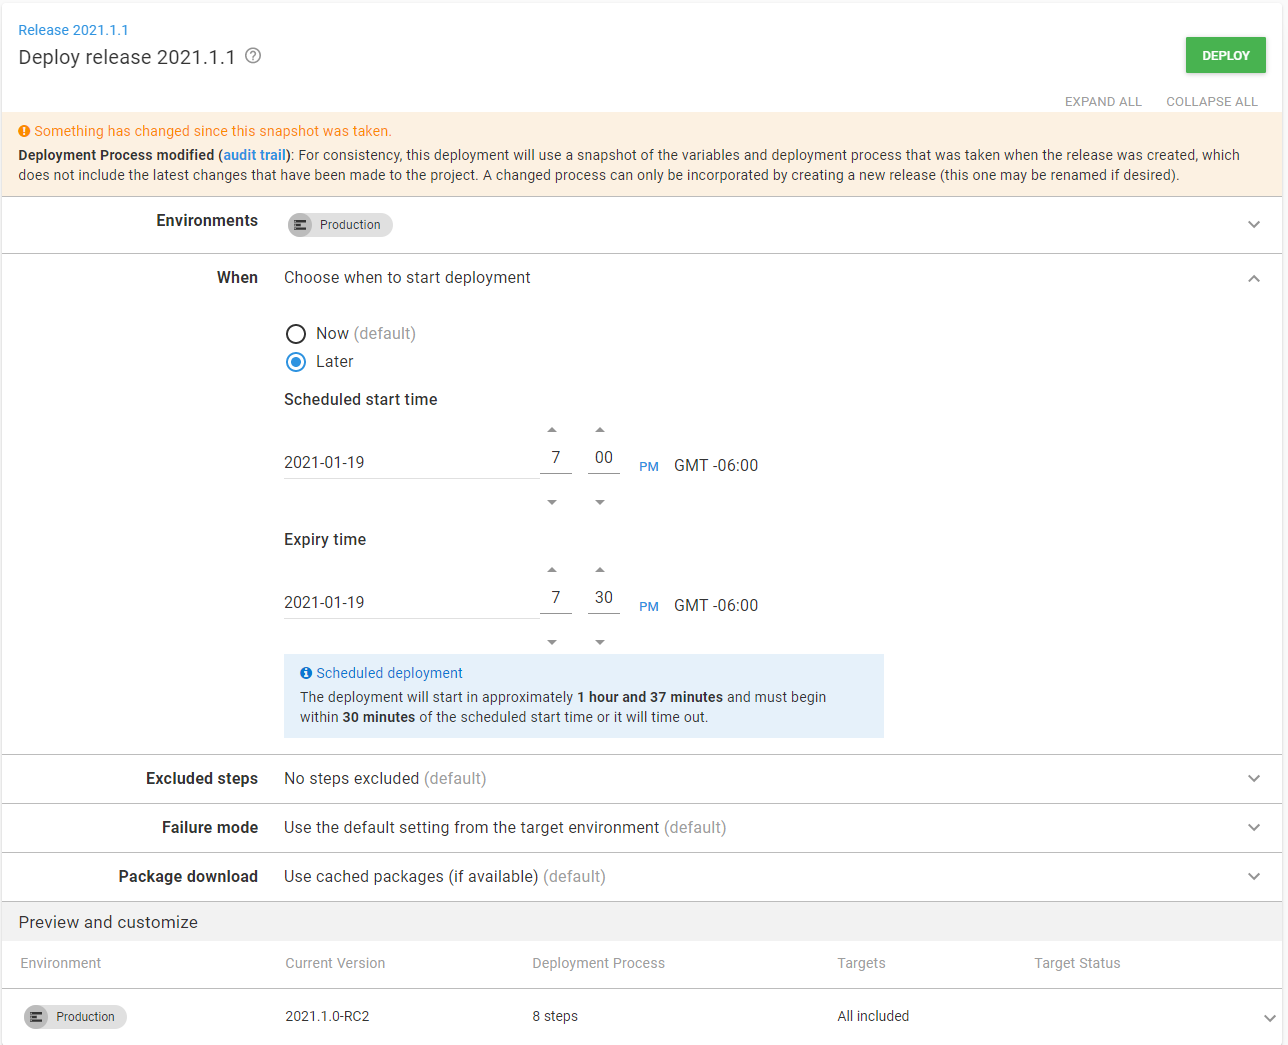
Now it’s time to schedule the release for deployment to Production. Using the built-in tool, we can schedule it to run at 7 PM tonight.
When the release is deployed, it will pull the approvals from the Prod Approval environment.
Scenario: Redeploy on demand
By default, the step template will skip any release already deployed to the target environment. For many use cases, this is the preferred behavior. However, there are several use cases where a redeployment is desired. These include:
- Environment refresh: When the Staging environment is refreshed from Production, it makes sense to redeploy the latest code to Staging to get the latest bits out for testing.
- Server reset: If one of the servers is experiencing issues, a solution is to redeploy, to make sure all the code and configuration values are up to date.
- New server: If a new server is added to the web farm, redeploy everything to make sure the web farm has the same code and configuration across all nodes.
To accomplish this we’ll use Octopus Deploy’s prompted variable functionality.
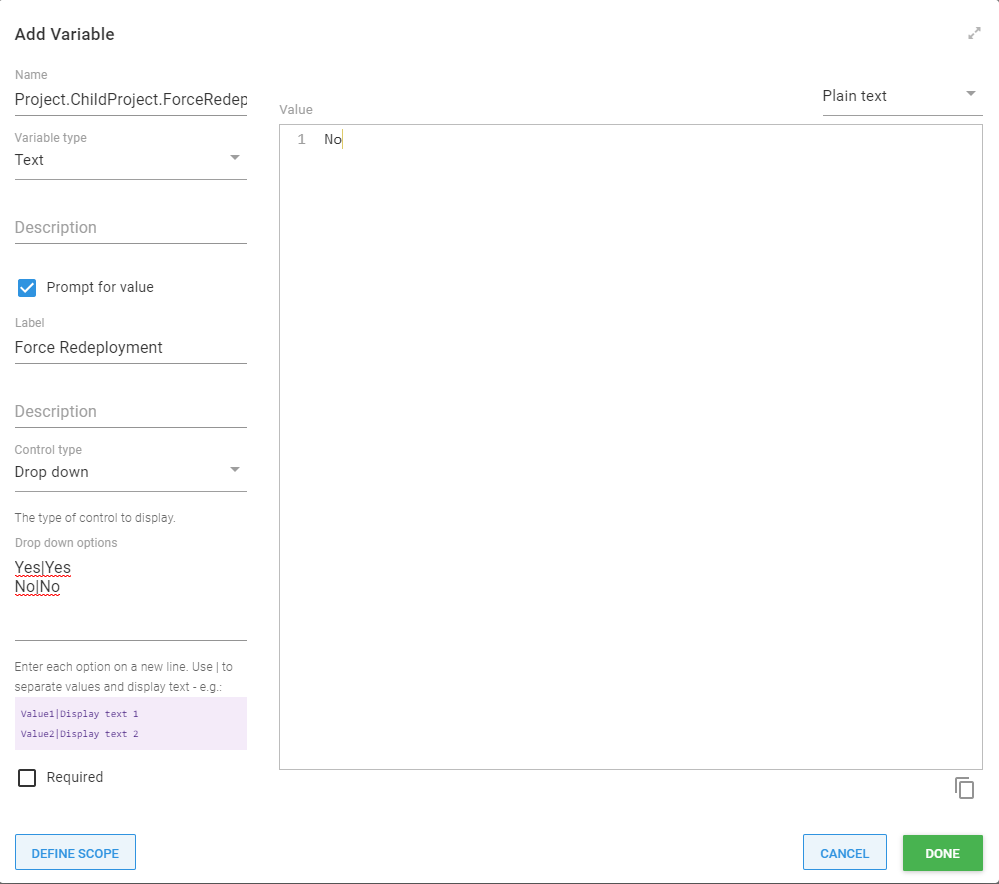
First, we will add a new variable to the project:
- Name:
Project.ChildProject.ForceRedeployment - Default Value:
No - Label:
Force Redeployment - Control Type: Drop Down List
- Options:
YesandNo
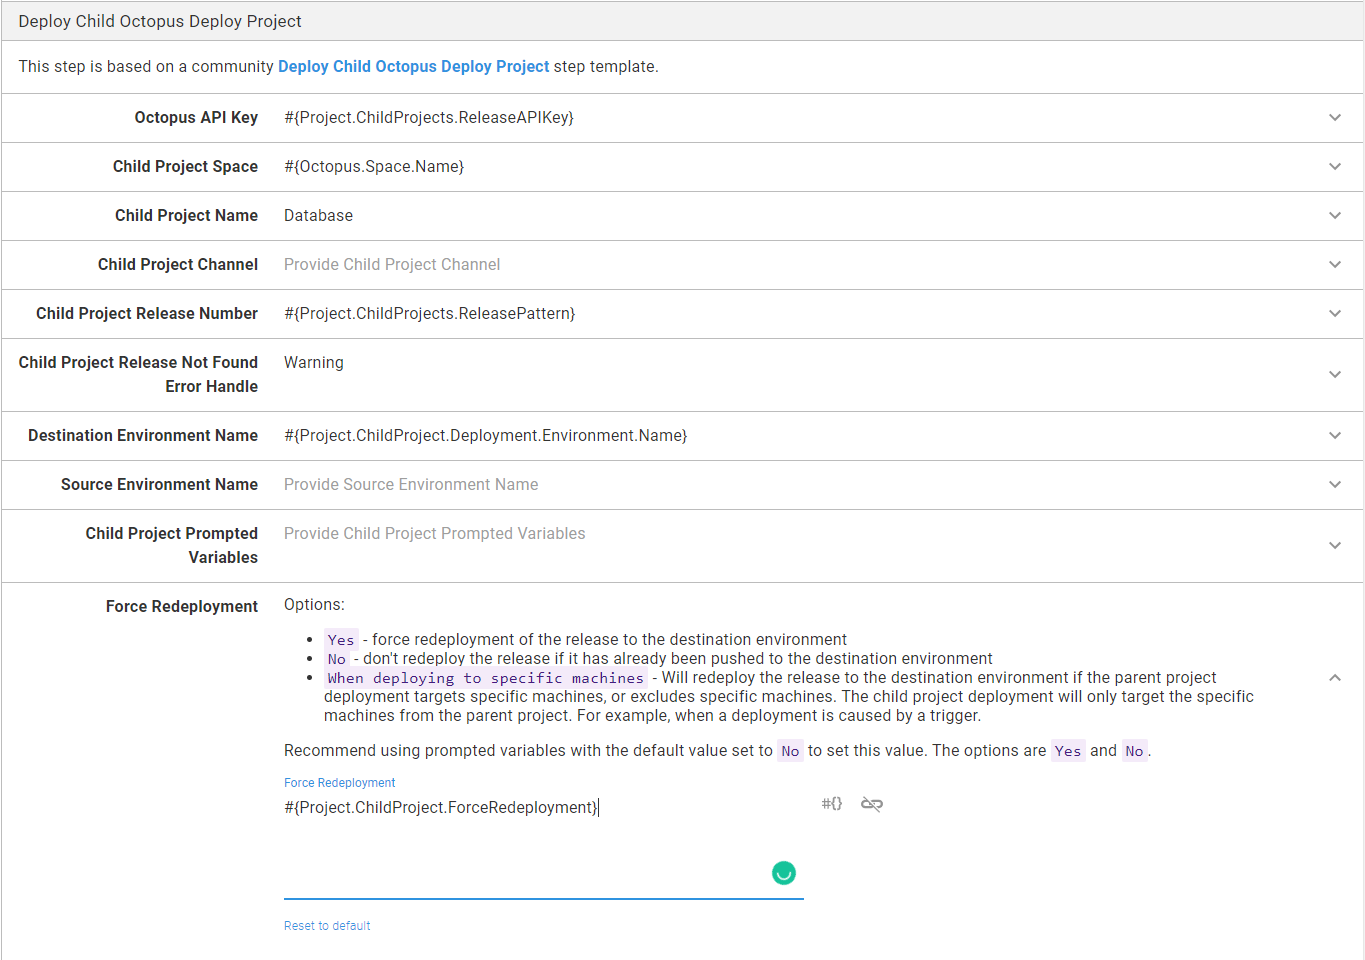
Next, update the Force Redeployment parameter to use this new variable.
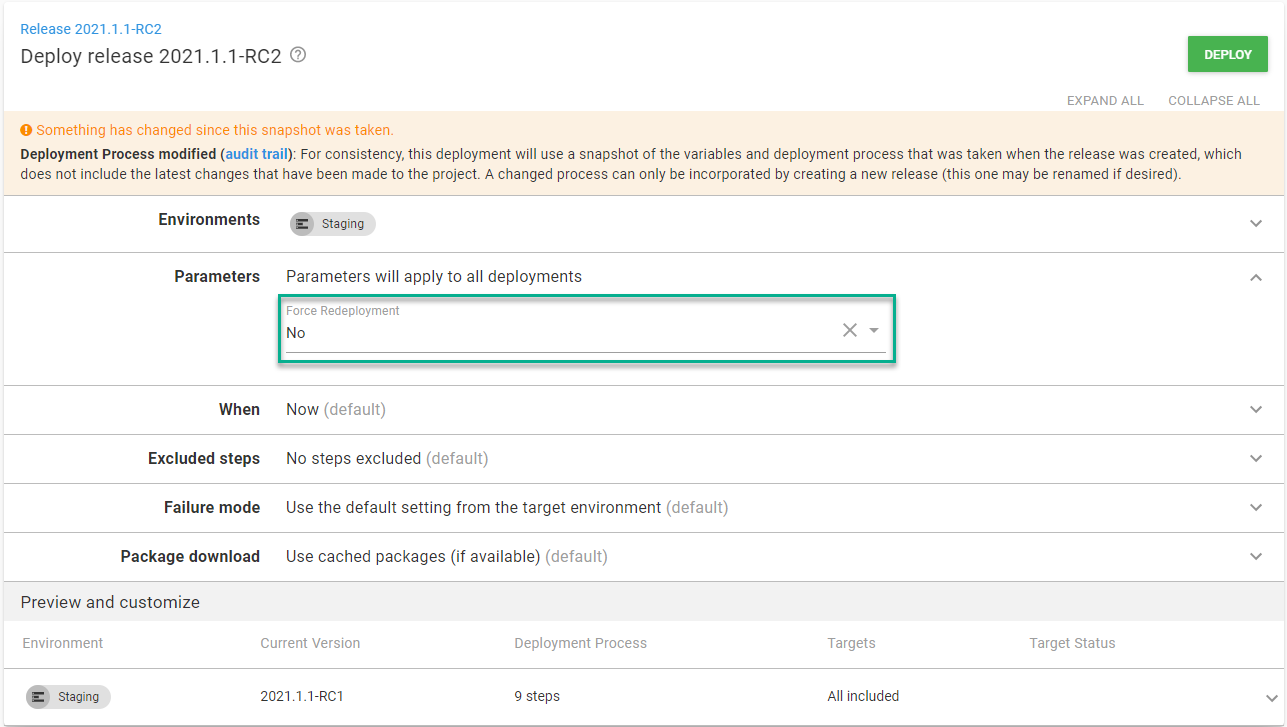
Now when you’re deploying, you’ll be prompted to force a redeployment. The default is No, if a user doesn’t change anything the default functionality will be used.
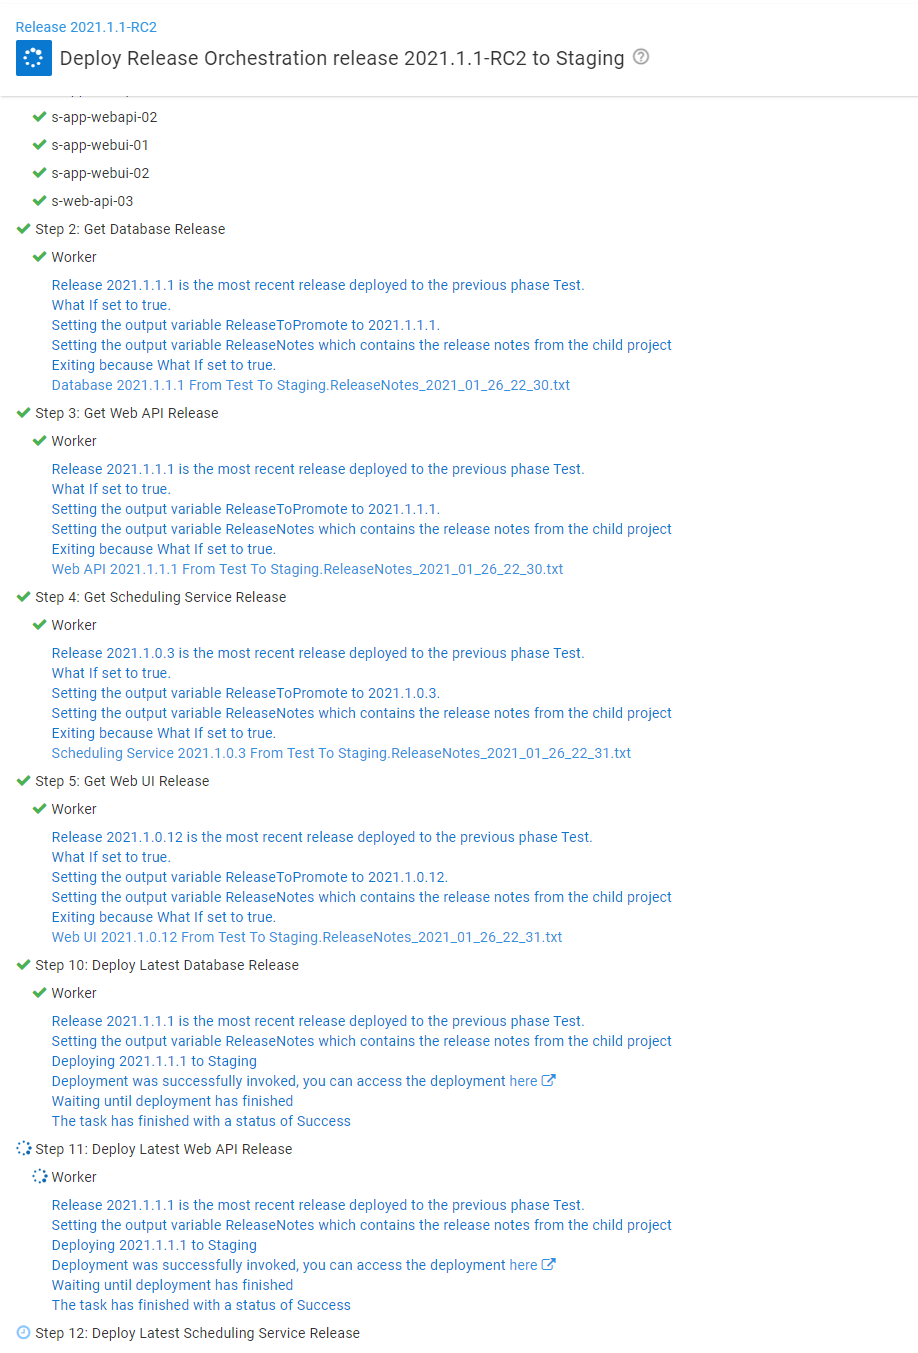
When it is set to Yes, you’ll see all the child projects redeploy.
Currently, the prompted variable makes redeployment all or nothing. You might prefer to have a unique variable per component project, or group them together logically.
Alternatives
You might be thinking this is all very complex, but I believe it’s beneficial. Let’s re-examine why you might want a project per component:
- Minimize downtime by only deploying what has changed.
- Minimize build time by only building what has changed.
- Minimize the number of decisions a person has to make.
- Single responsibility principle; each project deploys one thing to the best of its ability.
At this time, an Octopus project per component is the best solution to meet these requirements.
There are alternatives to a project per component. This section will walk through those alternatives to better understand why an Octopus project per component solves the problem most efficiently.
Single project with multiple channels
It’s possible to have a single project and use the Octopus Deploy channels feature and scope steps to run on specific channels. The channel is selected when you create a release. Typically, releases are created by a build server and automatically deployed to a Development environment.
The first problem is all the possible component combinations. For four components, there would be 15 channels:
- WebUI
- WebAPI
- Database
- Service
- WebUI WebAPI
- WebUI Database
- WebUI Service
- WebAPI Database
- WebAPI Service
- Service Database
- WebUI WebAPI Database
- WebUI WebAPI Service
- WebAPI Service Database
- WebUI Service Database
- WebUI WebAPI Database Service
Adding a fifth component would mean 36 channels. A sixth component would mean 63 channels. As this demonstrates, channels per component combination don’t scale.
The second problem is when a release is created, something or someone has to decide which channel to use. Making the wrong decision can result in the wrong component being deployed, which can lead to human error.
Single project with disabling steps at deployment time
Another alternative is a single project, but instead of using channels, disable steps on the deployment screen.
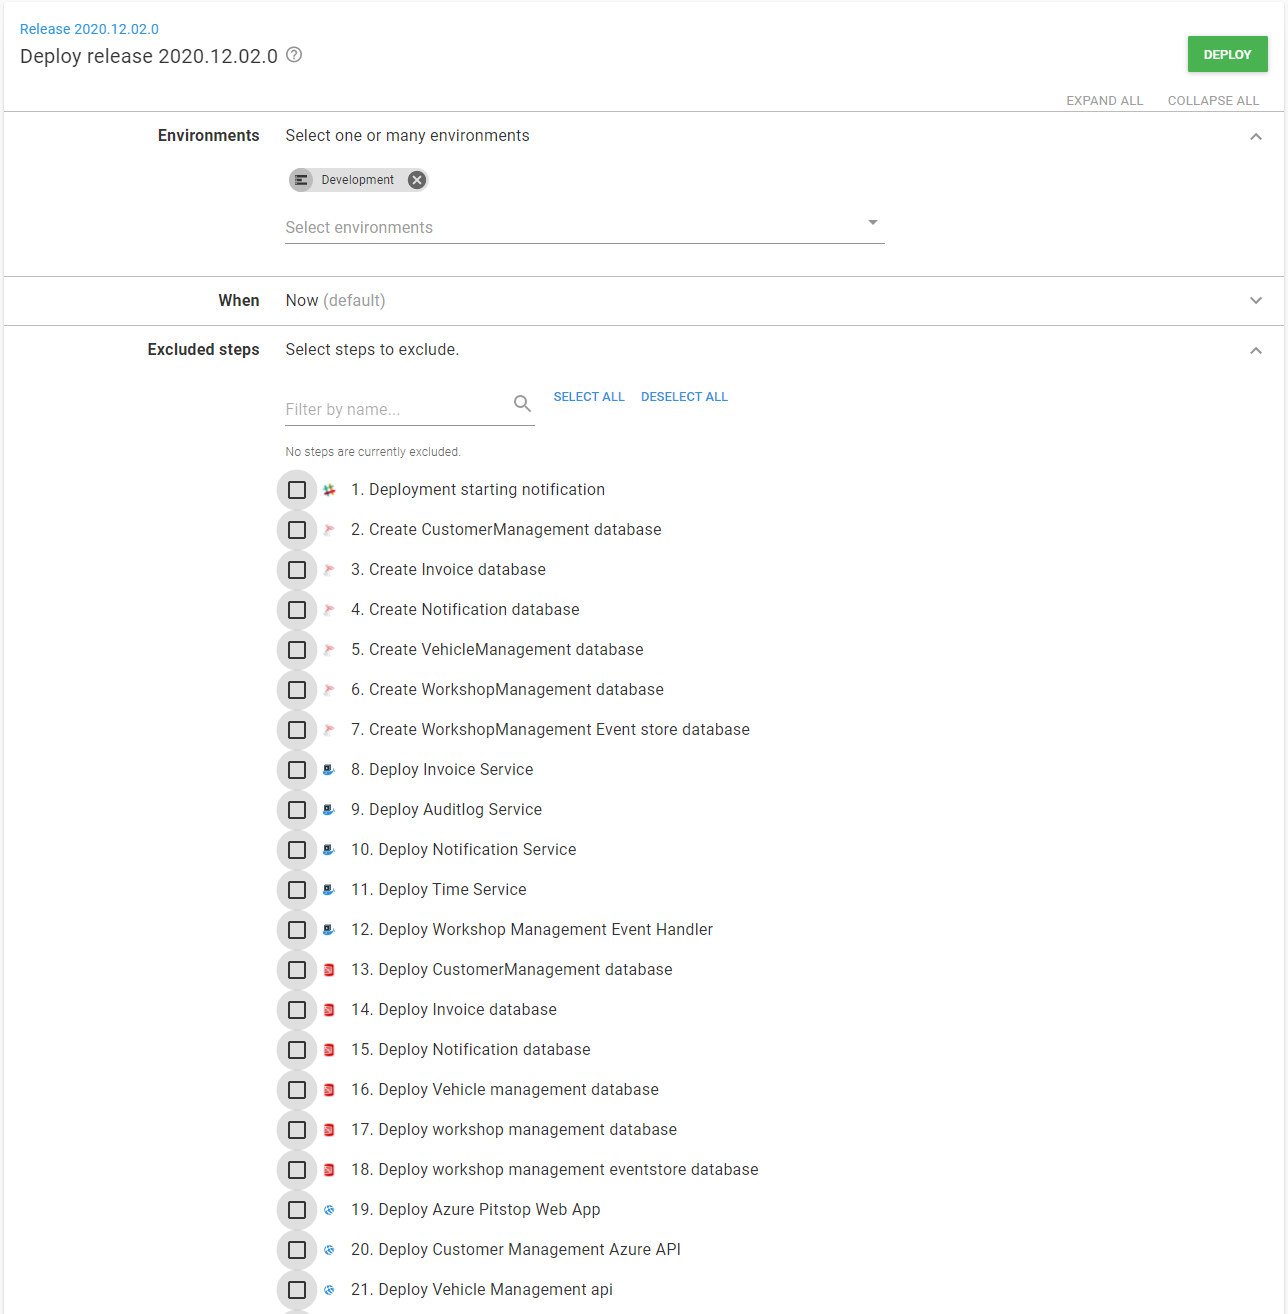
The main problem with this option is the manual process involved. Someone has to pick which steps to disable. The more steps, the greater the chance of error, and the steps have to be disabled during each deployment, which further increases the chance of error.
The project package redeployment setting
There is a package redeployment option in the project settings pages. You could set that to Skip any package that is already installed.
There are several roadblocks with this setting:
- Often, deployments involve more than just pushing out a package. There are other steps to configure the database or the web-server. Maybe there are steps to run sanity checks tests after the deployment. That setting only applies to the deployment package steps, not to any script steps.
- That setting applies to all the packages in the deployment process. You can’t choose the packages the setting applies to.
- That setting doesn’t work well with rollbacks or redeployments. It causes a package to get skipped at the wrong time.
Conclusion
Although this process feels complex, I believe it’s worth the effort.
Deployments take time, even when using the best machines and fastest connections. Deployment time also varies from application to application. Some application deployments can take over 12 hours, with one or two components responsible for the vast majority of that time. Some deployments have to occur in the middle of the night, because that’s the only time when downtime is permitted. Unless we can find ways to minimize downtime by skipping components that haven’t changed, the chance of doing more frequent deployments diminishes.
I hope this new step template solves some of the release management issues you’ve run into, and makes future deployments more reliable.
Happy deployments!
There are two more guides in this series:
Tags: