As you deploy your projects, you can assign releases of projects to specific channels. This is useful when you want releases of a project to be treated differently depending on the criteria you’ve set. Without channels, you could find yourself duplicating projects in order to implement multiple release strategies. This would, of course, leave you trying to manage multiple duplicated projects. Channels lets you use one project, with multiple release strategies.
Channels can be useful in the following scenarios:
- Feature branches (or experimental branches) are deployed to test environments but not production.
- Early access versions of the software are released to members of your early access program.
- Hot-fixes are deployed straight to production and then deployed through the rest of your infrastructure after the fix has been released.
When you are implementing a deployment process that uses channels you can scope the following to specific channels:
You can also define rules per channel to ensure that only package versions and Git resources which meet specific criteria are deployed to specific channels.
Managing channels
Every project has a default channel.
Channels are managed from the Projects page by selecting the specific project you are working with and clicking Channels.
As you add more channels, you’ll notice that they are arranged in alphabetical order on the channels page.
Channel Types
There are two types of channel:
- Lifecycle channels: Releases in this channel will progress through the lifecycle defined for the channel.
- Ephemeral Environment channels: Releases in this channel will be deployed to ephemeral environments. The environment will be provisioned automatically when it is first deployed to. A project can only have one ephemeral environment channel.
Create a new lifecycle channel
- From the Channels page, click on the Add Channel button.
- Select Lifecycle for the channel type
- Give the channel a name and add a description. The channel name must be unique within the project.
- Select the lifecycle the channel will use, or allow the channel to inherit the default lifecycle for the project. See the lifecycle docs for information about creating new lifecycles.
- If you want to make this the default channel for the project, click the Default channel check-box.
- Configure the channel rules.
- Package version will be used to enforce which versions of your packages are deployed to this channel
- Git protection rules will be used to control the use of files from Git repositories during deployments
- Configure any custom fields you want to require when creating releases in this channel.
Create a new ephemeral environment channel
Ephemeral Environment channels are designed to work with ephemeral environments. When a release is deployed to an ephemeral environment channel, the environment will be provisioned automatically if it does not already exist.
- From the Channels page, click on the Add Channel button.
- Select Ephemeral Environment for the channel type
- Give the channel a name and add a description. The channel name must be unique within the project.
- If you want to make this the default channel for the project, click the Default channel check-box.
- Select the parent environment.
- Select whether you want to automatically deploy to the environment when a release is created.
- Provide a name template for the ephemeral environment.
- Configure the channel rules.
- Package version will be used to enforce which versions of your packages are deployed to this channel
- Git protection rules will be used to control the use of files from Git repositories during deployments
- Configure any custom fields you want to require when creating releases in this channel.
Channel rules
Channels allow to you to configure rules to ensure that package versions and Git resources that meet specific criteria can be deployed using the channel.
When creating a release for a channel with rules, an option can be configured on the project to allow the channel rules to be ignored. This option is disabled by default on new projects, but can be enabled in project settings.
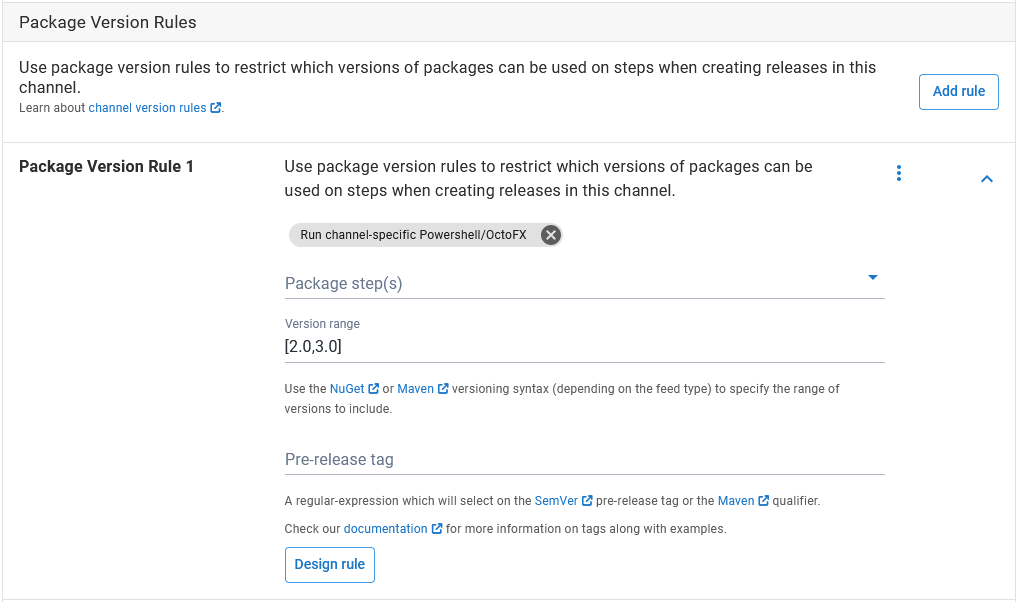
Package version rules
Package version rules assist in selecting the correct versions of packages for the channel. They are only used when creating a release, either manually or via project triggers.
Version rules will work best when you follow Semantic Versioning (SemVer 2.0.0) for your versioning strategy.
-
When viewing a channel, click Add rule in the Package Version Rules section.
-
Select the package step(s) (and as such the packages) the version rule will be applied to.
-
Enter the version range in the Version range field. You can use either Nuget or Maven versioning syntax to specify the range of versions to include.
You can use the full semantic version as part of your version range specification. For example:
[2.0.0-alpha.1,2.0.0)will match all 2.0.0 pre-releases (where the pre-release component is>= alpha.1), and will exclude the 2.0.0 release. -
Enter any pre-release tags you want to include.
Following the standard 2.0.0 SemVer syntax, a pre-release tag is the alphanumeric text that can appear after the standard major.minor.patch pattern immediately following a hyphen. Providing a regex pattern for this field allows the channel to filter packages based on their tag in a very flexible manner. The SemVer build metadata will also be evaluated by the regex pattern. Some examples are.
Pattern Description Example use-case ^[^\+].* matches any pre-release Enforce inability to push to production by specifying lifecycle that stops at staging ^(|\+.*)$ matches any non pre-release, but allows build metadata Ensure a script step only runs for non pre-release packages ^$ matches versions with no pre-release or metadata components Official releases are filtered to have nothing other than core version components (e.g. 1.0.0 ) ^beta matches pre-releases like betaandbeta0003Deploy pre-releases using a lifecycle that goes directly to a pre-release environment beta matches pre-releases with beta anywhere in the tag like betaandmy-betaDeploy pre-releases using a lifecycle that goes directly to a pre-release environment ^(?!beta).+ matches pre-releases that don’t start with beta Consider anything other than ‘beta’ to be a feature branch package so you can provision short-term infrastructure and deploy to it ^bugfix- matches any with *bugfix-*prefix (e.g.bugfix-sys-crash)Bypass Dev & UAT environments when urgent bug fixes are made to the mainline branch and to be released straight from Staging to Production ^beta matches pre-releases which begin with betabut not metadata containingbetaPrevent SemVer metadata from inadvertently matching the rule If adding a pre-release tag to channels, you will also need to add the tag
^$to yourdefaultchannel -
Click Design rule.
The Design Version Rule window will show a list of the packages that will deployed as part of the deploy package step selected earlier. The versions of the packages that will deployed in this channel with the version rules you’ve designed will be highlighted in green, and the versions of the packages that will not be deployed with be shown in red. You can continue to edit the version rules in this window.

-
Click Save.
Git protection rules
Git protection rules allow you to control the use of files from Git repositories during deployments, ensuring that important environments such as Production are protected. They are used when creating a release, either manually or via project triggers.
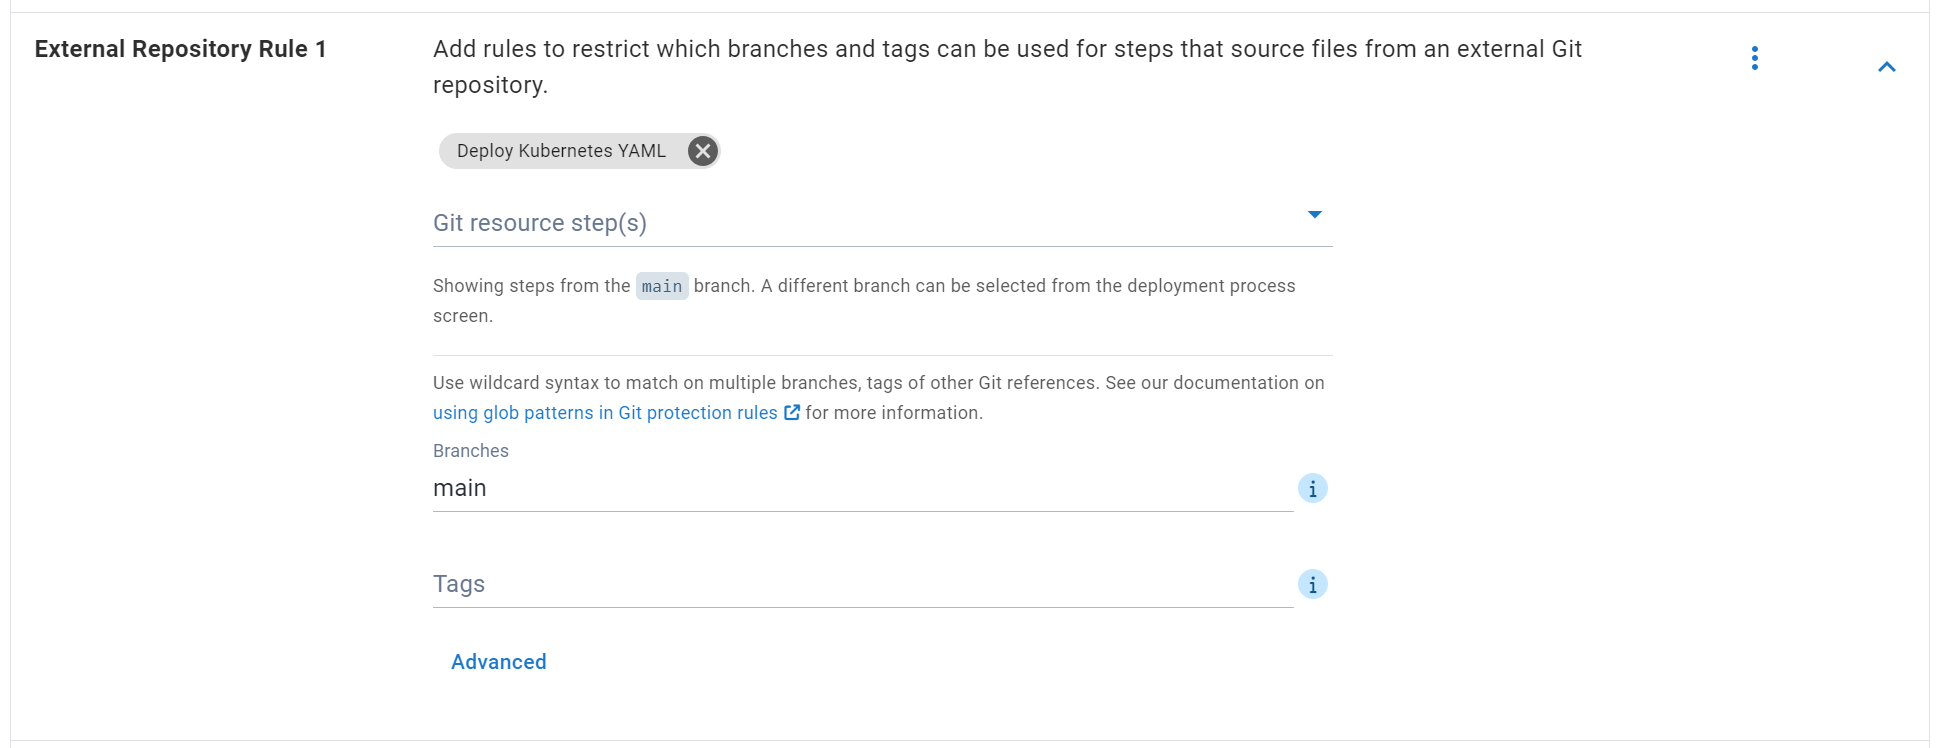
External repository rules
You can use external repository rules to restrict which branches and tags can be used for steps that source files from an external Git repository.
- When viewing a channel, click Add rule in the Git Protection Rules section.
- Select the step(s) that use external Git repositories the rule will be applied to.
- Enter patterns (separated by commas) to restrict which branches and/or tags can be selected when creating releases. Wildcard characters can be used, see Glob patterns in Git rules for more information.
- Click Save.
Project repository (version-controlled projects)
For version-controlled projects, you can use rules to restrict which branches and tags can be used as the source of the deployment process and variables when creating a release.
- When viewing a channel, expand the Project Repository section.
- Enter patterns (separated by commas) to restrict which branches and/or tags can be selected when creating releases. Wildcard characters can be used, see Glob patterns in Git rules for more information.
- Click Save.
When patterns are entered, a sample of the matching branches/tags from the Git repository used by the project will be shown to help in configuring the rules.

Glob patterns in Git protection rules
Branch and tag patterns used in Git protection rules support glob patterns and can include the following wildcard characters:
| Character | Description | Example |
|---|---|---|
* | Matches multiple characters except / | Branch pattern of release/* will match branch release/1.0.0 but not release/1.0.0/hotfix1 |
** | Matches multiple characters including / | Branch pattern of release/** will match branch release/1.0.0 and release/1.0.0/hotfix1 |
? | Matches a single character | Tag pattern of v? will match a tag of v1 but not v1.0.0 |
[0-9] | Matches a single character in the range | Tag pattern of v[0-9].[0-9].[0-9] will match a tag v1.0.0 |
[abc] | Matches a single character from the set | Branch pattern of release/[abc]* will match branch release/a-new-branch but not release/my-new-branch |
Advanced patterns
Some Git providers support Git references outside of branches and tags. For example when a pull request is created in a GitHub repository, a merge branch will be created with a Git reference of refs/pull/{id}/merge, containing the merged code between the source and target branches of the pull request.
To target these references in Git protection rules, you can click the Advanced button for project repository and external repository rules and enter advanced patterns to match on. These patterns must be fully-qualified, any existing branches or tags that were entered will be fully-qualified for you.
If the patterns entered in advanced section only contain branches or tags, then you can click the Basic button to return to entering branches and tags without needing to fully-qualify these.
Some examples:
| Type | Basic pattern | Fully-qualified pattern |
|---|---|---|
| Branch | main | refs/heads/main |
| Tag | v[0-9] | refs/tags/v[0-9] |
| GitHub pull request | N/A | refs/pull/*/merge |
Custom fields
Channels allow you to define which custom fields are required when creating a release within the channel, ensuring you can use them within scripts and steps in the deployment process. A maximum of 10 custom fields can be defined on a channel.
Support for custom fields in releases is rolling out to Octopus Cloud in Early Access Preview.
- When viewing a channel, click Add Custom Field in the Custom Fields section.
- Enter a name and description for the field.
- Click Save.

Using channels
Once a project has more than one channel, there a number of places they may be used.
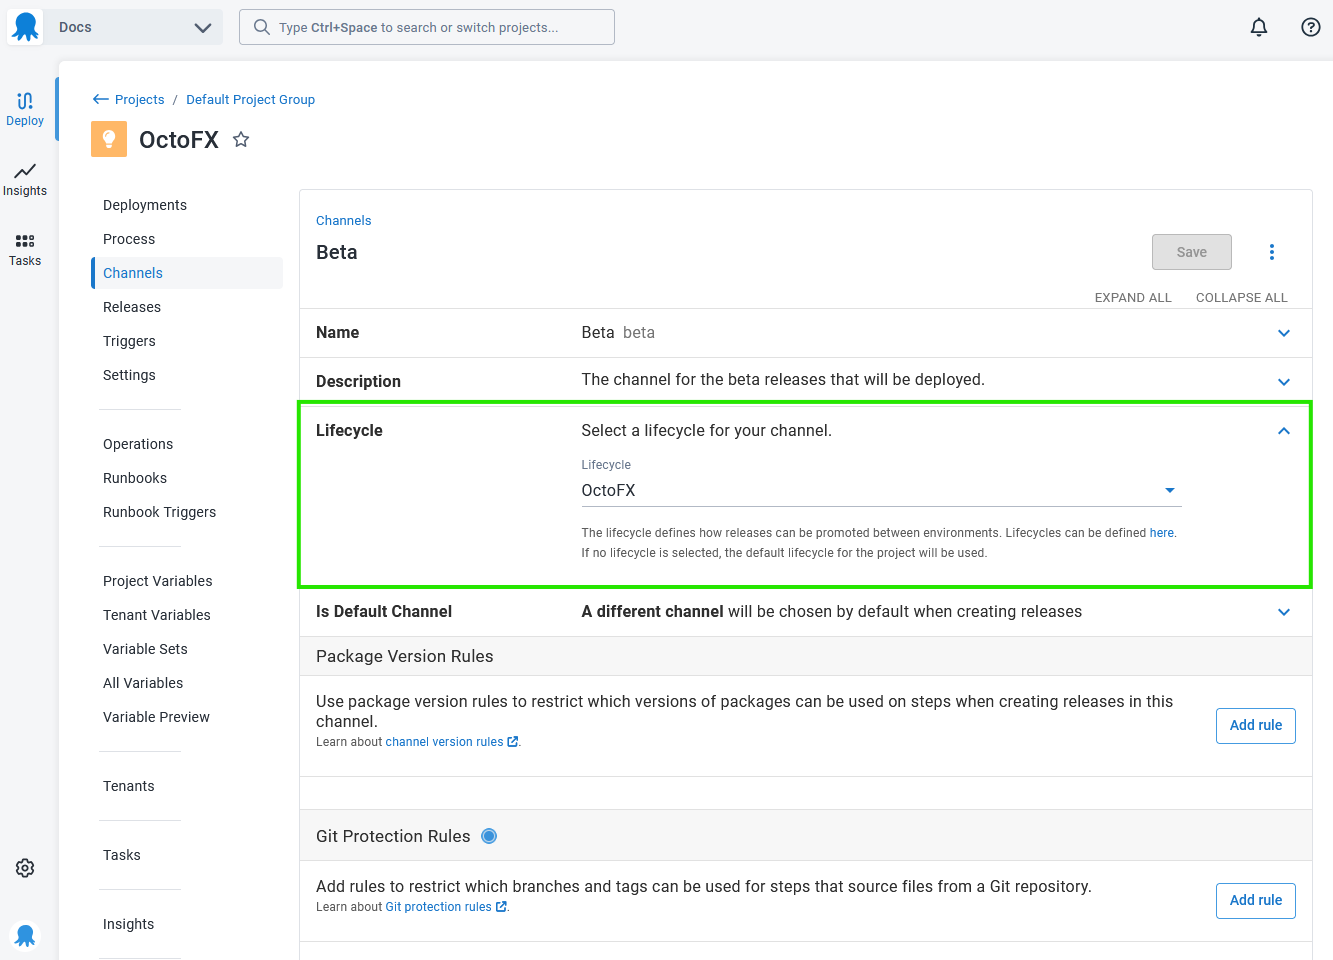
Controlling deployment lifecycle
Each channel defines which lifecycle to use when promoting releases between environments. You can choose a lifecycle for each channel, or use the default lifecycle defined by the project.
For instance, when you ship pre-release software to your early access users, you can use an early access (or beta) channel which uses a lifecycle that deploys the software to an environment your early access users have access to.
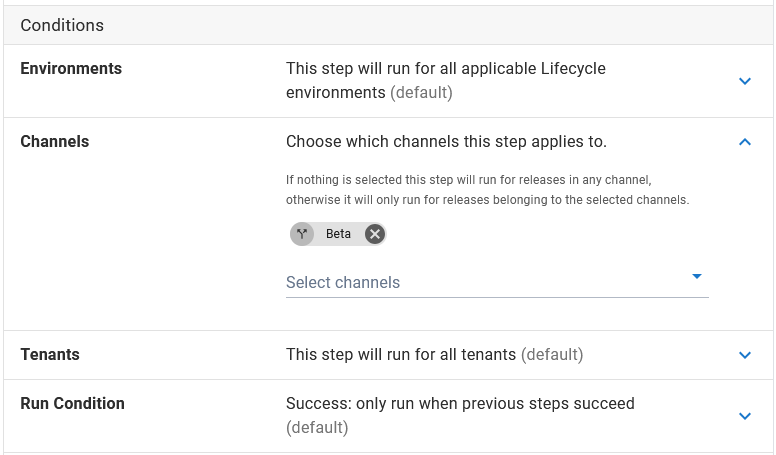
Modifying deployment process
Deployment steps can be restricted to only run on specific channels.
For instance, you might decide you’d like to notify your early access users by email when an update version of the software is available. This can be achieved by adding an email step to your deployment process and scoping the step to the early access channel. That way the step will only run when a release is deployed to the early access channel and your early access users will only receive emails about relevant releases.
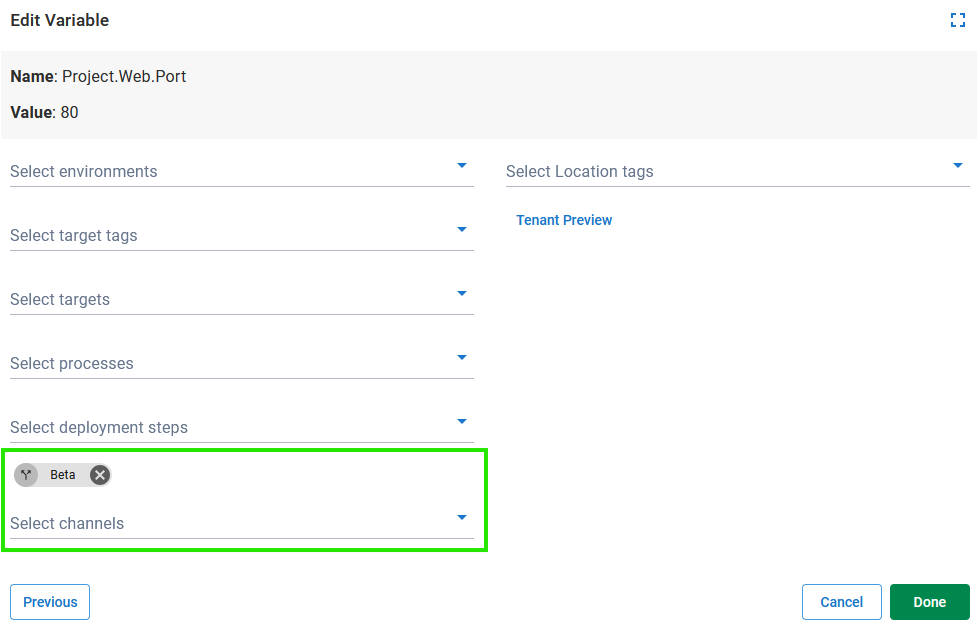
Variables
As you release software to different channels, it’s likely that some of the variables in those channels will need to be different. Variables can be scoped to specific channels.
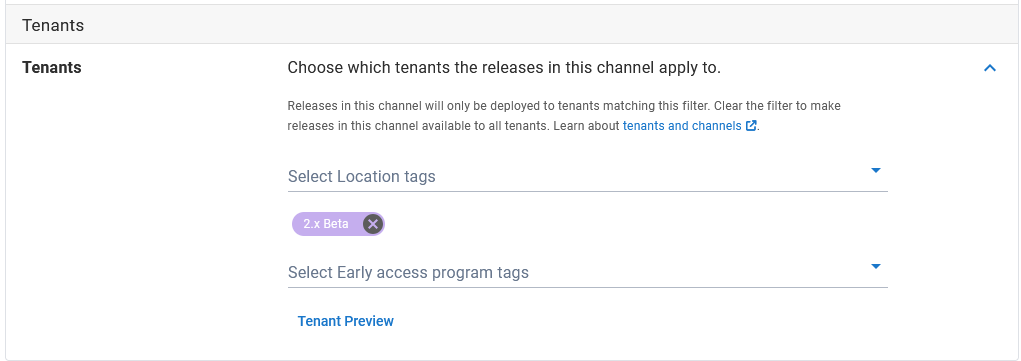
Deploying to tenants
You can control which releases will be deployed to certain tenants using channels. You can configure this under the Tenants section of a channel. In this example, releases in this channel will only be deployed to tenants tagged with Early access program/2.x Beta.
Creating releases
Every release in Octopus Deploy must be placed into a channel. Wherever possible Octopus will choose the best possible channel for your release, or you can manually select a channel for your release.
Manually creating releases
When you are creating a release, you can select a channel.
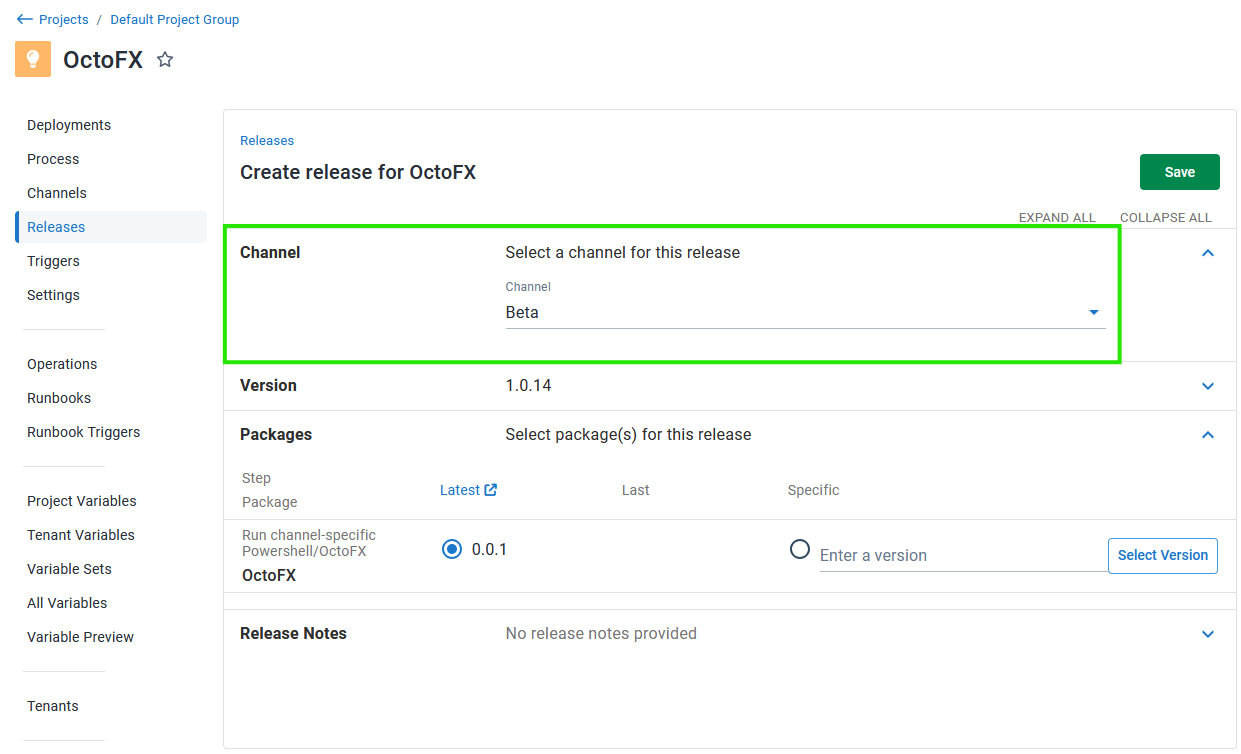
Selecting the channel will cause the release to use the lifecycle associated with the channel (or the project default, if the channel does not have a lifecycle). It will also cause the deployment process and variables to be modified as specified above.
The package list allows you to select the version of each package involved in the deployment. The latest column displays the latest packages that match the version rules defined for the channel (see version rules for more information).
Using build server extensions or the Octopus CLI
When using one of the build server extensions or the Octopus CLI to create releases, you can either let Octopus automatically choose the correct channel for your release (this is the default behavior), or choose a specific channel yourself.
Built-in package repository triggers
When adding a built-in package repository trigger to your project, you are required to select a channel (if the project has more than one).
Any releases created automatically will use the configured channel. Additionally, any version rules configured for the channel will be used to decide whether a release is automatically created.
In the following example, if version 3.1.0 of OctoFX is pushed to the built-in repository, no release will be created as the package version does not meet the version rule of the channel.
Discrete channel releases
The scenarios channels are used to model can be split into two categories. In the first, the channel controls the way releases are deployed (different lifecycles, deployment steps, etc), but the deployed releases should not be treated differently. An example of this would be a Hotfix channel, used to select a lifecycle designed to releases to production quickly.
In the second mode of use, releases deployed via different channels are different, and should be treated as such. As an example of this, imagine a company that makes a deployment tool available as both a downloadable self-hosted product and a cloud-hosted software-as-a-service product. In this example, the self-hosted and cloud channels not only select different lifecycles and deployment steps, but it is also desirable to view them as individual versions on the dashboard.
In Project Settings there’s an option named Discrete Channel Releases, designed to model this scenario.
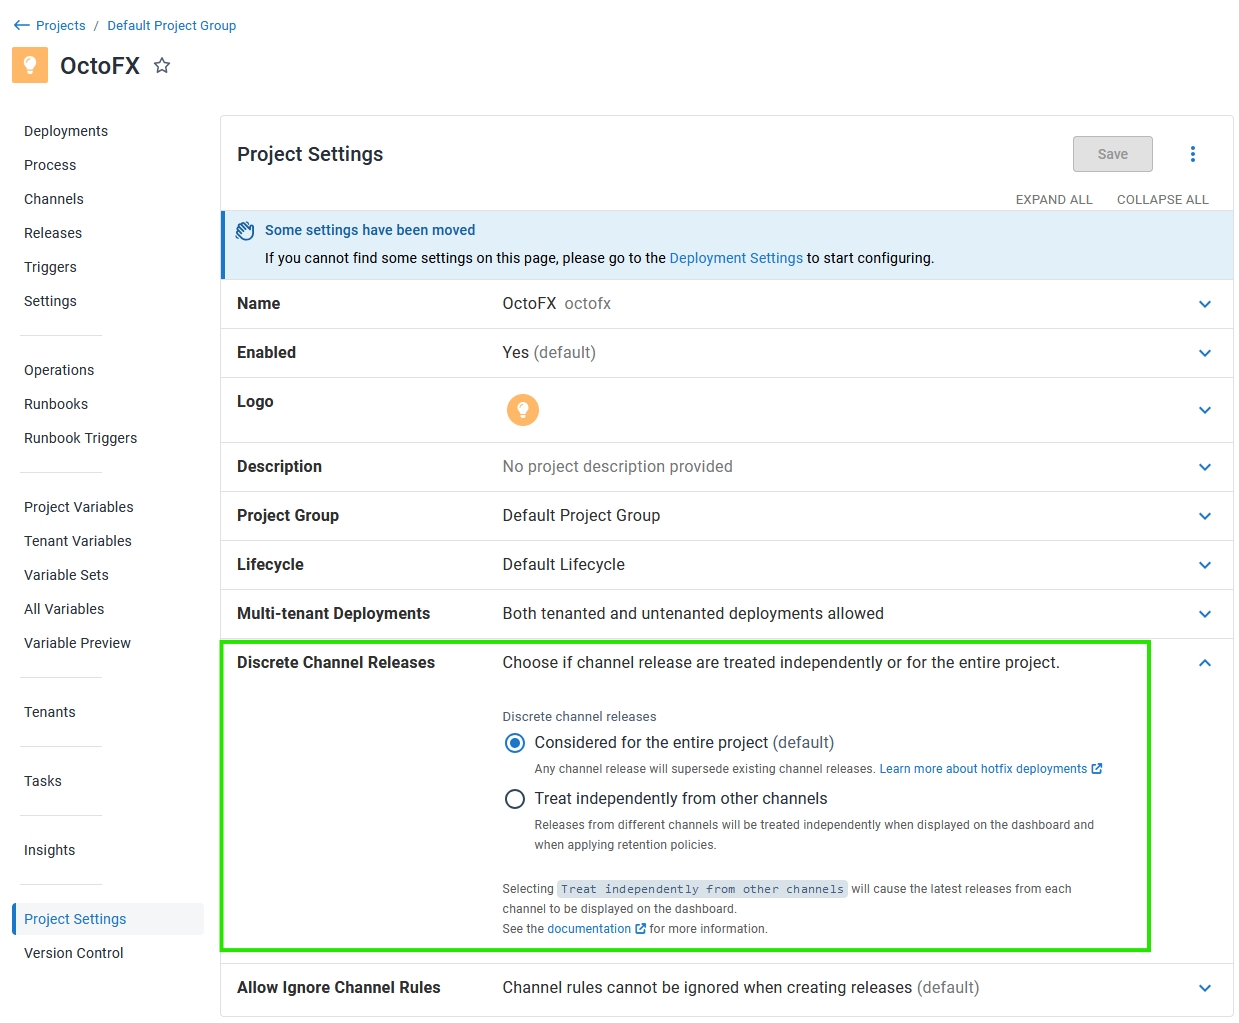
Setting this to Treat independently from other channels will cause:
- Versions for each channel to be displayed on the dashboard
- Each channel to be treated independently when applying release retention policies
The image below shows an example dashboard with discrete channel release enabled:

Removing channels
For projects using Config as Code, it’s up to you to take care to avoid deleting any channels required by your deployments. See our core design decisions for more information.
Help us continuously improve
Please let us know if you have any feedback about this page.
Page updated on Tuesday, October 28, 2025