It is generally safe to do an in-place upgrade from Octopus Deploy 4.x/2018.x to the latest version. Please keep in mind, 4.x/2018.x did not include the Spaces feature. Spaces made the following changes:
- The majority of endpoints in the API can accept a
Space-Id, for example/api/Spaces-1/projects?skip=0&take=100whereas before it was/api/projects?skip=0&take=100. If aSpace-Idisn’t supplied, the default space is used. - Teams can be assigned to multiple roles and spaces. Before, a team could be assigned to only one role.
- Unique internal package feed per space. Each space has a subfolder in the
Packagesdirectory to keep them segregated on the file system. Before, a package would be located atC:\Octopus\packages\MyPackage.2020.1.1.zip. Now it isC:\Octopus\packages\Spaces-1\MyPackage.2020.1.1.zip - Almost every table in the database had a
Space-Idcolumn added to it.
The upgrade should work without error, but there are integration concerns to consider. This guide will step through the steps to mitigate those concerns.
System Integrity Check
Before performing any upgrade steps, we highly recommend performing a System Integrity Check on your live instance database. This is so we can check that the Database Schema is in the expected condition for the upgrade. If the integrity check passes, you are good to start the upgrade process. If it fails, please contact support with the raw output of the task, and we can get that fixed for you.
Prep work
Before starting the upgrade, it is critical to back up the master key and license key. If anything goes wrong, you might need these keys to do a restore. It is better to have the backup and not need it than need the backup and not have it. The master key doesn’t change, while your license key changes, at most, once a year. Back them up once to a secure location and move onto the next steps.
- Backup the Master Key.
- Backup the License Key.
Backup the Octopus Master Key
Octopus Deploy uses the Master Key to encrypt and decrypt sensitive values in the Octopus Deploy database. The Master Key is securely stored on the server, not in the database. If the VM hosting Octopus Deploy is somehow destroyed or deleted, the Master Key goes with it.
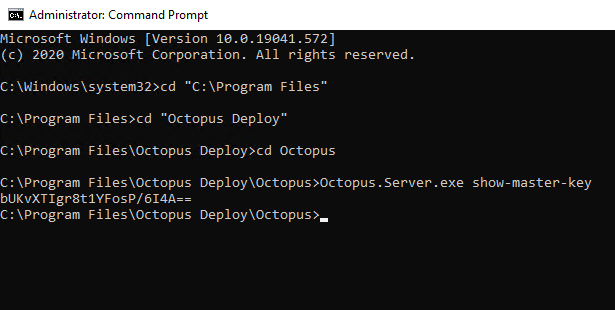
To view the Master Key, you will need login permissions on the server hosting Octopus Deploy. Once logged in, open up the Octopus Manager and click the view master key button on the left menu.

Save the Master Key to a secure location, such as a password manager or a secret manager.
An alternative means of accessing the Master Key is to run the Octopus.Server.exe show-master-key from the command line. Please note: you will need to be running as an administrator to do that.
Backup the License Key
Like the Master Key, the License Key is necessary to restore an existing Octopus Deploy instance. You can access the License Key by going to Configuration ➜ License. If you cannot access your License Key, please contact our support team and they can help you recover it.
Standard upgrade process
The standard upgrade process is an in-place upgrade. In-place upgrades update the binaries in the install directory and update the database. The guide below includes additional steps to backup key components to make it easier to rollback in the unlikely event of a failure.
While an in-place upgrade will work, it involves risk as you are upgrading from a version released back in 2018. Please see the risk mitigation sections below for steps on how to mitigate that risk.
Overview
The steps for this are:
- Download the latest version of Octopus Deploy.
- Enable maintenance mode.
- Backup the database.
- Do an in-place upgrade.
- Test the upgraded instance.
- Disable maintenance mode.
Downloading the latest version of Octopus Deploy
The downloads page will always have the latest version of Octopus Deploy. If company policy dictates you install an older version, for example, the latest version is 2020.4.11, but you can only download 2020.3.x, then visit the previous downloads page.
Maintenance mode
Maintenance mode prevents non-Octopus Administrators from doing deployments or making changes. To enable maintenance mode go to Configuration ➜ Maintenance and click the button Enable Maintenance Mode. To disable maintenance mode, go back to the same page and click on Disable Maintenance Mode.
Backup the SQL Server database
Always back up the database before upgrading Octopus Deploy. The most straightforward backup possible is a full database backup. Execute the below T-SQL command to save a backup to a NAS or file share.
BACKUP DATABASE [OctopusDeploy]
          TO DISK = '\\SomeServer\SomeDrive\OctopusDeploy.bak'
             WITH FORMAT;
The BACKUP DATABASE T-SQL command has dozens of various options. Please refer to Microsoft’s Documentation or consult a DBA as to which options you should use.
Octopus Deploy components
Before performing an in-place upgrade, it is essential to note the various components of Octopus Deploy. Most in-place upgrades will only change the install location and the SQL Server database. Very rarely will an in-place upgrade change the home folder or server folders.
The Windows Service is split across multiple folders to make upgrading easy and low risk.
- Install Location: By default, the install location for Octopus on Windows is
C:\Program Files\Octopus Deploy\Octopus. The install location contains the binaries for Octopus Deploy and is updated by the MSI. - SQL Server Database: Since
Octopus Deploy 3.x, the back-end database has been SQL Server. Each update can contain 0 to N database scripts embedded in a .dll in the install location. TheOctopus Managerinvokes those database scripts automatically. - Home Folder: The home folder stores configuration, logs, and other items unique to your instance. The home folder is separate from the install location to make it easier to upgrade, downgrade, uninstall/reinstall without affecting your instance. The default location of the home folder is
C:\Octopus. Except in rare cases, this folder is left unchanged by the upgrade process. - Instance Information: The Octopus Deploy Manager allows you to configure 1 to N instances per Windows Server. The
Octopus Managerstores a list of all the instances in theC:\ProgramData\Octopus\OctopusServer\Instancesfolder. Except in rare cases, this folder is left unchanged by the upgrade process. - Server Folders: Logs, artifacts, packages, and event exports are too big for Octopus Deploy to store in a SQL Server database. The server folders are sub-folders in
C:\Octopus\. Except in rare cases, these folders are left unchanged by an upgrade. - Tentacles: Octopus Deploy connects to deployment targets via the Tentacle service. Each version of Octopus Deploy includes a specific Tentacle version. Tentacle upgrades do not occur until after the Octopus Deploy server is upgraded. Tentacle upgrades are optional; any Tentacle greater than 4.x will work with any modern version of Octopus Deploy. We recommend you upgrade them to get the latest bug fixes and security patches when convenient.
- Calamari: The Tentacles facilitate communication between Octopus Deploy and the deployment targets. Calamari is the software that does the actual deployments. Calamari and Octopus Deploy are coupled together. Calamari is upgraded automatically during the first deployment to a target.components.
Install the newer version of Octopus Deploy
Installing a newer version of Octopus Deploy is as simple as running MSI and following the wizard. The MSI will copy all the binaries to the install location. Once the MSI is complete, it will automatically launch the Octopus Manager.
Validation checks
Octopus Deploy will perform validation checks before upgrading the database. These validation checks include (but are not limited to):
- Verify the current license will work with the upgraded version.
- Verify the current version of SQL Server is supported.
If the validation checks fail, don’t worry, install the previously installed version of Octopus Deploy, and you will be back up and running quickly.
Database upgrades
Each release of Octopus Deploy contains 0 to N database scripts to upgrade the database. The scripts are run in a transaction; when an error occurs, the transaction is rolled back. If a rollback does happen, gather the logs and send them to our support team for troubleshooting. You can install the previous version to get your CI/CD pipeline back up and running.
If you use PAAS to host your Octopus Deploy database it is recommended to consider scaling up the database prior to the upgrade, especially if the upgrade spans a large version range and will therefore have an increased number of database scripts to run.
Testing the upgraded instance
It is up to you to decide on the level of testing you wish to perform on your upgraded instance. At a bare minimum, you should:
- Do test deployments on projects representative of your instance. For example, if you have IIS deployments, do some IIS deployments. If you have Java deployments, do some Java deployments.
- Check previous deployments, ensure all the logs and artifacts appear.
- Ensure all the project and tenant images appear.
- Run any custom API scripts to ensure they still work.
- Verify a handful of users can log in, and that their permissions are similar to before.
- Build server integration; ensure all existing build servers can push to the upgraded server.
We do our best to ensure backward compatibility, but it’s impossible to cover every user scenario for every possible configuration. If something isn’t working, please capture all relevant screenshots and logs and send them over to our support team for further investigation.
Upgrade High Availability
In general, upgrading a high available instance of Octopus Deploy follows the same steps as a typical in-place upgrade. Download the latest MSI and install that. The key difference is to upgrade only one node first, as this will upgrade the database, then upgrade all the remaining nodes.
Attempting to upgrade all nodes at the same time will most likely lead to deadlocks in the database.
The process should look something like this:
- Download the latest version of Octopus Deploy.
- Enable maintenance mode.
- Stop all the nodes.
- Backup the database.
- Select one node to upgrade, wait until finished.
- Upgrade all remaining nodes.
- Start all remaining stopped nodes.
- Test upgraded instance.
- Disable maintenance mode.
As of 2023.2.9755, a database upgrade will abort if Octopus detects there are nodes still running. Ensure all nodes are properly shutdown and try again.
A small outage window will occur when upgrading a highly available Octopus Deploy instance. The outage window will happen between when you shut down all the nodes and upgrade the first node. The window duration depends on the number of database changes, the size of the database, and compute resources. It is highly recommended to automate your upgrade process to reduce that outage window.
Risk mitigation recommended approach - create a test instance
An in-place upgrade should be the safest approach. Upgrade scripts assume you are upgrading from older versions of Octopus Deploy. While the upgrade will work, there might be a new feature or breaking changes you will want to test first. The recommended approach is to create a test instance containing a subset of projects representing your main instance. Upgrade that test instance, verify it, and then upgrade the main instance.
Overview
The steps for this are:
- Download the same version of Octopus Deploy as your main instance.
- Install Octopus Deploy on a new VM.
- Export a subset of projects from the main instance.
- Import that subset of projects to the test instance.
- Download the latest version of Octopus Deploy.
- Backup the test instance database.
- Upgrade that test instance to the latest version of Octopus Deploy.
- Test and verify the test instance.
- Enable maintenance mode on the main instance.
- Backup the database on the main instance.
- Backup all the folders on the main instance.
- Do an in-place upgrade of your main instance.
- Test upgraded main instance.
- Disable maintenance mode.
Downloading the same version of Octopus Deploy
Migrating data from Octopus to a test instance requires both the main instance and test instance to be on the same version. You can find the version you are running by clicking on your name in the top right corner of your Octopus Deploy instance.

You can find all the previous versions on the previous versions download page.
Installing Octopus Deploy
Run the MSI you downloaded to install Octopus Deploy. After you install Octopus Deploy, the Octopus Manager will automatically launch. Follow the wizard. A few notes:
- You can reuse your same license key on up to three unique instances of Octopus Deploy. We determine uniqueness based on the database it connects to. If you are going to exceed the three instance limit, please contact us to discuss your options.
- Create a new database for this test instance. Restoring a backup will cause Octopus to treat this as a cloned instance, with the same targets, certificates, and keys.
- Run the test instance database on the same version of SQL Server as the main instance. Only deviate when you plan on upgrading SQL Server.
Export/import subset of projects using export/import projects feature
The Export/Import Projects feature added in Octopus Deploy 2021.1 can be used to export/import projects to a test instance. Please see the up to date documentation to see what is included.
Export subset of projects using the data migration tool
All versions of Octopus Deploy since version 3.x has included a data migration tool. The Octopus Manager only allows for the migration of all the data. We only need a subset of data. Use the partial export command-line option to export a subset of projects.
Run this command for each project you wish to export on the main, or production, instance. Create a new folder per project:
Octopus.Migrator.exe partial-export --instance=OctopusServer --project=AcmeWebStore --password=5uper5ecret --directory=C:\Temp\AcmeWebStore --ignore-history --ignore-deployments --ignore-machinesThis command ignores all deployment targets to prevent your test instance and your main instance from deploying to the same targets.
Import subset of projects using the data migration tool
The data migration tool also includes import functionality. First, copy all the project folders from the main instance to the test instance. Then run this command for each project:
Octopus.Migrator.exe import --instance=OctopusServer --password=5uper5ecret --directory=C:\Temp\AcmeWebStoreDownloading the latest version of Octopus Deploy
The downloads page will always have the latest version of Octopus Deploy. If company policy dictates you install an older version, for example, the latest version is 2020.4.11, but you can only download 2020.3.x, then visit the previous downloads page.
Maintenance mode
Maintenance mode prevents non-Octopus Administrators from doing deployments or making changes. To enable maintenance mode go to Configuration ➜ Maintenance and click the button Enable Maintenance Mode. To disable maintenance mode, go back to the same page and click on Disable Maintenance Mode.
Backup the SQL Server database
Always back up the database before upgrading Octopus Deploy. The most straightforward backup possible is a full database backup. Execute the below T-SQL command to save a backup to a NAS or file share.
BACKUP DATABASE [OctopusDeploy]
          TO DISK = '\\SomeServer\SomeDrive\OctopusDeploy.bak'
             WITH FORMAT;
The BACKUP DATABASE T-SQL command has dozens of various options. Please refer to Microsoft’s Documentation or consult a DBA as to which options you should use.
Octopus Deploy components
Before performing an in-place upgrade, it is essential to note the various components of Octopus Deploy. Most in-place upgrades will only change the install location and the SQL Server database. Very rarely will an in-place upgrade change the home folder or server folders.
The Windows Service is split across multiple folders to make upgrading easy and low risk.
- Install Location: By default, the install location for Octopus on Windows is
C:\Program Files\Octopus Deploy\Octopus. The install location contains the binaries for Octopus Deploy and is updated by the MSI. - SQL Server Database: Since
Octopus Deploy 3.x, the back-end database has been SQL Server. Each update can contain 0 to N database scripts embedded in a .dll in the install location. TheOctopus Managerinvokes those database scripts automatically. - Home Folder: The home folder stores configuration, logs, and other items unique to your instance. The home folder is separate from the install location to make it easier to upgrade, downgrade, uninstall/reinstall without affecting your instance. The default location of the home folder is
C:\Octopus. Except in rare cases, this folder is left unchanged by the upgrade process. - Instance Information: The Octopus Deploy Manager allows you to configure 1 to N instances per Windows Server. The
Octopus Managerstores a list of all the instances in theC:\ProgramData\Octopus\OctopusServer\Instancesfolder. Except in rare cases, this folder is left unchanged by the upgrade process. - Server Folders: Logs, artifacts, packages, and event exports are too big for Octopus Deploy to store in a SQL Server database. The server folders are sub-folders in
C:\Octopus\. Except in rare cases, these folders are left unchanged by an upgrade. - Tentacles: Octopus Deploy connects to deployment targets via the Tentacle service. Each version of Octopus Deploy includes a specific Tentacle version. Tentacle upgrades do not occur until after the Octopus Deploy server is upgraded. Tentacle upgrades are optional; any Tentacle greater than 4.x will work with any modern version of Octopus Deploy. We recommend you upgrade them to get the latest bug fixes and security patches when convenient.
- Calamari: The Tentacles facilitate communication between Octopus Deploy and the deployment targets. Calamari is the software that does the actual deployments. Calamari and Octopus Deploy are coupled together. Calamari is upgraded automatically during the first deployment to a target.components.
Install the newer version of Octopus Deploy
Installing a newer version of Octopus Deploy is as simple as running MSI and following the wizard. The MSI will copy all the binaries to the install location. Once the MSI is complete, it will automatically launch the Octopus Manager.
Validation checks
Octopus Deploy will perform validation checks before upgrading the database. These validation checks include (but are not limited to):
- Verify the current license will work with the upgraded version.
- Verify the current version of SQL Server is supported.
If the validation checks fail, don’t worry, install the previously installed version of Octopus Deploy, and you will be back up and running quickly.
Database upgrades
Each release of Octopus Deploy contains 0 to N database scripts to upgrade the database. The scripts are run in a transaction; when an error occurs, the transaction is rolled back. If a rollback does happen, gather the logs and send them to our support team for troubleshooting. You can install the previous version to get your CI/CD pipeline back up and running.
If you use PAAS to host your Octopus Deploy database it is recommended to consider scaling up the database prior to the upgrade, especially if the upgrade spans a large version range and will therefore have an increased number of database scripts to run.
Testing the upgraded instance
It is up to you to decide on the level of testing you wish to perform on your upgraded instance. At a bare minimum, you should:
- Do test deployments on projects representative of your instance. For example, if you have IIS deployments, do some IIS deployments. If you have Java deployments, do some Java deployments.
- Check previous deployments, ensure all the logs and artifacts appear.
- Ensure all the project and tenant images appear.
- Run any custom API scripts to ensure they still work.
- Verify a handful of users can log in, and that their permissions are similar to before.
- Build server integration; ensure all existing build servers can push to the upgraded server.
We do our best to ensure backward compatibility, but it’s impossible to cover every user scenario for every possible configuration. If something isn’t working, please capture all relevant screenshots and logs and send them over to our support team for further investigation.
Maintenance mode
Maintenance mode prevents non-Octopus Administrators from doing deployments or making changes. To enable maintenance mode go to Configuration ➜ Maintenance and click the button Enable Maintenance Mode. To disable maintenance mode, go back to the same page and click on Disable Maintenance Mode.
Backup the SQL Server database
Always back up the database before upgrading Octopus Deploy. The most straightforward backup possible is a full database backup. Execute the below T-SQL command to save a backup to a NAS or file share.
BACKUP DATABASE [OctopusDeploy]
          TO DISK = '\\SomeServer\SomeDrive\OctopusDeploy.bak'
             WITH FORMAT;
The BACKUP DATABASE T-SQL command has dozens of various options. Please refer to Microsoft’s Documentation or consult a DBA as to which options you should use.
Backup the server folders
The server folders store large binary data outside of the database. By default, the location is C:\Octopus. If you have High Availability configured, they will likely be stored on a NAS or some other file share.
- Packages: The default location is
C:\Octopus\Packages\. It stores all the packages in the internal feed. - Artifacts: The default location is
C:\Octopus\Artifacts. It stores all the artifacts collected during a deployment along with project images. - Tasklogs: The default location is
C:\Octopus\Tasklogs. It stores all the deployment logs. - EventExports: The default location is
C:\Octopus\EventExports. It stores all the exported event audit logs.
Any standard file-backup tool will work, even RoboCopy. Very rarely will an upgrade change these folders. The release notes will indicate if these folders are going to be modified.
In-place upgrade of the main instance
Upgrading your main Octopus Deploy instance should follow the same steps you did with the test or cloned instance. Don’t forget to run your backups!
Risk mitigation alternative approach - create a cloned instance
An alternative approach to an in-place upgrade is to create a cloned instance and upgrade that. From there, you can migrate over to the cloned instance or do an in-place upgrade of your existing instance and use the cloned instance for testing future upgrades.
Overview
Creating a clone of an existing instance involves:
- Enable maintenance mode on the main instance.
- Backup the database of the main instance.
- Disable maintenance mode on the main instance.
- Restore the backup of the main instance’s database as a new database on the desired SQL Server.
- Download the same version of Octopus Deploy as your main instance.
- Installing that version on a new server and configure it to point to the cloned/restored database.
- Copying all the files from the backed up folders from the source instance.
- Optional: Disable all deployment targets.
- Upgrade cloned instance.
- Test cloned instance. Verify all API scripts, CI integrations, and deployments work.
- If migrating, then migrate over. Otherwise, leave the test instance alone, backup the folders and database, and upgrade the main instance.
Maintenance mode
Maintenance mode prevents non-Octopus Administrators from doing deployments or making changes. To enable maintenance mode go to Configuration ➜ Maintenance and click the button Enable Maintenance Mode. To disable maintenance mode, go back to the same page and click on Disable Maintenance Mode.
Backup the SQL Server database
Always back up the database before upgrading Octopus Deploy. The most straightforward backup possible is a full database backup. Execute the below T-SQL command to save a backup to a NAS or file share.
BACKUP DATABASE [OctopusDeploy]
          TO DISK = '\\SomeServer\SomeDrive\OctopusDeploy.bak'
             WITH FORMAT;
The BACKUP DATABASE T-SQL command has dozens of various options. Please refer to Microsoft’s Documentation or consult a DBA as to which options you should use.
Restore backup of database
Use SQL Server Management Studio’s (SSMS) built-in restore backup functionality. SSMS provides a wizard to make this process as pain-free as possible. Be sure to consult a DBA or read up on Microsoft’s Documentation.
Downloading the same version of Octopus Deploy
Migrating data from Octopus to a test instance requires both the main instance and test instance to be on the same version. You can find the version you are running by clicking on your name in the top right corner of your Octopus Deploy instance.
You can find all the previous versions on the previous versions download page.
Installing Octopus Deploy
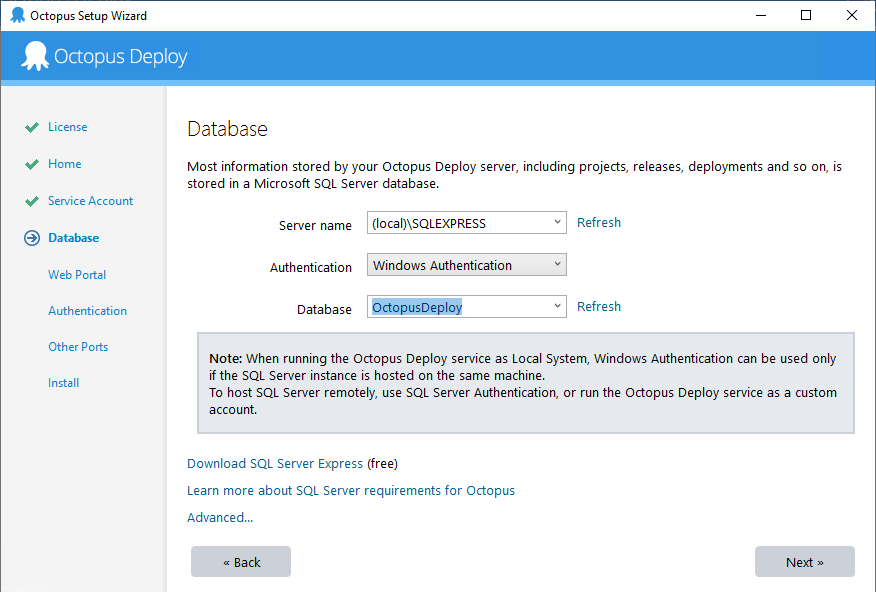
Run the MSI you downloaded to install Octopus Deploy. Once the MSI is finished, the Octopus Manager will automatically launch. Follow the wizard, and on the section where you configure the database, select the pre-existing database.
Selecting an existing database will ask you to enter the Master Key.
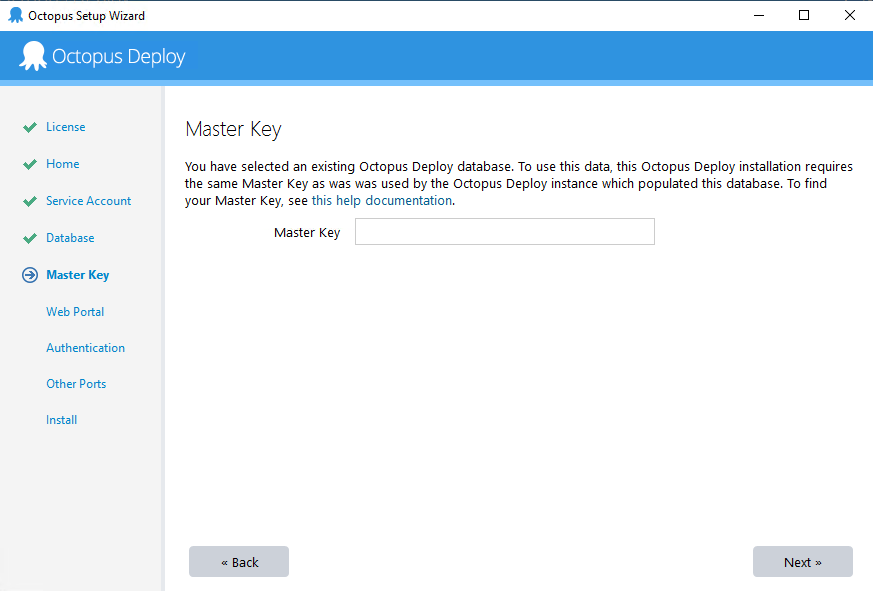
Enter the Master Key you backed up earlier, and the manager will verify the connection works.
Finish the wizard, keep an eye on each setting to ensure you match your main instance. For example, if your main instance uses Active Directory, your cloned instance should also be configured to use Active Directory. After the wizard is finished and the instance is configured, log in to the cloned instance to ensure your credentials still work.
Copy all the files from the main instance
After the instance has been created, copy all the contents from the following folders.
- Artifacts, the default is
C:\Octopus\Artifacts - Packages, the default is
C:\Octopus\Packages - Tasklogs, the default is
C:\Octopus\Tasklogs - EventExports, the default is
C:\Octopus\EventExports
Failure to copy over files will result in:
- Empty deployment screens
- Missing packages on the internal package feed
- Missing project or tenant images
- Missing archived events
- And more
Disabling all Targets/Workers/Triggers/Subscriptions - optional
Cloning an instance includes cloning all certificates. Assuming you are not using polling Tentacles, all the deployments will “just work.” That is by design if the VM hosting Octopus Deploy is lost and you have to restore Octopus Deploy from a backup.
Just working does have a downside, as you might have triggers and other items configured. These items could potentially perform deployments. You can run this SQL Script on your cloned instance to disable everything.
Use [OctopusDeploy]
go
DELETE FROM OctopusServerNode
IF EXISTS (SELECT null FROM sys.tables WHERE name = 'OctopusServerNodeStatus')
    DELETE FROM OctopusServerNodeStatus
UPDATE Subscription SET IsDisabled = 1
UPDATE ProjectTrigger SET IsDisabled = 1
UPDATE Machine SET IsDisabled = 1
IF EXISTS (SELECT null FROM sys.tables WHERE name = 'Worker')
    UPDATE Worker SET IsDisabled = 1
DELETE FROM ExtensionConfiguration WHERE Id in ('authentication-octopusid', 'jira-integration')
Remember to replace OctopusDeploy with the name of your database.
Octopus Deploy components
Before performing an in-place upgrade, it is essential to note the various components of Octopus Deploy. Most in-place upgrades will only change the install location and the SQL Server database. Very rarely will an in-place upgrade change the home folder or server folders.
The Windows Service is split across multiple folders to make upgrading easy and low risk.
- Install Location: By default, the install location for Octopus on Windows is
C:\Program Files\Octopus Deploy\Octopus. The install location contains the binaries for Octopus Deploy and is updated by the MSI. - SQL Server Database: Since
Octopus Deploy 3.x, the back-end database has been SQL Server. Each update can contain 0 to N database scripts embedded in a .dll in the install location. TheOctopus Managerinvokes those database scripts automatically. - Home Folder: The home folder stores configuration, logs, and other items unique to your instance. The home folder is separate from the install location to make it easier to upgrade, downgrade, uninstall/reinstall without affecting your instance. The default location of the home folder is
C:\Octopus. Except in rare cases, this folder is left unchanged by the upgrade process. - Instance Information: The Octopus Deploy Manager allows you to configure 1 to N instances per Windows Server. The
Octopus Managerstores a list of all the instances in theC:\ProgramData\Octopus\OctopusServer\Instancesfolder. Except in rare cases, this folder is left unchanged by the upgrade process. - Server Folders: Logs, artifacts, packages, and event exports are too big for Octopus Deploy to store in a SQL Server database. The server folders are sub-folders in
C:\Octopus\. Except in rare cases, these folders are left unchanged by an upgrade. - Tentacles: Octopus Deploy connects to deployment targets via the Tentacle service. Each version of Octopus Deploy includes a specific Tentacle version. Tentacle upgrades do not occur until after the Octopus Deploy server is upgraded. Tentacle upgrades are optional; any Tentacle greater than 4.x will work with any modern version of Octopus Deploy. We recommend you upgrade them to get the latest bug fixes and security patches when convenient.
- Calamari: The Tentacles facilitate communication between Octopus Deploy and the deployment targets. Calamari is the software that does the actual deployments. Calamari and Octopus Deploy are coupled together. Calamari is upgraded automatically during the first deployment to a target.components.
Install the newer version of Octopus Deploy
Installing a newer version of Octopus Deploy is as simple as running MSI and following the wizard. The MSI will copy all the binaries to the install location. Once the MSI is complete, it will automatically launch the Octopus Manager.
Validation checks
Octopus Deploy will perform validation checks before upgrading the database. These validation checks include (but are not limited to):
- Verify the current license will work with the upgraded version.
- Verify the current version of SQL Server is supported.
If the validation checks fail, don’t worry, install the previously installed version of Octopus Deploy, and you will be back up and running quickly.
Database upgrades
Each release of Octopus Deploy contains 0 to N database scripts to upgrade the database. The scripts are run in a transaction; when an error occurs, the transaction is rolled back. If a rollback does happen, gather the logs and send them to our support team for troubleshooting. You can install the previous version to get your CI/CD pipeline back up and running.
If you use PAAS to host your Octopus Deploy database it is recommended to consider scaling up the database prior to the upgrade, especially if the upgrade spans a large version range and will therefore have an increased number of database scripts to run.
Testing the upgraded instance
It is up to you to decide on the level of testing you wish to perform on your upgraded instance. At a bare minimum, you should:
- Do test deployments on projects representative of your instance. For example, if you have IIS deployments, do some IIS deployments. If you have Java deployments, do some Java deployments.
- Check previous deployments, ensure all the logs and artifacts appear.
- Ensure all the project and tenant images appear.
- Run any custom API scripts to ensure they still work.
- Verify a handful of users can log in, and that their permissions are similar to before.
- Build server integration; ensure all existing build servers can push to the upgraded server.
We do our best to ensure backward compatibility, but it’s impossible to cover every user scenario for every possible configuration. If something isn’t working, please capture all relevant screenshots and logs and send them over to our support team for further investigation.
Migrating to a new instance
It will be possible to run both the old and cloned instances side by side. Both of them can deploy to the same targets (assuming you are not using polling Tentacles). But there are a few items to keep in mind.
- The Octopus Server is tightly coupled with Calamari. Deploying to the same target from both servers will result in Calamari getting upgraded/downgraded a lot.
- The newer Octopus Server will prompt you to upgrade the Tentacles. While running both instances side by side, you will want to avoid this.
- Unless the cloned instance has the same domain name, polling Tentacles will not connect to the cloned instance. A clone of the polling Tentacles might need to be created.
- The thumbprints for certificates and other sensitive items are stored in the Octopus Deploy database. Cloning the database cloned those values.
- You must update the Installation ID on the cloned instance. Cloning copies the Installation ID from the original, which means both instances will report telemetry under the same identifier. This corrupts usage data. See Creating a test instance for the SQL script to generate a new Installation ID.
Considerations
As you migrate your instance, here are few items to consider.
- Will the new instance’s domain name be the same, or will it change? For example, will it change from
https://octopusdeploy.mydomain.comtohttps://octopus.mydomain.com. If it changes and you are using polling Tentacles, you will need to create new Tentacle instances for the new Octopus Deploy instance. - What CI, or build servers, integrate with Octopus Deploy? Do those plug-ins need to be updated? You can find several of the plug-ins on the downloads page.
- Do you have any internally developed tools or scripts that invoke the Octopus API? We’ve done our best to maintain backward compatibility, but there might be some changes.
- What components do you use the most? What does a testing plan look like?
- Chances are there are new features and functionality you haven’t been exposed to. How will you train people on the new functionality? If unsure, please contact us to get pointed in the right direction.
Drift concerns
While it is possible to run two instances side by side, each minute that passes, the two instances will drift further apart. Changes to the deployment process, new packages, new and releases deployments will be happening during this time.
If you find yourself needing more time than a few days, a week tops, consider setting up a test instance. Or using this newly cloned instance as a test instance. Work out all the kinks on the test instance, then restart the cloning process on a fresh instance.
If you are unsure how long the migration will take, consider setting up a test instance first. Work out all the kinks, then start the cloning process.
Polling Tentacles
A Polling Tentacle can only connect to one Octopus Deploy instance. It connects via DNS name or IP address. If the new instance’s DNS name changes - for example, the old instance was https://octopusdeploy.mydomain.com with the new instance set to https://octopus.mydomain.com - you’ll need to clone each Polling Tentacle instance.
Each Polling Tentacle will need to be cloned on each deployment target. To make things easier, we have provided this script to help clone a Tentacle instance. That script will look at the source instance, determine the roles, environments, and tenants, then create a cloned Tentacle and register that cloned Tentacle with your cloned instance.
Any script that clones a Tentacle instance must be run on the deployment target. It cannot be run on your development machine.
Executing the cutover
Cutting over from the old instance to the new instance will require a bit of downtime and should be done off hours.
- Enable maintenance mode on the old instance to put it into read-only mode.
- Ensure all CI servers are pointing to the new instance (or change DNS).
- You don’t have to upgrade Tentacles right away. Newer versions of Octopus Deploy can communicate with older versions of Tentacles. You can upgrade a set at a time instead of upgrading everything, starting in 2020.x you can perform a search on the deployment target page and update only the returned Tentacles. Or, you can upgrade Tentacles per environment.
Backup the server folders
The server folders store large binary data outside of the database. By default, the location is C:\Octopus. If you have High Availability configured, they will likely be stored on a NAS or some other file share.
- Packages: The default location is
C:\Octopus\Packages\. It stores all the packages in the internal feed. - Artifacts: The default location is
C:\Octopus\Artifacts. It stores all the artifacts collected during a deployment along with project images. - Tasklogs: The default location is
C:\Octopus\Tasklogs. It stores all the deployment logs. - EventExports: The default location is
C:\Octopus\EventExports. It stores all the exported event audit logs.
Any standard file-backup tool will work, even RoboCopy. Very rarely will an upgrade change these folders. The release notes will indicate if these folders are going to be modified.
In-place upgrade of the main instance
Upgrading your main Octopus Deploy instance should follow the same steps you did with the test or cloned instance. Don’t forget to run your backups!
Upgrade High Availability
In general, upgrading a high available instance of Octopus Deploy follows the same steps as a typical in-place upgrade. Download the latest MSI and install that. The key difference is to upgrade only one node first, as this will upgrade the database, then upgrade all the remaining nodes.
Attempting to upgrade all nodes at the same time will most likely lead to deadlocks in the database.
The process should look something like this:
- Download the latest version of Octopus Deploy.
- Enable maintenance mode.
- Stop all the nodes.
- Backup the database.
- Select one node to upgrade, wait until finished.
- Upgrade all remaining nodes.
- Start all remaining stopped nodes.
- Test upgraded instance.
- Disable maintenance mode.
As of 2023.2.9755, a database upgrade will abort if Octopus detects there are nodes still running. Ensure all nodes are properly shutdown and try again.
A small outage window will occur when upgrading a highly available Octopus Deploy instance. The outage window will happen between when you shut down all the nodes and upgrade the first node. The window duration depends on the number of database changes, the size of the database, and compute resources. It is highly recommended to automate your upgrade process to reduce that outage window.
Rollback failed upgrade
While unlikely, an upgrade may fail. It could fail on a database upgrade script, SQL Server version is no longer supported, license check validation, or plain old bad luck. Depending on what failed, you have a decision to make. If the cloned instance upgrade failed, it might make sense to start all over again. Or, it might make sense to roll back to a previous version. In either case, if you decide to roll back the process will be:
- Restore the database backup.
- Restore the folders.
- Download and install the previously installed version of Octopus Deploy.
- Do some sanity checks.
- If maintenance mode is enabled, disable it.
Restore backup of database
Use SQL Server Management Studio’s (SSMS) built-in restore backup functionality. SSMS provides a wizard to make this process as pain-free as possible. Be sure to consult a DBA or read up on Microsoft’s Documentation.
Restore Octopus folders
Octopus Deploy expects the artifacts, packages, tasklog, and event export folders to be in a specific format. The best chance of success is to:
- Copy the existing folders to a safe location.
- Delete the contents of the existing folders.
- Copy the contents of the existing folders from the backup.
- Once the rollback is complete, delete the copy from the first step.
Find and download the previous version of Octopus Deploy
Octopus Deploy stores the installation history in the database. Run this query on your Octopus Deploy database if unsure as to which version to download:
SELECT TOP 5 [Version]
  FROM [dbo].[OctopusServerInstallationHistory]
  ORDER BY Installed desc
When you know the version to install, go to the previous downloads page.
Installing the previous version
The key configuration items, such as connection string, files, instance information, etc., are not stored in the install directory of Octopus Deploy. To install the previous version, first, uninstall Octopus Deploy. Uninstalling will only delete items from the install directory, or C:\Program Files\Octopus Deploy\Octopus. Then run the MSI to install the previous version.
Help us continuously improve
Please let us know if you have any feedback about this page.
Page updated on Wednesday, October 4, 2023