Octopus: High Availability (HA) enables you to run multiple Octopus Server nodes, distributing load and tasks between them. We designed it for enterprises that need to deploy around the clock and rely on the Octopus Server being available.

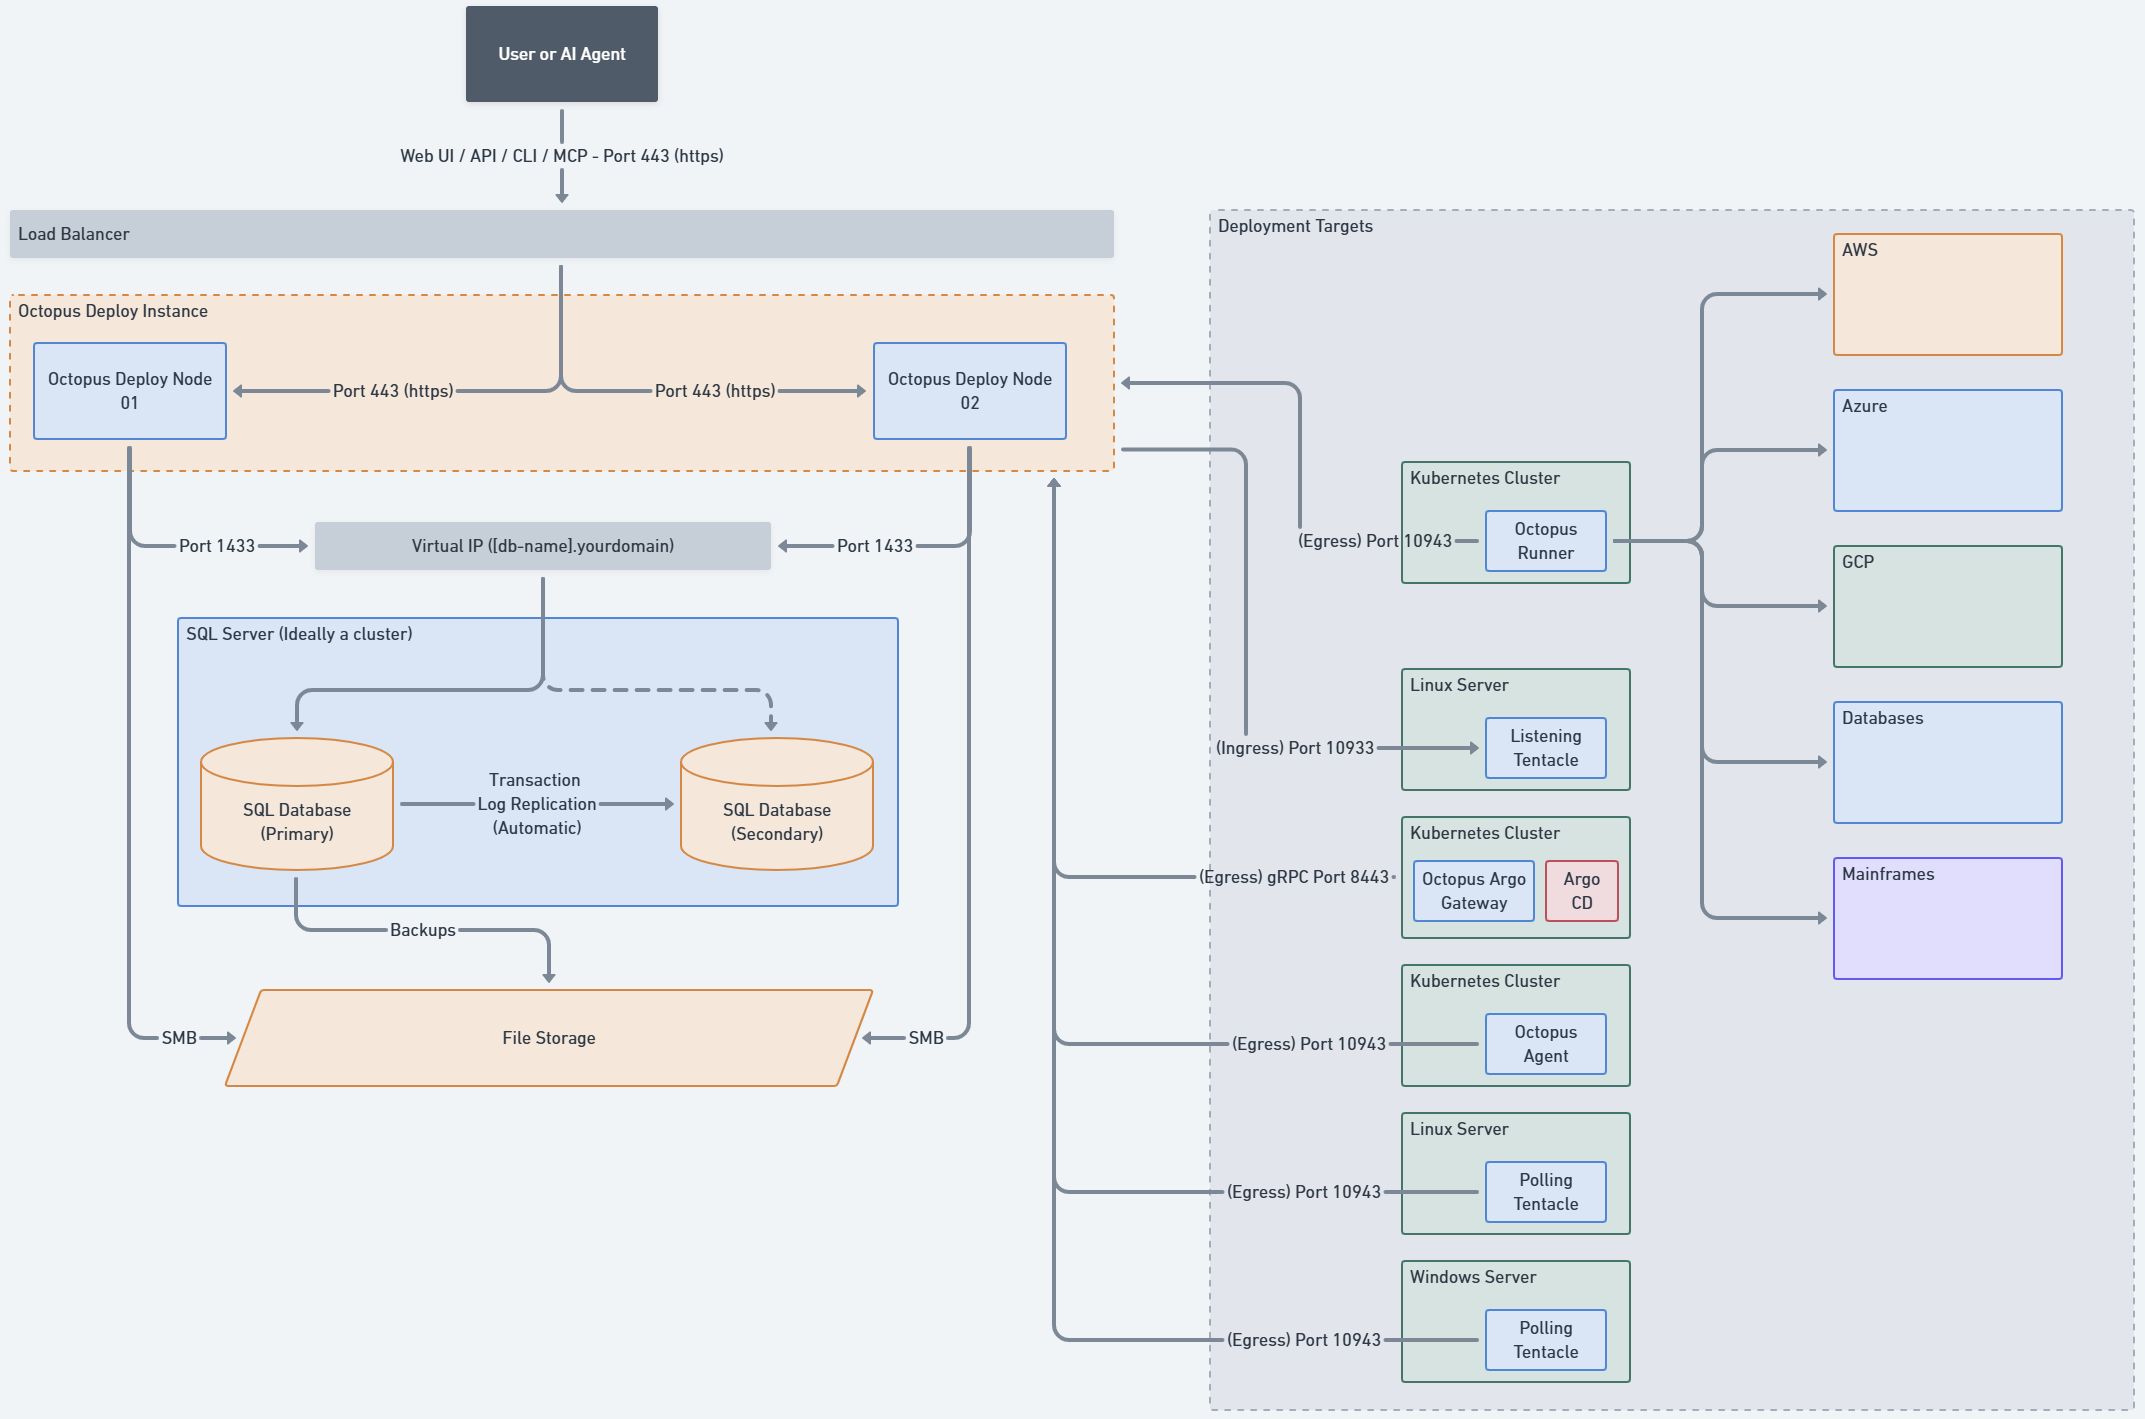
An Octopus High Availability configuration requires four main components:
- A load balancer This will direct user traffic bound for the Octopus web interface between the different Octopus Server nodes.
- Octopus Server nodes These run the Octopus Server service. They serve user traffic and orchestrate deployments.
- A database Most data used by the Octopus Server nodes is stored in this database.
- Shared storage Some larger files - like packages, artifacts, and deployment task logs - aren’t suitable to be stored in the database, and so must be stored in a shared folder available to all nodes.
One of the benefits of High Availability is the database and file storage is running on a separate infrastructure from the Octopus Server service. For a production instance, we recommend everyone follow the steps below, even if you plan on running a single node instance. If anything were to happen to that single node, you could be back up and running quickly with a minimal amount of effort. In addition, adding a second node later will be much easier.
This implementation guide will help configure High Availability. If you are looking for an in-depth set of recommendations, please refer to our white paper on Best Practices for Self-Hosted Octopus Deploy HA/DR.
How High Availability Works
High Availability (HA) distributes load between multiple nodes. There are two kinds of load an Octopus Server node encounters:
- Tasks (Deployments, runbook runs, health checks, package re-indexing, system integrity checks, etc.)
- User Interface via the Web UI and REST API (Users, build server integrations, deployment target registrations, etc.)
Tasks are placed onto a first-in-first-out (FIFO) queue. By default, each Octopus Deploy node is configured to process five (5) tasks concurrently, which can be updated in the UI. That is known as the task cap. Once the task cap is reached, the remaining tasks in the queue will wait until one of the other tasks is finished.
Each Octopus Server node has a separate task cap. High Availability allows you to scale the task cap horizontally. If you have two (2) Octopus Server nodes each with a task cap of 10, you can process 20 concurrent tasks. Each node will pull items from the task queue and process them.
Learn more about how High Availability processes tasks in the queue section.
High Availability Limits
Octopus Deploy’s High Availability functionality provides many benefits, but it has limits.
- All Octopus Server nodes must run the same version of Octopus Deploy. Upgrading to a newer version of Octopus Deploy will require an outage as you upgrade all nodes.
- You cannot specify the node a deployment or runbook run to execute on. Octopus Deploy uses a FIFO queue, nodes will pick up any pending tasks.
- If a deployment or runbook run fails, it fails. Octopus Deploy will not automatically attempt to re-run that failed deployment or runbook run on a different node. In our experience, changing nodes rarely has been the solution to a failed deployment or runbook run.
- All the Octopus Server nodes must connect to the same database.
- Octopus Server nodes have no concept of a “read-only” connection to a database. All online nodes perform write operations to the database. Even if it is not processing tasks.
- Octopus Server nodes are sensitive to latency to SQL Server and the file storage. The Octopus Server nodes, SQL Server, and file storage should all be located in the same data center or cloud region. The latency between availability zones within the same cloud region is acceptable. While the latency between cloud regions or data centers is not.
Generally, these limits are encountered when our users attempt to use Octopus Deploy’s High Availability functionality for disaster recovery in a hot/hot configuration. A hot/hot configuration between two or more data centers or cloud regions is not supported or recommended. Please see our white paper on recommendations for high availability and disaster recovery.
Calculating Task Cap
The amount of computing resources required for the Octopus Server nodes and database is dependent on the task cap. The higher the task cap, the more resources you’ll need.
To calculate the task cap we recommend using the number of applications or projects you need to deploy during the production deployment window.
- Deployments and runbook runs are the most common tasks.
- Deployments typically take longer than any other task, including runbook runs.
- Production deployments are time-constrained. They are done off-hours during an outage window.
Once you know the number of projects and the duration of the window, you can calculate the task cap using the average deployment duration. If you don’t know the average deployment duration, use 30 minutes as the starting point. The formula is:
(Number of Projects to Deploy * Average Deployment Duration) / Production Deployment Window in Minutes
For example, you need to deploy 50 applications, each taking 30 minutes to deploy. You have two hours (120 minutes) to deploy all the applications.
- 50 Applications * 30 Minutes = 1500
- 1500 / 120 Minutes (two-hour production deployment window) = 12.5
That means at a minimum, you’d need a task cap of 13. A safe option would be 16 to account for any longer-running deployments or other tasks that need to run.
Once you know the max task cap, you can divide that by the number of nodes you need for the HA cluster. If you need a max task cap of 16 and plan on having two nodes, each node would have a task cap of 8.
We’ve created a series of lookup tables where you can see the number of deployments for popular task cap configurations.
Licensing
Each Octopus Deploy SQL Server database is a unique Instance. Nodes are the Octopus Server service that connects to the database. High Availability occurs when two or more nodes connect to the same Octopus Deploy database. An HA Cluster refers to all components, the load balancer, nodes, database, and shared storage.
For self-hosted customers, High Availability is available for the following license types:
- Professional: limited to 2 nodes
- Enterprise: unlimited nodes
The node limit is included in the license key in the NodeLimit node.
<NodeLimit>Unlimited</NodeLimit>If you do not have that node in your license key then you are limited to a single node. If you recently purchased a license key and it is missing that node then reach out to sales@octopus.com.
Infrastructure
Octopus Deploy’s High Availability functionality requires you to create and configure infrastructure for Octopus Server nodes, a database, shared storage, and a load balancer. This section will provide the necessary details required for each of those components.
Octopus Server nodes
The Octopus Server nodes host and run the Octopus Server service. We support running Octopus Deploy on Windows Server 2016 or greater as well as running Octopus Deploy in a container.
Due to how Octopus stores the paths to various BLOB data (task logs, artifacts, packages, imports, event exports etc.), you cannot run a mix of both Windows Servers, and Octopus Linux containers connected to the same Octopus Deploy instance. A single instance should only be hosted using one method.
How to install and configure Octopus Deploy on these nodes is outside the scope of this implementation guide. You can find detailed instructions in the links below.
Regardless of the host, you’ll need to determine how many nodes you want in your HA cluster and how much compute resources each node needs.
Number of Octopus Server nodes
Most of our customers have between two (2) and four (4) nodes. Generally, more nodes are better (up to a point). Restarting a node in a four-node cluster will reduce your capacity by 25%, while doing the same for a two-node cluster will reduce capacity by 50%. There is a margin of diminishing returns. We don’t recommend going beyond six (6) to eight (8) nodes. At that point, you’ll see a margin of diminishing returns.
Octopus Server node compute resources
Below is a baseline for setting compute resources based on the task cap. You are responsible for monitoring the compute resource utilization of your Octopus Server nodes to ensure you aren’t over or under-provisioning.
| Task Cap Per Node | Windows Compute Resources | Container Compute Resources |
|---|---|---|
| 5 - 10 | 2 Cores / 4 GB RAM | 150m - 1000m / 1500 Mi - 3000 Mi |
| 20 | 4 Cores / 8 GB RAM | 1000m - 2000m / 3000 Mi - 6000 Mi |
| 40 | 8 Cores / 16 GB RAM | 1250m - 2500m / 4000 Mi - 8000 Mi |
| 80 | 16 Cores / 32 GB RAM | 2000m - 4000m / 5000 Mi - 10000 Mi |
| 160 | 32 Cores / 64 GB RAM | 3500m - 7000m / 6000 Mi - 12000 Mi |
While possible to have an Octopus Server node with a task cap above 160, it isn’t recommended. Once you go beyond those limits you’ll likely run into underlying Host OS, .NET, or networking limitations. We’ve found 40-80 to be a reasonable max for the task cap for each node. It is far better to scale horizontally by adding more nodes.
In our research the biggest limiting factor in processing concurrent tasks is the database. It won’t matter how many nodes or how big they are if the database cannot handle the load. You have to scale your database resources as you increase the overall task cap.
Database
Octopus Deploy stores project, environment, and deployment-related data in a shared Microsoft SQL Server Database. You can host that SQL Database on a self-managed SQL server, or use one of the many popular cloud providers. We recommend picking the option based on where you plan on hosting Octopus Deploy.
Database Compute Resources
The amount of compute resources to assign the databases is based on the total amount of concurrent tasks you wish to process. Below is a baseline of resources. You are responsible for monitoring the compute resource utilization of your database to ensure you aren’t over or under-provisioning. We have some customers in Octopus Cloud who require 3200 DTUs due to their Octopus Deploy usage.
| Total Task Cap | Virtual Machine Host | Azure DTUs |
|---|---|---|
| 5 - 10 | 2 Cores / 4 GB RAM | 50 DTUs |
| 20 | 2 Cores / 8 GB RAM | 100 DTUs |
| 40 | 4 Cores / 16 GB RAM | 200 DTUs |
| 80 | 8 Cores / 32 GB RAM | 400 DTUs |
| 160 | 16 Cores / 64 GB RAM | 800 DTUs |
Database High Availability
Since the database is shared, the database server must be also highly available. Octopus Deploy supports a variety of SQL Server editions, from SQL Server Express up to Enterprise as well as managed SQL Server. How the database is made highly available is really up to you; to Octopus, it’s just a connection string. We are not experts on SQL Server high availability, so if you have an on-site DBA team, we recommend using them.
Octopus High Availability works with:
Each of the popular cloud providers provides some version of SQL Server Always On Availability groups. Please see the links to the implementation guides below for details for your specific cloud provider.
Octopus High Availability has not been tested with Log Shipping or Database Mirroring and does not support SQL Server replication.
Database Implementation Guides
If you wish to learn more about how to configure Octopus Deploy with a specific hosting option, please refer to our installation guides.
File Storage
Octopus stores several files that are not suitable to store in the database. These include:
- Packages used by the built-in repository. These packages can often be very large in size.
- Artifacts collected during a deployment. Teams using Octopus sometimes use this feature to collect large log files and other files from machines during a deployment.
- Task logs are text files that store all log output from deployments and other tasks.
- Imported zip files used by the Export/Import Projects feature.
- Archived audit logs by the Archived audit logs feature.
As with the database, you’ll tell the Octopus Servers where to store them as a file path within your operating system. The shared storage needs to be accessible by all Octopus nodes. Each of these three types of data can be stored in a different location.
Whichever way you provide the shared storage, there are a few considerations to keep in mind:
- To Octopus, it needs to appear as either:
- A mapped network drive e.g.
X:\ - A UNC path to a file share e.g.
\\server\share - For Linux containers they need to be a volume mount.
- A mapped network drive e.g.
- The service account that Octopus runs needs full control over the directory.
- Drives are mapped per user, so you should map the drive using the same service account that Octopus is running under.
Your file storage should be hosted in the same data center or cloud region as the Octopus Server nodes. We’ve included guides for the most common file storage options we encounter.
Load Balancer
Octopus Deploy only has two possible inbound connections.
- Web UI / Web API over http/https (ports 80/443)
- Polling Tentacles over TCP (port 10943)
For the Web UI and API traffic you can leverage SSL offloading. For Polling Tentacles, SSL offloading is not supported.
Health Checks
Octopus Deploy provides an endpoint you can use for health checks for your load balancer to ping: /api/octopusservernodes/ping.
Making a standard HTTP GET request to this URL on your Octopus Server nodes will return:
- HTTP Status Code
200 OKas long as the Octopus Server node is online and not indrain mode. - HTTP Status Code
418 I'm a teapotwhen the Octopus Server node is online, but it is currently indrain modepreparing for maintenance. - Anything else indicates the Octopus Server node is offline, or something has gone wrong with this node.
The Octopus Server node configuration is also returned as JSON in the HTTP response body.
Traffic distribution
We recommend using a round-robin (or similar) approach for sharing traffic between the nodes in your cluster, as the Octopus Web Portal is stateless.
Auditing Traffic
Audit events include the IP address of the client that initiated the request. As High Availability redirects user traffic through a load balancer, the default value of the IP address in audit events will be the IP address of the load balancer rather than the client’s IP address. See IP address forwarding for configuring trusted proxies in Octopus
Request size and timeout
All package uploads are sent as a POST to the REST API endpoint /api/[SPACE-ID]/packages/raw. Because the REST API will be behind a load balancer, you’ll need to configure the following on the load balancer:
- Timeout: Octopus is designed to handle 1 GB+ packages, which takes longer than the typical http/https timeout to upload.
- Request Size: Octopus does not have a size limit on the request body for packages. Some load balancers only allow 2 or 3 MB files by default.
Polling Tentacles
Polling Tentacles poll each Octopus Server node at regular intervals to see if that node has picked up a task. Using Polling Tentacles with HA requires every Polling Tentacle to be able to connect to all nodes.
You have two options:
- Using a unique address per node with the default port of
10943.- Node1 would be: Octo1.domain.com<10943>
- Node2 would be: Octo2.domain.com<10943>
- Node3 would be: Octo3.domain.com<10943>
- Using the same address with a different port per node.
- Node1 would be: octopus.domain.com<10943>
- Node2 would be: octopus.domain.com<10944>
- Node3 would be: octopus.domain.com<10945>
For Polling Tentacles, SSL offloading is not supported. Octopus Deploy and the Tentacle establishes a two-way trust using the certificates created by Octopus Deploy and the Tentacle. If either of them doesn’t match, the connection is closed and all commands are rejected.
Additional Load Balancer Resources
We’ve created guides for configuring many popular load balancers.
- Local Options
- AWS Load Balancers
- Azure Load Balancers
- GCP Load Balancers
Octopus Deploy Configuration
Once the infrastructure is in place to support high availability, you can then start configuring Octopus Deploy to leverage it. The good news is if you have an existing instance in place you can update the configuration without having to rebuild everything.
Creating a new instance
When creating a new instance, you must start with a single node. Once that is up and running, you can add additional nodes. When you create a new Octopus Deploy instance, it will run a series of SQL Scripts to populate the Octopus Deploy database with the appropriate tables, views, and stored procedures.
Windows Host
Follow these steps if you elect to host Octopus Deploy on Windows Servers.
- Download the latest MSI from Octopus Downloads
- Install the MSI on the Windows Server. Once complete, it will start the Octopus Setup Wizard.
- Follow the wizard and complete the configuration.
- Once the setup wizard is complete, you’ll be taken to the Octopus Manager. Now is a good time to retrieving the master key. That master key is required to add additional nodes to your High Availability Cluster.
- Run the following script to configure the BLOB storage.
Octopus.Server.exe path --clusterShared \\OctoShared\OctopusDataLearn more at Installing Octopus Deploy Overview
Container Host
Follow these steps if you elect to host Octopus Deploy on a container host like Kubernetes.
- Generate a Master Key using
openssl rand 16 | base64. - Send that master key, along with the database connection string and volume mounts to the container or helm chart.
- Once the first node is up and running, you can add additional nodes.
Additional container host resources:
Migrating an existing instance
Migrating an existing instance is possible, and for most configurations can be completed in as little as a few hours. However, you should be aware of the steps. Please read through each section below before starting a migration.
Backup the Master Key
Before getting started, it is important to ensure you have a backup of the master key. The master key is used by Octopus Deploy to encrypt and decrypt data within the Octopus Deploy database. If this master key is lost, you will have to reset all the encrypted items in your database.
Learn more about retrieving the master key.
Migrating Database
In our experience, it is uncommon to have the Octopus Deploy service and database running on the same server for a production instance. You can skip this step if your database is already running on a SQL Server cluster, on a managed server like AWS RDS or Azure SQL, or leveraging always-on High Availability.
If you need to move the database the process is:
- Turn off the Octopus Deploy service.
- Perform a full backup of the existing database.
- Restore the database to the desired SQL Server location.
- Update the connection string for the existing service.
- Turn back on the Octopus Deploy service.
Learn more about moving the Octopus Server Database.
Migrating File Storage
Typically, the file storage takes the most time of the high availability migration. The good news is you can do most of the work prior to the cutover. The file storage stores items like deployment logs and runbook run logs. Once a deployment or runbook run is complete, Octopus Deploy will leave those files until they are deleted by the retention policies.
The following work can be completed without turning off any Octopus Server nodes. Your Octopus instance might have years worth of data. It can take hours or days to finish copying all the files over.
- Create the main directory and subdirectories.
- TaskLogs
- Artifacts
- Packages
- Imports
- EventExports
- Telemetry
- Using tools such as
robocopyorrsynccopy the files and subdirectories to the corresponding folder. Leverage the mirror functionality to ensure your file share folder structure matches the original.
Once the files are copied over, you can update your Octopus Deploy instance to point to the file share.
- Turn off the Octopus Deploy service.
- Run
robocopyorrsyncone final time to pick up any new files since the last sync. - Run the following PowerShell script to update Octopus to point to the new directory.
Set-Location "C:\Program Files\Octopus Deploy\Octopus"
$filePath = "YOUR ROOT DIRECTORY"

& .\Octopus.Server.exe path --clusterShared "$filePath"- Turn back on your Octopus Deploy service.
Learn more about moving the Octopus Server folders.
Migrating to the Load Balancer
For Web UI and API traffic, migrating to a load balancer should be seamless. Use the configuration information from an earlier section in this document to configure the load balancer. Once you’ve verified all the traffic is working as expected, then provide the new URL to your users.
Adding Nodes
Generally, the same process is followed when adding new nodes to an existing High Availability cluster.
- Ensure the new host, be it Windows or Containers, can connect to the Octopus Deploy database and file storage.
- Run a script to configure the Octopus Server node instance on a Windows machine or to start up a new container. You’ll need to provide the master key and database connection information. For containers, you’ll also need to provide the volume mounts.
- Add that new node to the load balancers.
- Update all the polling tentacles to connect to that new node.
Because all the configuration is stored in the database and blob storage, you can delete all the nodes and create new ones if you so desire.
We recommend writing scripts to automate this process.
Polling Tentacles and Kubernetes Agent with High Availability
Once the load balancer is configured to expose each Octopus Server node, you must register them with each polling tentacle. You can use this PowerShell script as a basis for your automation. The script should add any new nodes you’ve created. If you added two nodes to your High Availability cluster, your script would look like this.
C:\Program Files\Octopus Deploy\Tentacle>Tentacle poll-server --server=Octo2.domain.com:10943 --apikey=YOUR_API_KEY
C:\Program Files\Octopus Deploy\Tentacle>Tentacle poll-server --server=Octo3.domain.com:10943 --apikey=YOUR_API_KEY
More details at Polling Tentacles with Octopus High Availability
Maintenance
Most of the maintenance concerns for an Octopus Deploy High Available cluster are related to:
- The availability of each node.
- The work each node is performing.
- Each node’s connectivity to the database and file storage.
- Each node’s connectivity to all the deployment targets.
- Ensuring all the nodes are running the same version of Octopus Deploy.
Node configuration page
A dedicated page to High Availability within the Octopus Deploy user interface can be accessed via Configuration -> Nodes.
That page provides the following functionality:
- The number of nodes your HA cluster has registered.
- The last time each node “checked-in” or was seen.
- The number of tasks each node is processing.
- Changing the task cap on each node via the overflow menu.
- Draining a specific node via the overflow menu will stop it from processing tasks.
- Deleting a specific node via the overflow menu will remove it from the HA cluster.
Node Status and Last Seen
A healthy node will update the Last Seen date on the node configuration page every 60 seconds or so. The code to update that last seen date runs on a dedicated thread and will do its very best to update that date. That means there is a problem if that value isn’t updated for a specific node in a while.
Modifying the task cap
This page enables you to change the task cap for each node. We recommend having the same task cap for all nodes, however there are use cases in which you want a different value for each node.
- Setting the task cap to 0 to have “UI Only” nodes that do not process any tasks.
- Setting the task cap to 1 for a new node in a canary-style deployment to ensure everything is working as expected before setting it to the default value.
- Setting the task cap to a lower value than the others because the server doesn’t have the same compute allocations.
Draining a node
The drain toggle can be used to prevent an Octopus Server node from executing any new tasks. All existing tasks running on that node will continue to run until completion. This is useful when you want to restart or shut down a node, remove a node, or you want to upgrade the Octopus version number.
While draining:
- An Octopus Server node will finish running any tasks is it currently executing and then idle.
- The Octopus Server ping URL will not return 200 OK.
Deleting a node
Once a node has been retired, you can delete it from the HA Cluster using the node configuration page. It is important to note that deleting an active node will have minimal impact. Every 60 seconds the nodes will perform a check-in where they update the “last seen” date. If the node is not present in the table, it will automatically add itself.
Auto-scaling nodes
It is possible to leverage AWS Auto-Scaling Groups, Azure Virtual Machine Scale Sets, or Kubernetes auto-scaling capability to automatically horizontally scale your nodes. Adding nodes is fairly trivial, removing them is much more difficult due to how Octopus processes tasks.
The process for adding nodes is:
- Create the new application host.
- Download and install the same version as the other nodes.
- configure any volume mounts for file storage.
- Configure the Octopus Server node using the master key and database connection information.
The process for removing a node is:
- Use the API to set the node to draining using an API key.
- Wait for all the tasks to be completed. Failure to do so will cause those tasks to fail.
- Delete the application host.
The complexity of removing a node is due to having to invoke the API to drain the node and waiting for the node to complete any in-flight tasks. For cloud providers such as Azure or AWS that typically means leveraging a function or a Lambda.
For scripts and examples, please refer to the auto-scaling high availability nodes page.
Connectivity issues with the database
If an Octopus Server node cannot connect to the database it will start then immediately stop. The logs will indicate a connection failure.
Connectivity issues with the file storage
Octopus Deploy is generally more forgiving if it cannot access the files. There are scenarios in which the Octopus Deploy service will not start, typically on permissions denied or the path cannot be found. However, if the paths exist, but they don’t have data, then Octopus will continue to run.
The telltale signs are:
- The service gets a permissions denied error and stops.
- Empty deployment logs for completed deployments.
- Missing deployment artifacts.
- Missing project and space images.
- Packages cannot be found in the built-in repository.
The paths to the file storage are stored within the database. That means all nodes will use the same path.
- Ensure the file storage paths point to a file share. The file storage must be on a file share accessible by all nodes. It cannot be a local drive.
- When running Octopus Deploy on Windows ensure the account the Octopus Deploy Windows Service is running as can access those file shares.
- When running Octopus Deploy on a container ensure the volumes are all mounted properly.
Upgrading the Octopus Deploy version
Upgrading an HA cluster to the latest Octopus Deploy version will require an outage window as all nodes must be upgraded at the same time. Octopus Deploy provides the capability to upgrade from almost any modern version. For example, upgrading from 2022.2 to 2024.2. Because of that, database changes are not backward compatible.
The upgrade process will be:
- Backup the master key.
- Drain all the nodes.
- After all tasks are finished, stop all the nodes
- Backup the database.
- Install the latest version on one node (this will upgrade the database).
- Upgrade the remaining nodes.
- Start the nodes.
- Disable the draining.
More detailed instructions can be found in the upgrading guide.
Help us continuously improve
Please let us know if you have any feedback about this page.
Page updated on Wednesday, October 4, 2023