Chocolately is a popular package manager for Windows. It allows you to automate the installation of software used by the machines where you deploy your software, for example, systems running .NET.
With Runbooks, you can create a runbook as part of a routine operations task to install software via Chocolatey that are required for your deployment targets or Workers.
Create the runbook
To create a runbook to install software with Chocolatey:
- From your project’s overview page, navigate to Operations ➜ Runbooks, and click ADD RUNBOOK.
- Give the runbook a name and click SAVE.
Next, you need to ensure Chocolatey is installed.
Install chocolatey
Before you can use Chocolatey, it must be installed. To do this, you can use an existing step template from our community library called Chocolatey - Ensure Installed. To add this step to a runbook:
- Add the community step template called Chocolatey - Ensure Installed, and give the step a name.
- Choose the Execution Location on which to run this step.
- Optionally, configure any conditions for the step, and click Save.
You can now use this step in conjunction with other runbook steps to install your software with Chocolatey.
Common packages
There are plenty of different types of software you can install with Chocolatey. The next few sections outline some of the common ones you can install with a runbook using the Run a script step.
Test for installed chocolatey package
A helper PowerShell function called Test-ChocolateyPackageInstalled is used by the examples to check if the package to be installed is already present on the target machine:
function Test-ChocolateyPackageInstalled {
    Param (
        [ValidateNotNullOrEmpty()]
        [string]
        $Package
    )

    Process {
        if (Test-Path -Path $env:ChocolateyInstall) {
            $packageInstalled = Test-Path -Path $env:ChocolateyInstall\lib\$Package
        }
        else {
            Write-Host "Can't find a chocolatey install directory..."
        }

        return $packageInstalled
    }
}
The script checks to see if the package specified in $Package is already installed by testing the path specified in $env:ChocolateyInstall\lib\$Package, and returning the result in $packageInstalled.
.NET Framework
There are different versions of the .NET Framework you can install using Chocolatey. This example will use the dotnetfx package from Chocolatey.
To add this to a runbook:
- Click Script, and then select the Run a Script step.
- Give the step a name.
- Choose the Execution Location on which to run this step.
- In the Inline source code section, add the following code as a PowerShell script:
# function Test-ChocolateyPackageInstalled omitted here.

$package = "dotnetfx"

if (Test-ChocolateyPackageInstalled -Package $package) {
    Write-Host "$package is already installed"
}
else {
    choco install $package -confirm
}
The script will run the choco install command if the dotnetfx package isn’t already installed.
.NET Core
To install .NET Core, we use the dotnetcore Chocolatey package.
To add this to a runbook:
- Click Script, and then select the Run a Script step.
- Give the step a name.
- Choose the Execution Location on which to run this step.
- In the Inline source code section, add the following code as a PowerShell script:
# function Test-ChocolateyPackageInstalled omitted here.

$package = "dotnetcore"

if (Test-ChocolateyPackageInstalled -Package $package) {
    Write-Host "$package is already installed"
}
else {
    choco install $package -confirm
}
The script will run the choco install command if the dotnetcore package isn’t already installed. Configure any other settings for the step and click Save, and you have a runbook step to install .NET Core.
Windows features
Chocolatey can also be used to install Windows features by leveraging DISM, or Deployment Imaging Service Management.
To find out what features are available to install on the machine, you can run the command:
Dism /online /Get-FeaturesThe command to install DISM features through Chocolatey is:
choco install [Feature Name] /y /source windowsfeaturesWhere [Feature Name] is the name of the Windows feature you wish to install.
To add this to a runbook step to install multiple features:
- Click Script, and then select the Run a Script step.
- Give the step a name.
- Choose the Execution Location on which to run this step.
- In the Inline source code section, add the following code as a PowerShell script:
# Octopus Variable with a comma separated list of features to install
$dismAppList = "#{Project.Chocolatey.DISM.RequiredFeatures}"

if ([string]::IsNullOrWhiteSpace($dismAppList) -eq $false){
    Write-Host "DISM Features Specified"

    $appsToInstall = $dismAppList -split "," | foreach { "$($_.Trim())" }

    foreach ($app in $appsToInstall)
    {
        Write-Host "Installing $app"
        & choco install $app /y /source windowsfeatures | Write-Output
    }
}- Add a project variable called
Project.Chocolatey.DISM.RequiredFeaturesand include the features you wish to install. For example the following variable will install three Windows features:
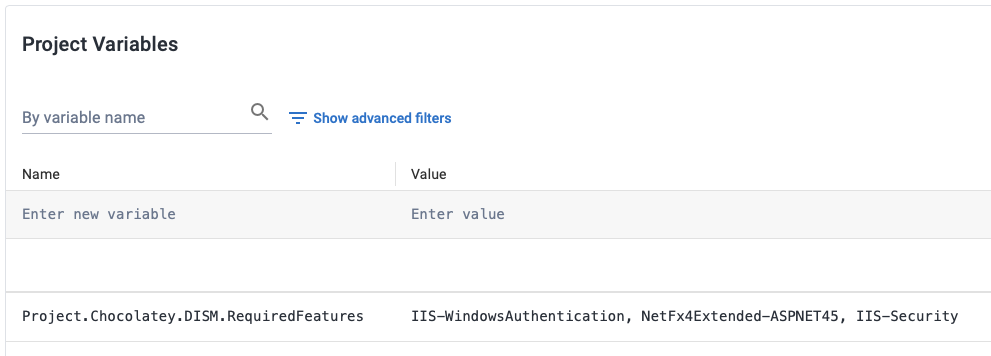
The features which will be installed are:
- IIS-WindowsAuthentication
- NetFx4Extended-ASPNET45
- IIS-Security
Configure any other settings for the step and click Save, and you have a runbook step to install Windows features.
Automating Tentacle installation with chocolatey packages
The Tentacle agent can be automatically installed from the command-line. This is very useful if you’re deploying to a large number of servers or you’re provisioning servers automatically.
In addition, it’s also possible to automate the installation of chocolatey packages at the same time as the Tentacle installation.
We have a number of bootstrap scripts available in our OctopusSamples Infrastructure as Code (IaC) GitHub repository. The following scripts are available to support Chocolatey package installation as part of a Tentacle installation:
- BootstrapTentacleAndRunChoco.ps1 - This script installs a Listening Tentacle and will install any Chocolately packages specified in the
$chocolateyAppListparameter. - BootstrapTentacleAndRunChocoPolling.ps1 - This script installs a Polling Tentacle and will install any Chocolately packages specified in the
$chocolateyAppListparameter.
These scripts support both standard Chocolatey packages and ones sourced through DISM.
Samples
We have a Target - Windows Space on our Samples instance of Octopus. You can sign in as Guest to take a look at this example and more runbooks in the OctoFX project.
Learn more
Help us continuously improve
Please let us know if you have any feedback about this page.
Page updated on Sunday, January 1, 2023