To use Google Workspace authentication with Octopus Server, Google Workspace must be configured to trust Octopus by setting it up as an app. This section covers the details of configuring the app.
Configure Google Workspace
Configure an app
To configure an app within Google Workspace, you must have a Developer account at https://developers.google.com. This account will own the app configuration, so we recommend you create an account for company use, rather than using an individual account.
Once you have an account, log in to https://console.developers.google.com and the following actions:
- Create a project for Octopus (this might take a minute or so) and then within that project
- Under the APIs and services, select Credentials.
- Click the Configure consent screen button.
- Select the User Type Internal and click Create.
- Fill out the App information, including a descriptive App name such as Octopus Server or Octopus Cloud, and select an appropriate User support email.
- Fill out the App logo details and upload a logo to make it easy to identify the application. You can download the Octopus logo here.
- Fill out the App domain information, providing
https://octopus.comas the Application home page,https://octopus.com/privacyas the Application privacy policy link andhttps://octopus.com/legal/customer-agreementas the Application Terms of Service link. Add the Top Level Domain of your Octopus instance to the Authorized domains list. If you are setting Google Workspaces up for Octopus Cloud this will beoctopus.appandoctopus.com. - Fill out the Developer contact information.
- Click Save and continue.
- On the Scopes screen, click Save and continue.
- Click Back to dashboard
- Select Credentials tab and click Create credentials, selecting Create Oauth client ID.
- Under Application type, select
Web application, In the Name field enterOctopus, click Add URI, and enterhttps://octopus.example.com/api/users/authenticatedToken/GoogleApps(replacinghttps://octopus.example.comwith the URL of your Octopus Server) to the Authorized redirect URIs and click Create. - Enter a Name for identification, e.g. Octopus. This is the name that will appear when the user is asked to allow access to their details.
- Take note of the Client ID and Client secret from the
OAuth client createdmodal.
Tips:
- Reply URLs are case-sensitive - Be aware that the path in this URL after the domain name was case-sensitive during our testing.
- Not using SSL? We highly recommend using SSL, but we know it’s not always possible. If you do not have SSL enabled on your Octopus Server, you can use
http. Please beware of the security implications of accepting a security token over an insecure channel. Octopus integrates with Let’s Encrypt, making it easier to set up SSL on your Octopus Server.
Configure Octopus Server
You can configure the Google Workspace settings from the command line. You will need the Client ID and Client secret from the Credentials tab and your hosted domain name.
Support for OAuth code flow with PKCE was introduced in Octopus 2022.2.4498. If you are using a version older than this, the Client secret setting is not required.
Once you have those values, run the following from a command prompt in the folder where you installed Octopus Server:
Octopus.Server.exe configure --googleAppsIsEnabled=true --googleAppsClientId=ClientID --googleAppsClientSecret=ClientSecret --googleAppsHostedDomain=your-domain.comAlternatively these settings can be defined through the user interface by selecting Configuration ➜ Settings ➜ GoogleApps and populating the fields Is Enabled, Hosted Domain, Client ID and Client Secret.

Octopus user accounts are still required
Even if you are using an external identity provider, Octopus still requires a user account so you can assign those people to Octopus teams and subsequently grant permissions to Octopus resources. Octopus will automatically create a user account based on the profile information returned in the security token, which includes an Identifier, Name, and Email Address.
How Octopus matches external identities to user accounts When the security token is returned from the external identity provider, Octopus looks for a user account with a matching Identifier. If there is no match, Octopus looks for a user account with a matching Email Address. If a user account is found, the External Identifier will be added to the user account for next time. If a user account is not found, Octopus will create one using the profile information in the security token.
Already have Octopus user accounts? If you already have Octopus user accounts and you want to enable external authentication, simply make sure the Email Address matches in both Octopus and the external identity provider. This means your existing users will be able to sign in using an external identity provider and still belong to the same teams in Octopus.
Getting permissions
If you are installing a clean instance of Octopus Deploy you will need to seed it with at least one admin user. This user will have access to create and configure other users as required. To add a user, execute the following command
Octopus.Server.exe admin --username USERNAME --email EMAILThe most important part of this command is the email, as usernames are not necessarily included in the claims from the external providers. When the user logs in the matching logic must be able to align their user record based on the email from the external provider or they will not be granted permissions.
Troubleshooting
We do our best to log warnings to your Octopus Server log whenever possible. If you are having difficulty configuring Octopus to authenticate with Google Workspace, be sure to check your server logs for warnings.
Double and triple-check your configuration
Unfortunately, security-related configuration is sensitive to everything. Make sure:
- You don’t have any typos or copy-paste errors.
- Remember things are case-sensitive.
- Remember to remove or add slash characters as we’ve instructed - they matter too!
Check OpenID Connect metadata is working
You can see the OpenID Connect metadata by going to https://accounts.google.com/.well-known/openid-configuration.
Inspect the contents of the security token
Perhaps the contents of the security token sent back by Google Workspace aren’t exactly the way Octopus expected, especially certain claims that may be missing or named differently. This will usually result in the Google Workspace user incorrectly mapping to a different Octopus User than expected. The best way to diagnose this is to inspect the JSON Web Token (JWT) which is sent from Google Workspace to Octopus via your browser. To inspect the contents of your security token:
- Open your browser’s Developer Tools and enable Network logging, making sure the network logging is preserved across requests.
- In Chrome Dev Tools this is called “Preserve Log”:
- Attempt to sign into Octopus using Google Workspace and find the HTTP POST coming back to your Octopus instance from Google Workspace on a route like
/api/users/authenticatedToken/GoogleApps. You should see anid_tokenfield in the HTTP POST body.
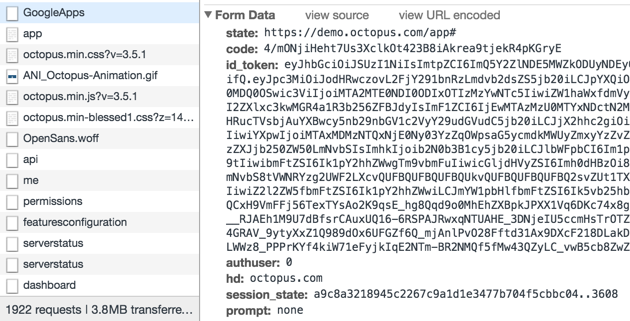
- Grab the contents of the
id_tokenfield and paste that into https://jwt.io/ which will decode the token for you.
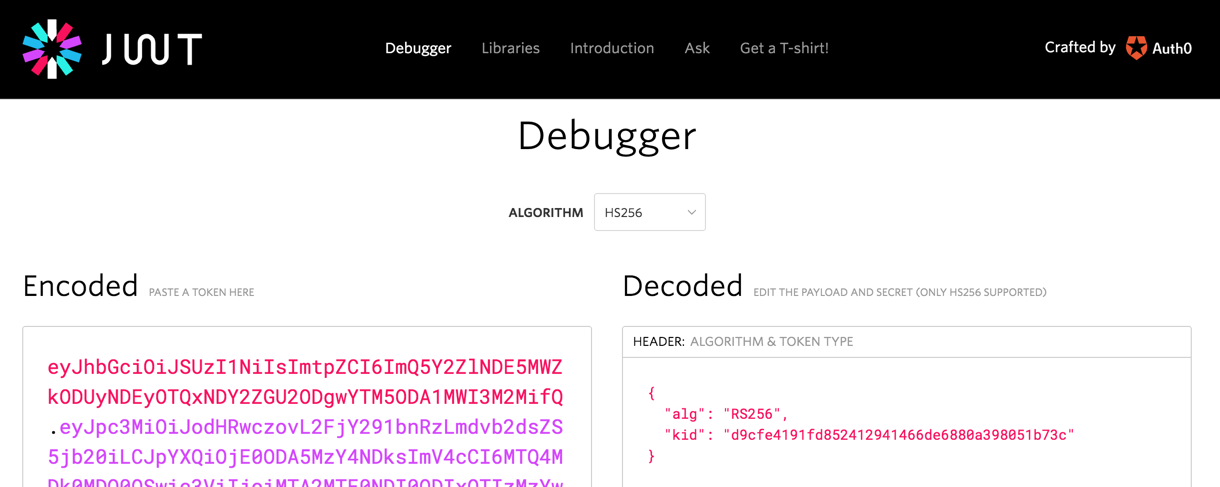
- Don’t worry if jwt.io complains about the token signature, it doesn’t support RS256 which is used by Google Workspace.
- Octopus uses most of the data to validate the token, but it primarily uses the
sub,email, andnameclaims. If these claims are not present, you will likely see unexpected behavior. - If you are not able to figure out what is going wrong, please send a copy of the decoded payload to our support team and let them know what behavior you are experiencing.
Help us continuously improve
Please let us know if you have any feedback about this page.
Page updated on Tuesday, December 10, 2024