To demonstrate some of the basic functionality provided by the Docker steps in Octopus, we’ll walk through the process of starting two containers that can communicate with each other through their own isolated network. The first container will simply start and run a non exiting process, while the second container will ping the first to demonstrate connectivity. As part of this we will set up an external feed to DockerHub and include a cleanup task to remove existing containers. We will use a Linux machine running Ubuntu, which has the latest version of Docker installed and has network access to retrieve images from Docker Hub.
Windows Containers on Windows Server While Docker Containers on Windows Server (not Docker for Windows through Docker Toolbox) are now generally available, this feature appears to still have some issues with key areas such as networking. This is an area that the Docker and Windows team are actively improving. While deploying a Windows Container to a Tentacle target on Windows should work, you may experience issues trying to use custom networks or volumes. We would suggest using Linux targets via SSH for the time being until this feature stabilizes.
Configuring a Docker host
If you already have a Linux machine with Docker installed, you can use that once you have configured it as a Linux target in Octopus.
If not, you’ll need to configure a host for our sample application. We recommend using Ubuntu 18.04 LTS or Ubuntu 20.04 LTS for this sample.
- Install Ubuntu.
- Configure your Ubuntu machine as either an SSH target or Linux Tentacle in Octopus
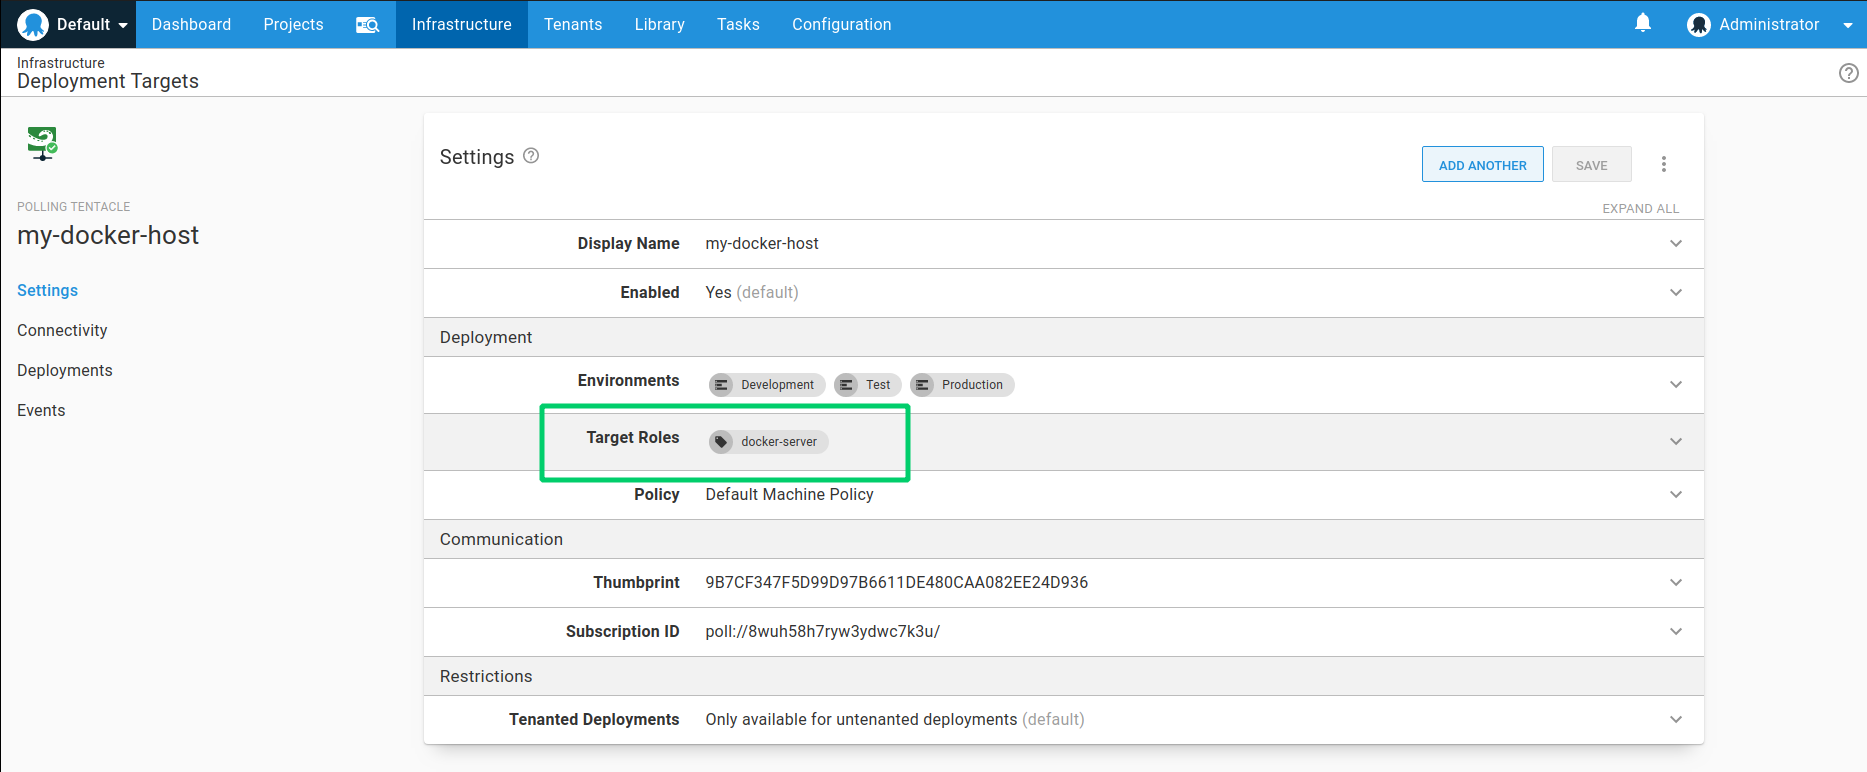
- Make sure this Deployment Target has a target tag like docker-server. We will configure the Docker steps to target this tag.
- Install and configure Docker Engine on your Ubuntu machine.
- Optionally, configure a Docker Group and grant Octopus the ability to manage the Docker Daemon as a non-root user.
You should now be ready to deploy Docker containers to your Ubuntu machine using Octopus Deploy.
Configuring a DockerHub feed
Next we are going to create a connection to the official Docker Hub registry so we can use those images for this demonstration.
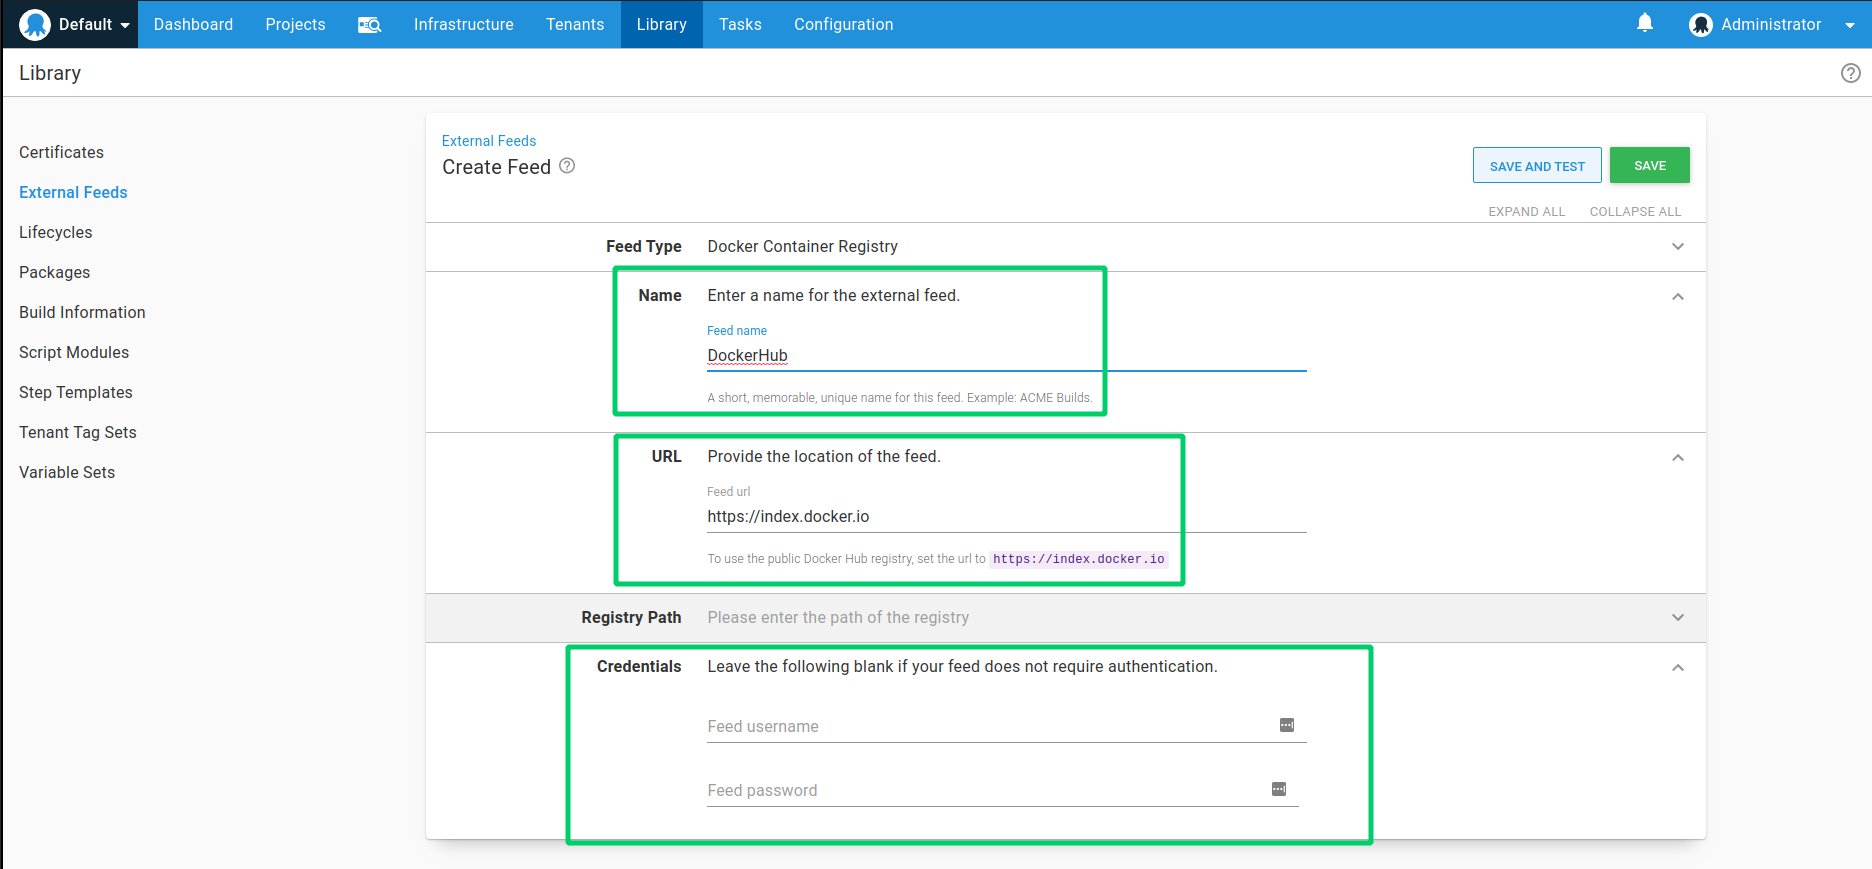
- Go to Deploy ➜ Manage ➜ External Feeds ➜ Add Feed.
- For Feed Type, select Docker Container Registry.
- Set the Name to something meaningful like DockerHub.
- Set the URL to the Docker Hub API url of https://index.docker.io.
- Since the registry is accessible from both the Octopus Server and the Linux deployment target using the same URL, we can leave the RegistryPath field blank.
- Similarly, since we will only be using public official images from Docker Hub we don’t need to provide any credentials. If you wanted to access any private Docker images you would need to provide your Docker Hub login details.
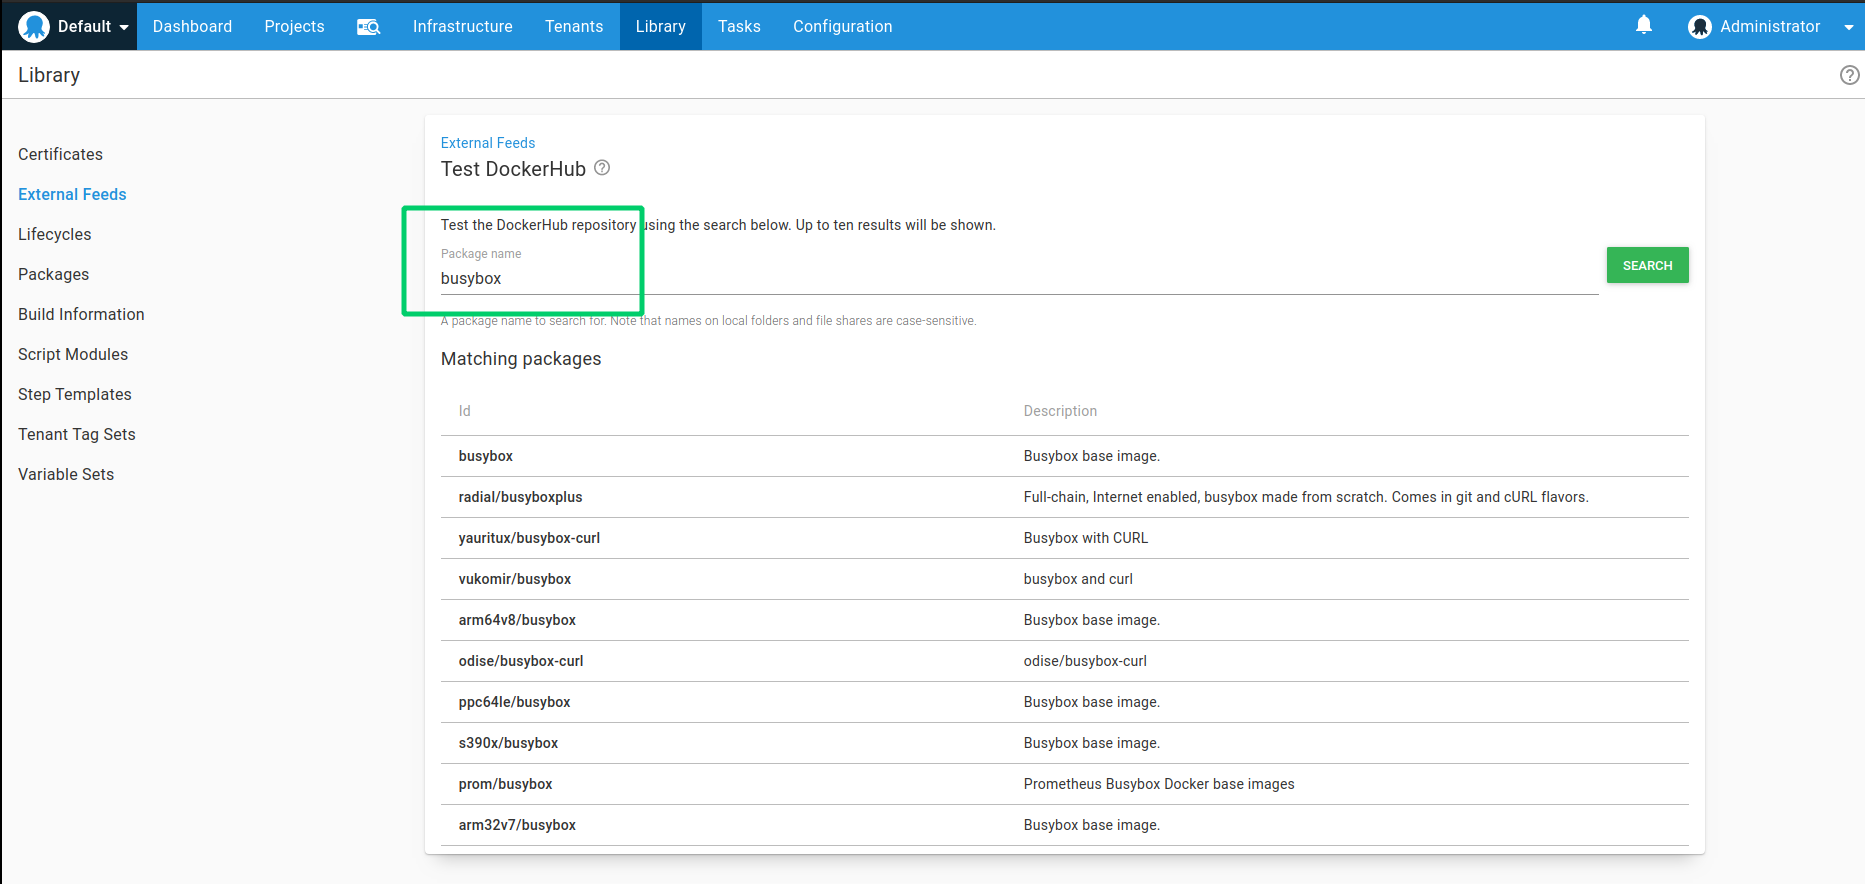
- Click Save and Test to make sure the connection to the Docker Hub registry is working.
Configuring the Docker project
Step 1: Docker network step
In a newly created project, click Add Step ➜ Create a Docker network. This step manages parameters that will be passed to the docker network create command.
- Ensure the step is set to run on the docker-server target tag (targeting the Docker host we created earlier).
- Set the Name to Custom Network. This name will be referenced later on in subsequent steps that will link the containers to the created network.
- Leave the Driver as the default Bridge type. This network type allows containers on the same network to immediately communicate with each other, while keeping them isolated from external networks.
- Set the Subnet to
172.28.6.0/24. You can optionally provide IP ranges that will define the Subnet, IP Range, and Gateway used by the network. In this case we have opted to just set up the subnet using the CIDR format172.28.6.0/24meaning that connected containers will be assigned IP addresses in the range172.28.6.0-172.28.6.255.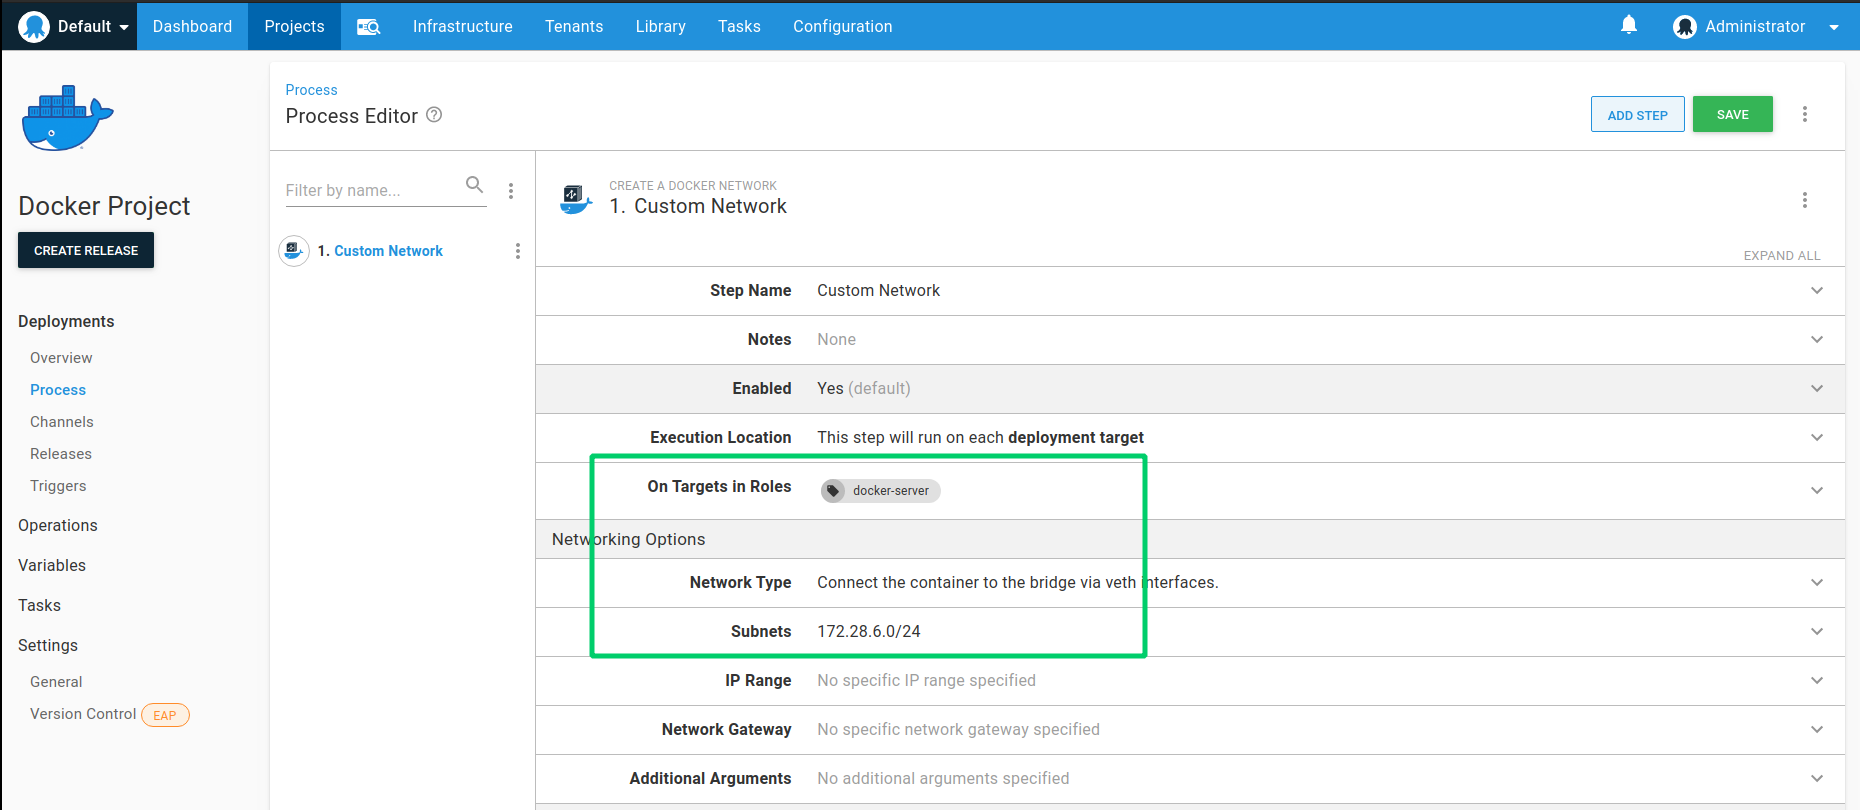
Docker network support
Keep in mind that as the Docker Network Octopus step simply wraps the docker network command, you will need to ensure your installed version of docker-engine supports this command. This was provided as of the 1.9.0 Docker Engine release.
For detailed information about Docker networking and additional arguments you can provide, we suggest reading the Understand Docker container networks and the network create Docker documentation.
Step 2: Creating container 1
From the project process page, add a new step via Add Step ➜ Run a Docker Container. This step helps you configure the parameters that will be passed to the docker run command.
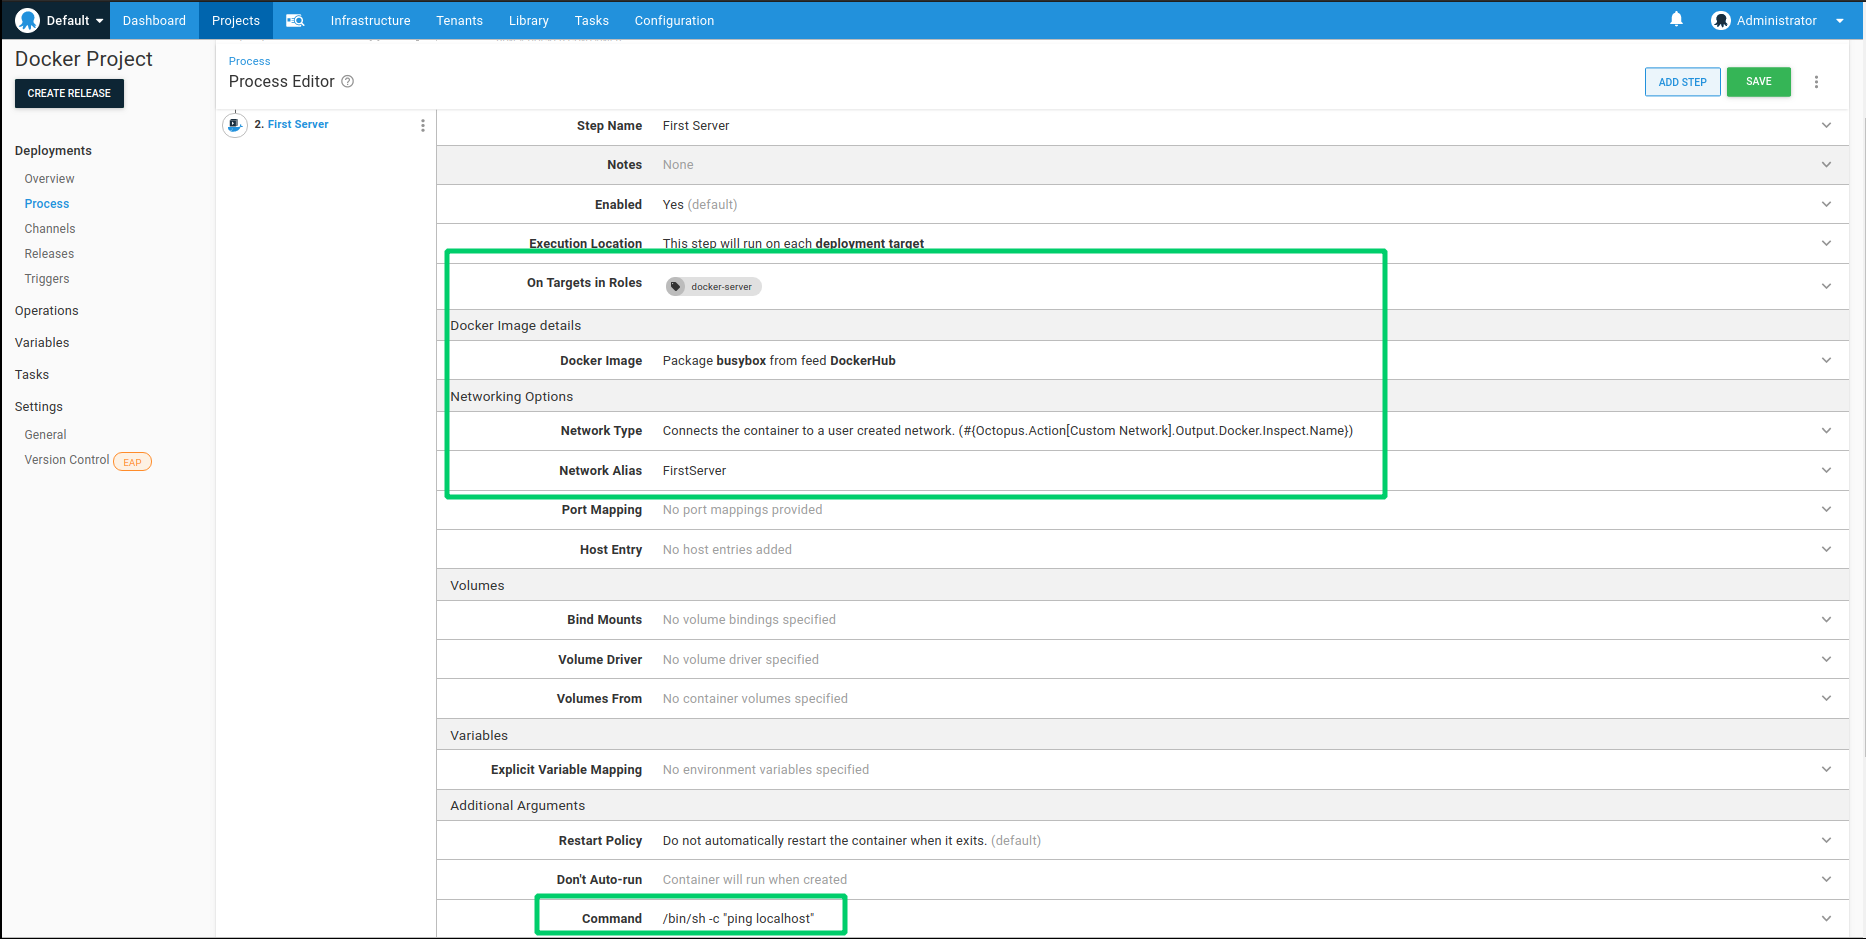
- Set the Name to First Server.
- Ensure the step is set to run on the docker-server target tag (targeting the Docker host and Network we created earlier).
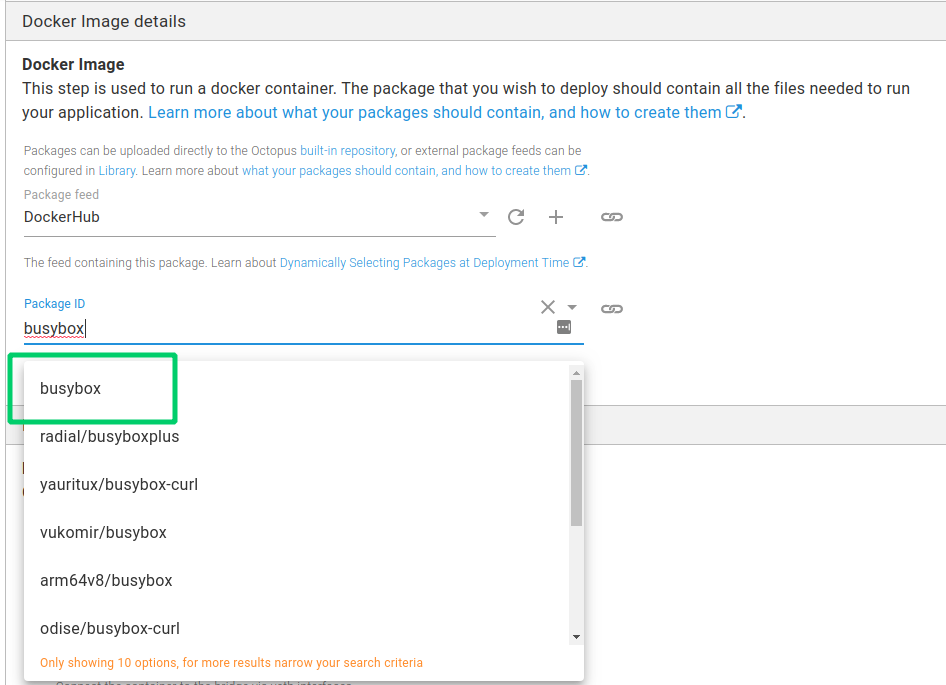
- For the Package Feed the DockerHub feed. You may notice the only options are Docker feeds, like the one we created earlier. This is because only Docker feeds will be shown for Docker-specific steps.
- Set the Package ID as busybox. Note, the package auto-complete should search for and return all public images from Docker Hub with the word “busybox”. Since we want to use the official image, select the one that is not preceded by a registry prefix. busybox is a tiny linux distro that, at just over 1 MB, will serve as a sufficient image for this feature demonstration.
- Under the Networking section, select the Network Type as Custom Network and provide the name as
#{Octopus.Action[Custom Network].Output.Docker.Inspect.Name}.
Using output variables from Docker Inspect Once Octopus creates the network in the previous step, it invokes the docker network inspect command and stores the JSON output in an output variable. This data contains all the information about the network and we will use the network name to signify to the container that it should connect to that network. All the values of the inspect command can be accessed with standard variable substitution syntax.
- Set Network Alias to FirstServer. This will make it easier to identify this specific container from another container in the network.
- Skip down to the Additional Arguments section, and set the Command to be:
/bin/sh -c "ping localhost". This arbitrary script instructs the linux instance to ping itself forever, keeping the container alive for this demonstration.
Container entry point The command itself is arbitrary. What is important is that we start a process that keeps running to keep the container alive. Since Octopus starts these containers in detached mode, the containers by default are configured to exit when the root process used to run the container exits. This ping command will be treated as the root process and by not stopping, means that the container itself will keep running until we tell it to stop (or the pinging itself fails and terminates). Typically, you would be less likely to actually supply this command argument through Octopus as you would probably supply a startup command or entry point in your DockerFile when you create your image.
- Save the first container configuration and move on to creating the second container step.
Step 3: Creating container 2
Now we will create a second container, exactly the same as the first using busybox, but this container will connect to the first container to demonstrate how containers can communicate in a Docker network.
- Create a new Run Docker Container step (very much like the first one, but notice some subtle differences):
- Set the Name to Second Server.
- Set the Target Tags to docker-server.
- Set the Package feed to DockerHub.
- Set the Package ID to busybox.
- Set the Network Type to Custom Network using the name
#{Octopus.Action[Custom Network].Output.Docker.Inspect.Name}.
- Skip down to the Variables section and under Explicit Variable Mapping, add a variable named PING_COUNT to a value of
#{PingCount}. This will demonstrate the mechanism for getting variables from Octopus into the container at run time via environment variables.
Getting Octopus variables into your container Keeping in line with the Docker ethos we are providing the ability to pass through Octopus variables into the container which are made available as environment variables inside the container. This method has some limitations such as requiring explicit inclusion of each variable required, proper escaping of special characters and line breaks as well as exposing sensitive variables to all processes within that container.
Some other options include passing through all variables to the container through an environment file or pulling files out of the container, performing variable replacement, and then pushing the files back in using the layered file system, before starting the container up.
- This time set the Command parameter to
/bin/sh -c "ping -c \$PING_COUNT FirstServer | grep PING; sleep 5s". As with Container A, this will start the container with the ping process however in this case it will only ping a limited number of times before exiting with the first line showing the IP address of the server being called. A 5 second sleep is also appended for demonstration purposes so that we can extract the container information before it exits.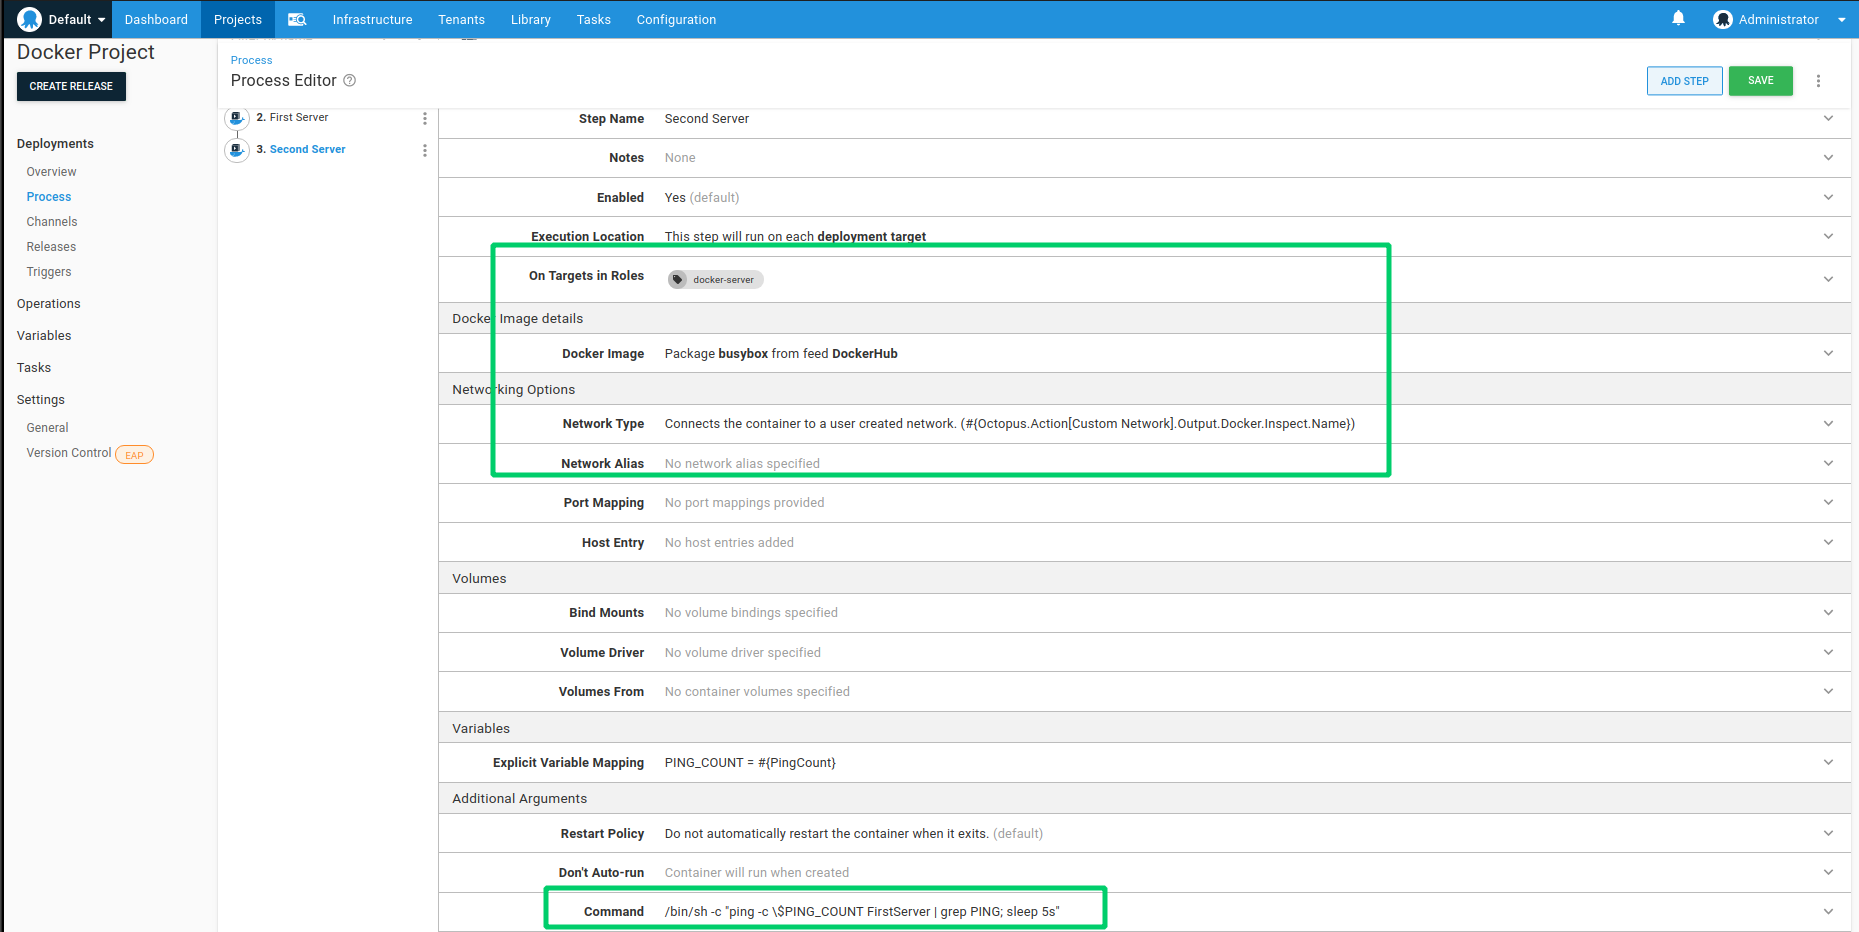
- Save this step.
Step 4: Configure the PingCount variable
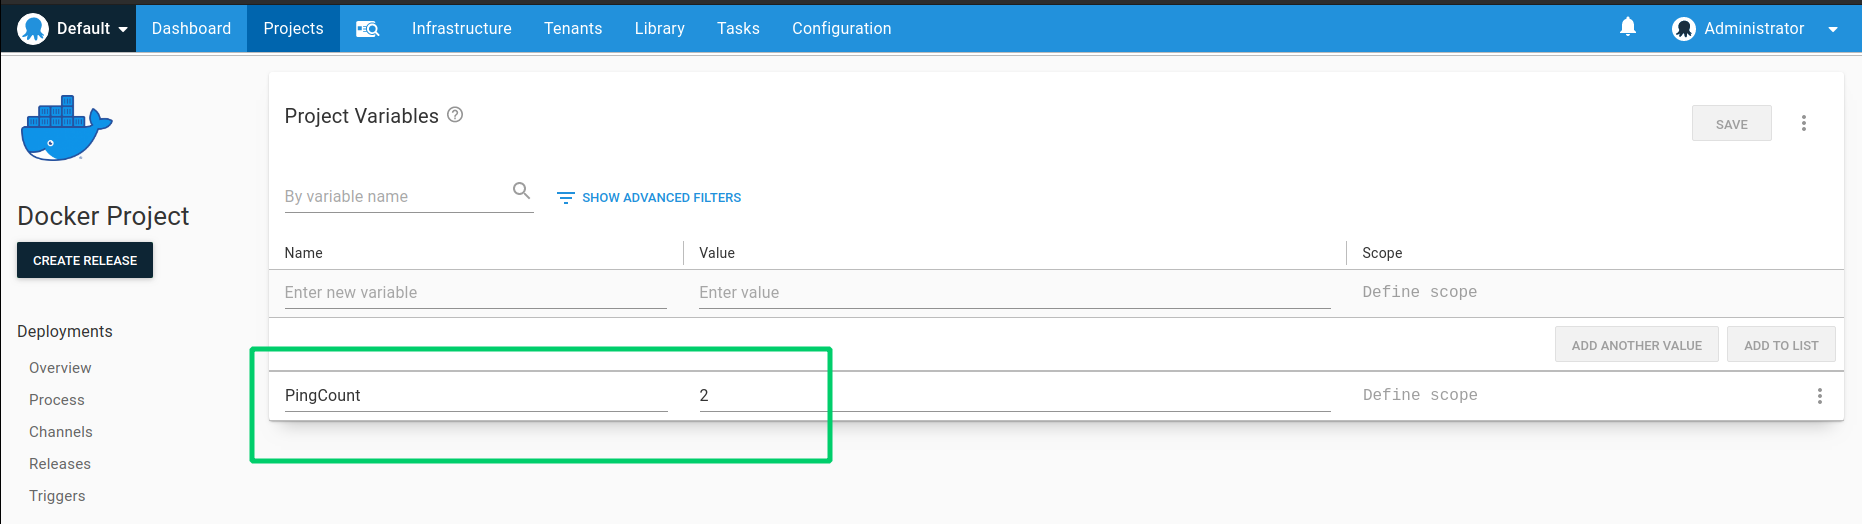
Now we need to create a single Project Variable used by the second container to control how many pings to perform before exiting.
- Create a project variable named PingCount and give it a value of 2 so that two pings take place before the container exits.
Step 5: Docker stop
Although we could deploy a project as many times as we want with a Docker run step, increasing the number of running containers, you may want to stop containers run from previous deployments before or after creating a new container from the same Image. For this reason we have included the Stop a Docker Resource deployment step. This allows you to configure previous containers or networks to stop (and optionally remove them) before or after any other step in your deployment process. In this case because we are creating a network with a specific subnet, to avoid clashes with networks created as a result of a redeployment we will simply remove everything previously created from this project before the network is created. In your case however, you may want to create multiple stop steps throughout your process before or after each specific container starts. Provide the details as shown below and re-order this step to run as the first step in the deployment.

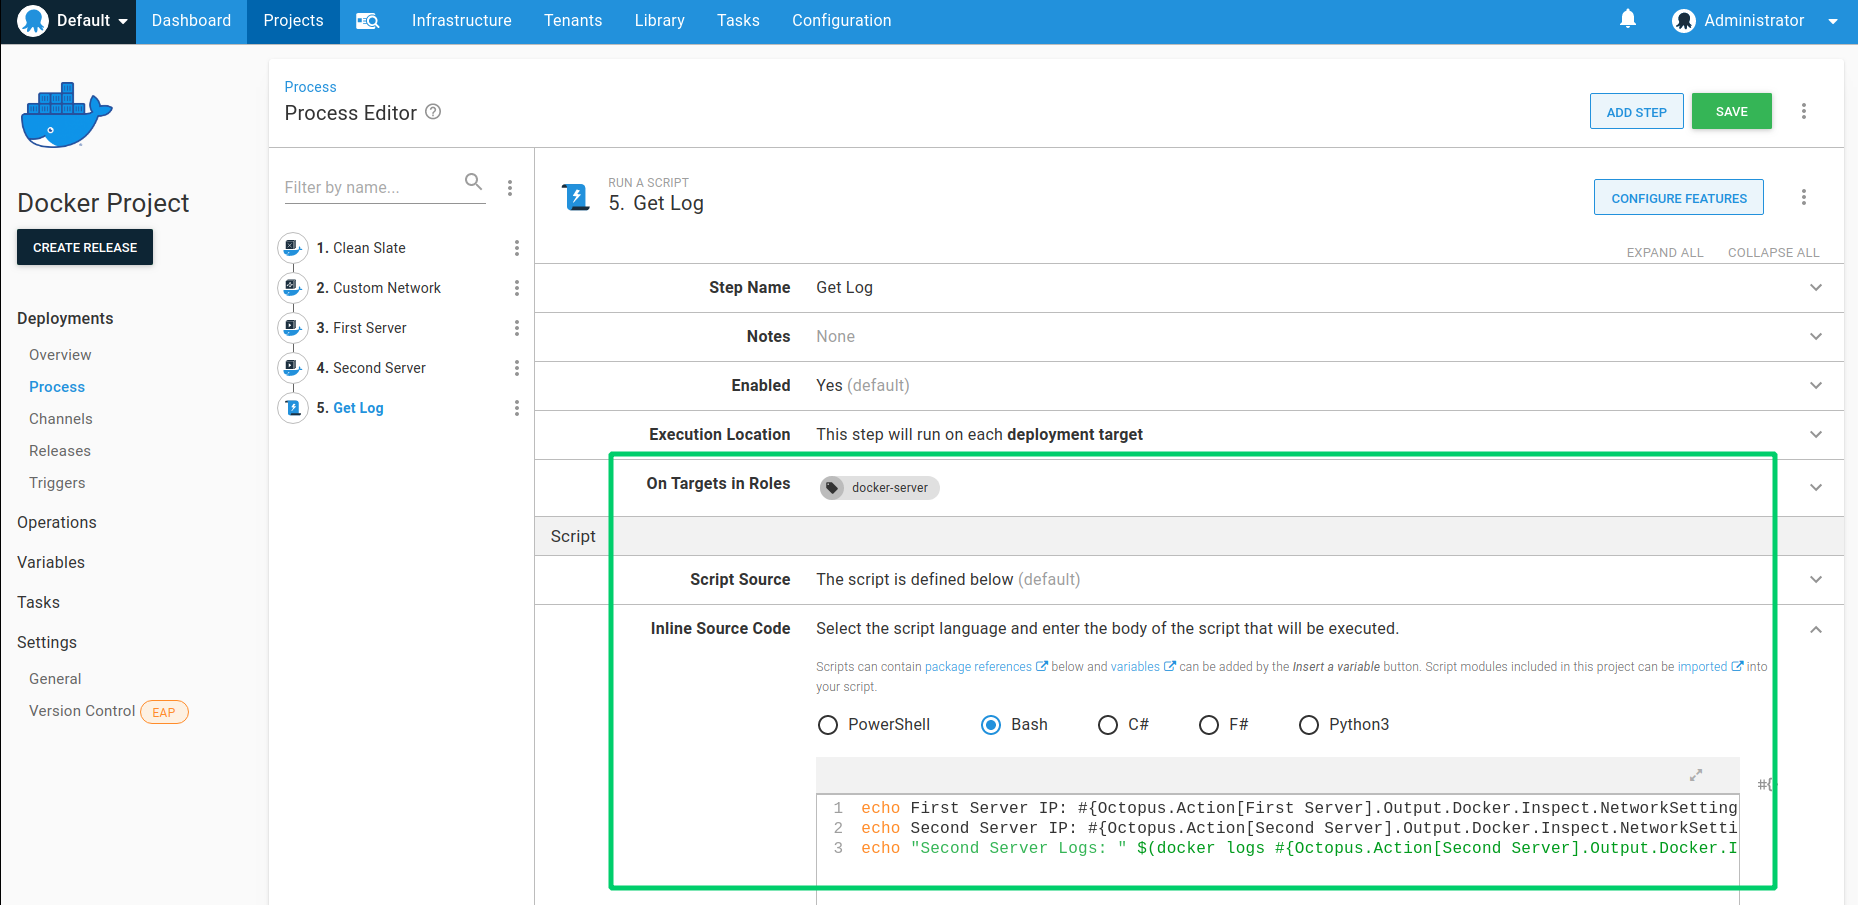
Step 6: Script step - accessing container details
As one final step we will write out to the logs the IP addresses of the containers that were created, as well as show the ping results of the second container from the Docker logs.
- Create a new script step.
- Set the Name to Get Log.
- Set the Target Tags to docker-server.
- Set the Type to Bash.
- Provide the following code which uses a mixture of advanced Octopus variable parsing, and directly calling the
docker logscommand:
echo First Server IP: #{Octopus.Action[First Server].Output.Docker.Inspect.NetworkSettings.Networks[#{Octopus.Action[Custom Network].Output.Docker.Inspect.Name}].IPAddress}
echo Second Server IP: #{Octopus.Action[Second Server].Output.Docker.Inspect.NetworkSettings.Networks[#{Octopus.Action[Custom Network].Output.Docker.Inspect.Name}].IPAddress}
echo "Second Server Logs: " $(docker logs #{Octopus.Action[Second Server].Output.Docker.Inspect.Name})
Advanced variable parsing and inspection Note that to access the IP address of the two containers we are using the results of the inspect information that is extracted right after they are created. This also means that if your container configuration changes after they were created, the inspect information may be outdated. In addition, since containers can be added to multiple networks, to get the IP address corresponding to the network we have created, we also need to index the network using an inner variable that resolves to the network name.
To see the full results of the inspect command try echoing out the variable just up to the Inspect section (i.e. #{Octopus.Action[First Server].Output.Docker.Inspect} ). This will return a large JSON blob that the variable parser, Octostache, is now able to traverse.
Creating a release of our Docker project
From this point forward, the deployment will follow the same process that you should be comfortable with: Good old Octopus Releases.
Go ahead and create a release of your Docker Project.
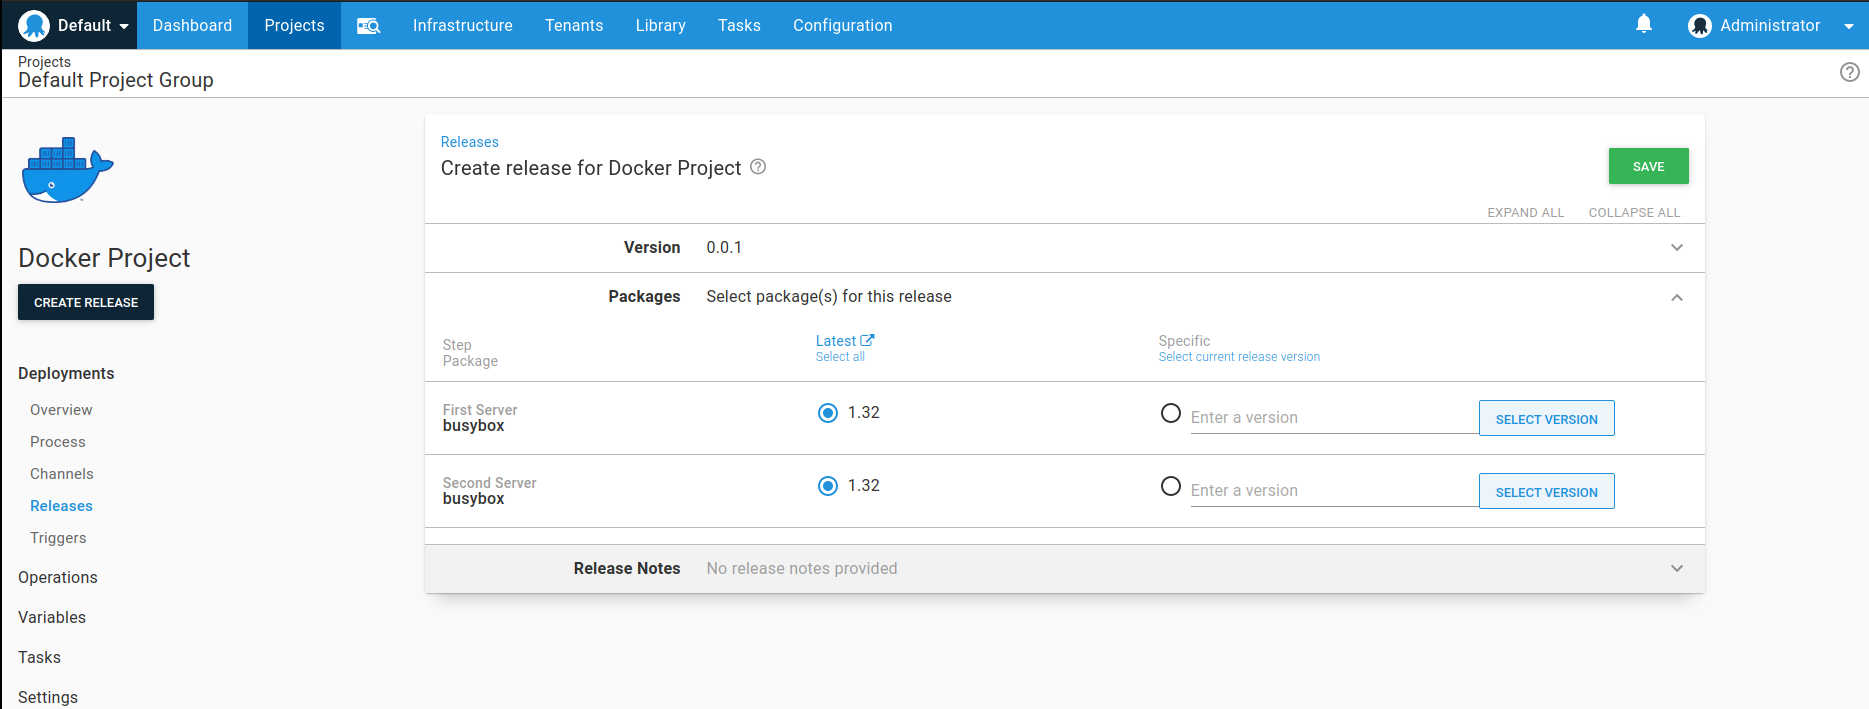
Creating releases based on Docker images When creating a release, the Octopus Server will query the Docker registry to retrieve the list of tags for the image selected in the run steps. The tags are then parsed to a Semantic Version where tags that cannot be parsed will be excluded. You will be given the option to select the version of the container that will be used in the deployment.
Note that “latest” in Octopus is the “highest” Semantic Version and not the image tagged with “latest”.
Deploying a release of our Docker project
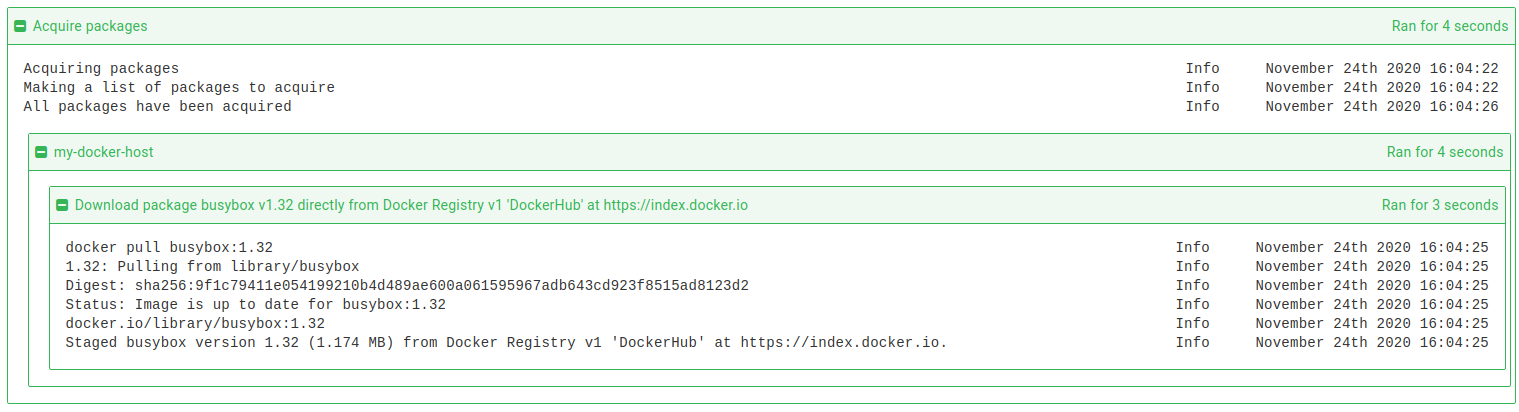
Looking at the results of a deployment you will see some logging indicating the work being performed.
Having problems deploying to Docker? Usually this will come down to problems with the Octopus Account you configured accessing the Docker daemon with messages like this:
Cannot connect to the Docker daemon. Is the Docker daemon running on this host?
For steps to grant the Octopus Account the ability to manage the Docker daemon, refer to the Docker post-installation steps for Linux.
To identify containers and networks that need to be stopped, all resources created through an Octopus deployment are configured with labels that contain the project Id, release Id, deployment Id and if applicable, tenant Id. When the clean step is then run, the available networks and containers are then filtered based on the parameters supplied in the step configuration. When a container is flagged to be removed first all linked containers will be disconnected from that network. For containers, all relevant containers are first stopped via the docker stop command and then removed. This provides your process time to gracefully end by receiving the SIGTERM signal before being killed.

The Docker equivalent of the “Package Acquisition” phase involves retrieving the images from the registry using the docker pull command on the target itself. This ensures that the target has the latest copy of that image however due to the nature of containers this will incur next to no bandwidth if it is already up to date. If a newer version of an image is retrieved than is available locally, then it is possibly that only a single “layer” of the image needs to be retrieved and so again, the bandwidth usage is minimized. Note that if credentials are required for the registry, then a docker login command is first issued. This will use either the hostname of the registry URI provided, or the Registry Path explicitly provided when setting up the feed. There is currently no “push to target” capability for images in Docker steps.
When creating a network or container, the name and Id as simply echoed to the standard logs. The verbose logs will show the Docker version on the target, the full Docker command being called and if successful, the results of the inspect command that are passed to an output variable.
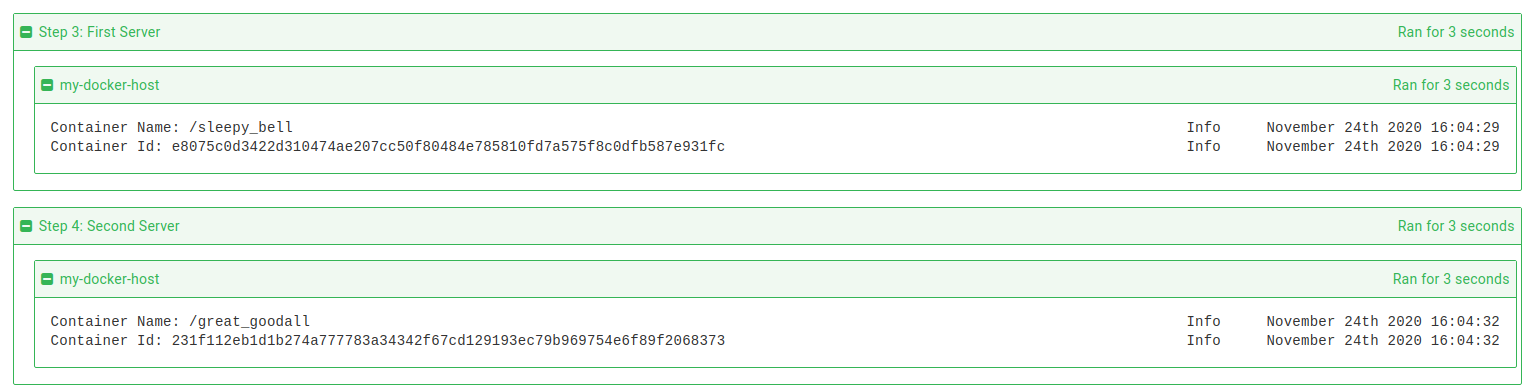
In the case of our simple scenario above, the final step should display the IP address of the containers, within the bound of the subnet specified by the configured network, as well as a line from the second container’s ping command showing connectivity to the first container.

Learn more
Help us continuously improve
Please let us know if you have any feedback about this page.
Page updated on Thursday, June 27, 2024