Octopus supports the deployment of AWS CloudFormation templates through the Deploy an AWS CloudFormation Template step. This step executes a CloudFormation template using AWS credentials managed by Octopus, and captures the CloudFormation outputs as Octopus output variables.
The proceeding instructions can be followed to configure the Deploy an AWS CloudFormation Template step.
Add the CloudFormation step
Add the Deploy an AWS CloudFormation template step to the project, and provide it a name.
AWS section
Select the variable that references the Amazon Web Services Account under the AWS Account section or select whether you wish to execute using the service role of an EC2 instance. If you don’t have an AWS Account Variable yet, check our documentation on how to create one.
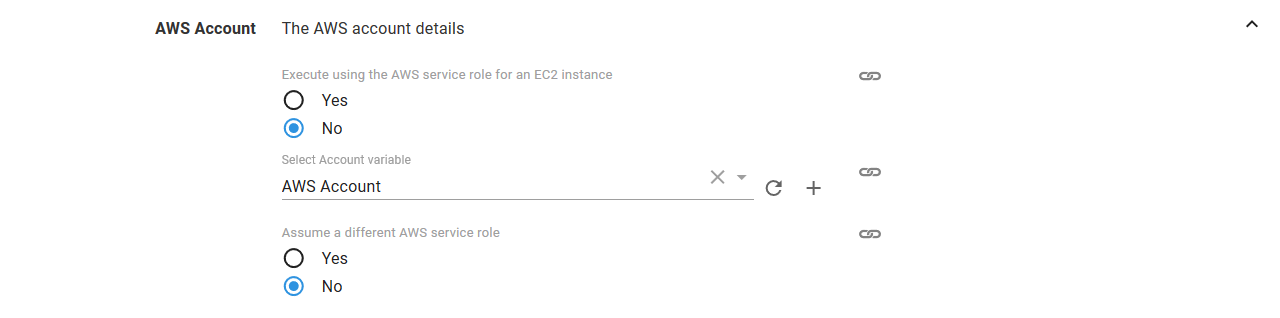
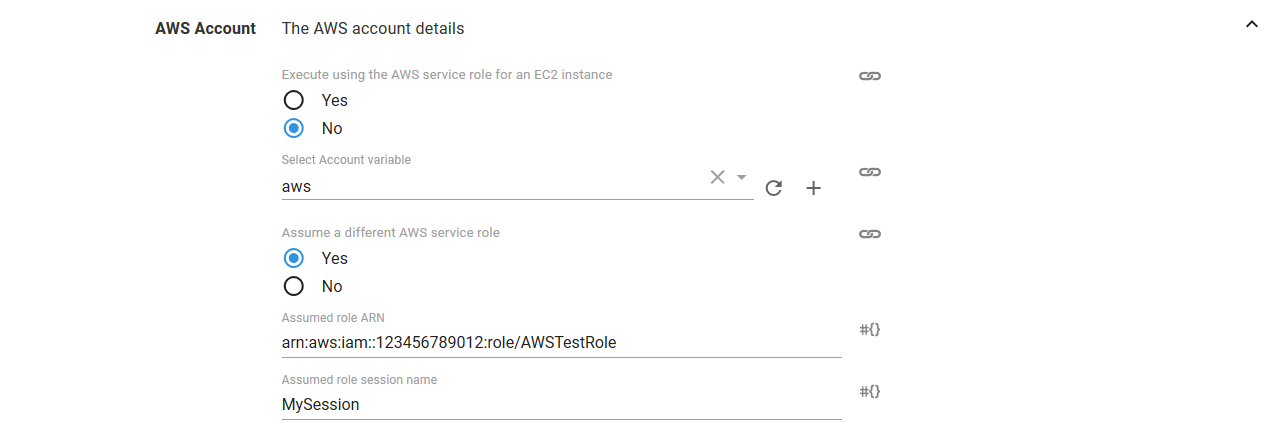
The supplied account can optionally be used to assume a different AWS service role. This can be used to run the AWS commands with a role that limits the services that can be affected.
If you select Yes to Execute using the AWS service role for an EC2 instance, you do not need an AWS account or account variable. Instead, the AWS service role for the EC2 instance executing the deployment will be used. See the AWS documentation for more information on service roles.
CloudFormation section
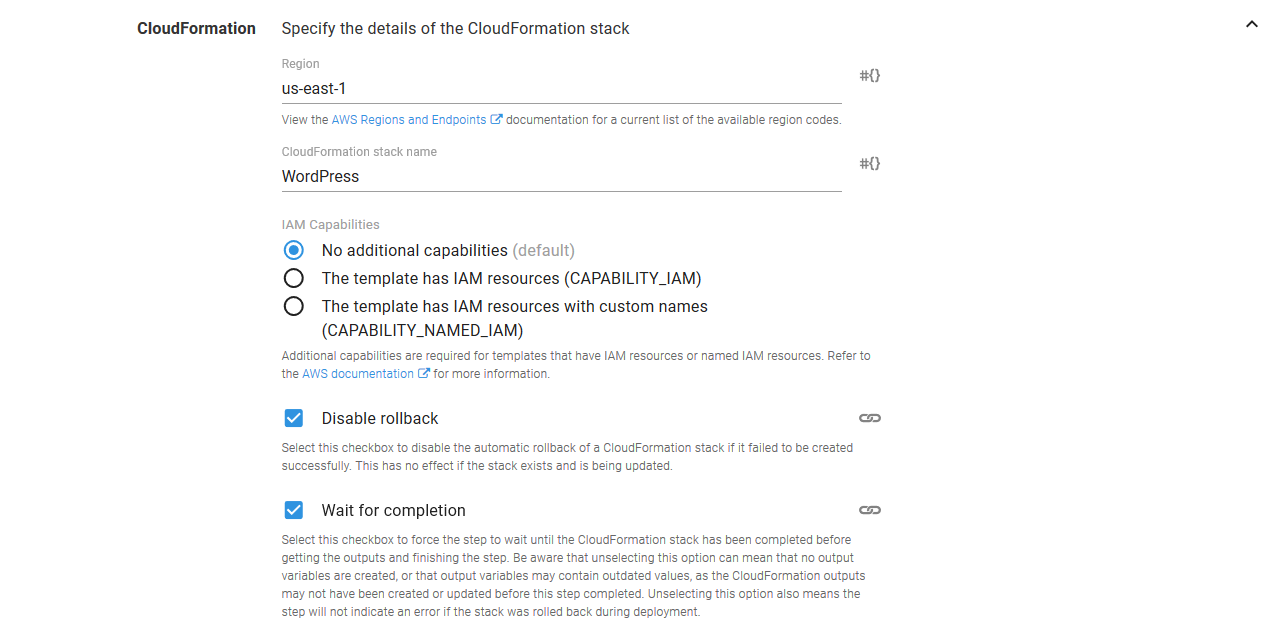
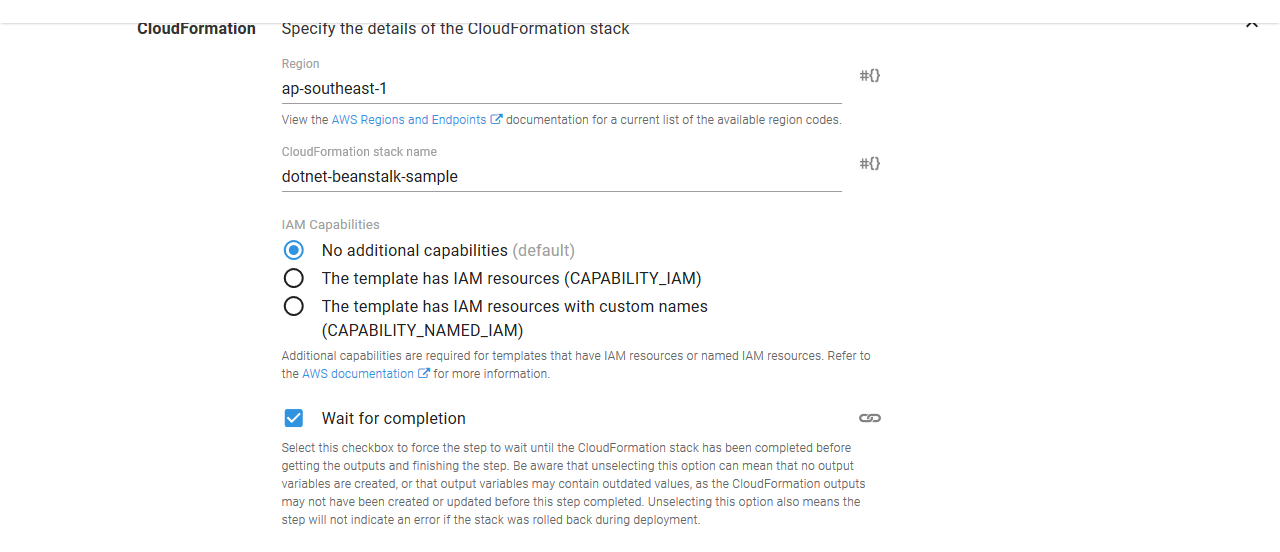
Under the CloudFormation section, the AWS region and stack name need to be defined.
You can also optionally wait for the stack to complete before finishing the step by selecting the Wait for completion check-box.
Unselecting the Wait for completion check-box will allow the step to complete once that CloudFormation process has been started. However, unselecting the option does mean that the output variables may be missing or outdated, because they will be read before the stack has finished deploying. It also means that the step will not fail if the CloudFormation deployment fails.
If creating the CloudFormation stack, you can select Disable rollback to prevent a failed stack from being rolled back. This is useful if you need to debug the resources that were not created successfully.
IAM capabilities
This is a quote from the AWS documentation:
Before you can create a stack, AWS CloudFormation validates your template. During validation, AWS CloudFormation checks your template for IAM resources that it might create. IAM resources, such as an IAM user with full access, can access and modify any resource in your AWS account. Therefore, we recommend that you review the permissions associated with each IAM resource before proceeding so that you don’t unintentionally create resources with escalated permissions. To ensure that you’ve done so, you must acknowledge that the template contains those resources, giving AWS CloudFormation the specified capabilities before it creates the stack.
To acknowledge that the CloudFormation template contains IAM resources, you can select an option under IAM Resources.
If your template includes IAM resources, you can select The template has IAM resources (CAPABILITY_IAM) or The template has IAM resources with custom names (CAPABILITY_NAMED_IAM).
If your template includes custom names for IAM resources, you must select The template has IAM resources with custom names (CAPABILITY_NAMED_IAM).
Template section
The CloudFormation template can come from two sources: directly entered source code or from files in a package.
Source code
The first option is to paste the template directly into the step. This is done by selecting the Source code option, and clicking the ADD SOURCE CODE button.

This will present a dialog in which the CloudFormation template can be pasted, in either JSON or YAML.
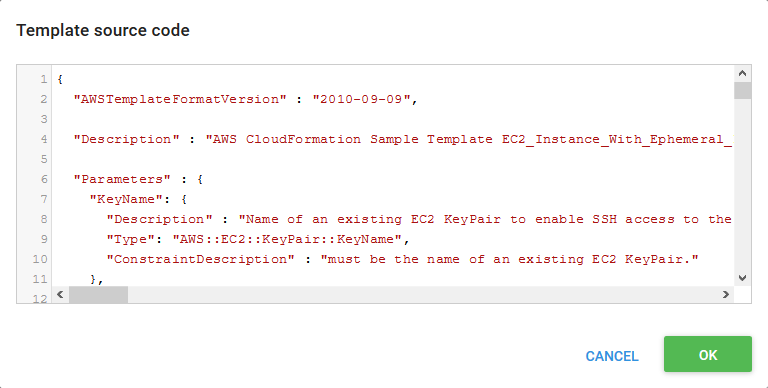
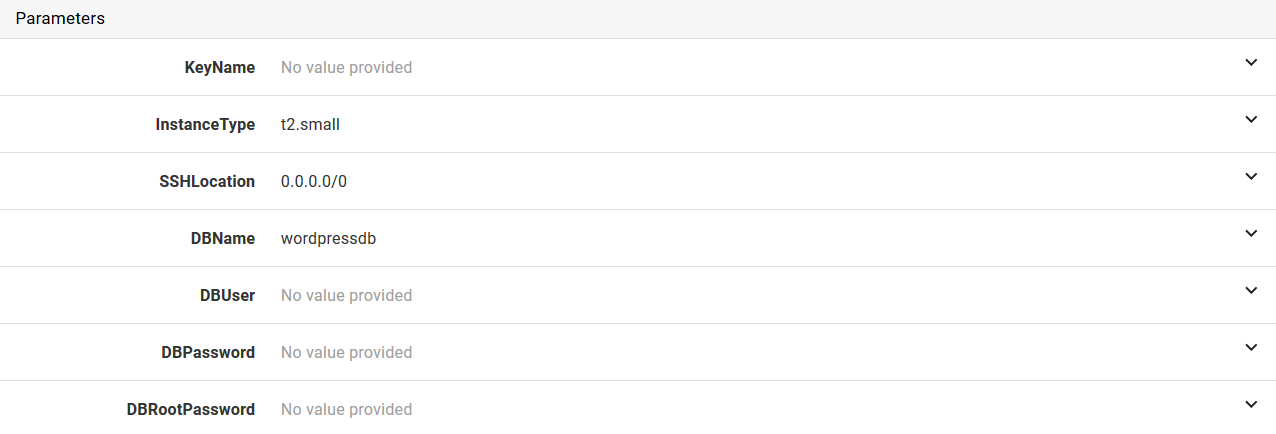
Once the OK button is clicked, the parameters defined in the template will be shown under the Parameters section.
Package
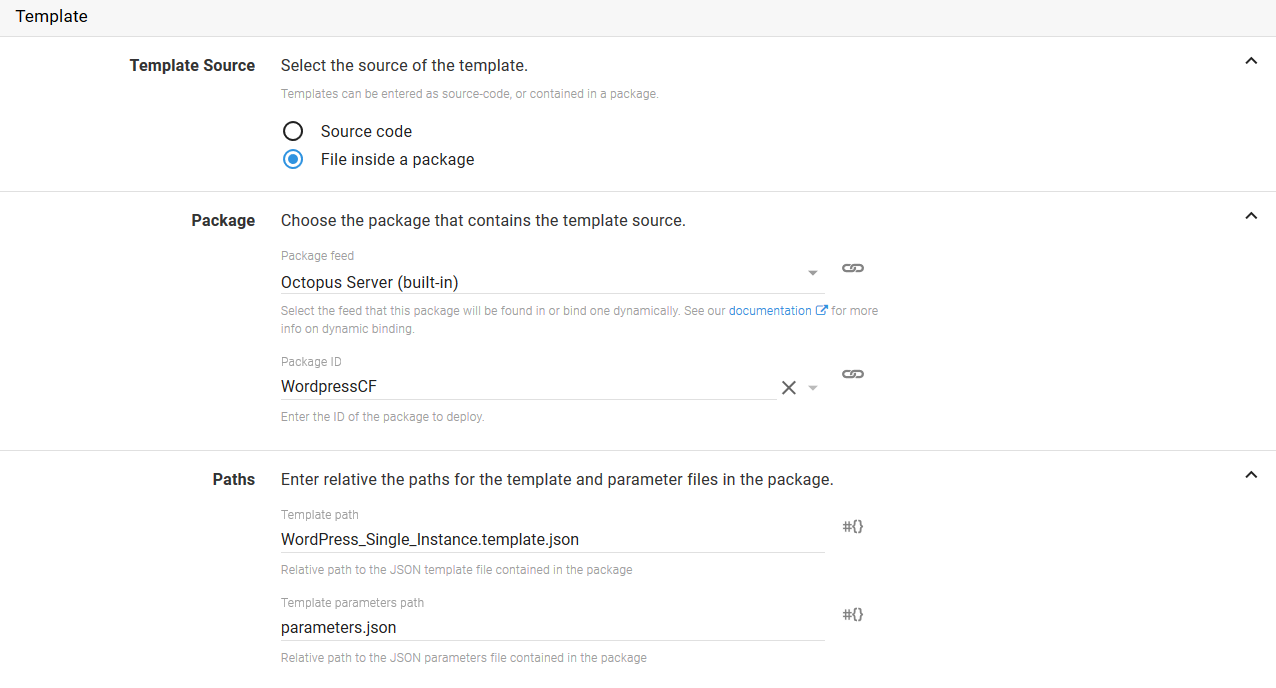
The second option is to reference a CloudFormation template and properties file from a package. This is done by selecting the File inside a package option, specifying the package, and the supplying the name of the template file (which can be a JSON or YAML file), and optionally the path to the parameters file (which only supports JSON).
Variable replacements
Variable replacement is performed before the template is deployed when deploying from either an inline script or a package. For example, if you were deploying from a package and your properties file looked like this:
[
  {
    "ParameterKey": "KeyPairName",
    "ParameterValue": "#{KeyName}"
  },
  {
    "ParameterKey": "InstanceType",
    "ParameterValue": "#{InstanceType}"
  }
]
Then the values from the project variables KeyName and InstanceType would be substituted for the markers #{KeyName} and #{InstanceType}.
See the variable substitution documentation for more information.
Accessing CloudFormation outputs
As mentioned in the Template Section, when the wait for completion check-box has been checked, any outputs defined in your CloudFormation template will be made available as Octopus output-variables automatically. For example, an output Foo would be available as:
Octopus.Action[CloudFormationTemplateStepName].Output.AwsOutputs[Foo]Output variables
In addition to any outputs defined in your CloudFormation template, we also provide the following output variables which can be used in subsequent steps.
- Octopus.Action[StepName].Output.AwsOutputs[StackId] - The stack ARN as used by the step.
- Octopus.Action[StepName].Output.AwsOutputs[ChangesetId] - The change set ARN which was generated when change sets have been enabled.
- Octopus.Action[StepName].Output.AwsOutputs[Changes] - The changes that were applied or are to be applied when deferring execution.
Change sets and CloudFormation transforms
In order to use change sets you must first enable the change set feature on your Deploy an AWS CloudFormation template step.

The Change Sets feature was introduced as part of Octopus 2018.8, and Octopus did not support CloudFormation transforms in prior versions.
Change set name
All change sets have to be unique for a given stack, and Octopus will generate a unique name such as octo-5ab48bcfd8ec447bbc8328f97231b729 unless specified otherwise. If you wish to change the names used you can uncheck the option to automatically generate change set names which will give you the option to specify the name. These can be bound to an output variable from a prior step.
Deferring execution and preview changes
There are times when you may wish to preview changes before applying them. This is enabled by checking the Defer Change Set Execution check-box, which tells Octopus to create the change set, but not apply it. A manual intervention step can then be used in conjunction with the AwsOutputs[Changes] output variable from a Deploy an AWS CloudFormation template step to view the changes. Similarly, the
Apply an AWS CloudFormation Change Set step can make use of the AwsOutputs[StackId] and AwsOutputs[ChangeSetId] output variables to apply the change set.
CloudFormation deployment workflow
The AWS CLI makes a clear distinction between creating and updating CloudFormation stacks. When using the CLI directly, it is up to you to know if the stack exists, and what state the stack is in, in order to know whether to create or update the stack.
Octopus takes a different approach. The CloudFormation steps are designed to be idempotent, which means you can run them multiple times and the result will be the same. This means that Octopus will create the stack if it doesn’t exist, update the stack if it does exist, and ignore cases where the stack has no updates. , deleting a stack will complete successfully if there is no stack to delete.
In addition, there are several states that a stack can be in where the only way to apply updates is to first delete the stack. A stack can enter one of these states for a variety of reasons, such as failing to be successfully created the first time.
The following states are those that require the stack to be deleted before they can be recreated:
- CREATE_FAILED
- ROLLBACK_COMPLETE
- ROLLBACK_FAILED
- DELETE_FAILED
- UPDATE_ROLLBACK_FAILED
The AWS documentation contains more details on the CloudFormation state states.
Error messages
The AWS deployment steps include a number of unique error codes that may be displayed in the output if there was an error. Below is a list of the errors, along with any additional troubleshooting steps that can be taken to rectify them.
AWS-CLOUDFORMATION-ERROR-0001
CloudFormation stack finished in a rollback state. Commonly this occurs because the AWS account configured to run the CloudFormation deployment did not have the correct permissions, or because some required variables were missing or invalid.
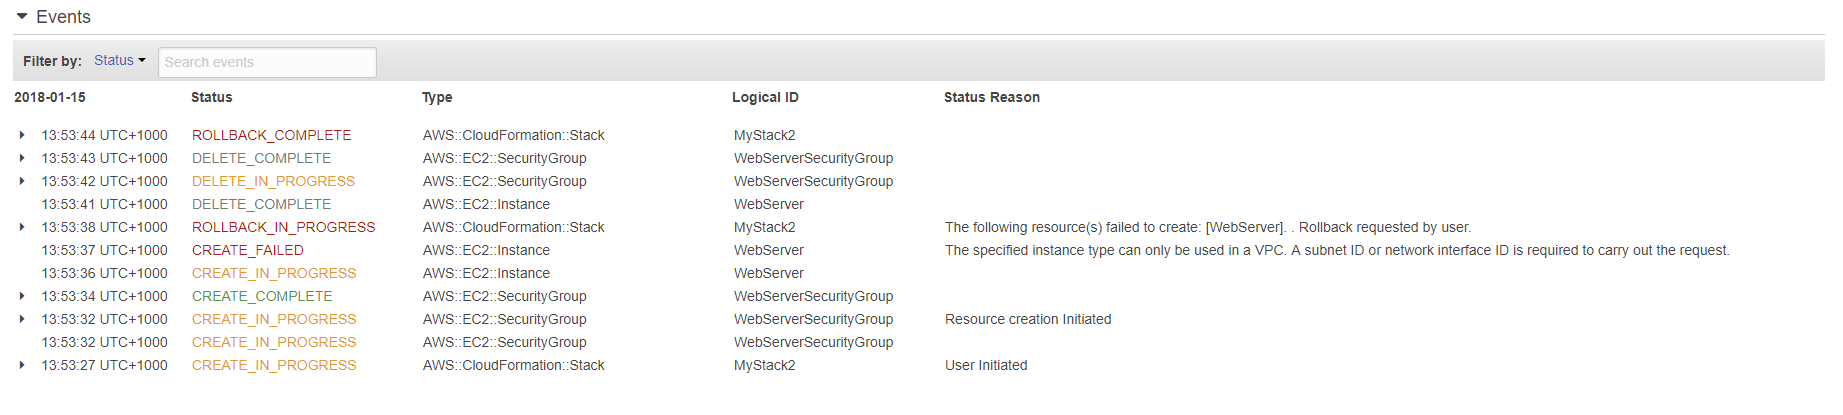
The last Status Reason from the stack events is displayed in the Octopus logs, but you can find more information about the error in the AWS CloudFormation console under the Events section for the stack.
For example, in the screenshot below you can see that the specified instance type could only be used in a VPC, triggering the rollback of this particular CloudFormation deployment.
AWS-CLOUDFORMATION-ERROR-0002
The AWS account used to perform the operation does not have the required permissions to query the current state of the CloudFormation stack. This step will complete without waiting for the stack to complete, and will not fail if the stack finishes in an error state.
The error message will include the error from AWS, which looks like this:
User: arn:aws:iam::123456789012:user/TestUser is not authorized to perform: cloudformation:DescribeStackEvents on resource: arn:aws:cloudformation:us-east-1:123456789012:stack/MyStack/*To resolve the error, ensure that the user has the appropriate permissions in AWS. AWS Permissions Required by Octopus contains an overview of the permissions required by the AWS steps.
AWS-CLOUDFORMATION-ERROR-0003
Please be aware that this error will also show if the Variable Account cannot be resolved to an AWS Account, in this case please check the variable scopes. You can use the Variables ➜ Preview for the project to test the variable values for a given deployment scenario are being included or not.
The AWS account used to perform the operation does not have the required permissions to describe the stack.
This is logged as a warning as Octopus will make some assumptions about the state of the stack and attempt to continue on:
- If the step was configured to create or update a stack, it is assumed that the stack does not exist and the stack will attempt to be created. In the event that the stack already exists, the step will fail as it will incorrectly attempt to create the stack instead of update it.
- If the step was configured to delete the stack, it is assumed that the stack does exist and it will attempt to be deleted.
The error message will include the error from AWS, which looks like this:
User: arn:aws:iam::123456789012:user/TestUser is not authorized to perform: cloudformation:DescribeStacks on resource: arn:aws:cloudformation:us-east-1:123456789012:stack/MyStack/*To resolve the error, ensure that the user has the appropriate permissions in AWS. AWS Permissions Required by Octopus contains an overview of the permissions required by the AWS steps.
AWS-CLOUDFORMATION-ERROR-0004
The AWS account used to perform the operation does not have the required permissions to describe the CloudFormation stack. This means that the step is not able to generate any output variables.
The error message will include the error from AWS, which looks like this:
User: arn:aws:iam::123456789012:user/TestUser is not authorized to perform: cloudformation:DescribeStacks on resource: arn:aws:cloudformation:us-east-1:123456789012:stack/MyStack/*To resolve the error, ensure that the user has the appropriate permissions in AWS. AWS Permissions Required by Octopus contains an overview of the permissions required by the AWS steps.
AWS-CLOUDFORMATION-ERROR-0005
An unrecognized exception was thrown while querying the CloudFormation stacks. This is a catch-all exception.
AWS-CLOUDFORMATION-ERROR-0006
An unrecognized exception was thrown while checking to see if the CloudFormation stack exists. This is a catch-all exception.
AWS-CLOUDFORMATION-ERROR-0007
The AWS account used to perform the operation does not have the required permissions to create the CloudFormation stack.
The error message will include the error from AWS, which looks like this:
User: arn:aws:iam::123456789012:user/TestUser is not authorized to perform: cloudformation:CreateStack on resource: arn:aws:cloudformation:us-east-1:123456789012:stack/MyStack/*To resolve the error, ensure that the user has the appropriate permissions in AWS. AWS Permissions Required by Octopus contains an overview of the permissions required by the AWS steps.
AWS-CLOUDFORMATION-ERROR-0008
An unrecognized exception was thrown while creating a CloudFormation stack.
If the text Requires capabilities : [CAPABILITY_NAMED_IAM] or Requires capabilities : [CAPABILITY_IAM] appears in the error message, you will need to define these capabilities in the CloudFormation deployment step.
AWS-CLOUDFORMATION-ERROR-0009
The AWS account used to perform the operation does not have the required permissions to delete the CloudFormation stack.
The error message will include the error from AWS, which looks like this:
User: arn:aws:iam::123456789012:user/TestUser is not authorized to perform: cloudformation:DeleteStack on resource: arn:aws:cloudformation:us-east-1:123456789012:stack/MyStack/*To resolve the error, ensure that the user has the appropriate permissions in AWS. AWS Permissions Required by Octopus contains an overview of the permissions required by the AWS steps.
AWS-CLOUDFORMATION-ERROR-0010
An unrecognized exception was thrown while deleting a CloudFormation stack.
AWS-CLOUDFORMATION-ERROR-0011
The AWS account used to perform the operation does not have the required permissions to update the CloudFormation stack.
The error message will include the error from AWS, which looks like this:
User: arn:aws:iam::123456789012:user/TestUser is not authorized to perform: cloudformation:UpdateStack on resource: arn:aws:cloudformation:us-east-1:123456789012:stack/MyStack/*To resolve the error, ensure that the user has the appropriate permissions in AWS. AWS Permissions Required by Octopus contains an overview of the permissions required by the AWS steps.
AWS-CLOUDFORMATION-ERROR-0012
An unrecognized exception was thrown while updating a CloudFormation stack.
AWS-CLOUDFORMATION-ERROR-0013
Failed to get the caller identity. This may be because the instance does not have a role assigned to it.
This typically occurs because the step has specified Yes to the Execute using the AWS service role for an EC2 instance option, but the instance running the deployment does not have a role assigned to it. See the AWS Documentation for more details.
AWS-CLOUDFORMATION-ERROR-0014
An exception was thrown while contacting the AWS API.
This can happen if accessing AWS via a proxy, and the response from AWS indicated an error. The response body is printed to the logs in these cases.
An incorrect AWS region can result in this error. Ensure that the region matches one from the AWS documentation.
AWS-CLOUDFORMATION-ERROR-0015
The AWS account used to perform the operation does not have the required permissions to describe the Change Set.
To resolve the error, ensure that the user has the appropriate permissions in AWS. AWS Permissions Required by Octopus contains an overview of the permissions required by the AWS steps.
AWS-CLOUDFORMATION-ERROR-0016
An unrecognized exception was thrown while describing the CloudFormation change set.
AWS-CLOUDFORMATION-ERROR-0017
The AWS account used to perform the operation does not have the required permissions to create the Change Set.
To resolve the error, ensure that the user has the appropriate permissions in AWS. AWS Permissions Required by Octopus contains an overview of the permissions required by the AWS steps.
AWS-CLOUDFORMATION-ERROR-0018
An unrecognized exception was thrown while creating the CloudFormation change set.
AWS-LOGIN-ERROR-0001
Failed to access the metadata URI, or failed to parse the response. We are unable to generate keys from the metadata endpoint.
This can happen if the role that was assigned to the instance does not trust the instance it was assigned to. This can be verified by accessing the URL http://169.254.169.254/latest/meta-data/iam/security-credentials/ROLENAME (replace ROLENAME with the name of the role assigned to the instance) from the Octopus Server. If the response looks like:
{
  "Code" : "AssumeRoleUnauthorizedAccess",
  "Message" : "EC2 cannot assume the role ROLENAME.  Please see documentation at http://docs.amazonwebservices.com/IAM/latest/UserGuide/RolesTroubleshooting.html.",
  "LastUpdated" : "2018-01-18T23:43:19Z"
}
then the role assigned to an EC2 instance needs to have a trust relationship policy something like this:
{
  "Version": "2012-10-17",
  "Statement": [
    {
      "Effect": "Allow",
      "Principal": {
        "Service": "ec2.amazonaws.com"
      },
      "Action": "sts:AssumeRole"
    }
  ]
}
See the AWS documentation for more details.
AWS-LOGIN-ERROR-0003
Failed to access the security credentials URI, or failed to parse the response. This may be because the instance does not have a role assigned to it.
You can confirm the roles assigned to the instance by performing a GET request on the URL http://169.254.169.254/latest/meta-data/iam/security-credentials from the instance. This request will list the assigned roles.
You should then be able to perform a GET request on the URL http://169.254.169.254/latest/meta-data/iam/security-credentials/ROLENAME (replacing ROLENAME with the name of the role). This should return security keys in a JSON response.
This error may also be due to the EC2 instance forcing the use of IMDSv2. Versions of Octopus before 2021.3 do not support IMDSv2. See this issue for more details.
Refer to the AWS documentation for more information on assigning roles to EC2 instances.
AWS-LOGIN-ERROR-0004
Failed to assume the role. Make sure the correct permissions have been enabled in AWS.
The role or user that is assuming the role need to have the sts:AssumeRole permission e.g.
{
"Version": "2012-10-17",
"Statement": [
{
"Sid": "Stmt1512947264000",
"Effect": "Allow",
"Action": [
"sts:AssumeRole"
],
"Resource": [
"arn:aws:iam::123456789012:role/RoleBeingAssumed"
]
}
]
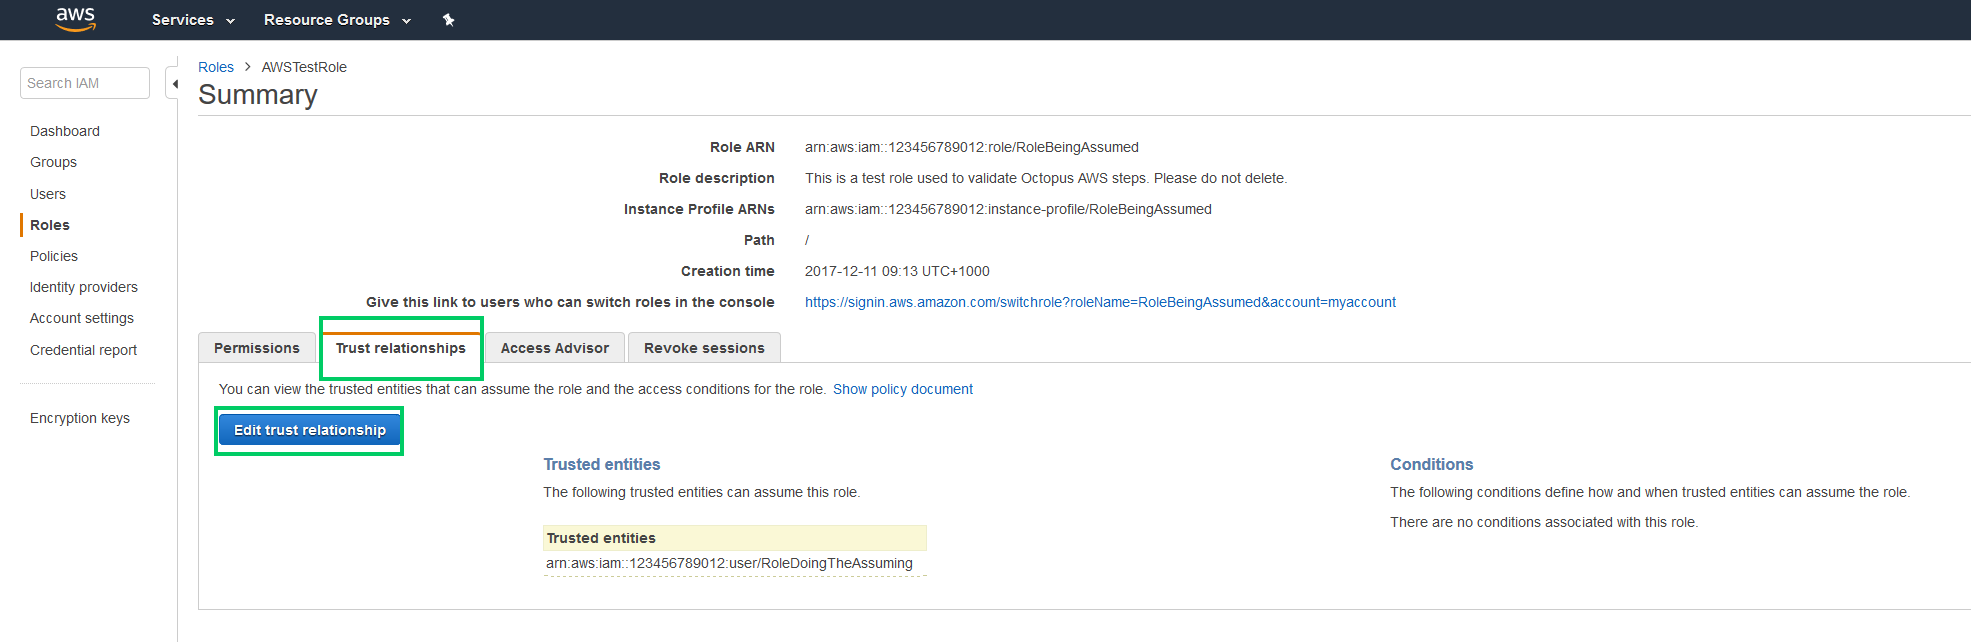
}The role being assumed then needs trust relationship with the role or user that is assuming it.
{
  "Version": "2012-10-17",
  "Statement": [
    {
      "Effect": "Allow",
      "Principal": {
        "AWS": "arn:aws:iam::123456789012:user/RoleDoingTheAssuming"
      },
      "Action": "sts:AssumeRole"
    }
  ]
}
AWS-LOGIN-ERROR-0005
Failed to verify the credentials. Please check the keys assigned to the Amazon Web Services Account associated with this step.
This can be done by opening Deploy ➜ Manage ➜ Accounts, selecting the account, and clicking the SAVE AND TEST button. If the verification fails, it means the keys are not valid.
This error can also be displayed if the proxy settings are incorrect.
AWS-LOGIN-ERROR-0006
Failed to verify the credentials. Please check the keys assigned to the Amazon Web Services Account associated with this step.
This can be done by opening Deploy ➜ Manage ➜ Accounts, selecting the account, and clicking the SAVE AND TEST button. If the verification fails, it means the keys are not valid.
This error can also be displayed if the proxy settings are incorrect.
When inheriting roles, Octopus first attempts to inherit the IAM role associated with an EKS Pod service account. It then falls back to inheriting an instance role via the Amazon EC2 Instance Metadata Service (IMDS).
If role inheritance fails, ensure the step is run on a worker that has been appropriately configured and, in the case of instance profiles, has network access to the IMDS.
Help us continuously improve
Please let us know if you have any feedback about this page.
Page updated on Sunday, January 1, 2023