Authentication using Authentik, a self-hosted identity management service.
To use Authentik authentication with Octopus you will need to:
- Configure Authentik to trust your Octopus Deploy instance (by setting it up as an app in Authentik).
- Configure your Octopus Deploy instance to trust and use Authentik as an Identity Provider.
Configure Authentik
-
Install Authentik using one of the many supported installation methods and complete the initial setup steps.
-
Open the Authentik Console in your web browser, and make sure that you’re in the Admin interface (check the button in the top right beside your profile picture).
-
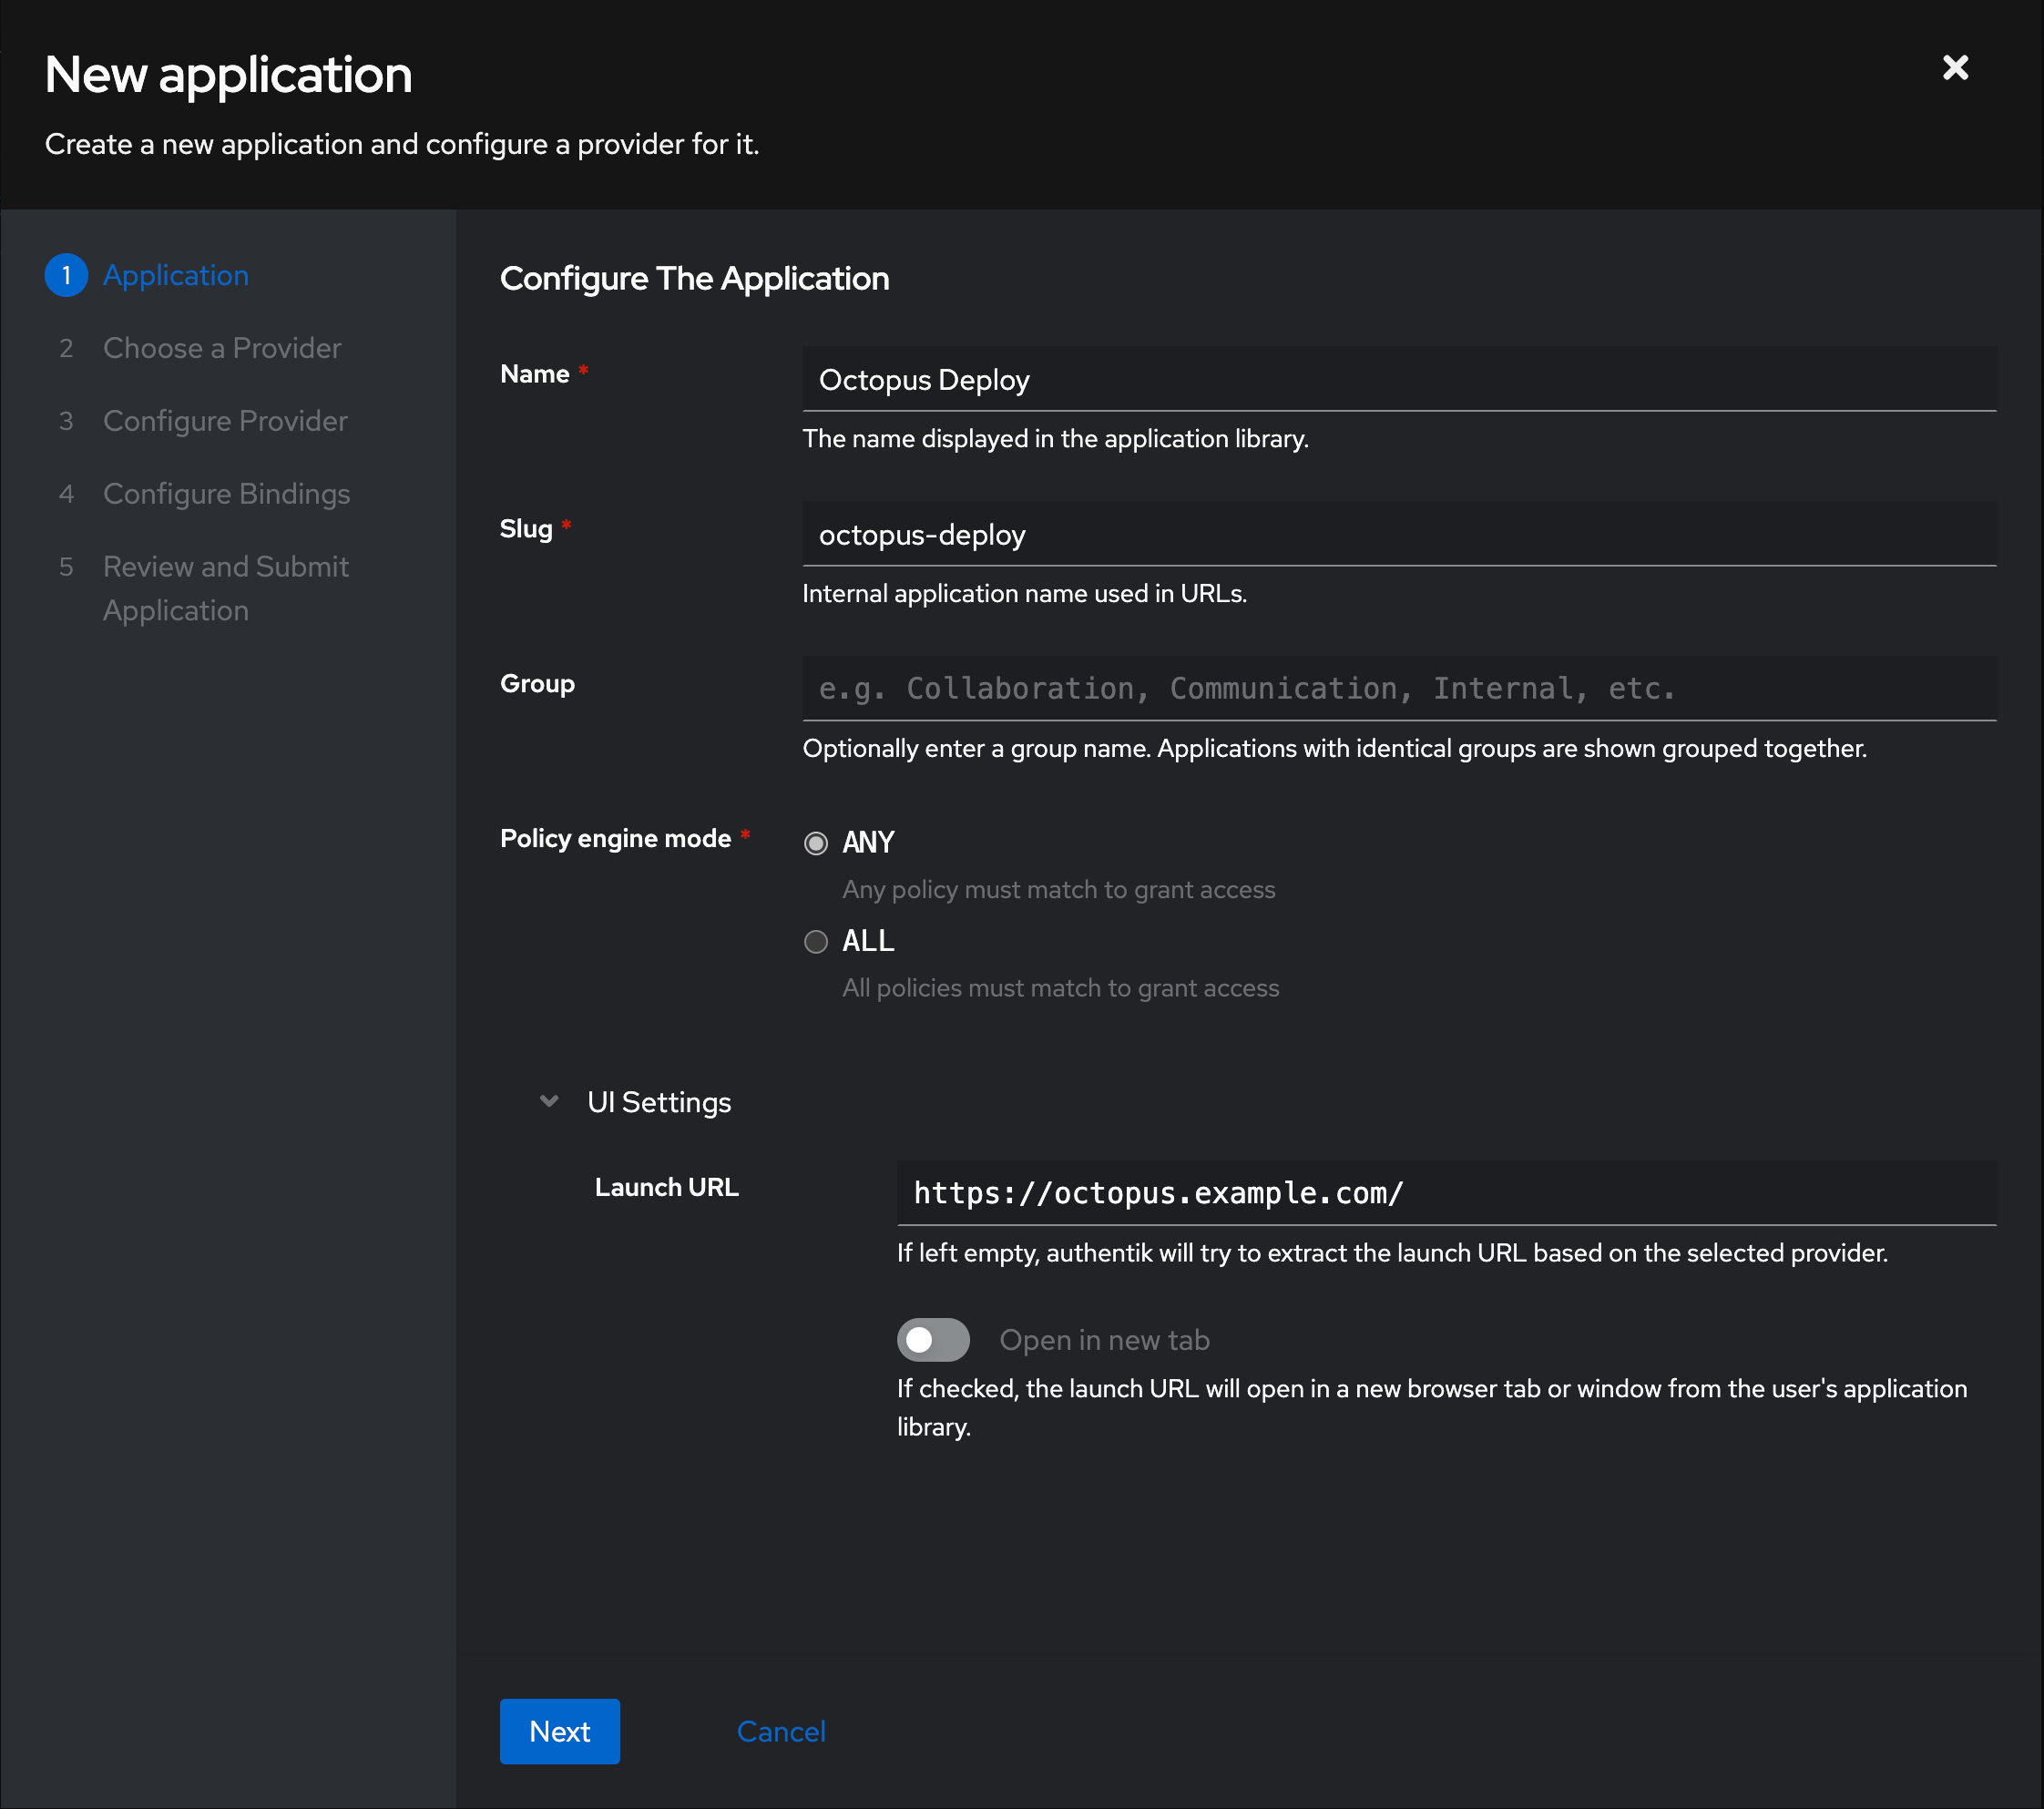
Navigate to Applications and click Create with Provider to create a new client that represents Octopus Deploy:
- Name:
Octopus Deployor the domain name of the Octopus Deploy server is a good option - Slug: can be anything, the domain name of the Octopus Deploy server is a good option
- UI Settings -> Launch URL: the URL of your Octopus Deploy server, so that users of Authentik can click through to Octopus from the user interface
- Name:
-
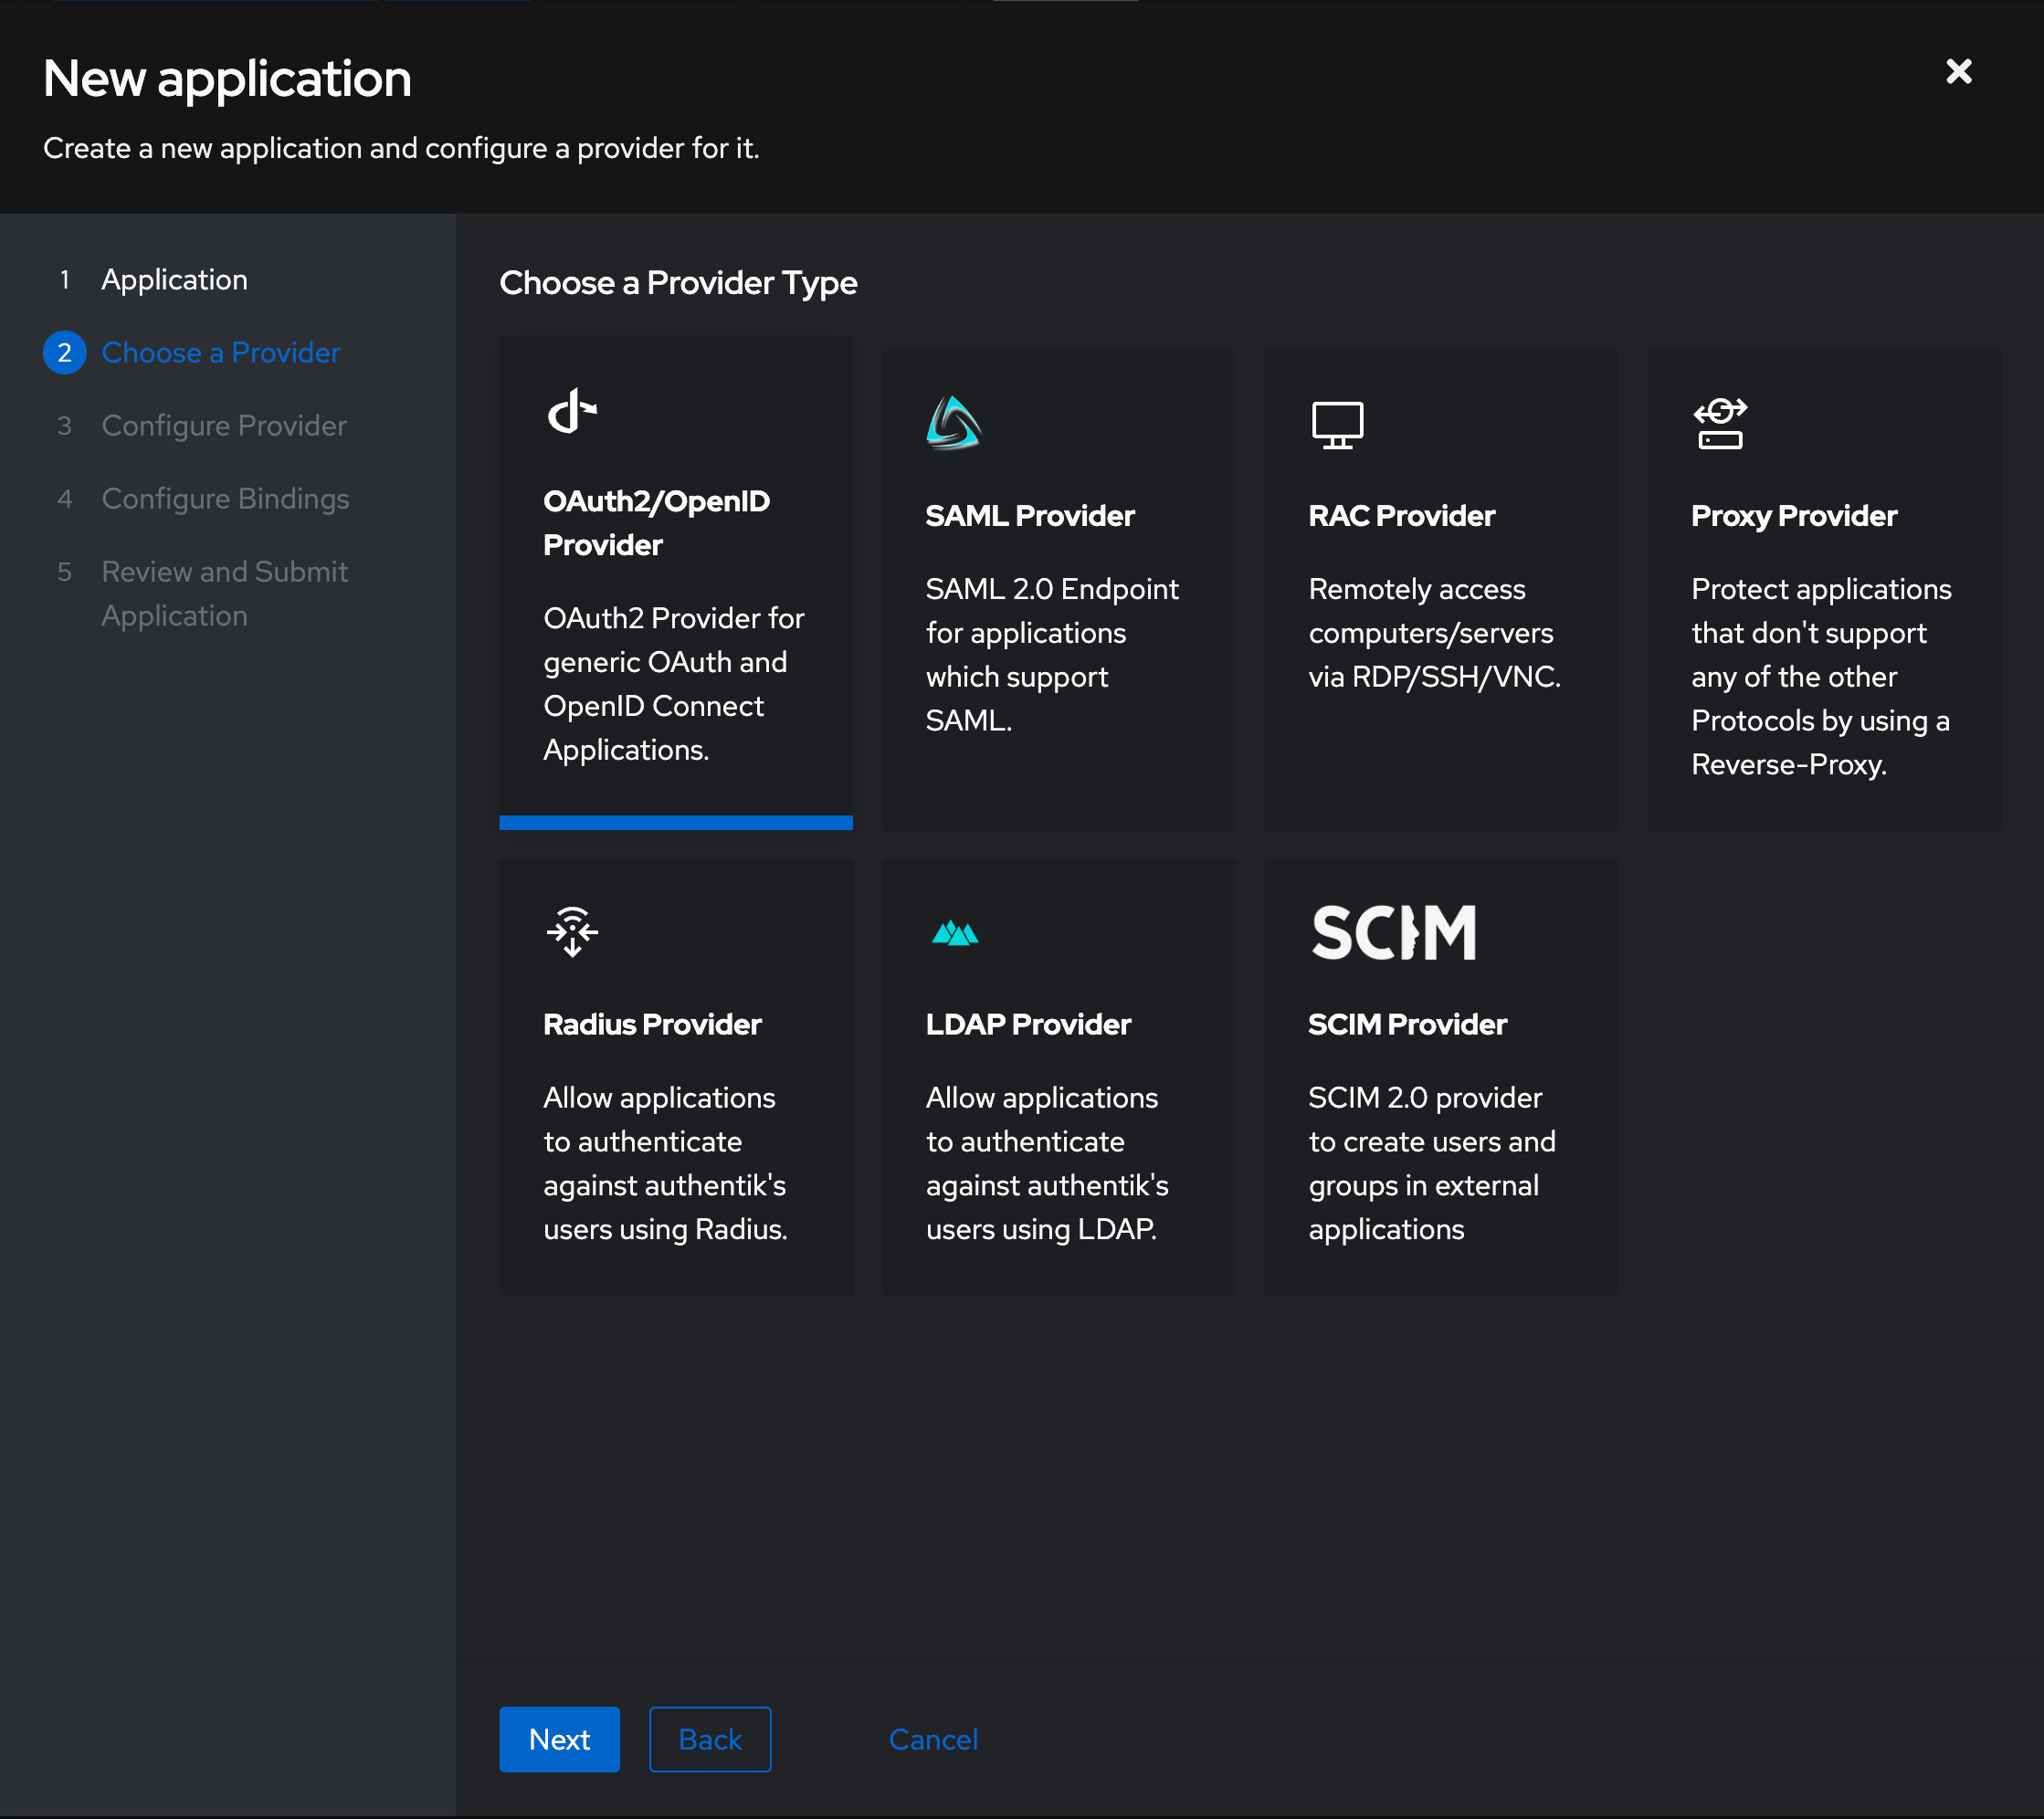
Click Next, then choose OAuth2/OpenID Provider as the provider type, then click Next.
-
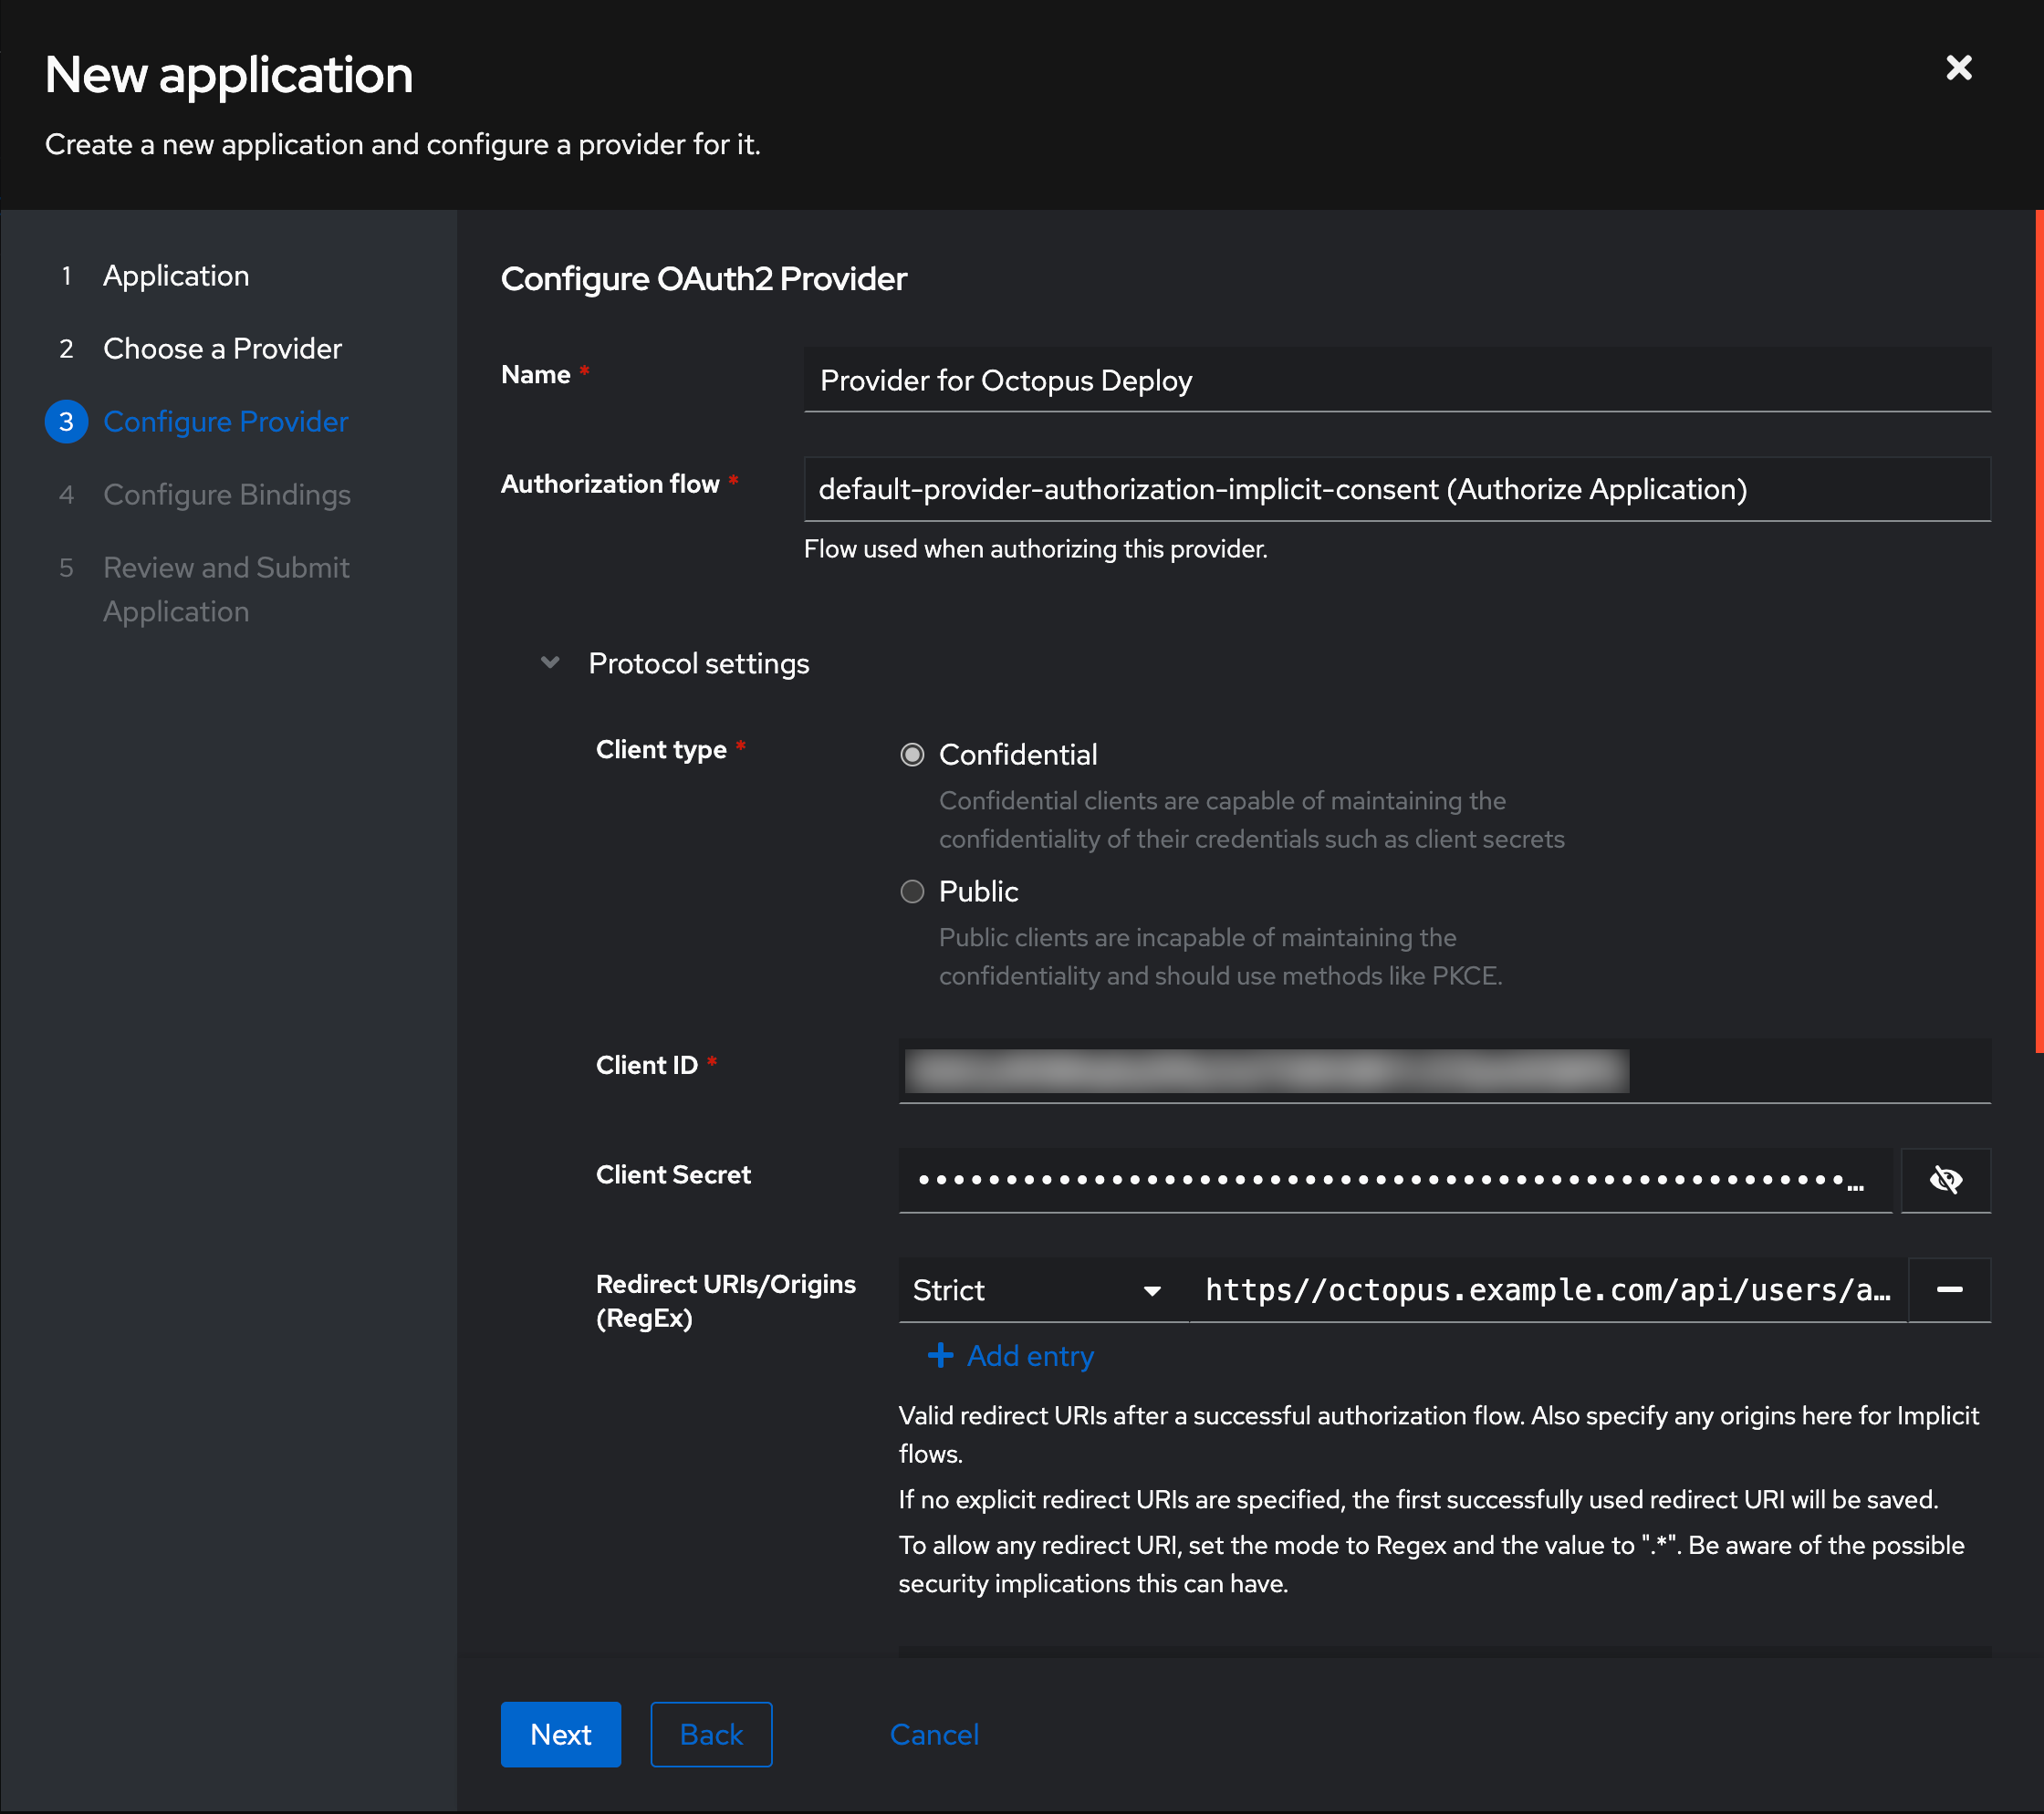
Enter the following details:
- Authentication Flow:
default-provider-authorization-implicit-consent - Client type:
Confidential - Redirect URIs/Origins should have a single
Strictentry ofhttps://your-octopus-url/api/users/authenticatedToken/GenericOidc(replacinghttps://your-octopus-urlwith the URL of your Octopus Server).
- Authentication Flow:
-
Note down both the Client ID and Client Secret to configure in Octopus Deploy later.
-
Choose an existing Signing Key to be used for signing the JSON Web Tokens (JWTs), but leave Encryption Key empty as Octopus Deploy does not support encrypted tokens. Click Next.
-
If you want to bind a policy, group or user to control who is allowed to authenticate, you can configure this here, otherwise leave the page empty and click Next.
-
Review the application configuration, then click Submit.
-
Navigate to Applications, then Providers and open the settings for the new provider. Note down the OpenID Configure Issuer URL, this will be the Issuer value in Octopus Deploy.
Configure Octopus Server
- Navigate to Configuration ➜ Settings ➜ OpenID Connect and populate the following fields:
- Enabled should be set to
Yes. - Role Claim Type should be
groups, to pull group membership from Authentik. - Username Claim Type should be set to
preferred_username. - Resource should be left unset.
- Scopes should be set to
openid profile email groups, by addinggroupsto the list. - Display Name can be used to customize the appearance of the button on the Octopus Deploy login screen. Use a name that your users will recognize for this identity provider.
- Issuer, Client ID and Client Secret should be the values you noted when creating the application.
- Allow Auto User Creation determines if Octopus Deploy should automatically create user accounts, or only allow authentication for users that already exist in Octopus Deploy.
- Enabled should be set to
- Click Save to apply the changes.
- If you sign out of Octopus Deploy, you should now see a new button on the login screen to authenticate with the OIDC provider.
Assign external groups to Octopus teams (optional)
If you want to use groups in Authentik to manage permissions in Octopus Deploy, you can assign those groups to Teams in the Octopus Portal.
-
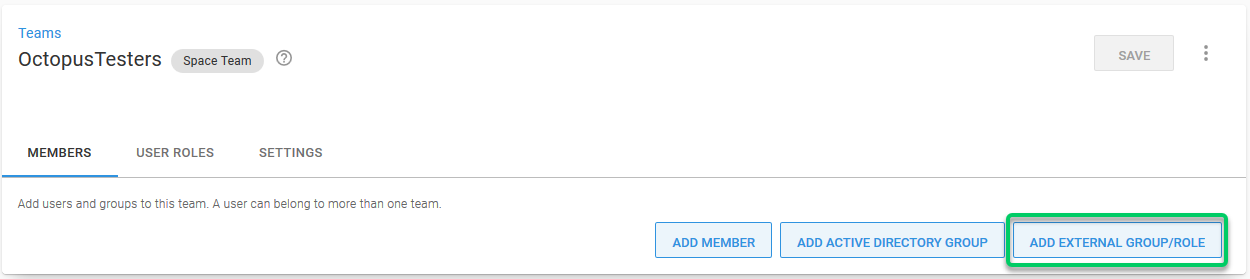
Open the Octopus Portal and select Configuration ➜ Teams.
-
Either create a new Team or choose an existing one.
-
Under the Members section, select the option Add External Group/Role.
-
Enter the name of the Authentik group as the Group/Role ID and then choose the name that should be displayed in Octopus, then click Add. In this example, we’re adding an existing Authentik group called
octopusTesters.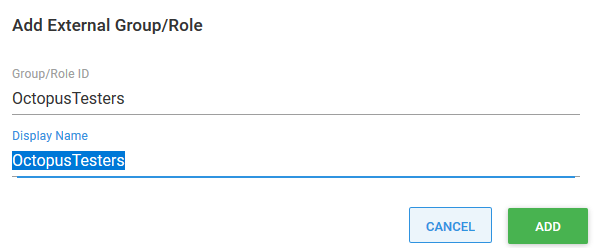
-
Save your changes by clicking the Save button.
Octopus user accounts are still required
Octopus still requires a user account so you can assign those people to Octopus teams and subsequently grant permissions to Octopus resources. Octopus will automatically create a user account based on the profile information returned in the security token, which includes an Identifier, Name, and Email Address.
How Octopus matches external identities to user accounts When the security token is returned from the external identity provider, Octopus looks for a user account with a matching Identifier. If there is no match, Octopus looks for a user account with a matching Email Address. If a user account is found, the External Identifier will be added to the user account for next time. If a user account is not found, Octopus will create one using the profile information in the security token.
Already have Octopus user accounts? If you already have Octopus user accounts and you want to enable external authentication, simply make sure the Email Address matches in both Octopus and the external identity provider. This means your existing users will be able to sign in using an external identity provider and still belong to the same teams in Octopus.
Getting permissions
If you are installing a clean instance of Octopus Deploy you will need to seed it with at least one admin user. This user will have access to create and configure other users as required. To add a user, execute the following command
Octopus.Server.exe admin --username USERNAME --email EMAILThe most important part of this command is the email, as usernames are not necessarily included in the claims from the external providers. When the user logs in the matching logic must be able to align their user record based on the email from the external provider or they will not be granted permissions.
Troubleshooting
If you are having difficulty configuring Octopus to authenticate with Authentik, check your server logs for warnings and check the Authentik logs. You can access logs in Authentik by navigating to the Admin interface, then selecting Events and then Logs from the sidebar.
Double- and triple-check your configuration
Unfortunately security-related configuration is sensitive to everything. Make sure:
- You don’t have any typos or copy-paste errors.
- Remember things are case-sensitive.
- Remember to remove or add slash characters - they matter too!
Check OpenID Connect metadata is working
If you open the provider settings in the Authentik console, the OpenID Configuration URL specifies where the configuration metadata is hosted. Make sure that you can open this URL in a web browser and that this URL is reachable from your Octopus Deploy server.
Contact Octopus Support
If you aren’t able to resolve the authentication problems yourself using these troubleshooting tips, please reach out to our support team with:
- The contents of your OpenID Connect Metadata or the link to download it (see above).
- A screenshot of the Octopus User Accounts, including their username, email address, and name.
Help us continuously improve
Please let us know if you have any feedback about this page.
Page updated on Wednesday, December 10, 2025