An SSH key pair account is one of the more secure authentication methods available for connections to SSH Targets.
Creating an SSH key pair
Before you can configure the SSH key pair account in Octopus, you need to generate public and private keys. This can be done on either the Linux target or the Octopus Server.
Generating a key pair on Linux
From Octopus 2021.1.7466, Octopus supports newer ED25519 SSH keys. For older versions, and legacy compatibility, please follow the RSA instructions.
- Run the following command on your Linux server:
ED25519
ssh-keygen -t ed25519RSA
ssh-keygen -t rsa -m PEMThis will bring up an interactive dialog, prompting for:
- The folder that the generated will be placed, defaulting to
~/.ssh/id_ed25519or~/.ssh/id_rsa, depending on your selection above. - Enter a passphrase (or press enter for no passphrase).
- If you entered a passphrase, re-enter the passphrase.
You now have two files:
id_ed25519orid_rsa(the private key)id_ed25519.puborid_rsa.pub(the public key)
The public key will be stored on this (the Linux) server and the private key will be copied to the Octopus Server.
- Copy the public key to the
authorized_keysfile that is used during authentication:
ED25519
cat ~/.ssh/id_ed25519.pub >> ~/.ssh/authorized_keysRSA
cat ~/.ssh/id_rsa.pub >> ~/.ssh/authorized_keys- Modify the permissions of the
authorized_keysfile:
chmod 600 ~/.ssh/authorized_keys- Copy the private key to the machine your Octopus Server is installed on.
Proceed to creating the SSH key pair account.
If you need more information about generating an SSH key pair, see the useful links section.
Generating a key pair on Windows
The easiest way to generate valid keys on Windows is to use a tool like PuTTYgen. Start by clicking “Generate” and wait for the tool to finish creating the random key pair.
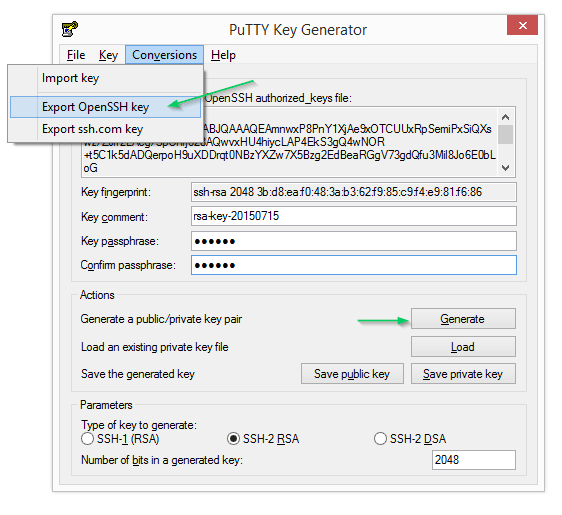
Provide your passphrase if desired and export the private key to the accepted format by going to Conversions ➜ Export OpenSSH Key. Clicking “Save private key” will actually produce a file that, while it can be used by this tool again, is not compatible with the standard SSH process. To get the public key over to the server you can either click “Save public key”, copy the file across to the server and add the key to ~/.ssh/authorized_keys as outlined above, or just cut+paste the content from the textbox directly into the remote file.
If you need more information about generating an SSH key pair, see the useful links section.
Creating the SSH key pair account
- Navigate to Deploy ➜ Manage ➜ Accounts and click ADD ACCOUNT.
- Select SSH key pair from the drop-down menu.
- Give the account a name so you can easily identify it when you need to use the account.
- Add a description.
- Enter the username you will use to access the remote host.
- Upload the private key to the Octopus Server.
- Enter the passphrase for the private key if you created one.
- If you want to restrict which environments can use the account, select only the environments that are allowed to account. If you don’t select any environments, all environments will be allowed to use the account.
- Click SAVE.
The account is now ready to be used when you configure your SSH deployment target.
The server will confirm that this private key matches its public key at the start of each SSH connection.
If you are storing the private key on disk it is recommended, but not mandatory, that you encrypt the key.
Useful links
Due to the number and configurable nature of the various Linux distributions available, there are other dedicated sites that can provide more precise information & tutorials for your specific use case.
- PuTTY download page has several useful Windows tools.
- ssh-keygen man page.
- sshd_config man page (Ubuntu).
- Great intro SSH keygen articles from DigitalOcean, GitHub or Atlassian.
Learn more
Help us continuously improve
Please let us know if you have any feedback about this page.
Page updated on Sunday, January 1, 2023