Cloudsmith is a fully managed package management as a service that securely hosts all of your packages, in any format that you need, including NuGet, Helm, Docker, Maven, or NPM in one location and accessible across your organization.
All Cloudsmith repositories are multi-format. This means you can mix and match different package types in one repository. A NuGet package can sit beside a Maven package, a Docker, or an NPM package.
Create a Cloudsmith Organization
Before setting up a Cloudsmith repository, you should create an Organization and invite others to join the Organization. Creating an Organization in Cloudsmith gives you the ability to configure and manage access for teams, individuals, and machines that map to your company’s organizational structure.
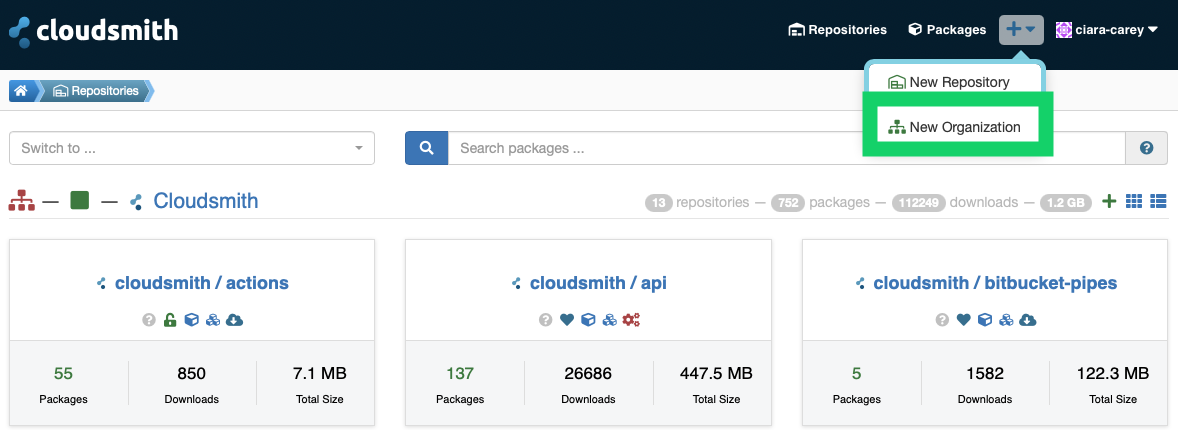
You can create an Organization by clicking on the + dropdown on the top menu bar and selecting New Organization.
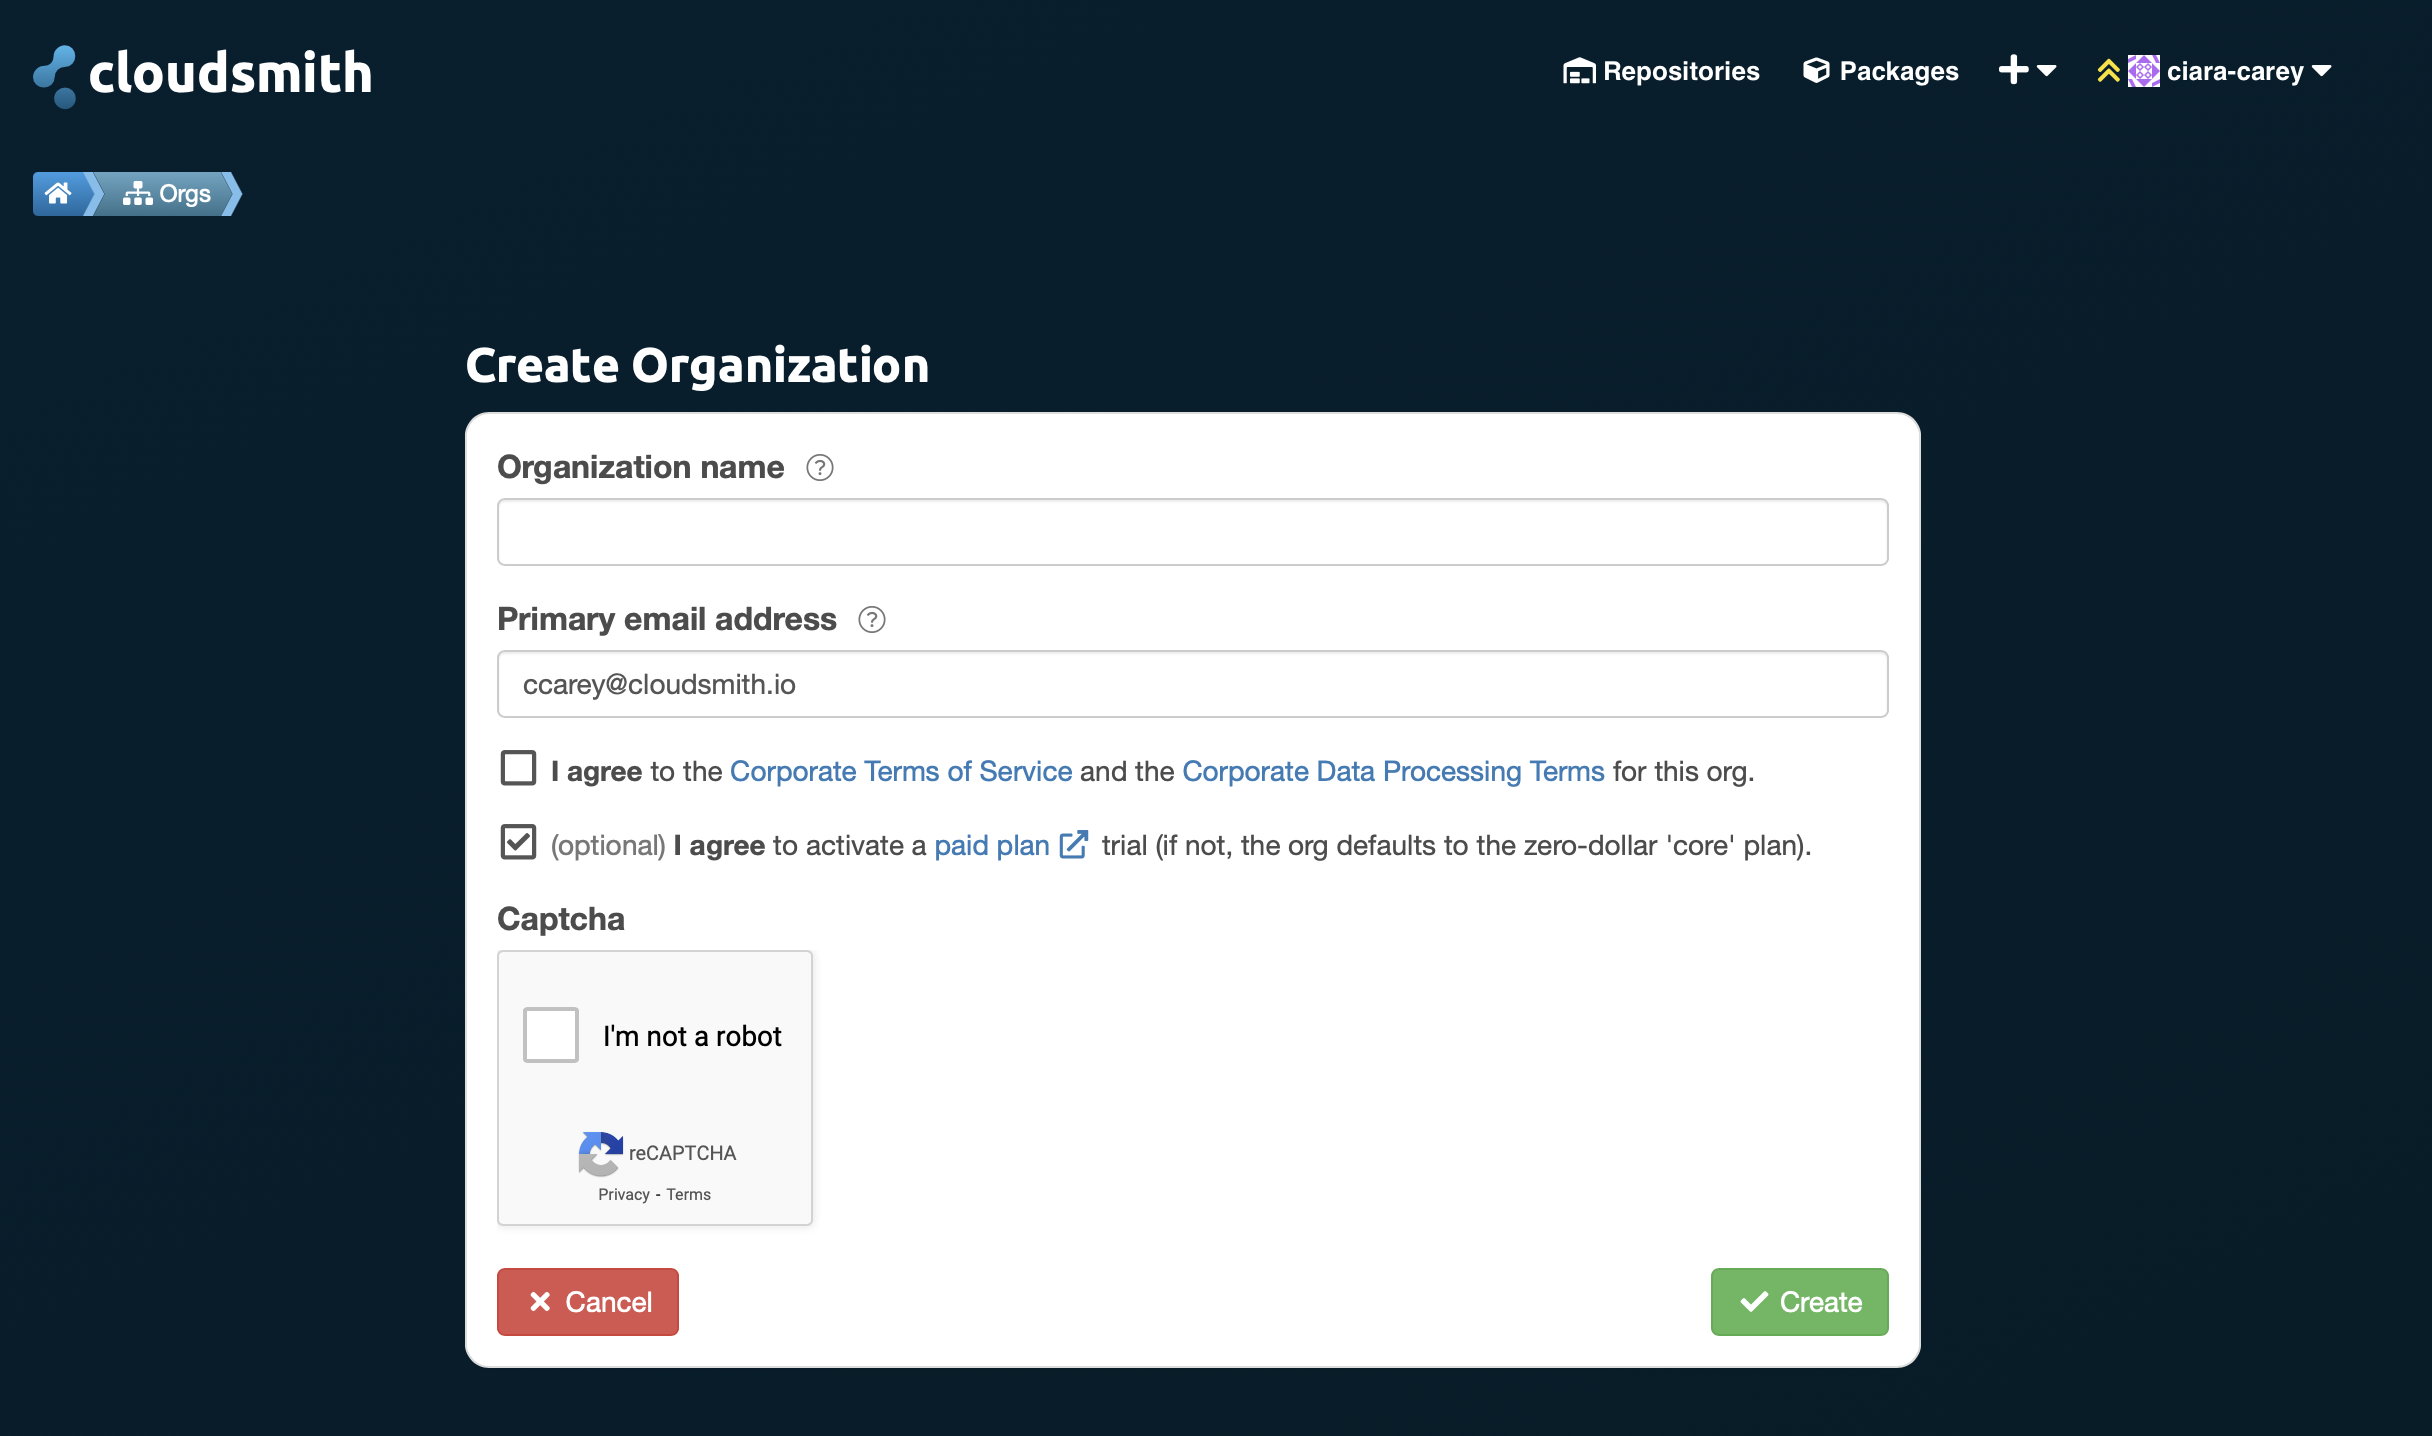
This will take you to the Create Organization form. You are required to enter a name for your Organization and a primary email address before creating your Organization (the organization name is checked to ensure it’s unique before creating it).
Once you have created the Organization, the next step is to create a repository. For instructions on how to configure the settings for the Organization, including how to create teams and invite users, refer to the Cloudsmith documentation.
Create a Cloudsmith Repository
You can create a new repository in three ways:
- Via the Cloudsmith CLI
- Via the Website UI
- Via the Cloudsmith API
For this guide we will create a repository via the Cloudsmith Website UI. To create a repository via the CLI or API, see the Cloudsmith documentation.
Create a repository via the Website UI
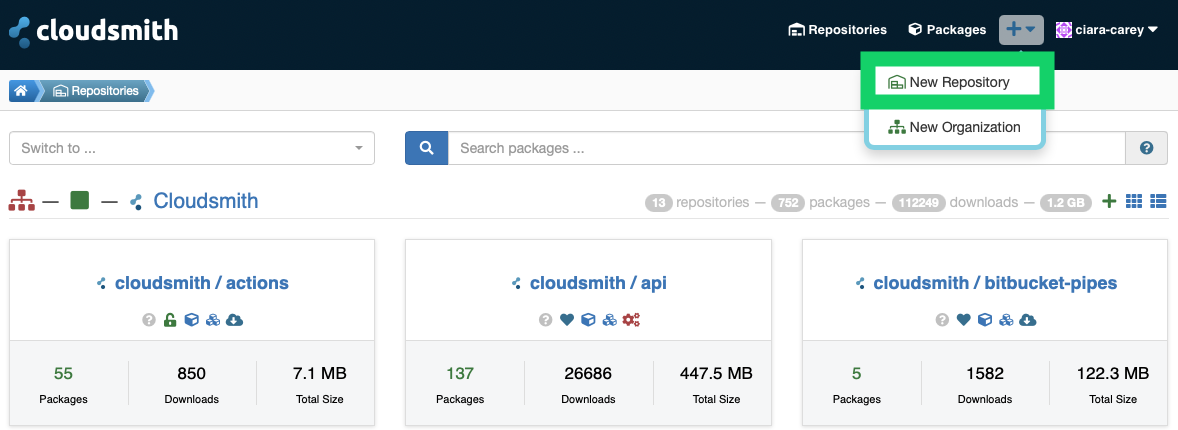
You can create a repository by clicking on the + dropdown on the top menu bar and selecting New Repository.
That will take you to the Create Package Repository form:
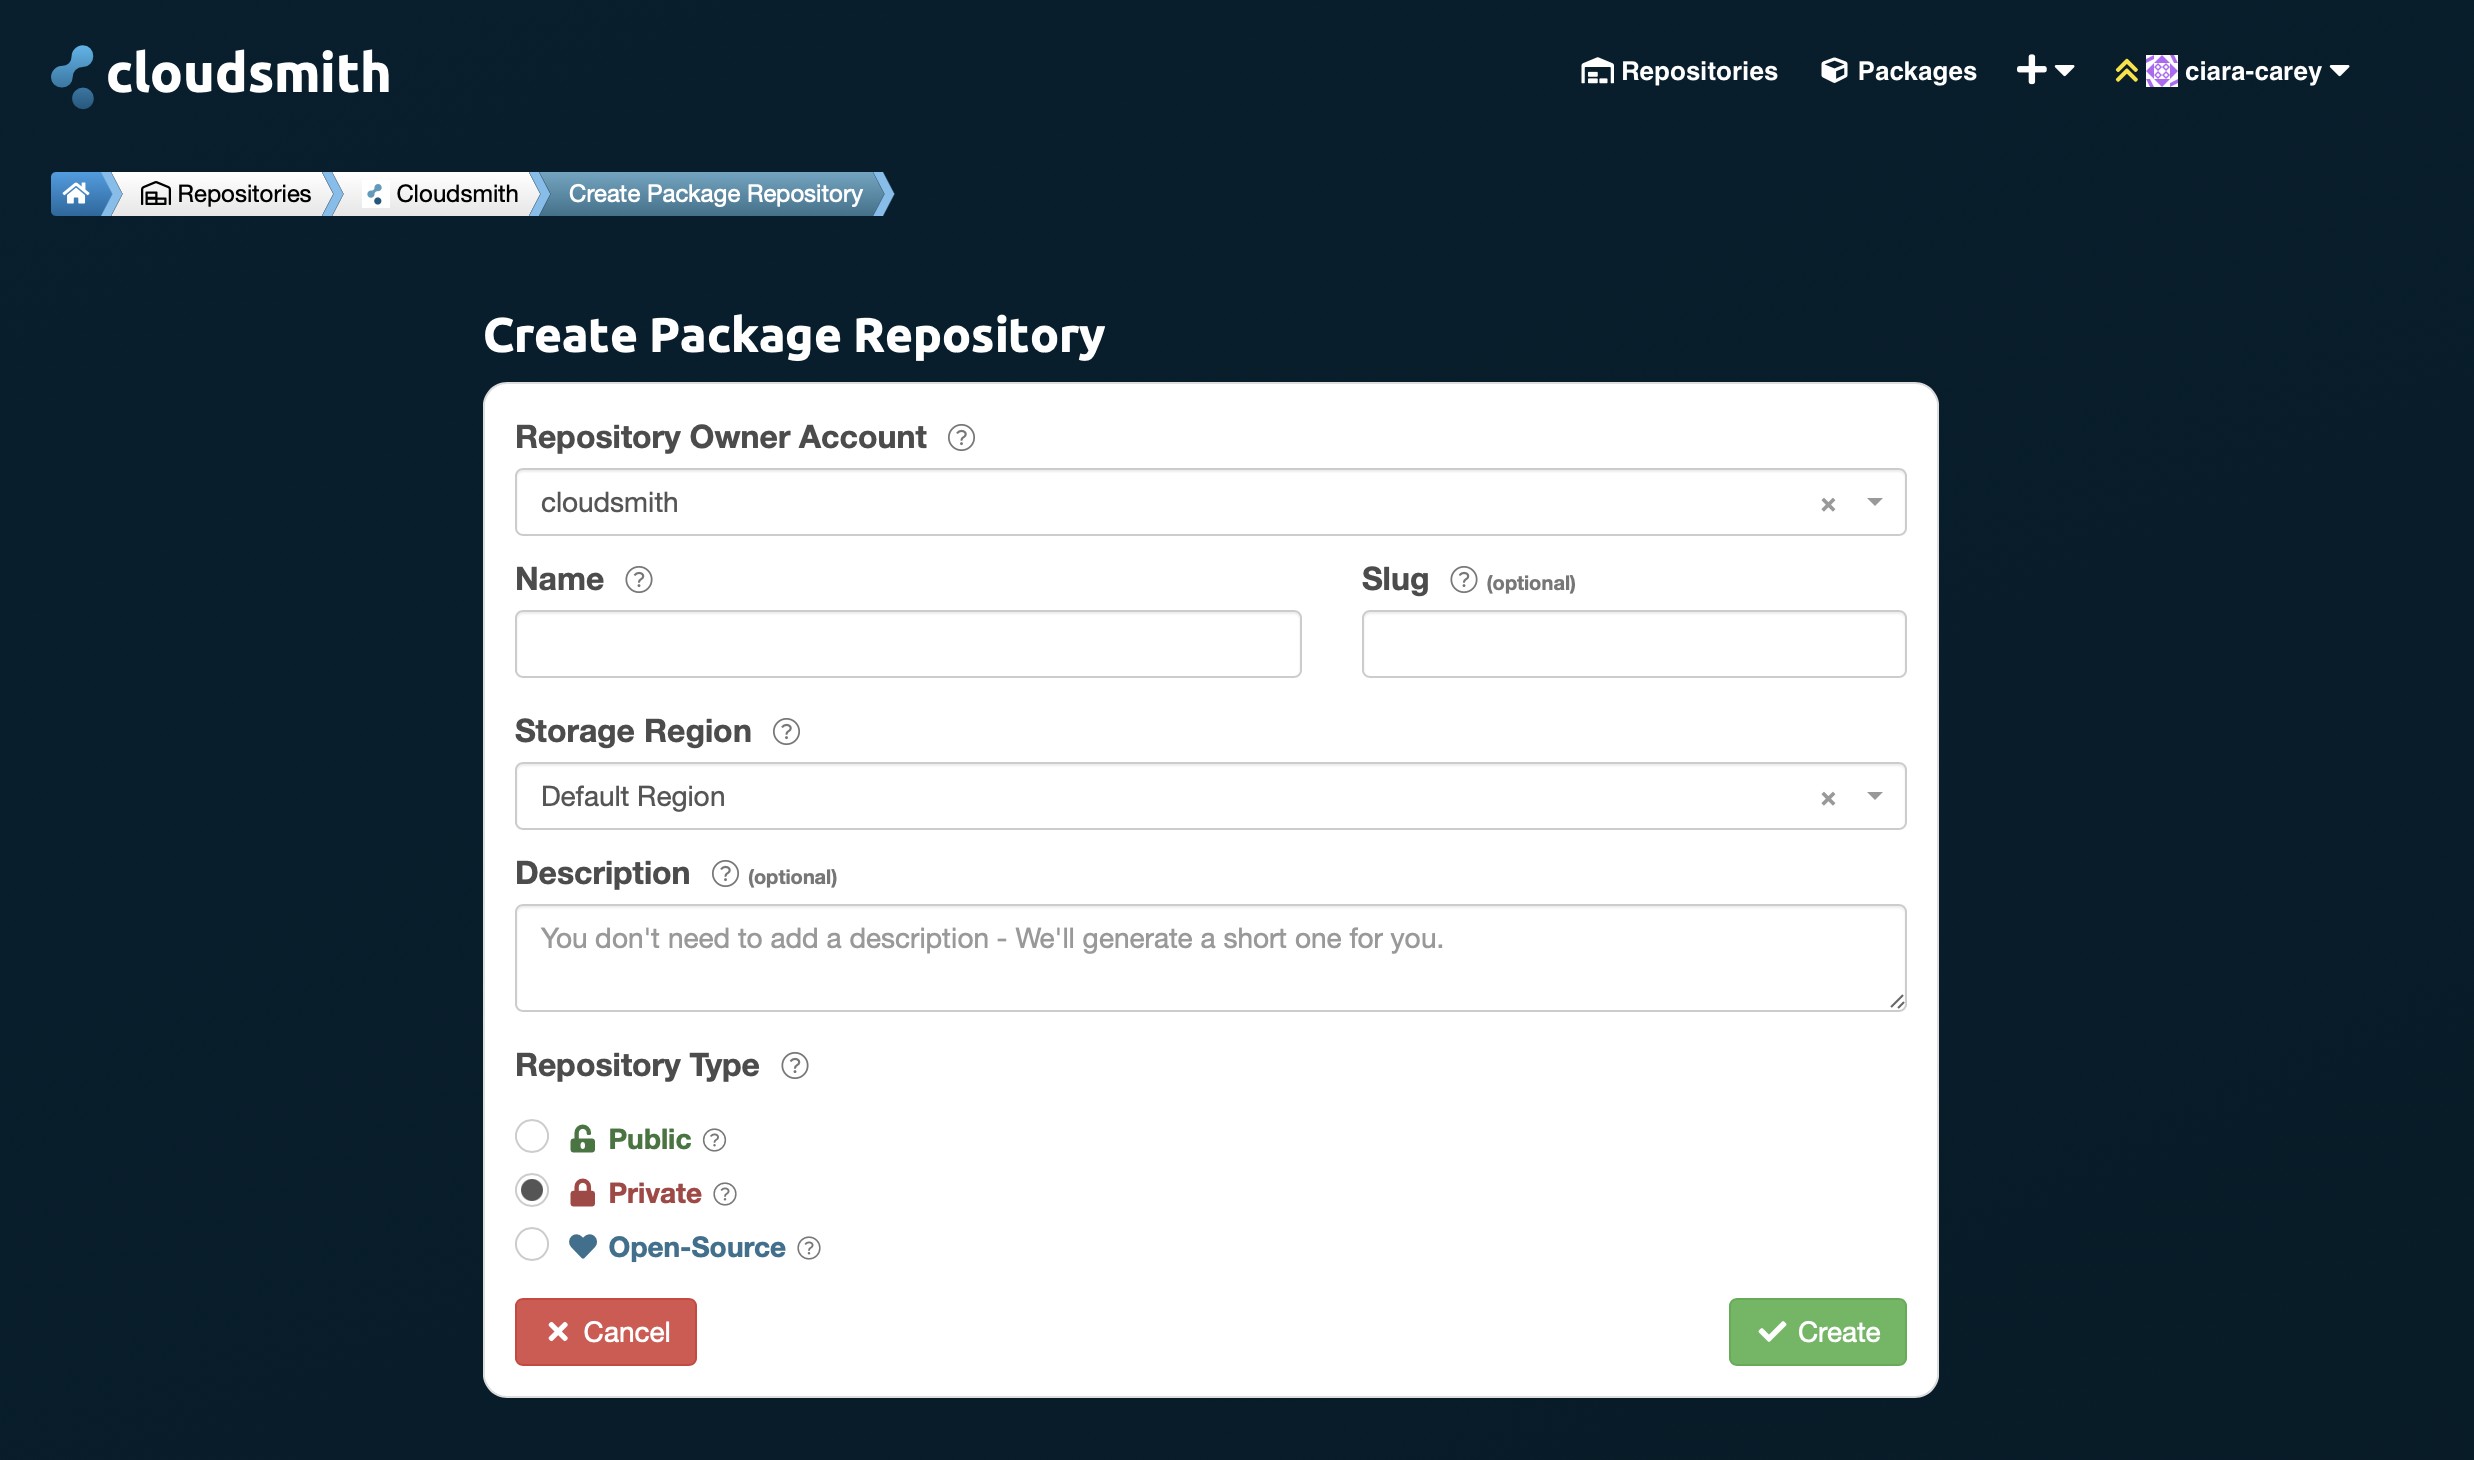
Here you can create a new repo by selecting a Repository Owner (the Organization you want the repo to live under) and a name. You can also specify an optional slug (identifier) for the repository. The slug is what will appear in the URL for the repository. The identifier can only contain lowercase alphanumeric characters, hyphens, and underscores. If you don’t specify an identifier, one will be automatically generated from the repository name for you.
The Storage Region allows you to choose a geographic region for the repository (see Custom Storage Regions for further details). Then you need to select the type; Public, Private or Open-Source.
Upload your package to Cloudsmith
Cloudsmith provides three ways to push your packages/files/assets into your repositories:
- Upload via the package-specific native CLI / tools (where supported).
- Upload via the API using tools/integrations, such as the official Cloudsmith CLI.
- Upload directly via the website.
Documentation for package-specific native CLI and tooling is available on the website within each repository. For example, after selecting NuGet as the package format to upload, a new form will pop up, click the link upload setup documentation and the following documentation is available:
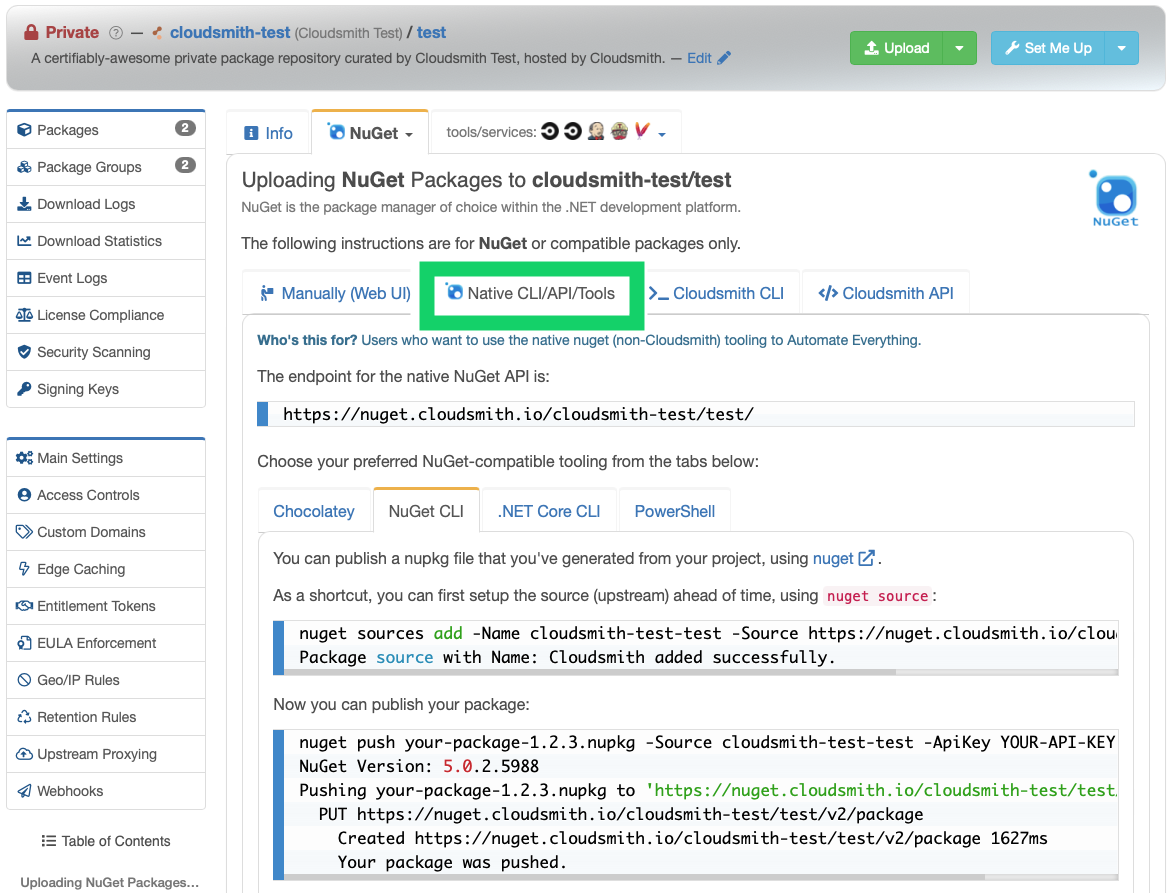
The next section will give an of overview uploading your package using the package-specific native CLI for NuGet, Docker and Maven. For Helm we will use the Cloudsmith CLI. See the Cloudsmith supported formats documentation for more information.
The commands that are included in this section should be entered into a command line shell, and it’s assumed the commands are run in the same directory as your package. We will use this terminology in the following examples:
| Identifier | Description |
|---|---|
| OWNER | Your Cloudsmith account name or organization name (namespace) |
| REGISTRY | Your Cloudsmith Repository name (also called slug) |
| USERNAME | Your Cloudsmith Entitlement Token (see Entitlements for more details) |
| USERNAME | Your Cloudsmith username |
| PASSWORD | Your Cloudsmith password |
| API-KEY | Your Cloudsmith API Key |
| IMAGE_NAME | The name of your Docker image |
| TAG | A tag for your Docker image |
Install the Cloudsmith CLI tool
Uploading a Helm package requires the Cloudsmith CLI to be installed. To install the Cloudsmith CLI, follow the Cloudsmith CLI installation instructions.
Generate Package
Before you can upload, you need to generate a package first. You can do this with one of the following commands (click on the Tab that matches your package-specific CLI):
NuGet
nuget packMaven
mvn packageHelm
helm package .Docker
docker save -o your-image.docker your-image:latestAdd Cloudsmith as a Source
Once you have generated a package, you need to add Cloudsmith as a Source in one of the following ways:
NuGet
nuget sources add -Name example-repo -Source https://nuget.cloudsmith.io/OWNER/REPOSITORY/v3/index.jsonMaven
# The distribution repositories define where to push your artifacts.
# In this case it will be a single repository, but you can configure alternatives.
# Add the following to your project pom.xml file:

<distributionManagement>
  <snapshotRepository>
    <id>NAME</id>
    <url>https://maven.cloudsmith.io/OWNER/REPOSITORY/</url>
  </snapshotRepository>
  <repository>
    <id>NAME</id>
    <url>https://maven.cloudsmith.io/OWNER/REPOSITORY/</url>
  </repository>
</distributionManagement>

# You must also configure your ~/.m2/settings.xml file with the API key of the uploading user:
<settings xmlns="http://maven.apache.org/SETTINGS/1.0.0"
  xmlns:xsi="http://www.w3.org/2001/XMLSchema-instance"
  xsi:schemaLocation="http://maven.apache.org/SETTINGS/1.0.0
                      https://maven.apache.org/xsd/settings-1.0.0.xsd">
  <servers>
    <server>
      <id>NAME</id>
      <username>USERNAME</username>
      <password>API-KEY</password>
    </server>
  </servers>
</settings>
Docker
docker login docker.cloudsmith.io
# You will be prompted for your Username and Password.
# Enter your Cloudsmith username and your Cloudsmith API Key.
Note: There are no steps required to add Cloudsmith as a Source for Helm.
Publish Package
Finally, you can publish (or upload) your package to Cloudsmith using one of the following commands:
NuGet
nuget push PACKAGE_NAME-PACKAGE_VERSION.nupkg -Source example-repo -ApiKey API-KEYMaven
mvn deployHelm
# The command to upload a Helm chart via the Cloudsmith CLI is:
cloudsmith push helm OWNER/REPOSITORY CHART_NAME-CHART_VERSION.tgz
Docker
# To publish an image to a Cloudsmith-based Docker registry, you first need to tag your image:\ndocker tag IMAGE_NAME:TAG docker.cloudsmith.io/OWNER/REGISTRY/IMAGE_NAME:TAG
# You can then publish the tagged image using docker push:
docker push docker.cloudsmith.io/OWNER/REGISTRY/IMAGE_NAME:TAG
Adding Cloudsmith as an External Feed to Octopus
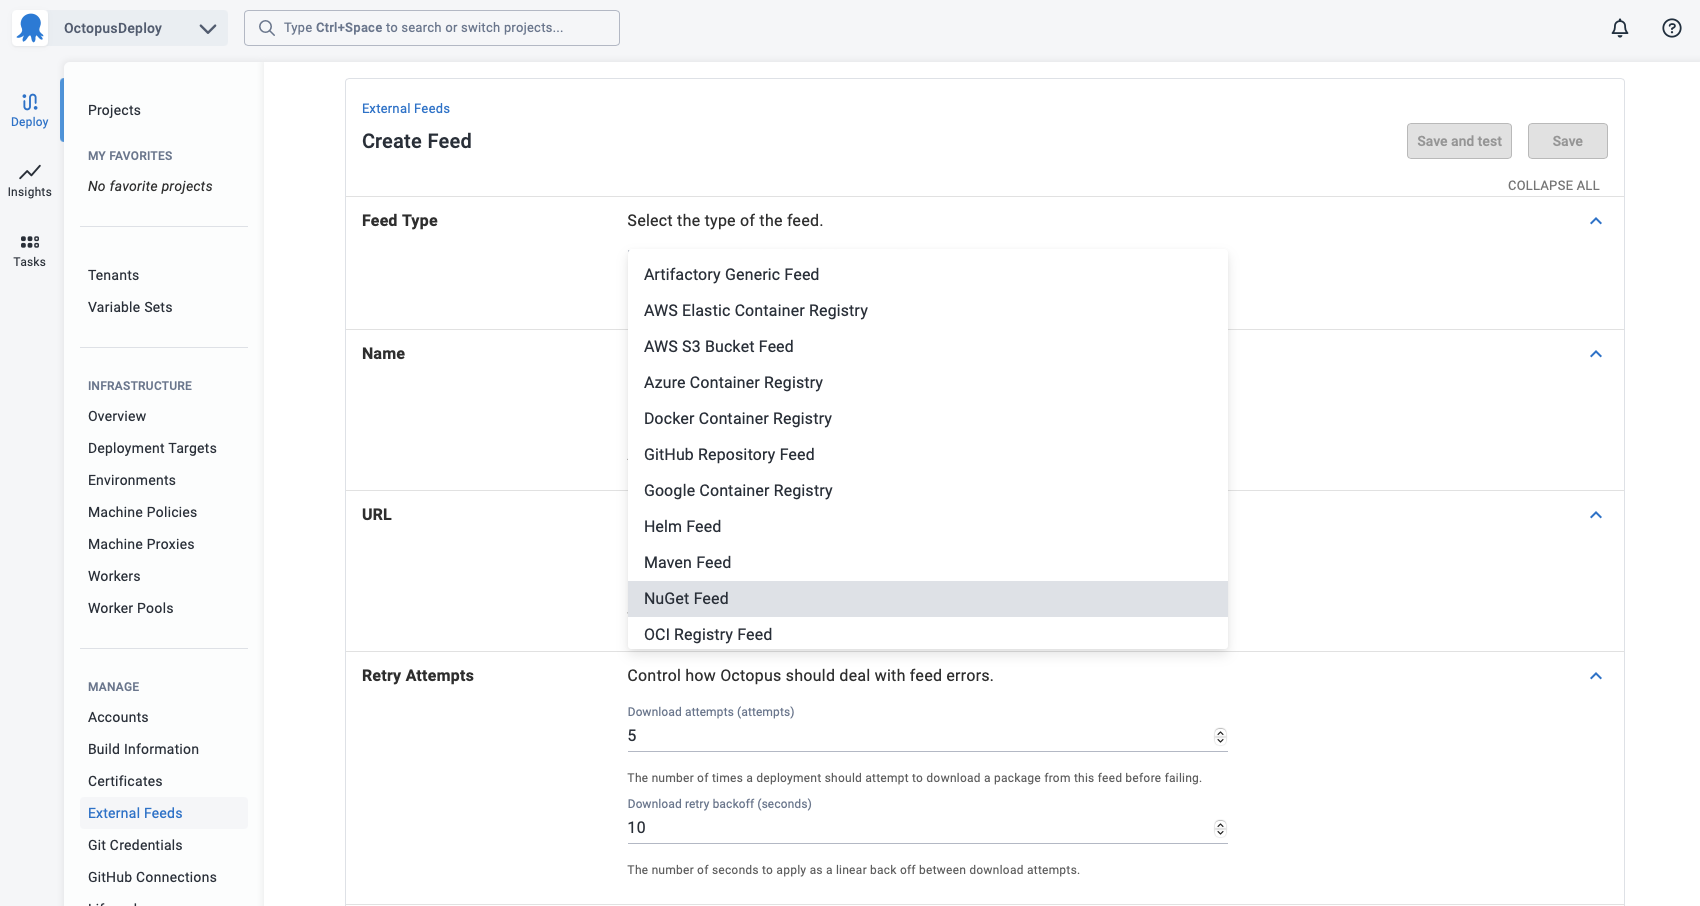
Now that we have created our repository we can add our Cloudsmith repository as an external feed in our Octopus instance.
From the Octopus Web Portal, create a new external feed by navigating to Deploy ➜ Manage ➜ External Feeds and selecting ADD FEED:
- Select the Feed type (NuGet, Helm, Docker, Maven),
- Give the feed a name and in the URL field, enter the HTTP/HTTPS URL of your Cloudsmith repository. Refer to the URLs for Feeds section for more information.
- Populate the credentials of your Cloudsmith repository if necessary. Refer to the Adding Credentials for Private Repositories section for more information.
URLs for Feeds
This section contains information about what Cloudsmith feed URL to use for your specific package.
NuGet
Create a new Octopus Feed by navigating to Deploy ➜ Manage ➜ External Feeds and selecting the NuGet Feed type.
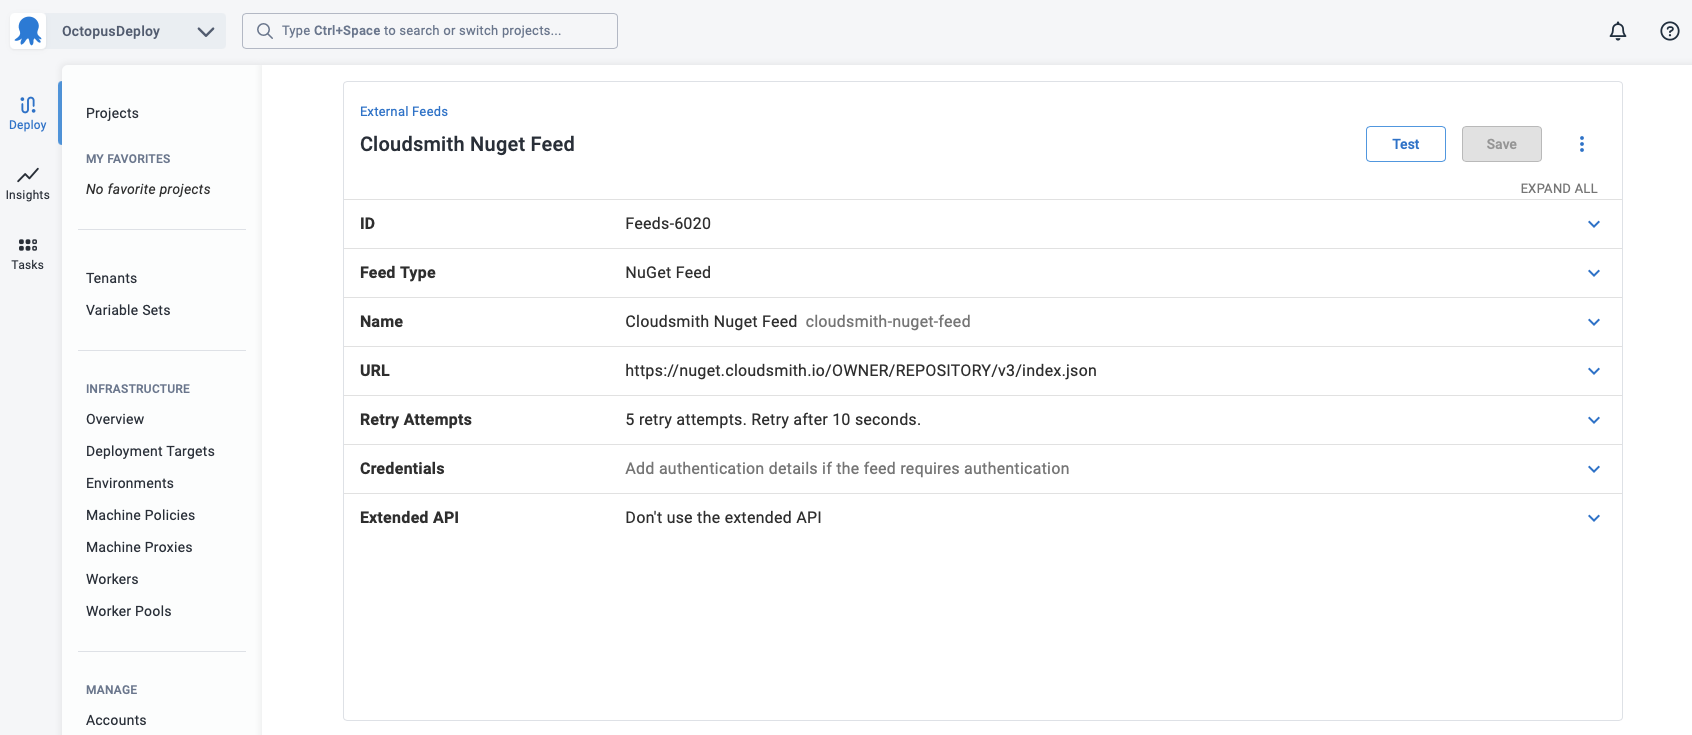
- Give the NuGet feed a name
- Enter the HTTP/HTTPS URL of the feed for your Cloudsmith NuGet repository using the version of NuGet that matches your configuration:
NuGet V2:
https://nuget.cloudsmith.io/OWNER/REPOSITORY/v2NuGet V3:
https://nuget.cloudsmith.io/OWNER/REPOSITORY/v3/index.jsonPrivate repositories require authentication. Refer to the Adding Credentials for Private Repositories section for more information on how to add your credentials
Docker
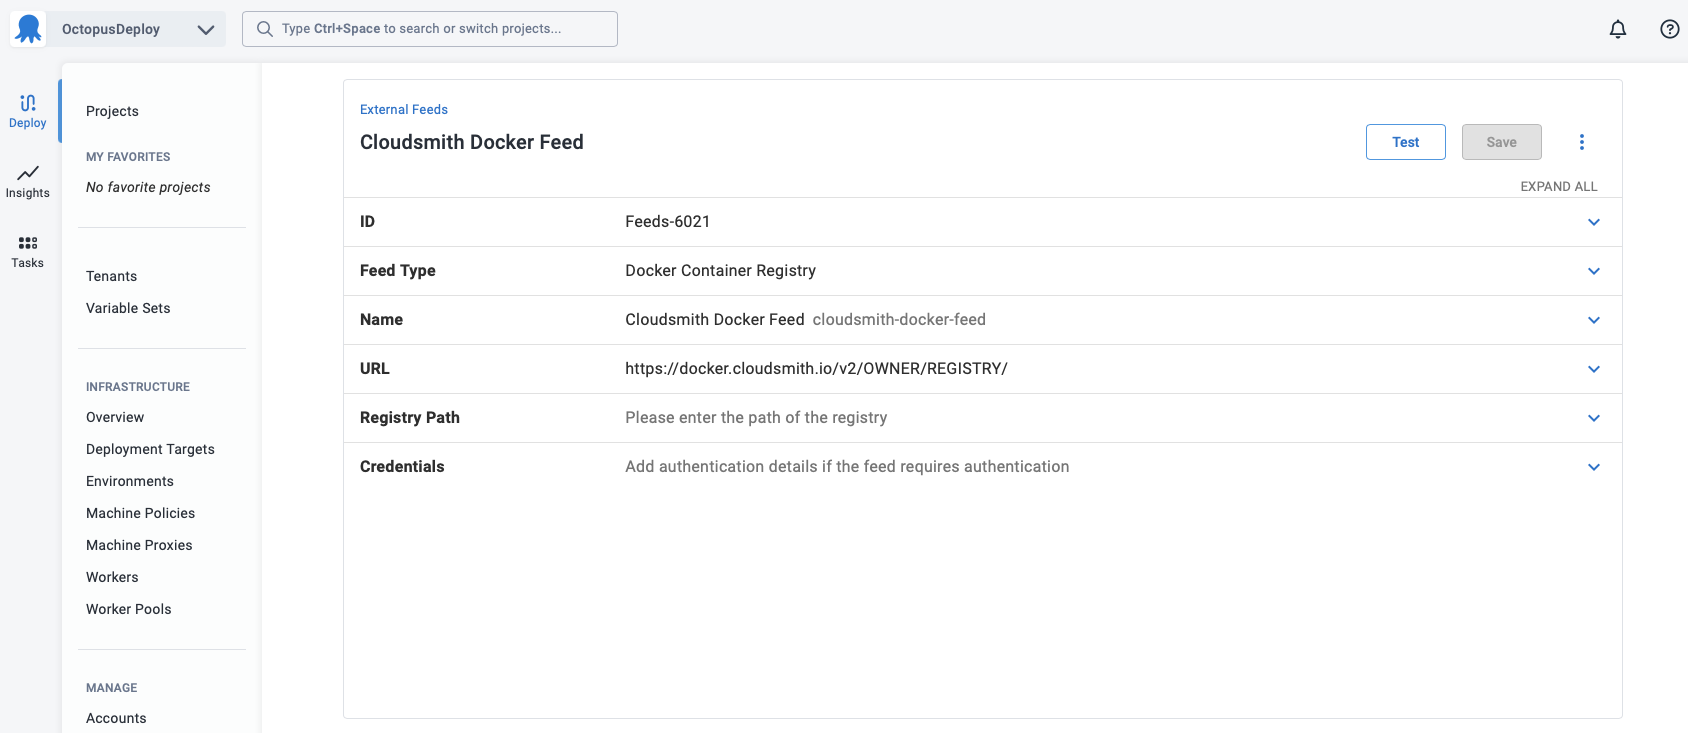
Create a new Octopus Feed by navigating to Deploy ➜ Manage ➜ External Feeds and selecting the Docker Container Registry Feed type.
-
Give the Docker feed a name
-
Enter the HTTP/HTTPS URL of the feed for your Cloudsmith Docker repository in the following format:
https://docker.cloudsmith.io/v2/OWNER/REGISTRY/
Private repositories require authentication. Refer to the Adding Credentials for Private Repositories section for more information on how to add your credentials
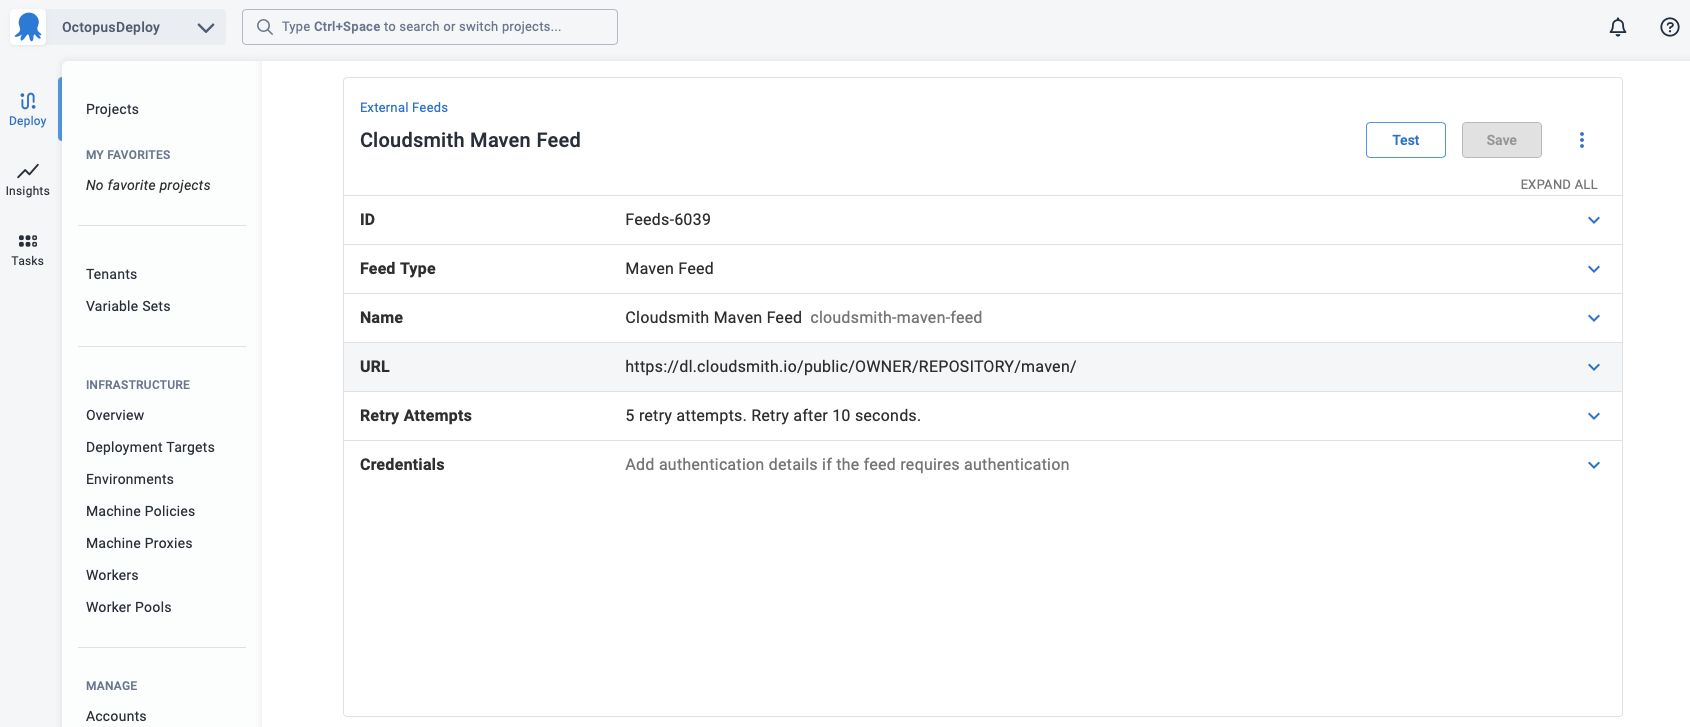
Maven
Create a new Octopus Feed by navigating to Deploy ➜ Manage ➜ External Feeds and selecting the Maven Feed type.
-
Give the feed a name
-
Enter the HTTP/HTTPS URL of the feed for your Cloudsmith Maven repository from the options below that match your configuration:
-
Public URL with no authentication:
https://dl.cloudsmith.io/public/OWNER/REPOSITORY/maven/ -
Entitlement Token Authentication:
https://dl.cloudsmith.io/TOKEN/OWNER/REPOSITORY/maven/ -
HTTP Basic Authentication:
https://dl.cloudsmith.io/basic/OWNER/REPOSITORY/maven/
-
Private repositories require authentication. Refer to the Adding Credentials for Private Repositories section for more information on how to add your credentials
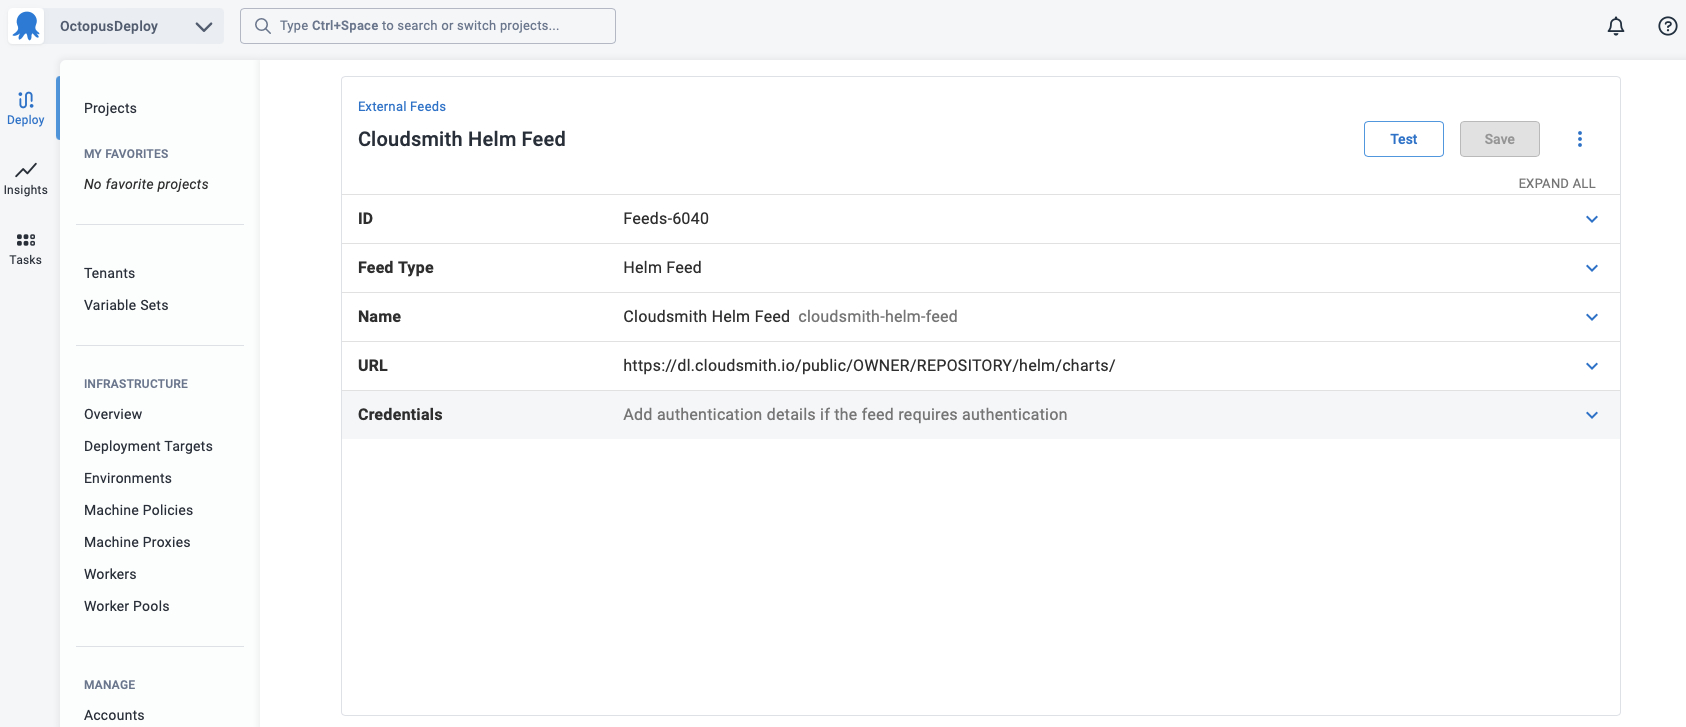
Helm
Create a new Octopus Feed by navigating to Deploy ➜ Manage ➜ External Feeds and selecting the Helm Feed type.
-
Give the feed a name
-
Enter the HTTP/HTTPS URL of the feed for your Cloudsmith Helm repository from the options below that match your configuration:
-
Public URL with no authentication:
https://dl.cloudsmith.io/public/OWNER/REPOSITORY/helm/charts/ -
Entitlement Token Authentication:
https://dl.cloudsmith.io/TOKEN/OWNER/REPOSITORY/helm/charts/ -
HTTP Basic Authentication:
https://dl.cloudsmith.io/basic/OWNER/REPOSITORY/helm/charts/
-
Private repositories require authentication. Refer to the Adding Credentials for Private Repositories section for more information on how to add your credentials
Adding Credentials for Private Repositories
Private Cloudsmith repositories require authentication. If you used a token in the URL then you do not need to add additional credentials.
You can choose between two types of authentication:
- Entitlement Token Authentication
- HTTP Basic Authentication.
The setup method will differ depending on what authentication type you choose to use.
Securing credentials: Entitlement Tokens, User Credentials and API-Keys should be treated as secrets and should be stored in a secure location, such as a Password Manager. You should avoid committing them into source control or exposing them in configuration and log files.
When you are adding or editing your external feed, you can add credentials for your feed by populating the Credentials section.
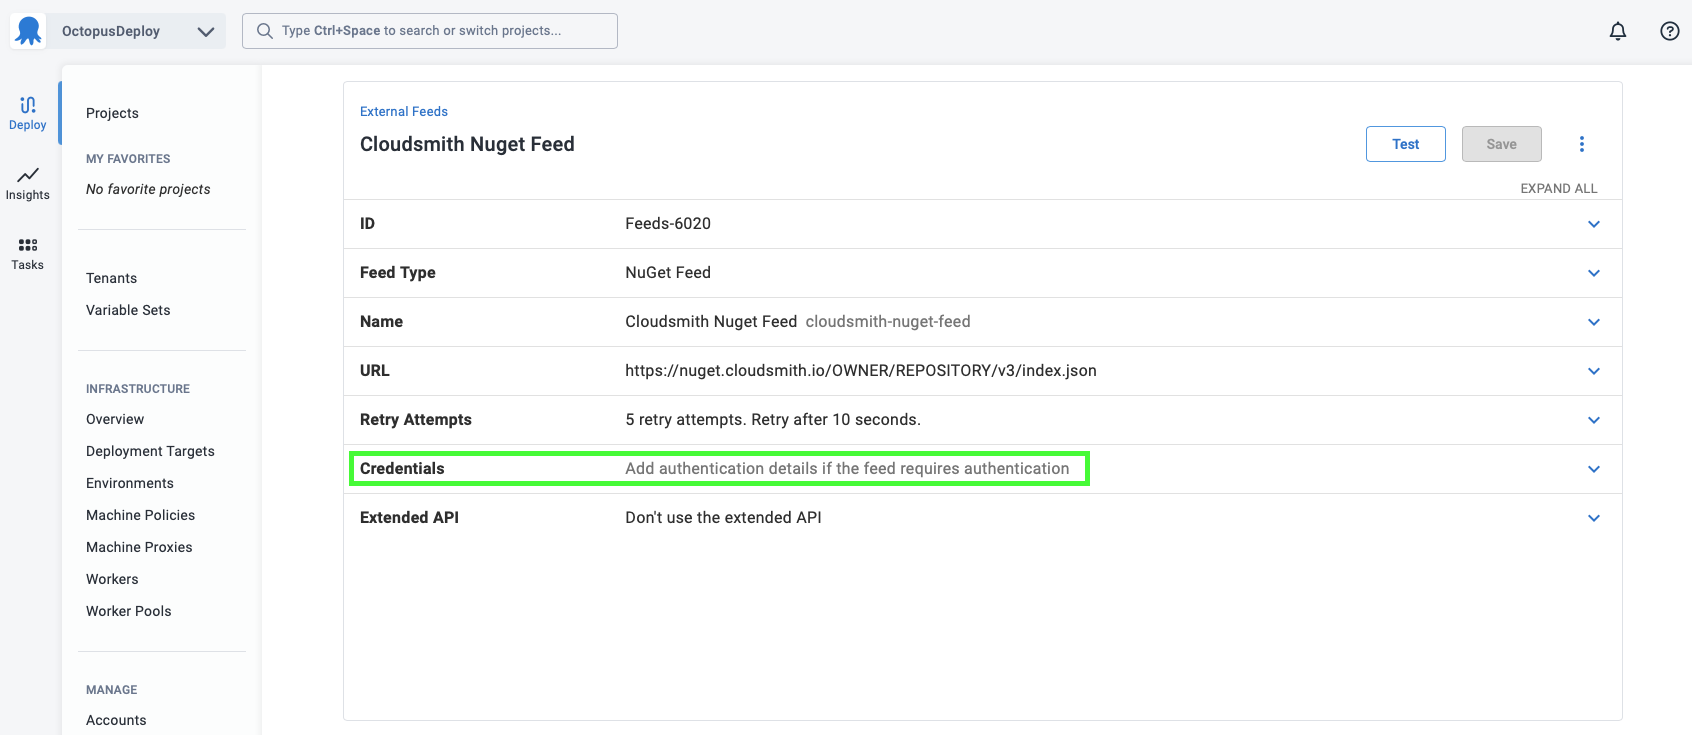
Provide one of the following three types of credentials:
- Cloudsmith Basic Authentication using your Username and Password
- Cloudsmith API Key
- An Entitlement Token
These will be populated in the Credentials section of the Octopus External Feed.
For more information about credentials refer to the Cloudsmith documentation.
Basic Authentication
For Basic authentication, add your Username and Password into the External feed:
- Feed username:
USERNAME - Feed password:
PASSWORD
API Key
For API Key authentication, add your Username and an API Key into the External feed:
- Feed username:
USERNAME - Feed password:
API-KEY
Entitlement Token
For Entitlement Token authentication, populate the credentials with the word token for the username, and the token value for the password:
- Feed username: the word
token - Feed password:
TOKEN
Help us continuously improve
Please let us know if you have any feedback about this page.
Page updated on Sunday, January 1, 2023