Octopus has first-class support for using OpenID Connect (OIDC) within GitHub Actions when using the OctopusDeploy/login action.
Using OIDC to access the Octopus API is only supported for service accounts, to access the API for a user account please use an API key.
For more information on OIDC in GitHub Actions see Security hardening with OpenID Connect.
Configuring an OIDC identity for GitHub Actions
To configure an OIDC identity for a GitHub Actions workflow:
- Go to Configuration -> Users and either create a new service account or locate an existing one.
- Open the OpenID Connect section.
- Click the New OIDC Identity button.
- Select GitHub Actions as the issuer type.
- Enter the details of your repository and how you want to filter the workflow runs that can authenticate using OIDC.
- Click Save.
Multiple OIDC identities can be added for a service account, these could be for workflow runs from the same repository, or separate repositories depending on your needs.
Filtering workflow runs
The OctopusDeploy/login action obtains an ID token from GitHub and then exchanges it for an Octopus access token.
The ID token that GitHub generates contains a subject (the sub property in the ID token), which is generated based on the details of the workflow that is being run. The subject of the OIDC identity in Octopus needs to match this subject exactly in order for the access token to be issued, the Octopus Portal will help you to generate this subject correctly.
The details of the subject that GitHub Actions will generate follow specific rules including:
- Whether a GitHub
environmentis being used within the workflow - The trigger for the workflow run e.g.
pull_requestvspush - Whether the GitHub workflow is running for a branch or a tag
For more information on the generation of subject claims see Example subject claims.
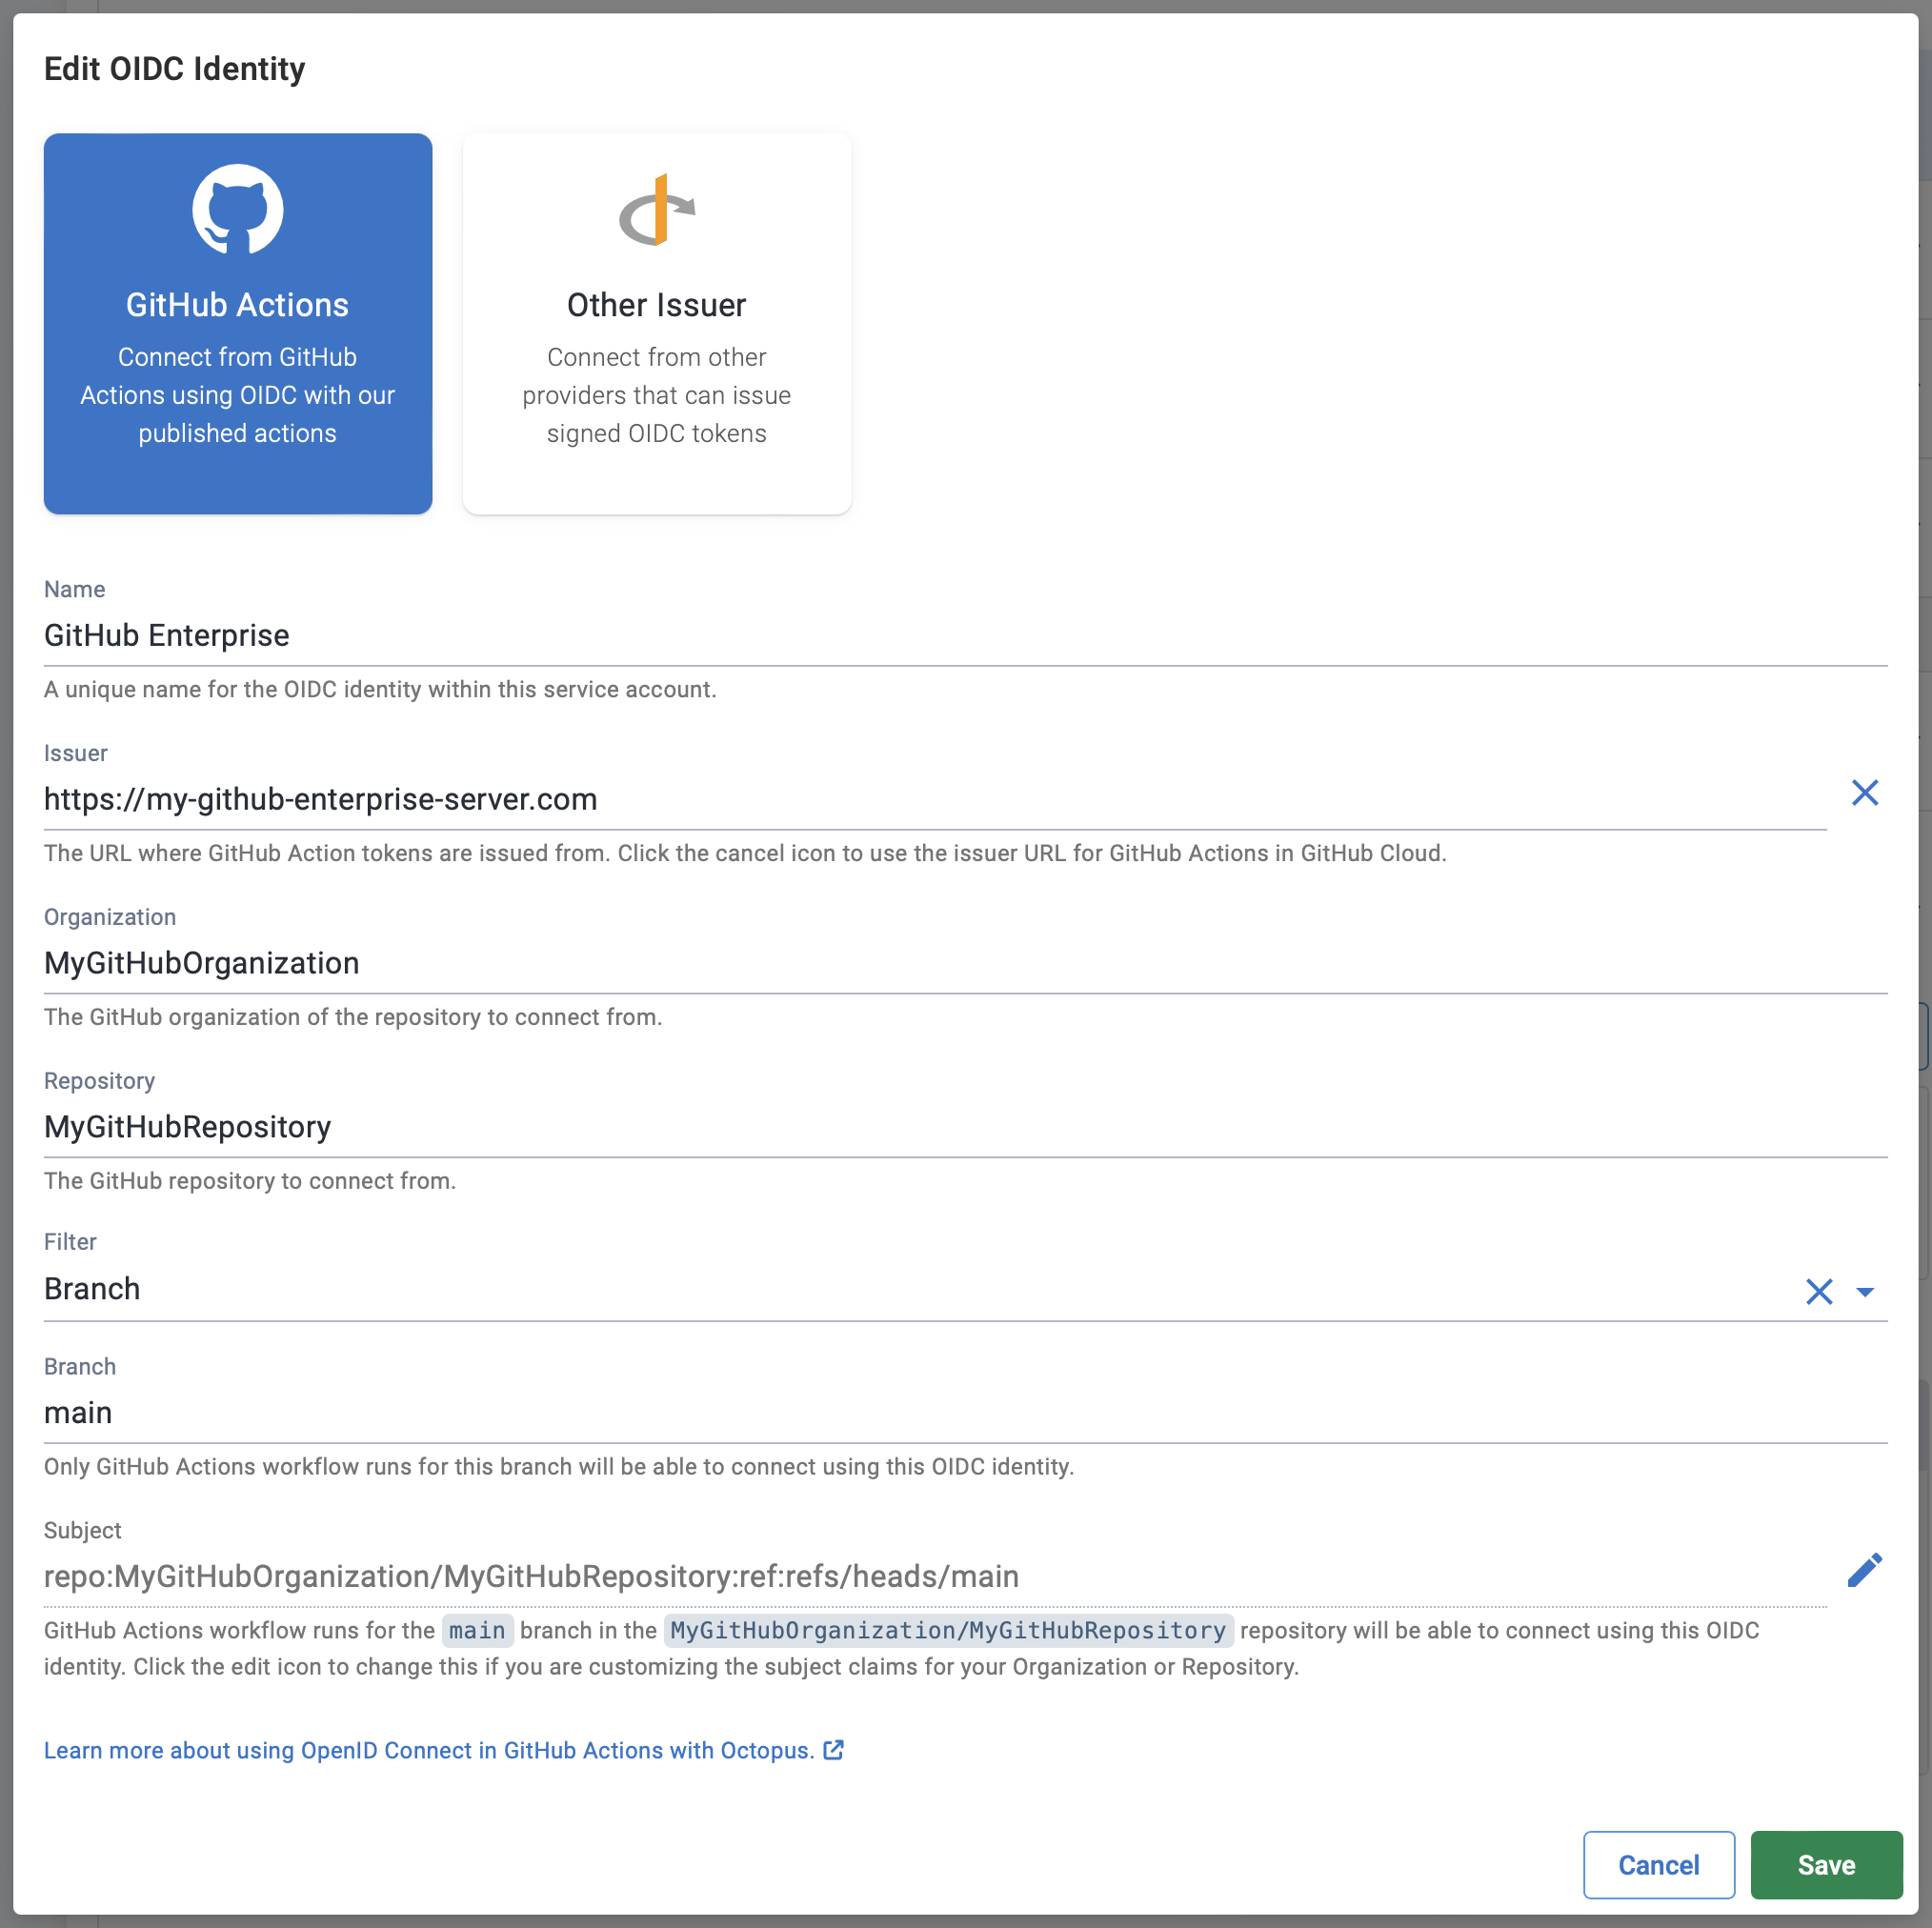
When configuring an OIDC identity for GitHub Actions you need to choose a filter that will match the workflow you want to be able to use OIDC with, the following options are available that match the subject claims above that GitHub uses:
- Branch: Workflow runs for the specific branch will be allowed to connect using the OIDC identity. The prefix for the git ref does not need to be supplied e.g. Use
maininstead ofrefs/heads/main. - Environment: Workflow runs for the specific GitHub environment will be allowed to connect using the OIDC identity.
- Pull Requests: Workflow runs triggered from pull requests will be allowed to connect using the OIDC identity.
- Tag: Workflow runs for the specific tag will be allowed to connect using the OIDC identity. The prefix for the git ref does not need to be supplied e.g. Use
v1instead ofrefs/tags/v1.
To match multiple characters in a subject use *, and to match a single character use ?.
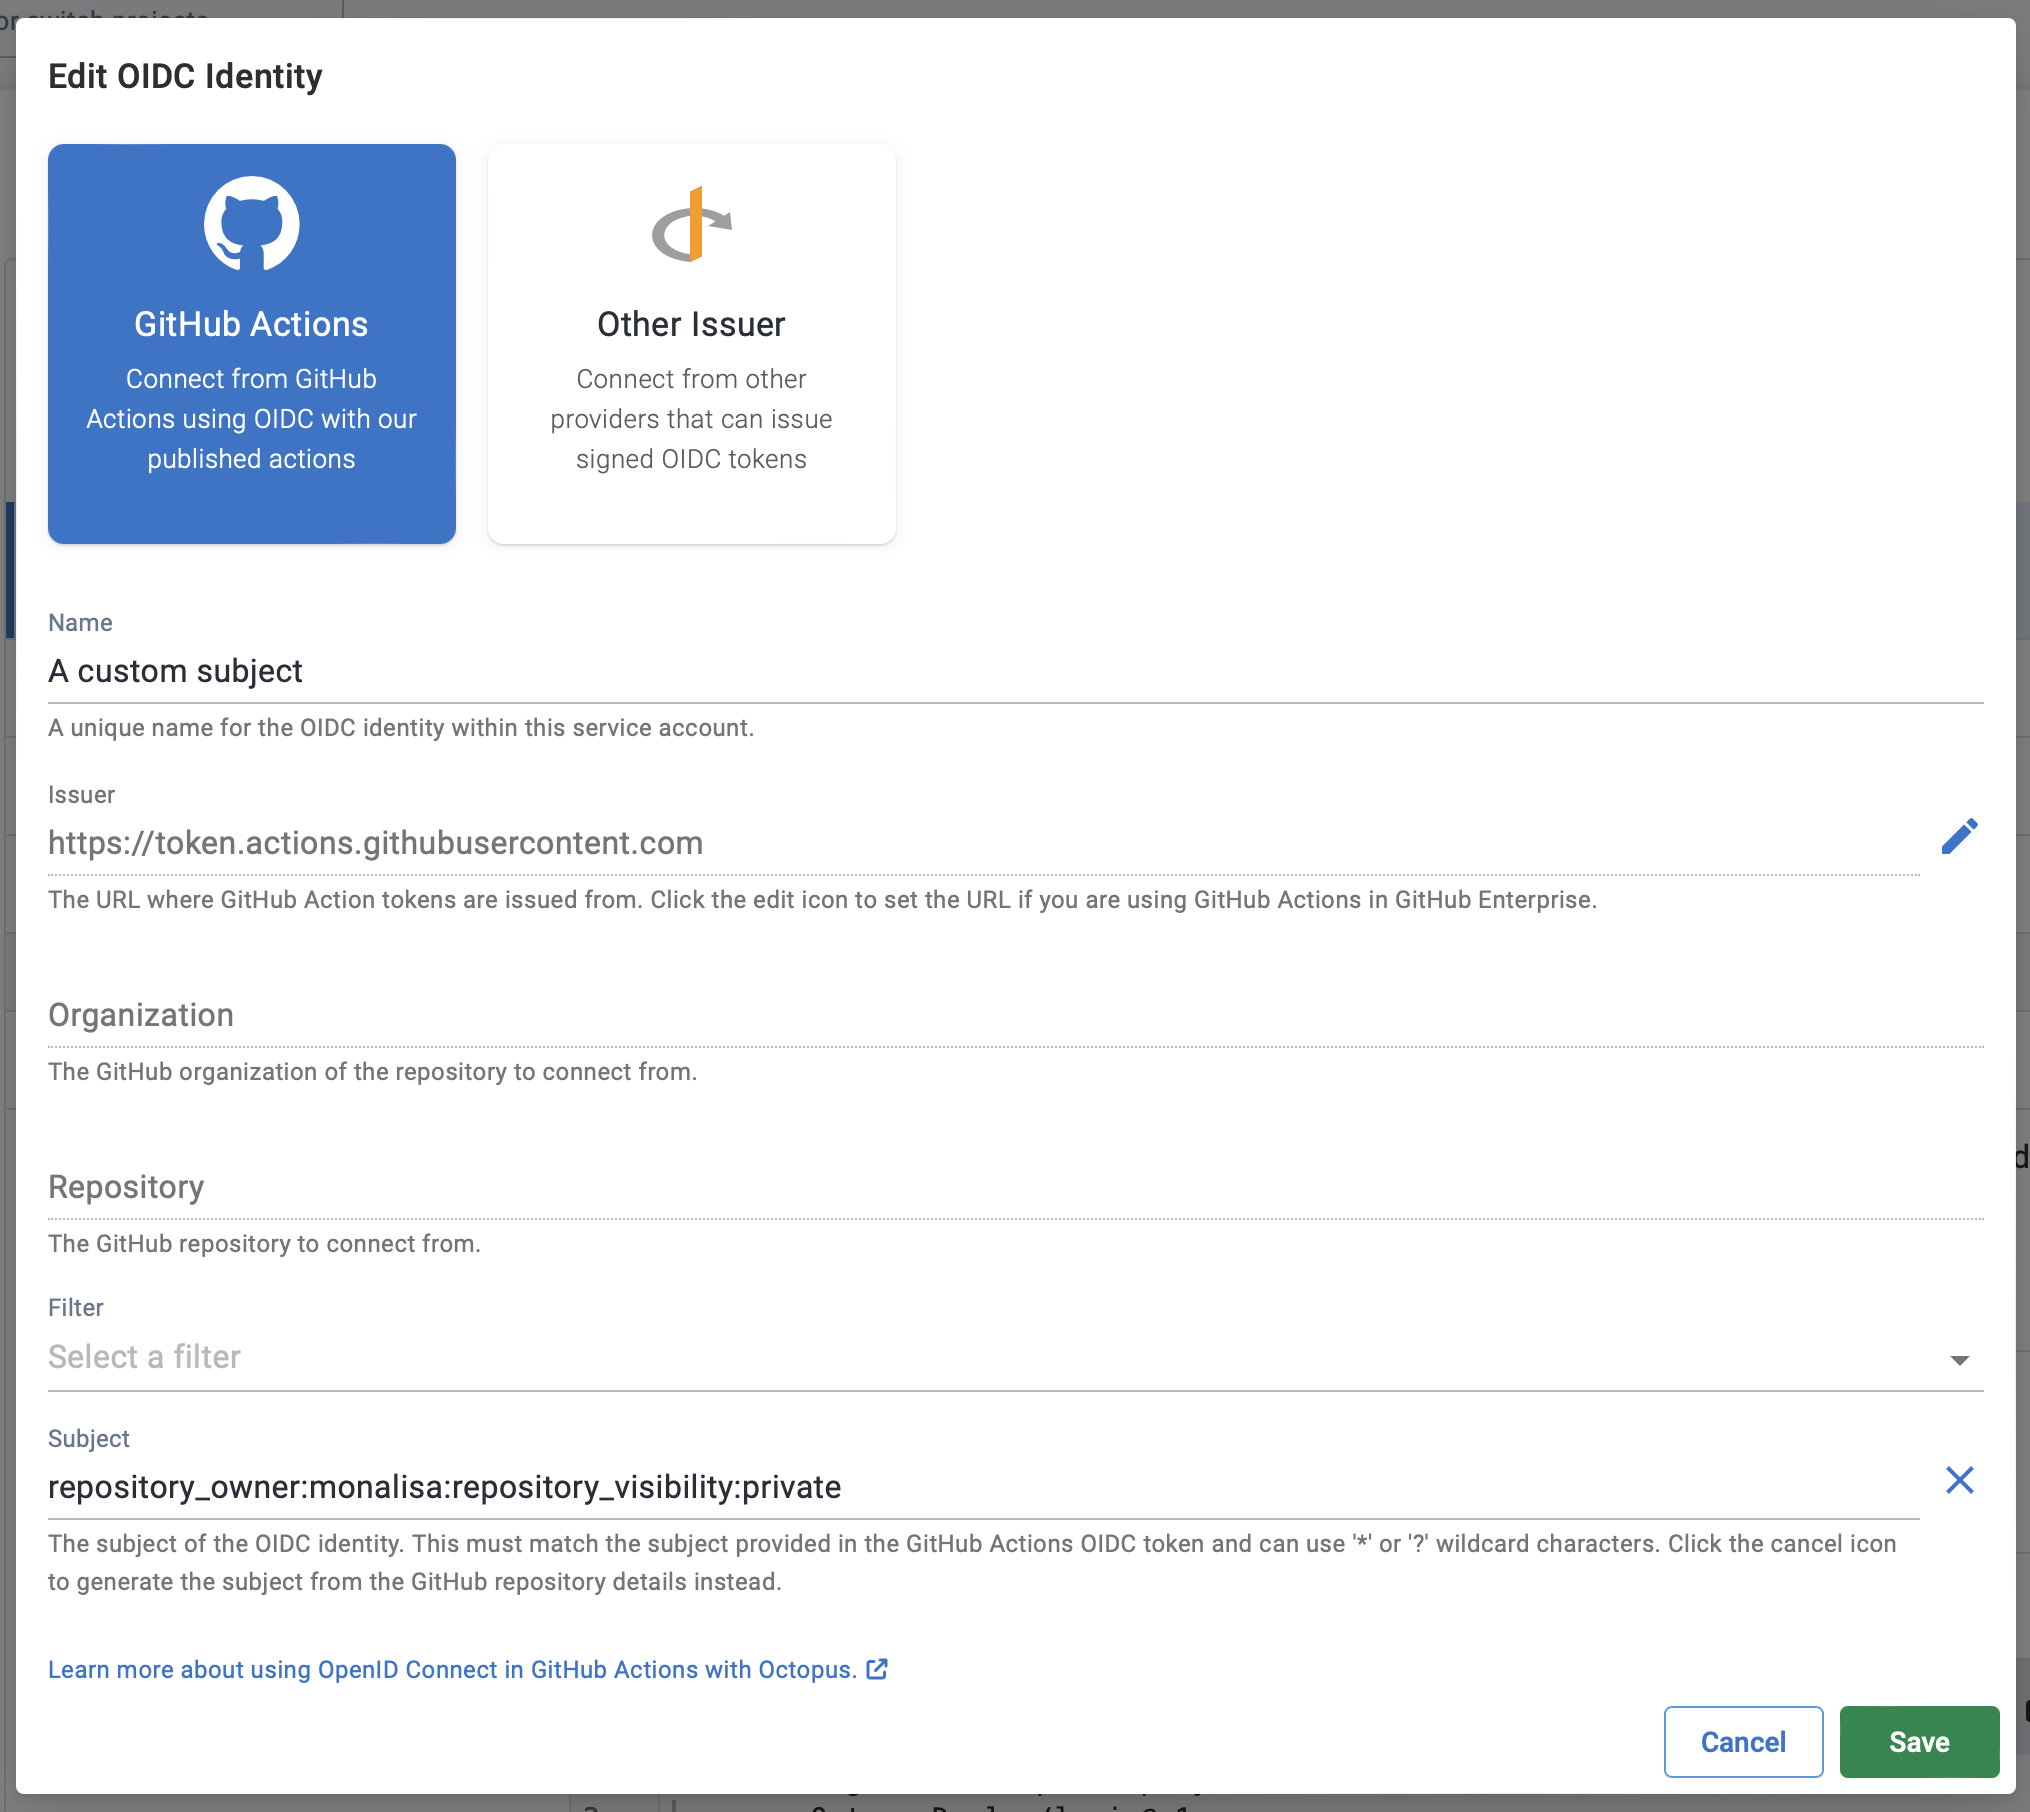
Customized subject claims
GitHub supports customizing the subject claims for an organization or repository, allowing other properties to be used in the generated subject of the ID token instead of the standard properties above. When configuring an OIDC identity for GitHub Actions you can click the Edit icon next to the subject to enter a custom subject matching the generated one from GitHub.
GitHub Enterprise (self-hosted)
When configuring an OIDC identity for GitHub Actions, by default the issuer URL will be set to the well-known issuer for GitHub Cloud: https://token.actions.githubusercontent.com. If you are using GitHub Actions from self-hosted GitHub Enterprise you can configure the Issuer URL by clicking the Edit icon and entering the URL. The URL must be HTTPS.
Using OctopusDeploy/login in GitHub Actions workflows
The OctopusDeploy/login action provides a first-class way to use OIDC with Octopus in GitHub Actions, exchanging the GitHub ID token for an Octopus access token. Other Octopus actions (e.g. OctopusDeploy/create-release-action) within the same workflow job will be pre-configured to use this access token, including any use of the octopus cli in scripts.
See the readme for more information on how to use the action.
If you are using multiple jobs within a workflow that interact with Octopus the login action needs to be added to each job.
Workflow job permissions
To use the OctopusDeploy/login action within a workflow job, a specific permission id-token: write needs to be granted to the job in order to obtain the ID token from GitHub, for example:
jobs:
  octopus:
    permissions:
      # Add any additional permissions your job requires here
      id-token: write # This is required to obtain the ID token from GitHub Actions
      contents: read # For example: this is required to check out code, remove if not needed
    steps: ...
When permissions are specified on a workflow job, any built-in permissions for the job are reset. This means that some existing steps in your workflow may now require setting explicit permissions in order to work correctly.
For example to checkout source code using the actions/checkout action you will need to add contents: read to the permissions.
For more information see Assigning permissions to jobs.
Converting existing Octopus GitHub Actions workflows to use OIDC
To convert existing Octopus GitHub Actions that are using API keys to instead use OIDC:
- Create an OIDC identity on a service account for the GitHub Action as outlined above.
- Copy the
OctopusDeploy/loginsnippet that is generated for the service account and add it to the workflow job. - Add
id-token: writepermissions to the workflow job as outlined above. - Remove any existing usage of
serverandapi_keyfrom other Octopus actions.
Example
The following is an example of a simple GitHub Actions workflow using API keys.
name: Create a release in Octopus
on:
  push:
    branches:
      - main

jobs:
  create_release:
    runs-on: ubuntu-latest
    name: Create a release in Octopus
    steps:
      - name: Create Octopus release
        uses: OctopusDeploy/create-release-action@v3
        with:
          server: https://my.octopus.app
          space: Default
          project: MyOctopusProject
          api_key: ${{ secrets.OCTOPUS_API_KEY }}
After conversion to use OIDC the workflow looks like:
name: Create a release in Octopus
on:
  push:
    branches:
      - main

jobs:
  create_release:
    runs-on: ubuntu-latest
    name: Create a release in Octopus
    permissions:
      # Add any additional permissions your job requires here
      id-token: write # This is required to obtain the ID token from GitHub Actions
      contents: read # For example: this is required to check out code, remove if not needed
    steps:
      - name: Log into Octopus
        uses: OctopusDeploy/login@v1
        with:
          server: https://my.octopus.app
          service_account_id: 5be4ac10-2679-4041-a8b0-7b05b445e19e

      - name: Create Octopus release
        uses: OctopusDeploy/create-release-action@v3
        with:
          space: Default
          project: MyOctopusProject
API keys
It is recommended to use OIDC over API keys due to the benefits it provides, however the OctopusDeploy/login action also supports using an API key, for scenarios where using OIDC is not available. When using an API key the remainder of the workflow job will be configured to use the Server URL and API key automatically via environment variables, eliminating the need to supply these to any other Octopus actions or to the octopus cli.
See the readme for more information.
Older Versions
- Support for wildcards when matching a subject was added in Octopus 2024.1.
Help us continuously improve
Please let us know if you have any feedback about this page.
Page updated on Monday, September 16, 2024