Control Center is where you manage your Octopus subscriptions and their associated user access.
There are two types of Octopus subscriptions:
- Cloud instances: Deployments-as-a-service
- Server licenses: Octopus on your infrastructure
Billing
Upgrade a trial to a paid subscription
Cloud instance:
- Navigate to your Cloud instance in Control Center.
- Click Upgrade Plan.
- Choose your plan and complete the purchase through our checkout.
Server license:
- Navigate to your Server License in Control Center.
- Click Upgrade Plan.
- Choose your plan and complete the purchase through our checkout.
Pay an invoice
We will send you a unique payment link to pay your invoice through Zuora’s secure payment page.
Please be cautious of phishing attempts. You can verify the payment page’s authenticity by checking it displays the correct invoice number.
Update billing information
Please contact sales to update your billing information.
View orders
- Navigate to your subscription in Control Center.
- Click Billing in the left sidebar.
- Click Contact Sales.
- Complete the form and we’ll get back to you with the order details.
Change your plan
To modify your plan:
- Navigate to your subscription in Control Center.
- Click Billing in the left sidebar.
- Click Get in Touch under the change plan section.
- A contact sales dialog will appear for you to request changes to your plan.
Cancel your plan
To cancel your plan:
- Navigate to your subscription in Control Center.
- Click Billing in the left sidebar.
- Click Get in Touch under the change plan section.
- A contact sales dialog will appear for you to cancel your plan.
Configuration
Change outage window (Cloud only)
To keep Octopus Cloud running smoothly, we use outage windows to perform updates. To minimize disruptions to your deployments, please pick a two-hour maintenance window outside of your regular business hours.
- Navigate to your subscription in Control Center.
- Click Configuration in the left sidebar.
- Click Change Window.
- Specify the start and end times.
- Click Submit.
Change instance URL (Cloud only)
- Navigate to your subscription in Control Center.
- Click Configuration in the left sidebar.
- Click Change URL.
- Specify the new URL.
- Click Submit.
Manage user access
Access levels in Control Center
There are two access levels in Control Center:
- Subscription Group access: manage a subscription group and access all current and future subscriptions in the group.
- Direct Subscription access: access a specific subscription.
Subscription Group access
Invite a user to Subscription Group access
Invite a user to manage a subscription group and access all current and future subscriptions in the group.
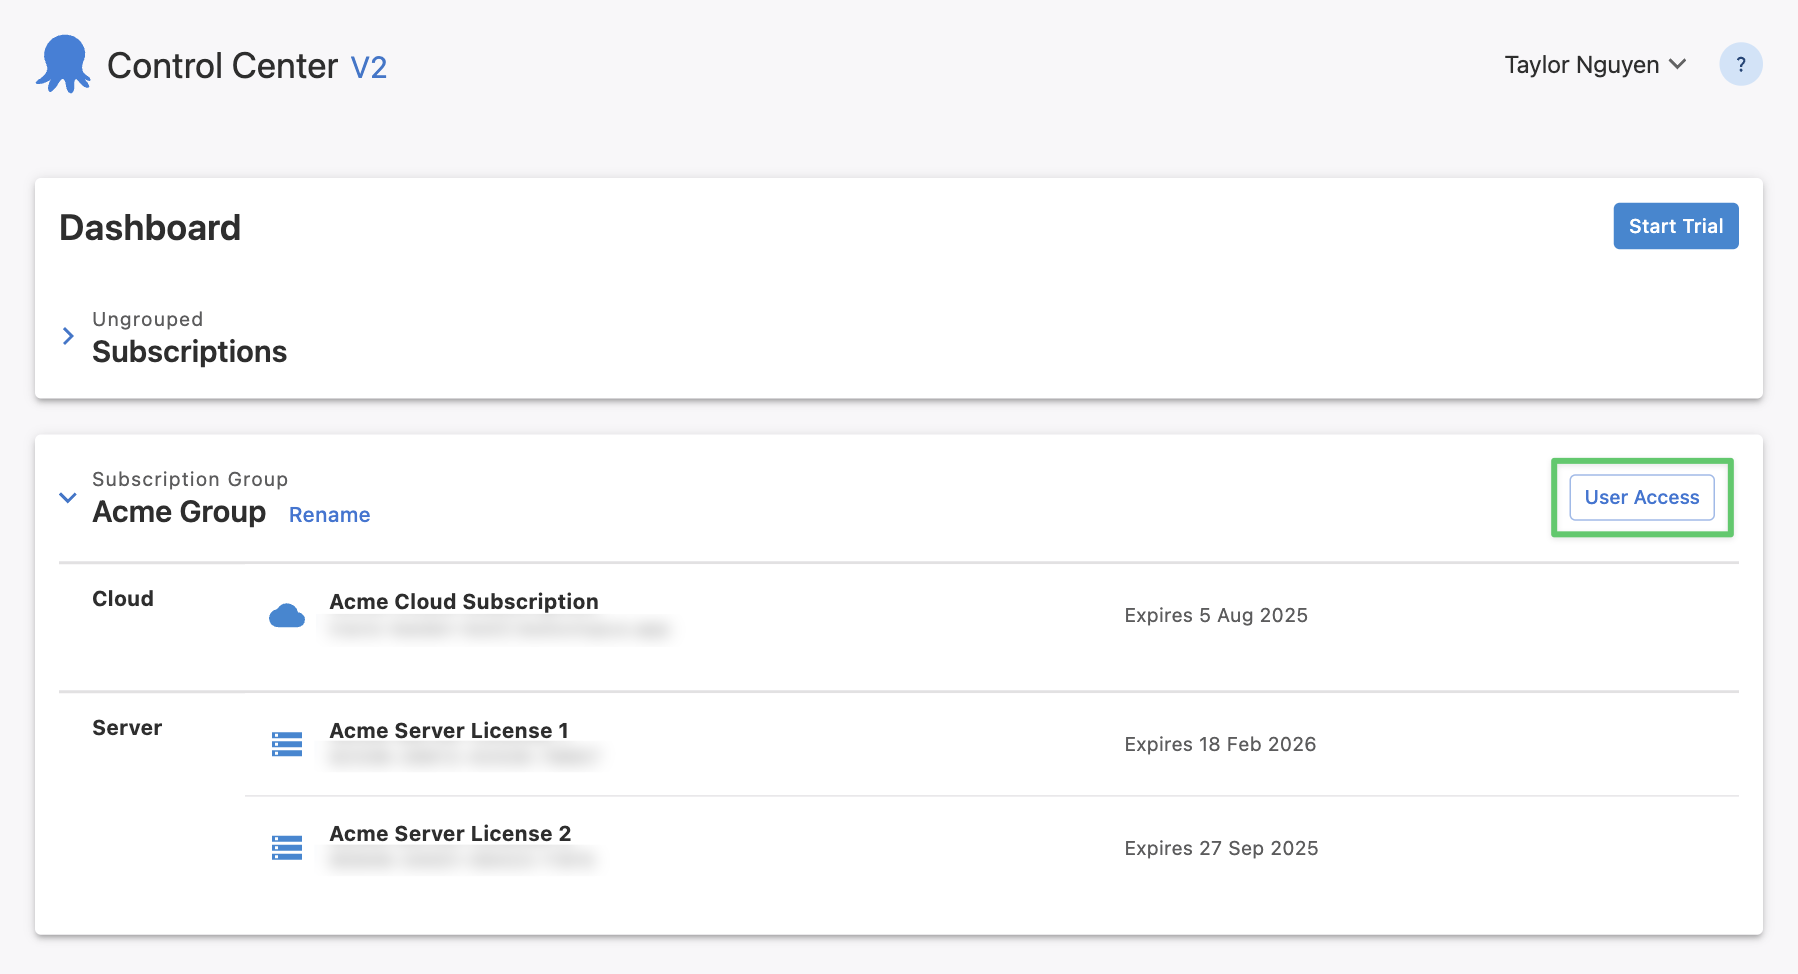
- In the Control Center dashboard, locate your subscription group.
- Click User Access.
- Click Invite User.
- Enter the user’s details.
- Select which role to give the user (see role permissions below).
- Click Invite.
Email invitation
The invited user will receive an email invitation.
If they already have an Octopus ID (Octopus Deploy account), they just need to click Accept invite to gain access to the subscription group and then click Sign in to view it.
Otherwise, they will first need to Register a new account using the email address the invitation was sent to.
Role permissions for Subscription Group access
Group-level
| — | Administrator | Technical Manager | Billing Manager |
|---|---|---|---|
| Control Center (billing.octopus.com) | Rename/Delete Group Manage User Access | Rename/Delete Group Manage User Access | - |
Subscription-level
Cloud
| — | Administrator | Technical Manager | Billing Manager |
|---|---|---|---|
| Control Center (billing.octopus.com) | View Overview Manage Billing Manage Configuration Manage User Access | View Overview Manage Configuration Manage User Access | View Overview Manage Billing |
| Octopus Instance (example.octopus.com) | “Octopus Managers” team | ”Space Managers” team | - |
Octopus uses teams and user roles to manage permissions. The “Octopus Managers” and “Space Managers” teams provide different levels of access in your instance. Learn about best practices for users, roles, and teams.
Server
| — | Administrator | Technical Manager | Billing Manager |
|---|---|---|---|
| Control Center (billing.octopus.com) | View License Key Manage Billing Manage User Access | View License Key Manage User Access | View License Key Manage Billing |
Direct Subscription access
Invite a user to Direct Subscription access
Invite a user to access a specific subscription.
Cloud
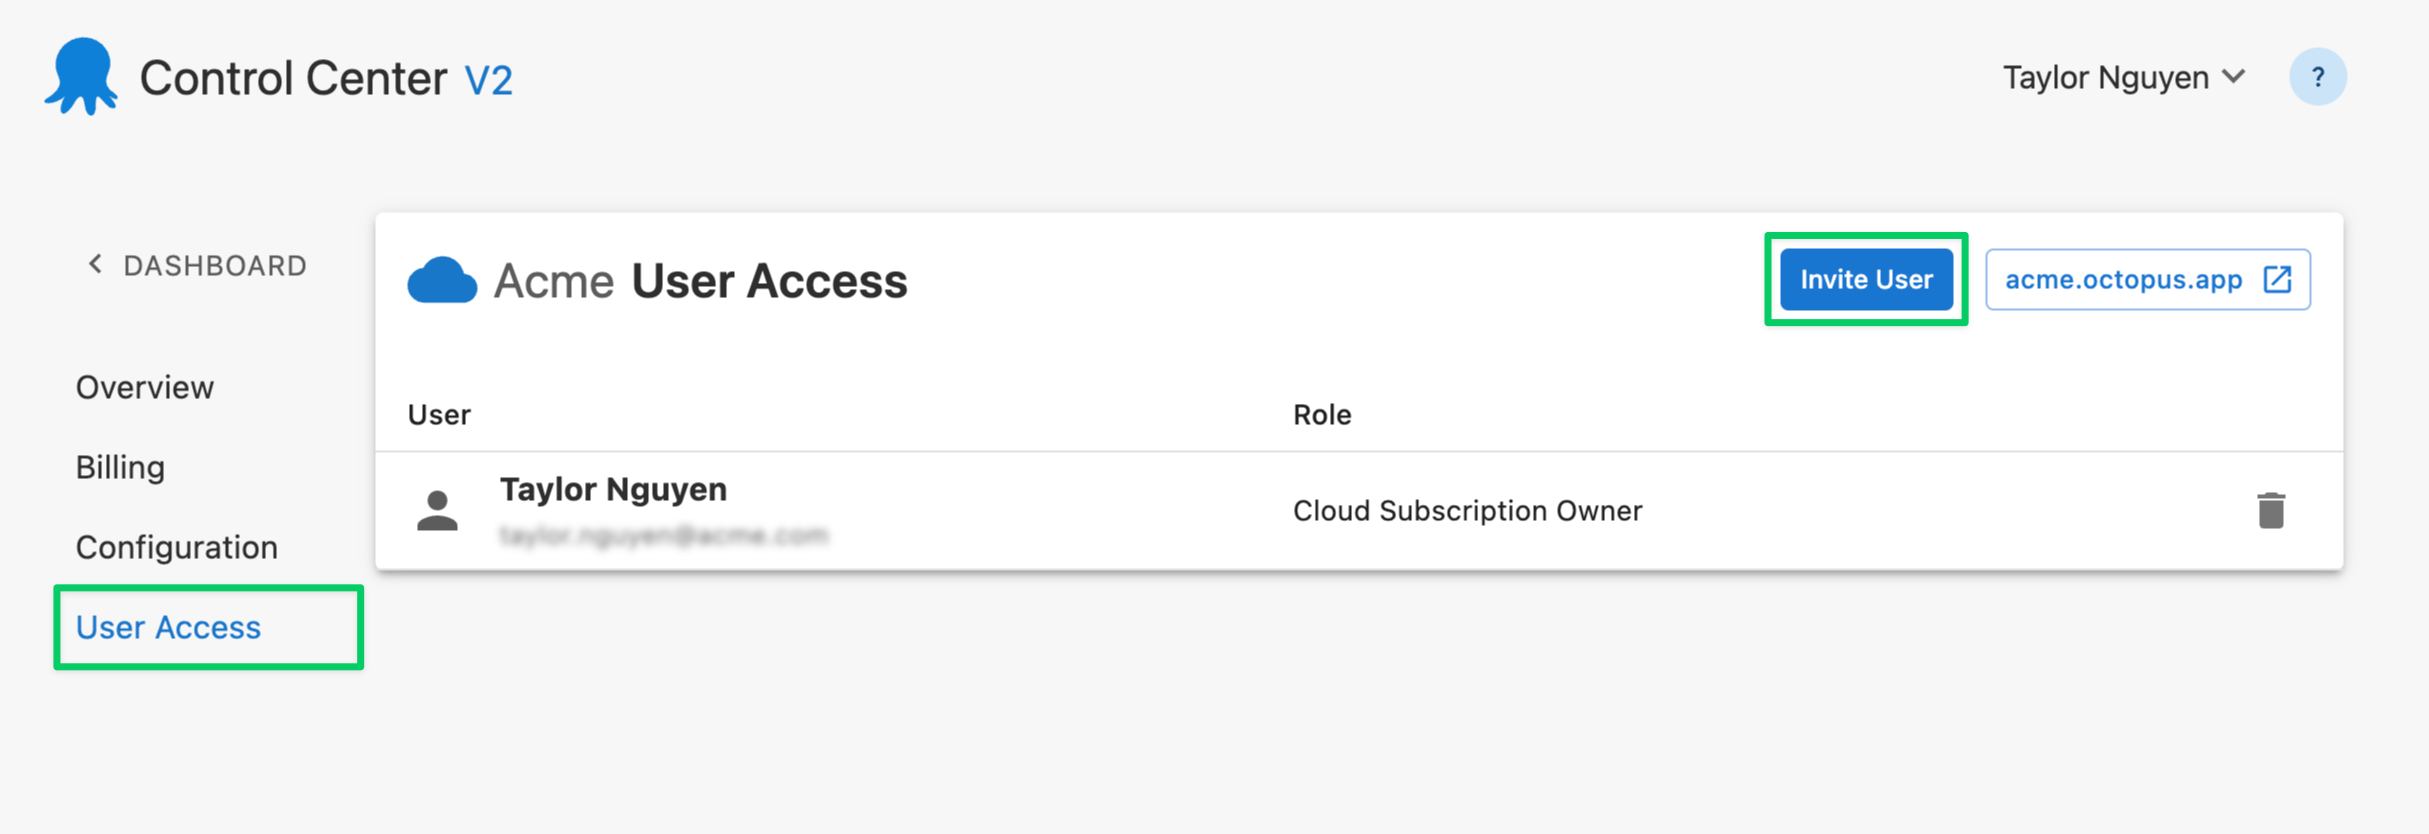
- Navigate to your Cloud instance in Control Center.
- Click User Access in the left sidebar.
- Click Invite User.
- Enter the user’s details.
- Select which role to give the user (see role permissions below).
- Click Invite.
Server
- Navigate to your Server license in Control Center.
- Click Admin Access in the left sidebar.
- Click Invite Admin.
- Enter the user’s details.
- Select which role to give the user (see role permissions below).
- Click Invite.
Email invitation
The invited user will receive an email invitation.
If they already have an Octopus ID (Octopus Deploy account), they just need to click Accept invite in the email to gain access to the subscription and then click Sign in to view the Octopus instance.
Otherwise, they will first need to Register a new account using the email address the invitation was sent to.
Cloud instances note: Invited users are only added to an Octopus Cloud instance after their first sign-in. To manage a newly invited user’s permissions, you will need to ask them to sign in to your Octopus Cloud instance first.
Role permissions for Direct access
Cloud
| — | Cloud Subscription Owner | Cloud Subscription User (Contributor) | Cloud Subscription User (Base) |
|---|---|---|---|
| Control Center (billing.octopus.com) | View Overview Manage Billing Manage Configuration Manage User Access | View Overview | View Overview |
| Octopus Instance (example.octopus.com) | “Octopus Managers” team By default, the user has full permissions across all spaces. | ”Space Managers” team By default, the user has full permissions in the “Default” space only. If you delete the “Default” space, the user will be added to the “Everyone” team. | ”Everyone” team By default, the user can sign in but can’t view or do anything. |
Octopus uses teams and user roles to manage permissions. The “Octopus Managers”, “Space Managers”, and “Everyone” teams provide different levels of access in your instance. Learn about best practices for users, roles, and teams.
Server
| — | Server License Owner | Server License Viewer |
|---|---|---|
| Control Center (billing.octopus.com) | View License Key Manage Billing Manage User Access | View License Key |
Change a user’s role
To change a user’s role, you must remove that user’s access and then re-invite them to the role you want them to have.
Delete a user
Deleting Subscription Group access users:
- Navigate to the dashboard and locate your subscription group.
- Click User Access.
- Locate the user in the table and click the trash icon.
- Click Delete in the confirmation dialog.
Deleting Direct access users:
- Navigate to your subscription.
- Click User Access in the left sidebar.
- Locate the user in the table and click the trash icon.
- Click Delete in the confirmation dialog.
Help and support
The question mark icon in the top right of the Control Center provides a menu of helpful links to the docs, to contact support, and to upload support files.
FAQ
Locating subscriptions
Most subscriptions (Cloud instances and Server licenses) are accessible from the dashboard of Control Center. Some legacy subscriptions are only accessible from the legacy Control Center V1.
If you need help please contact our support team.
What is Control Center V1?
Control Center V1 is our legacy system where legacy subscriptions are managed. You should only access Control Center V1 if you need to manage a legacy subscription.
Help us continuously improve
Please let us know if you have any feedback about this page.
Page updated on Friday, June 13, 2025