Octopus Deploy includes first class support for Windows Service deployments. Octopus can install, reconfigure, and start Windows Services during deployment, usually without requiring any custom scripts.
When deploying, sc.exe is used to create a Windows Service using the configured settings. If the service already exists, it will be stopped, re-configured, and re-started.
To deploy a Windows Service, add a Deploy a Windows Service step. For information about adding a step to the deployment process, see the add step section.
Configuring the step
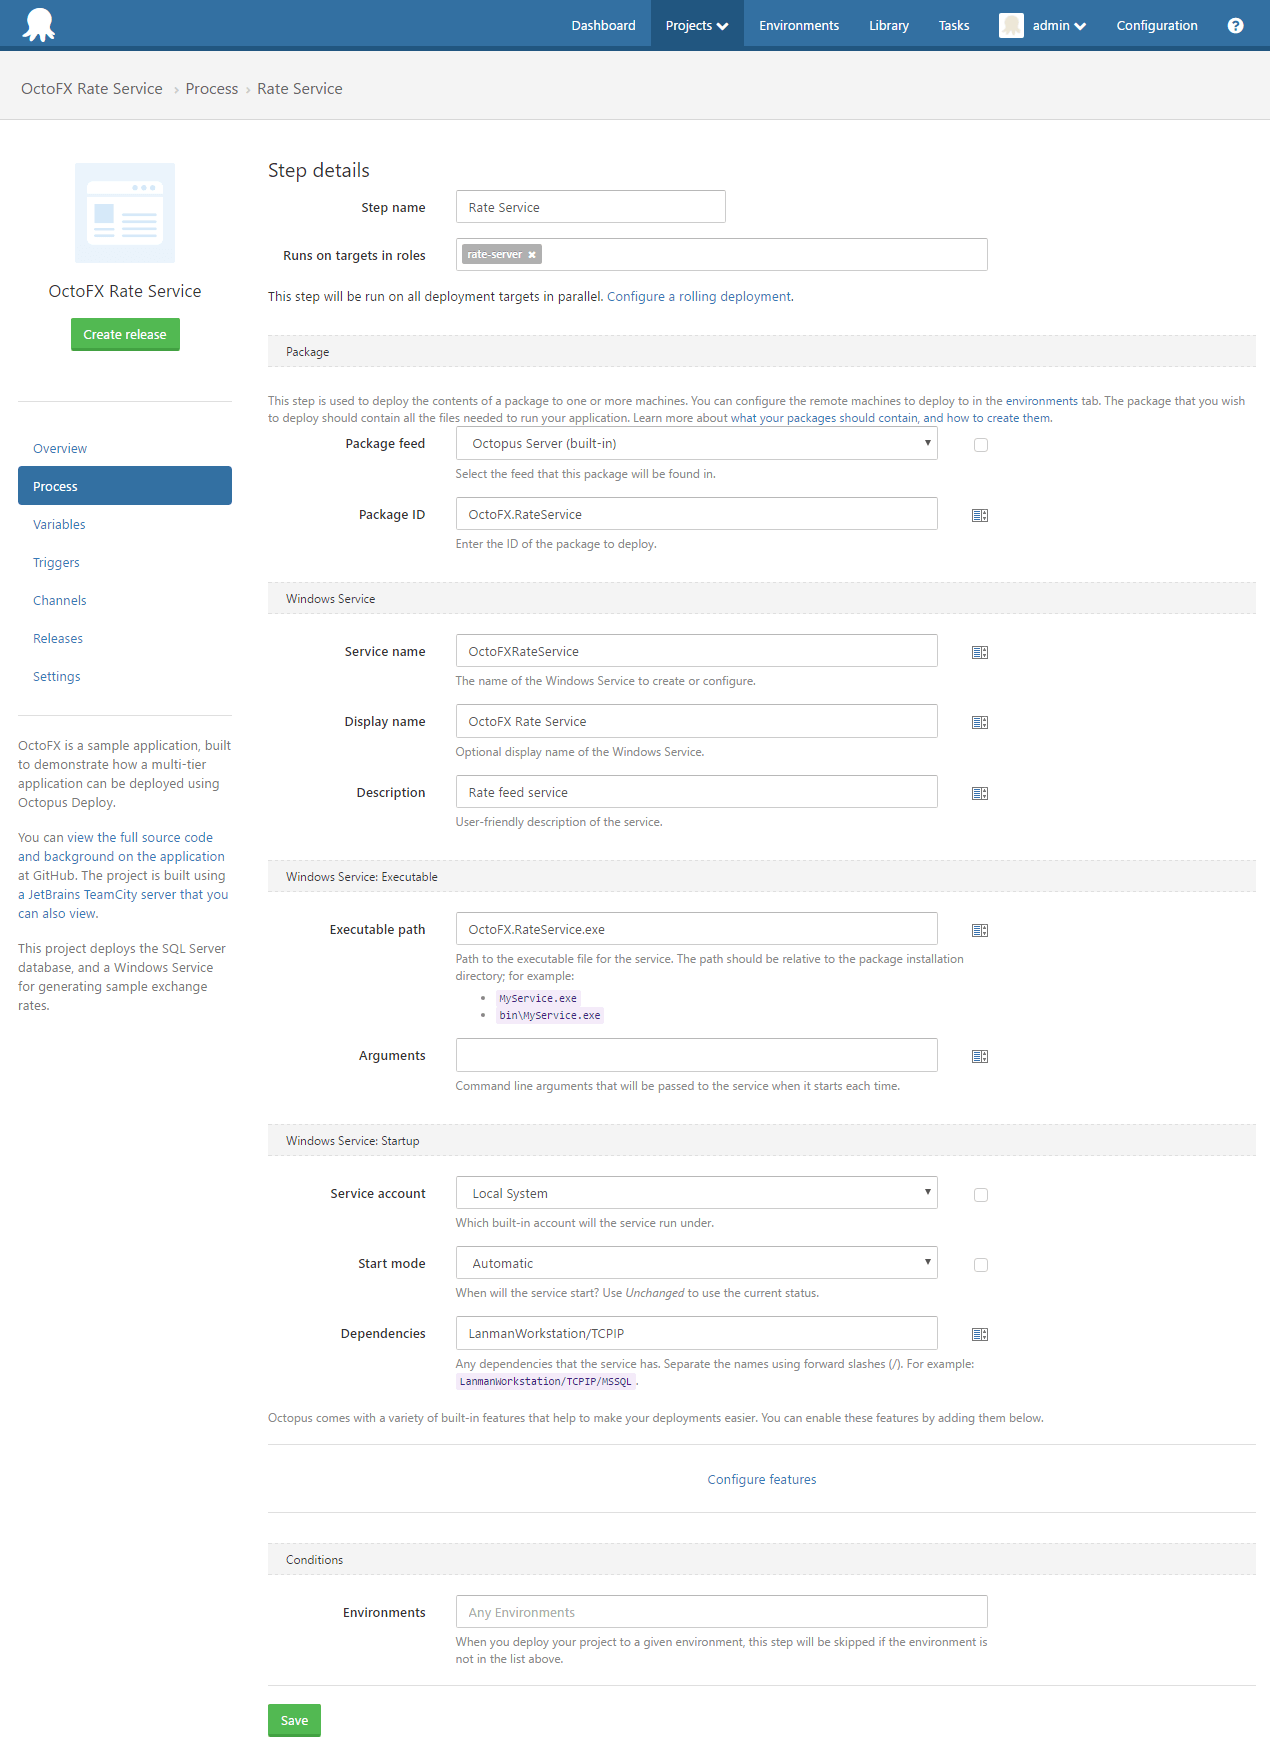
Step 1: Select a package
Use the Package Feed and Package ID fields to select the package containing the executable (.exe) to be installed as a Windows Service.
Step 2: Configure Windows Service options
| Field | Meaning |
|---|---|
| Service Name | The name of the Windows Service to create, or re-configure if it already exists. |
| Display Name | Optional display name of the service. If empty, the Service Name will be used instead. |
| Description | A short description of service that will appear in the services control manager. |
| Executable path | The relative path to the executable in the package that the Windows Service will point to. Examples: MyService.exe, bin\MyService.exe, foo\bin\MyService.exe, C:\Windows\myservice.exe |
| Arguments | Arguments that will always be passed to the service when it starts |
| Service account | The account that the Windows Service should run under. Options are: Local System, Network Service, Local Service, Custom user (you can specify the username and password). See below for Security Considerations and Using Managed Service Accounts (MSA) |
| Start mode | When will the service start: Automatic, Automatic (delayed), Manual, Disabled, Unchanged |
| State | The state of the service after the deployment has completed |
| Dependencies | Any dependencies that the service has. Separate the names using forward slashes (/). For example: LanmanWorkstation/TCPIP |
How does Octopus actually deploy my Windows Service?
Out of the box, Octopus will do the right thing to deploy your Windows Service, and the conventions we have chosen will eliminate a lot of problems with file locks, and leaving stale files behind. By default, Octopus will follow the conventions described in Deploying packages and apply the different features you select in the order described in Package deployment feature ordering.
Avoid using the Custom Installation Directory feature unless you are absolutely required to put your packaged files into a specific physical location on disk.
As an approximation including the Windows Service manager integration:
- Acquire the package as optimally as possible (local package cache and delta compression).
- Stop your Windows Service if it is already running. Ensure that the user account running the Octopus Tentacle has the appropriate permissions to start\stop the Windows Service or this step may fail.
- Create a new folder for the deployment (which avoids many common problems like file locks, and leaving stale files behind).
- Example:
C:\Octopus\Applications\[Tenant name]\[Environment name]\[Package name]\[Package version]\whereC:\Octopus\Applicationsis the Tentacle application directory you configured when installing Tentacle). - Extract the package into the newly created folder.
- Execute each of your custom scripts and the deployment features you’ve configured will be executed to perform the deployment following this order by convention..
- As part of this process Windows Service will be created, or reconfigured if it already exists, including updating the binPath to point to this folder and your executable entry point.
- The service will be started based on the selected
Stateoption using the rules in the table below. - Output variables and deployment artifacts from this step are sent back to the Octopus Server.
You can see exactly how Octopus deploys your Windows Service by looking at the scripts in our open-source Calamari project which actually performs the deployment:
- Octopus.Features.WindowsService_AfterPreDeploy.ps1
- Octopus.Features.WindowsService_BeforePostDeploy.ps1
You can inject your own logic into this process using custom scripts and understanding where your scripts will execute in the context of package deployment feature ordering.
This table shows how the combination of the Start Mode, State and the state of any existing services determines is the service will be started or left stopped after the deployment is completed.
| Start Mode | State | Existing Service Exists | Existing Service State | Resulting State |
|---|---|---|---|---|
| Disabled | n/a | n/a | n/a | Stopped |
| Automatic / Automatic (delayed) | Started | n/a | n/a | Running |
| Manual | Started | n/a | n/a | Running |
| Unchanged | Started | n/a | n/a | Running |
| Automatic / Automatic (delayed) | Stopped | n/a | n/a | Stopped |
| Manual | Stopped | n/a | n/a | Stopped |
| Unchanged | Stopped | n/a | n/a | Stopped |
| Automatic / Automatic (delayed) | Unchanged | Exists | Running | Running |
| Manual | Unchanged | Exists | Running | Running |
| Unchanged | Unchanged | Exists | Running | Running |
| Automatic / Automatic (delayed) | Unchanged | Exists | Stopped | Stopped |
| Manual | Unchanged | Exists | Stopped | Stopped |
| Unchanged | Unchanged | Exists | Stopped | Stopped |
| Automatic / Automatic (delayed) | Unchanged | Does not exist | n/a | Stopped |
| Manual | Unchanged | Does not exist | n/a | Stopped |
| Unchanged | Unchanged | Does not exist | n/a | Stopped |
| Automatic / Automatic (delayed) | Default | n/a | n/a | Running |
| Manual | Default | n/a | n/a | Stopped |
| Unchanged | Default | n/a | n/a | Stopped |
Setting advanced configuration options
Windows Services support some advanced settings not exposed by this feature. You can customize your Windows Service by including a PostDeploy.ps1 custom script.
This example configures the service Failure Action to Restart.
PostDeploy.ps1
$serviceName = $OctopusParameters["Octopus.Action.WindowsService.ServiceName"]
& "sc.exe" failure $serviceName reset= 30 actions= restart/5000
This script will run after the Windows Service has been created (or reconfigured), and then started. If you want to customize the Windows Service before it is started, set the Start Mode to Manual, and then start the Windows Service yourself as part of your custom script.
Using sc.exe This Microsoft TechNet article is a great reference on the sc.exe utility including the failure action above.
Deploying Services built with Topshelf
Topshelf is a library to build and work with Windows Services easily by allowing your code to run (and be debugged) inside a Console Application, but giving you the option to install and run as a Windows Service.
While Topshelf has its own command line options to make Service Registration easy, you can still use SC.EXE. This means that deploying a Topshelf enabled application as a Windows Service is easy using the Octopus service deploy feature. The only caveat is the value you specify in the Service Name parameter must match the Service Name specified in your Topshelf configuration code (in Program.cs) or the service will not start.
Security considerations
You will need to consider carefully which Service Account you choose for your Windows Service. If you decide to use a Custom Account, you will need to make sure the Account is granted the Logon as a Service logon right (SeServiceLogonRight).
When you use the Services snap-in console to configure your Windows Service, the SeServiceLogonRight logon right is automatically assigned to the account. If you use the Sc.exe tool or APIs to configure the account (like Octopus Deploy does on your behalf), the account has to be explicitly granted this right by using tools such as Carbon PowerShell module, the Security Policy snap-in (secpol.msc), Secedit.exe, or NTRights.exe. The built-in Windows Service accounts (Local System, Network Service, Local Service), and members of the Local Administrators group are assigned this right by default.
Carbon PowerShell module
Carbon is a PowerShell module that can be installed via Chocolatey, the PowerShell Gallery, or manually. For the PS gallery in PowerShell 5 or higher, you can run Install-Module Carbon, or to install manually visit their site and clone the repository or download a zip from the Releases page.
Carbon PowerShell script example:
# The Octopus variables below are just examples
# Use your own #{RunAsUser} or similar variable name.

# The SeServiceLogonRight lets accounts run as a service but isn't mutually exclusive
# with the "DenyInteractiveLogon" policy to prevent regular users from abusing it

# Check to see if the given account has the appropriate permission
Test-Privilege -Identity #{ServiceAccountName} -Privilege SeServiceLogonRight
# Returns False if account doesn't have permission

Grant-Privilege -Identity #{ServiceAccountName} -Privilege SeServiceLogonRight
# May not return anything

Test-Privilege -Identity #{ServiceAccountName} -Privilege SeServiceLogonRight
# Returns True once the account has permission

# The SeBatchLogonRight lets accounts trigger scheduled tasks

# Check to see if the given account has the appropriate permission
Test-Privilege -Identity #{ServiceAccountName} -Privilege SeBatchLogonRight
# Returns False

Grant-Privilege -Identity #{BatchAccountName} -Privilege SeBatchLogonRight
# May not return anything

Test-Privilege -Identity #{ServiceAccountName} -Privilege SeBatchLogonRight
# Returns True once the account has permission
Using managed service accounts (MSA)
Managed Service Accounts (MSA) allow you to eliminate those never-expire-service-accounts. An MSA is a special domain account that can be managed by the computer that uses it. That computer will change its password periodically without the need of an administrator.
To configure the Windows Service to use a Managed Service Account:
- Set the Service account to Custom user….
- Enter the domain name and username, making sure to append a $ to the username as shown below.
- Bind the Custom account password to an empty value to ensure no password is set for this account - after all, we want the password managed by the server, not us.
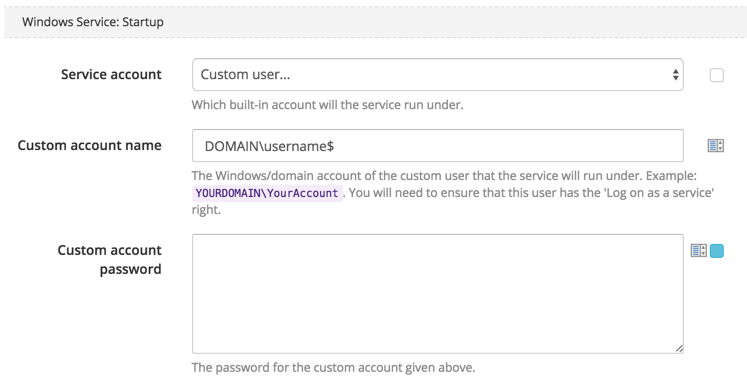
Important information about using Managed Service Accounts There must be a dollar sign ($) at the end of the account name. When you use the Services snap-in console to configure your Windows Service, the SeServiceLogonRight logon right is automatically assigned to the account. If you use the Sc.exe tool or APIs to configure the account (like Octopus Deploy does on your behalf), the account has to be explicitly granted this right by using tools such as the Carbon PowerShell module, the Security Policy snap-in (secpol.msc), Secedit.exe, or NTRights.exe.
Learn about Managed Service Accounts.
Help us continuously improve
Please let us know if you have any feedback about this page.
Page updated on Sunday, January 1, 2023