You can use Active Directory Federation Services (AD FS) to authenticate when logging in to Octopus Server. To use AD FS authentication with Octopus, you will need to do the following:
- Configure AD FS to trust your Octopus Deploy instance by setting it up as a client application in your AD FS configuration tool.
- Optionally, configure the claims that will be sent back from AD FS to Octopus Deploy (for creating or locating the Octopus user).
- Configure your Octopus Deploy instance to trust and use AD FS as an Identity Provider.
Configure AD FS
You need to configure AD FS to trust your instance of Octopus Deploy by configuring a client application in the AD FS configuration tool.
This guide assumes that you have Active Directory Federation Services installed and running on a server that you have administrative access to.
For more information, see the Microsoft documentation on AD FS.
Registering a new client application
-
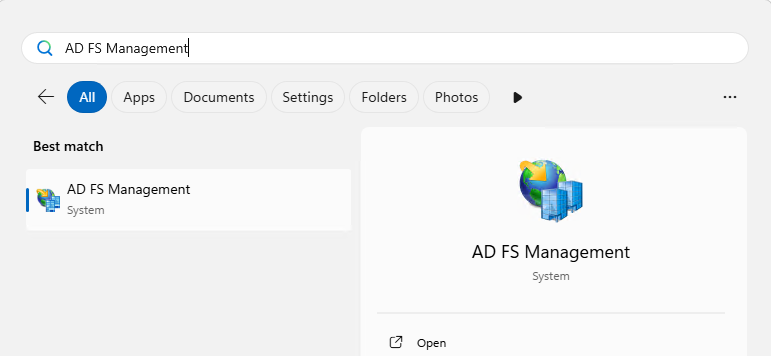
Log in to your AD FS server. Open the Start menu and search for “AD FS Management”.
-
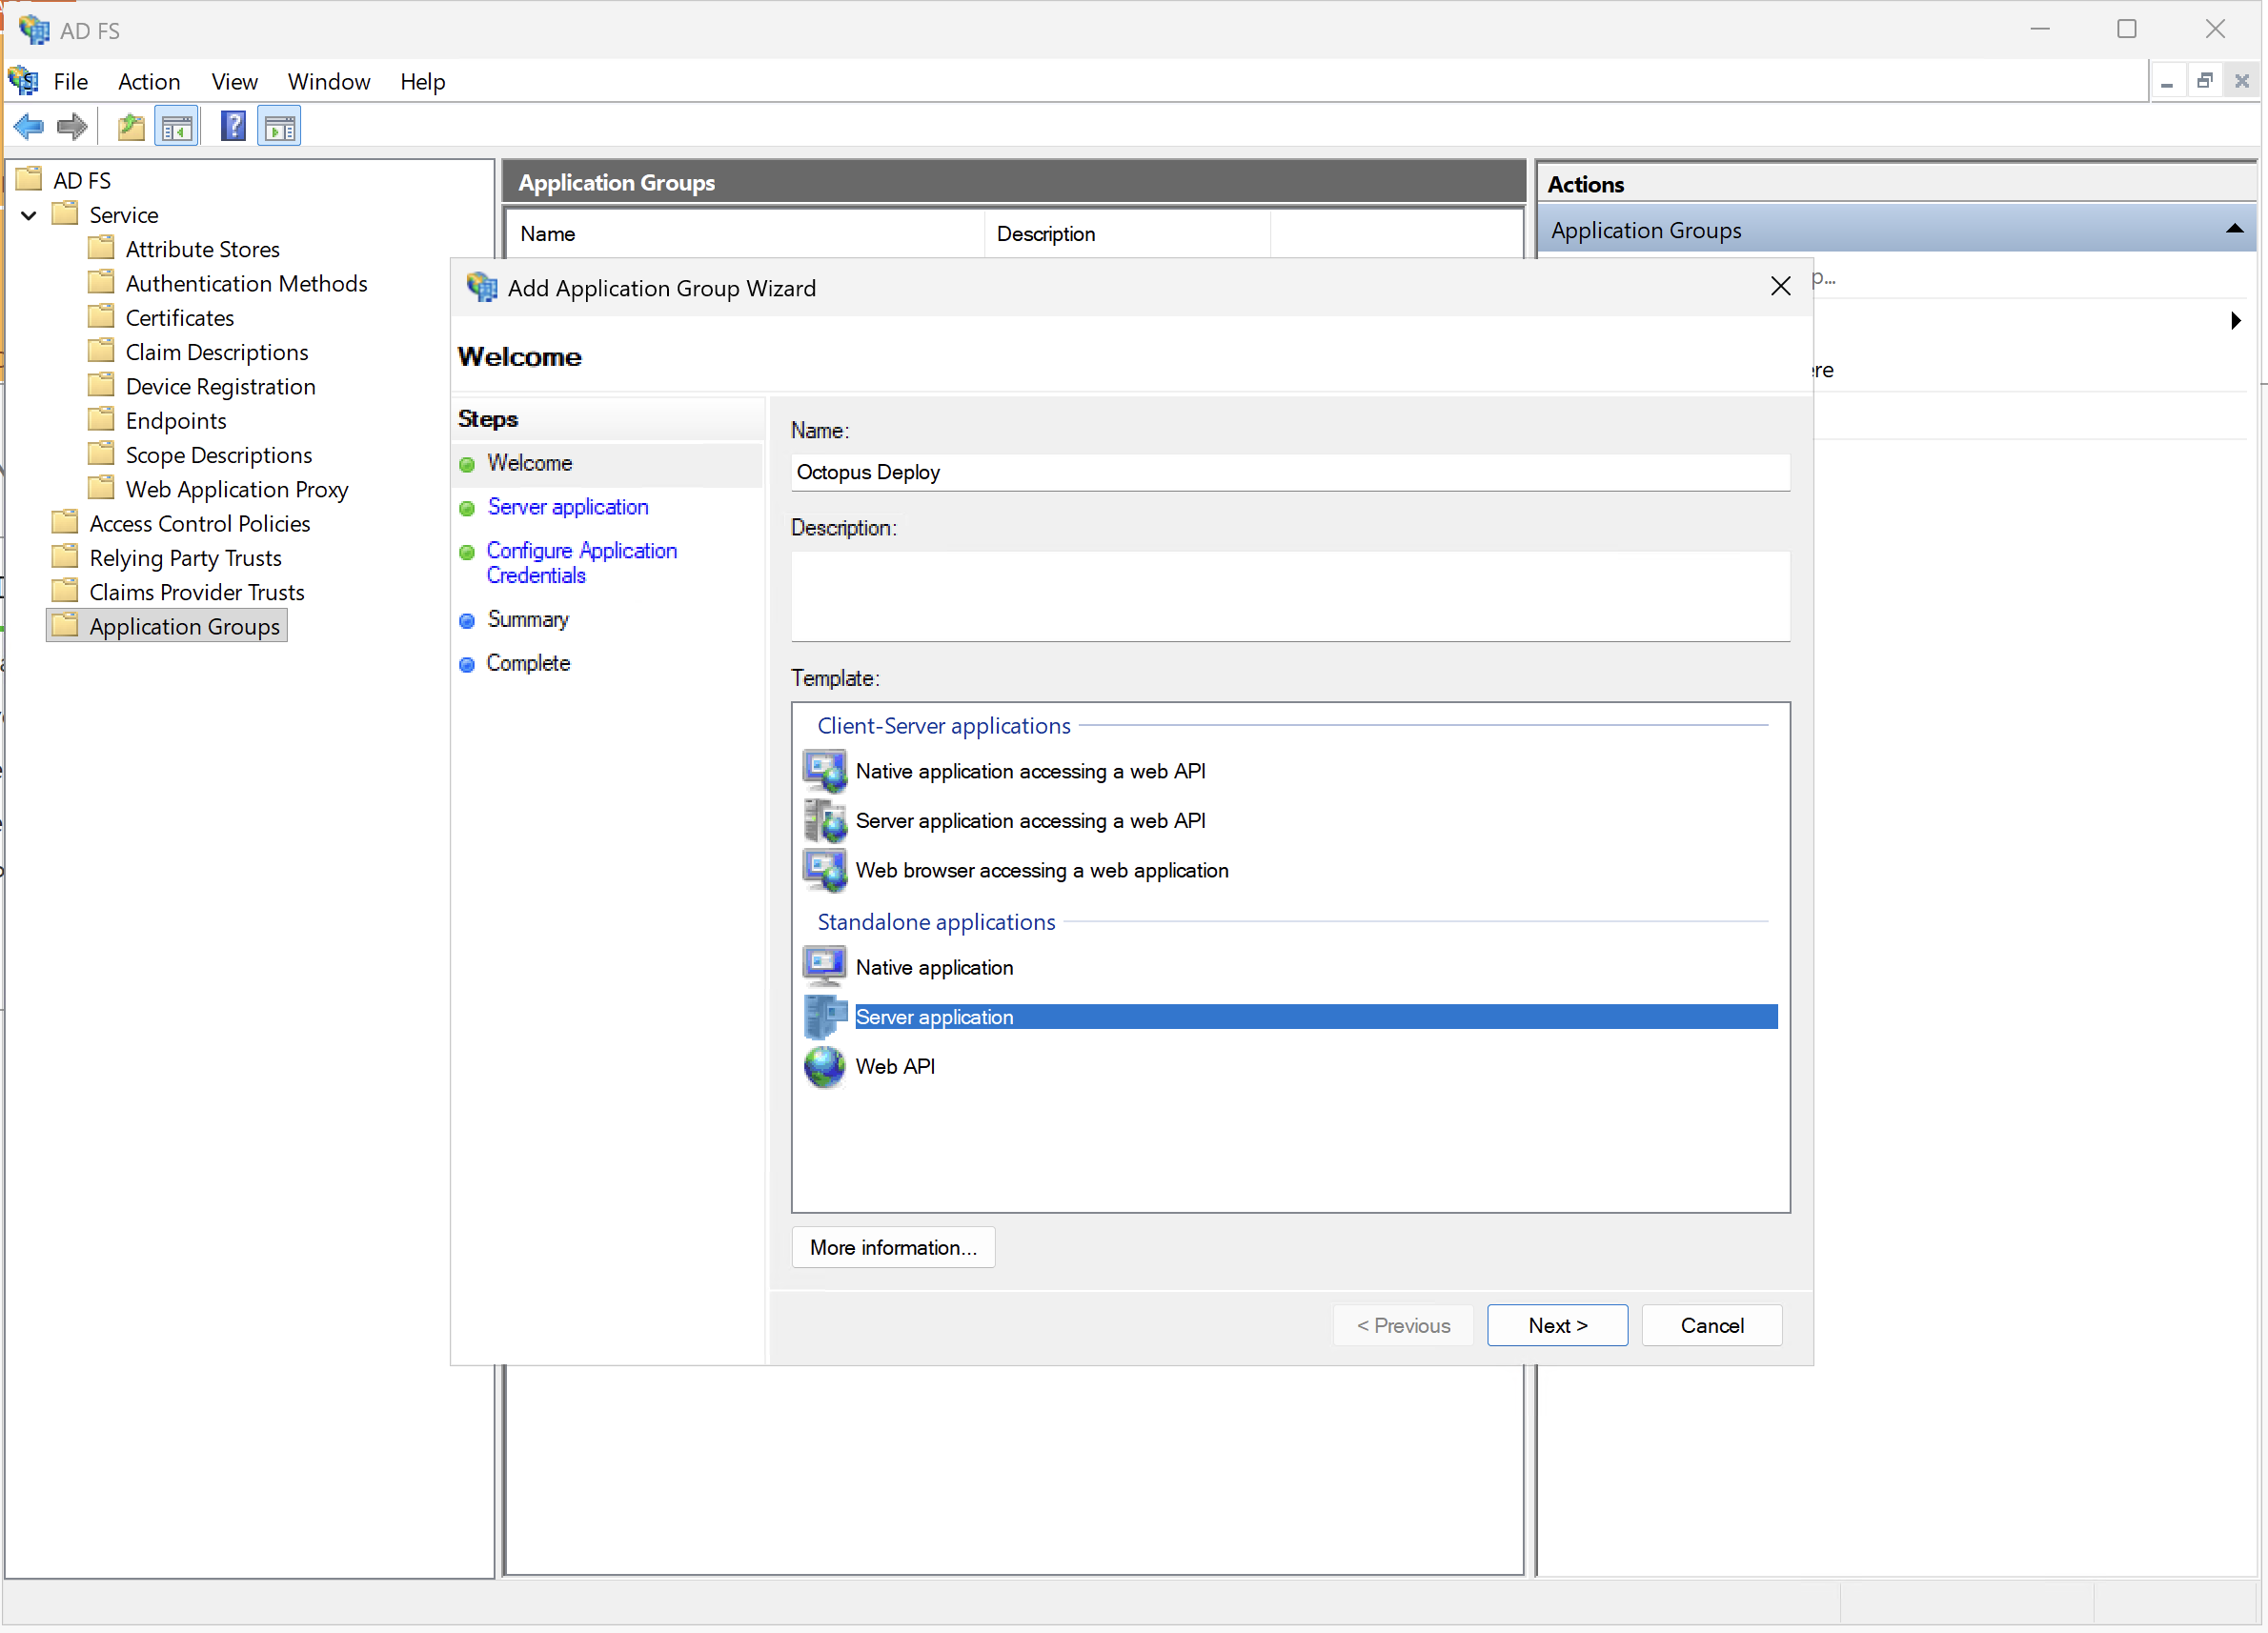
Expand “AD FS”, select “Application Groups”, and choose “Add Application Group”. Choose “Server application” and give the group a useful name (e.g., “Octopus Deploy”).
-
Click “Next”. This page configures the first application in the group. Please make a note of the Client ID; you will need it later. Give the application a useful name and description, then add
https://your-octopus-url/api/users/authenticatedToken/GenericOidcas a Redirect URI.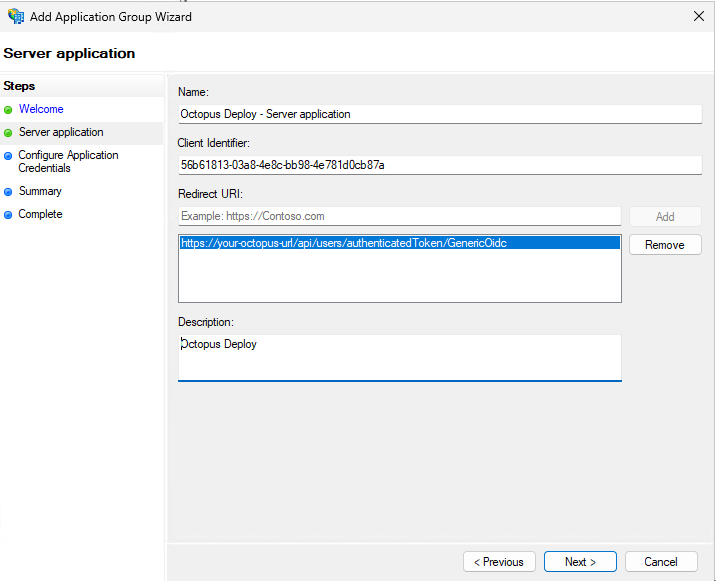
-
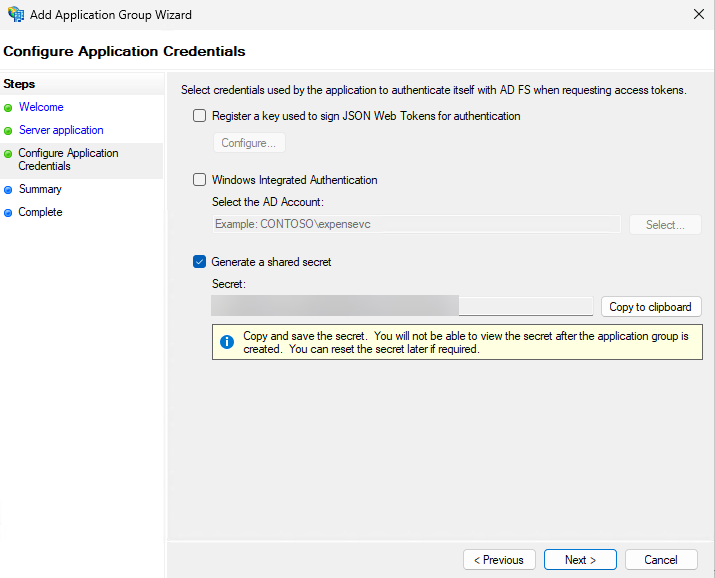
Click “Next”. This page specifies the credentials that Octopus Deploy will use to authenticate with AD FS. Select “Generate a shared secret”. Securely retain this Client Secret; you will need it later.
-
Click “Next”, confirm the information is correct, and click “Next” one last time. You should see a message indicating that the Application Group has been successfully created.
Configuring claims
By default, AD FS returns only the userinfo profile unless the resource indicator is provided in the authorization request. The ID token will contain limited information about the user, such as their email address, their DOMAIN\username, their SID, and a unique identifier.
If you require more, you will need to customize the claims in the ID token by:
- Creating a “Relying Party Trust” with a “Claims Issuance Policy”
- Authorizing the client application that represents Octopus Deploy for the relying party trust, and
- Specifying the identifier of the relying party trust as the Resource in the OpenID Connect configuration in Octopus Deploy
Creating a Relying Party Trust
Microsoft defines “Relying Party Trust” here.
-
In “AD FS Management”, expand “AD FS”, select “Relying Party Trusts”, right-click, and select “Add Relying Party Trust”.
-
Choose “Claims aware” and click “Start”.
-
Choose “Enter data about the relying party manually” and click “Next”.
-
Specify a display name and click “Next”.
-
Click “Next” to skip providing a token encryption certificate.
-
Click “Next” to skip providing optional protocol URLs.
-
Enter
https://your-octopus-urlas the “Relying party trust identifier”. This must be an absolute URL, and should resolve to your Octopus Deploy instance. Click “Next”. -
Select a suitable access control policy for the users in Active Directory that will be allowed to sign in to Octopus Deploy, and click “Next”
-
Review the settings you have selected and click “Next” if they are correct.
The relying party trust is now created. To customize the claims that will be sent to Octopus Deploy, you can leave “Configure claims issuance policy for this application” checked when you press close.
Creating a Claims Issuance Policy
This example will show how to include the user’s full name in the name claim so that Octopus Deploy can set it as the user’s display name.
If you need to send other claims to Octopus Deploy, refer to the AD FS documentation on configuring claims.
-
In “AD FS Management”, expand “AD FS”, and select “Relying Party Trusts”. Right-click on the appropriate relying party trust and select “Edit Claim Issuance Policy”.
-
Click “Add Rule…”
-
Choose “Send Claims Using a Custom Rule” and click “Next”
-
Name the rule “Send user display name” and paste the following text into the “Custom rule” box:
c:[Type == "http://schemas.microsoft.com/ws/2008/06/identity/claims/windowsaccountname", Issuer == "AD AUTHORITY"]
 => issue(store = "Active Directory", types = ("name"), query = ";displayName;{0}", param = c.Value);
The above text is AD FS claim rule language.
-
Click “Finish”
Authorizing the client application for the relying party trust
For Octopus Deploy to specify the resource indicator of the relying party trust and receive the customized claims, the client application representing Octopus Deploy needs to be permitted to use the relying party trust with the scope allatclaims.
On the AD FS server, run the following PowerShell command:
Grant-AdfsApplicationPermission -ClientRoleIdentifier ClientId -ServerRoleIdentifier "https://your-octopus-url" -ScopeNames @("openid", "profile", "email", "allatclaims")ServerRoleIdentifieris the “Relying party trust identifier”, and will be used for the Resource in the Octopus Deploy configuration.ClientRoleIdentifieris the Client ID of the client application.
You can double-check that it was applied correctly by running:
Get-AdfsApplicationPermission -ServerRoleIdentifier "https://your-octopus-url"Configure Octopus Server
- Navigate to Configuration ➜ Settings ➜ OpenID Connect and populate the following fields:
-
Enabled should be set to
Yes. -
Role Claim Type is optional. If you have configured a claims issuance policy that returns group information, set this to be the name of the claim containing the group information.
-
Username Claim Type is optional. If you leave it unset, the
subclaim will be used for the username, which is a unique identifier of the user. Some other options:- To use the user’s email, set
http://schemas.xmlsoap.org/ws/2005/05/identity/claims/upn - To use the user’s
DOMAIN\username, sethttp://schemas.xmlsoap.org/ws/2005/05/identity/claims/name - To use the user’s SID, set
sid
- To use the user’s email, set
-
Resource should be
https://your-octopus-url. This is the relying party trust identifier that you assigned to the relying party trust. -
Scopes should be left as the default of
openid profile email. -
Display Name can be used to customize the appearance of the button on the Octopus Deploy login screen. Use a name that your users will recognize for this identity provider.
-
Issuer should be a URL like
https://adfs.your-domain.com/adfs -
Client ID and Client Secret should be the values you noted when creating the client application. Client Secret can’t be retrieved from AD FS - if you lose it, you will need to assign a new one.
Note that the value of Client Secret cannot be retrieved once set - it can only be changed or deleted.
-
Allow Auto User Creation determines if Octopus Deploy should automatically create user accounts, or only allow authentication for users that already exist in Octopus Deploy.
-
- Click Save to apply the changes.
- If you sign out of Octopus Deploy, you should now see a new button on the login screen to authenticate with the OIDC provider.
Getting permissions
If you are installing a clean instance of Octopus Deploy you will need to seed it with at least one admin user. This user will have access to create and configure other users as required. To add a user, execute the following command
Octopus.Server.exe admin --username USERNAME --email EMAILThe most important part of this command is the email, as usernames are not necessarily included in the claims from the external providers. When the user logs in the matching logic must be able to align their user record based on the email from the external provider or they will not be granted permissions.
Troubleshooting
If you are having difficulty configuring Octopus to authenticate with AD FS, check your server logs for warnings.
Triple-check your configuration
Unfortunately, the security-related configuration is sensitive to everything. Make sure:
- You don’t have any typos or copy-paste errors.
- Remember, things are case-sensitive.
- Remember to remove or add slash characters.
Check the OpenID Connect metadata is working
You can see the OpenID Connect metadata by going to the Issuer address in your browser and adding /.well-known/openid-configuration to the end. This would be something like https://adfs.your-domain.com/adfs/.well-known/openid-configuration.
Contact Octopus Support
If you aren’t able to resolve the authentication problems yourself using these troubleshooting tips, please reach out to our support team with:
- The contents of your OpenID Connect Metadata or the link to download it (see above).
- A copy of the decoded payload for some security tokens (see above) may work as expected, and others will not.
- A screenshot of the Octopus User Accounts, including their username, email address, and name.
Help us continuously improve
Please let us know if you have any feedback about this page.
Page updated on Wednesday, December 10, 2025