To deploy infrastructure to AWS, you can define an AWS account in Octopus.
Octopus manages the AWS credentials used by the AWS steps.
The AWS account is either a pair of access and secret keys, or the credentials are retrieved from the IAM role assigned to the instance that is executing the deployment.
Create an AWS account
AWS steps can use an Octopus managed AWS account for authentication. There a two different account types you can choose from, Access Keys or OpenID Connect.
Access Key account
See the AWS documentation for instructions to create the access and secret keys.
- Navigate to Deploy ➜ Manage ➜ Accounts, click the ADD ACCOUNT and select AWS Account.
- Add a memorable name for the account.
- Provide a description for the account.
- Enter the Access Key and the secret Key.
- Click the SAVE AND TEST to save the account and verify the credentials are valid.
OpenID Connect
Support for OpenID Connect authentication to AWS requires Octopus Server version 2024.1
To use OpenID Connect authentication you have to follow the required minimum configuration.
See the AWS documentation for instructions to configure an OpenID Connect identity provider.
If using the AWS CLI or API to configure the identity provider.
See the AWS Documentation for instructions on how to obtain the thumbprint of your Octopus Server.
When setting up the identity provider you need to use the host domain name of your server as the Audience value, as configured under Configuration->Nodes->Server Uri.
Configuring AWS OIDC Account
-
Navigate to Deploy ➜ Manage ➜ Accounts, click the ADD ACCOUNT and select AWS Account.
-
Add a memorable name for the account.
-
Provide a description for the account.
-
Set the Role ARN to the ARN from the identity provider associated role. Note that this is different to the ARN of your Identity Provider.
-
Set the Session Duration to the Maximum session duration from the role, in seconds.
-
Click SAVE to save the account.
-
Before you can test the account you need to add a condition to the identity provider in AWS under IAM ➜ Roles ➜ {Your AWS Role} ➜ Trust Relationship :
{ "Version": "2012-10-17", "Statement": [ { "Effect": "Allow", "Principal": { "Federated": "arn:aws:iam::{aws-account}:oidc-provider/{your-identity-provider}" }, "Action": "sts:AssumeRoleWithWebIdentity", "Condition": { "StringEquals": { "example.octopus.app:sub": "space:[space-slug]:account:[slug-of-account-created-above]", "example.octopus.app:aud": "example.octopus.app" } } } ] } -
Go back to the AWS account in Octopus and click SAVE AND TEST to verify the credentials are valid.
Please read OpenID Connect Subject Identifier on how to customize the Subject value.
By default, the role trust policy does not have any conditions on the subject identifier. To lock the role down to particular usages you need to modify the trust policy conditions and add a condition for the sub.
For example, to lock an identity role to a specific Octopus environment for an untenanted deployment, you can update the conditions:
"Condition": {
  "StringEquals": {
        "example.octopus.app:sub": "space:default:project:aws-oidc-testing:environment:dev",
        "example.octopus.app:aud": "example.octopus.app"
  }
}default, aws-oidc-testing, and dev are the slugs of their respective Octopus resources. The tenant: segment is omitted because this deployment has no tenant value — when a selected subject key has no value at runtime, both the key and the value are dropped from the subject.
For a tenanted deployment, the subject also includes the tenant slug:
"Condition": {
  "StringEquals": {
        "example.octopus.app:sub": "space:default:project:aws-oidc-testing:tenant:acme:environment:dev",
        "example.octopus.app:aud": "example.octopus.app"
  }
}
AWS policy conditions also support complex matching with wildcards and StringLike expressions.
For example, to lock an identity role to any Octopus environment, you can update the conditions:
"Condition": {
  "StringLike": {
        "example.octopus.app:sub": "space:default:project:aws-oidc-testing:environment:*",
        "example.octopus.app:aud": "example.octopus.app"
  }
}
default and aws-oidc-testing are the slugs of their respective Octopus resources.
AWS steps can also defer to the IAM role assigned to the instance that hosts the Octopus Server for authentication. In this scenario there is no need to create the AWS account.
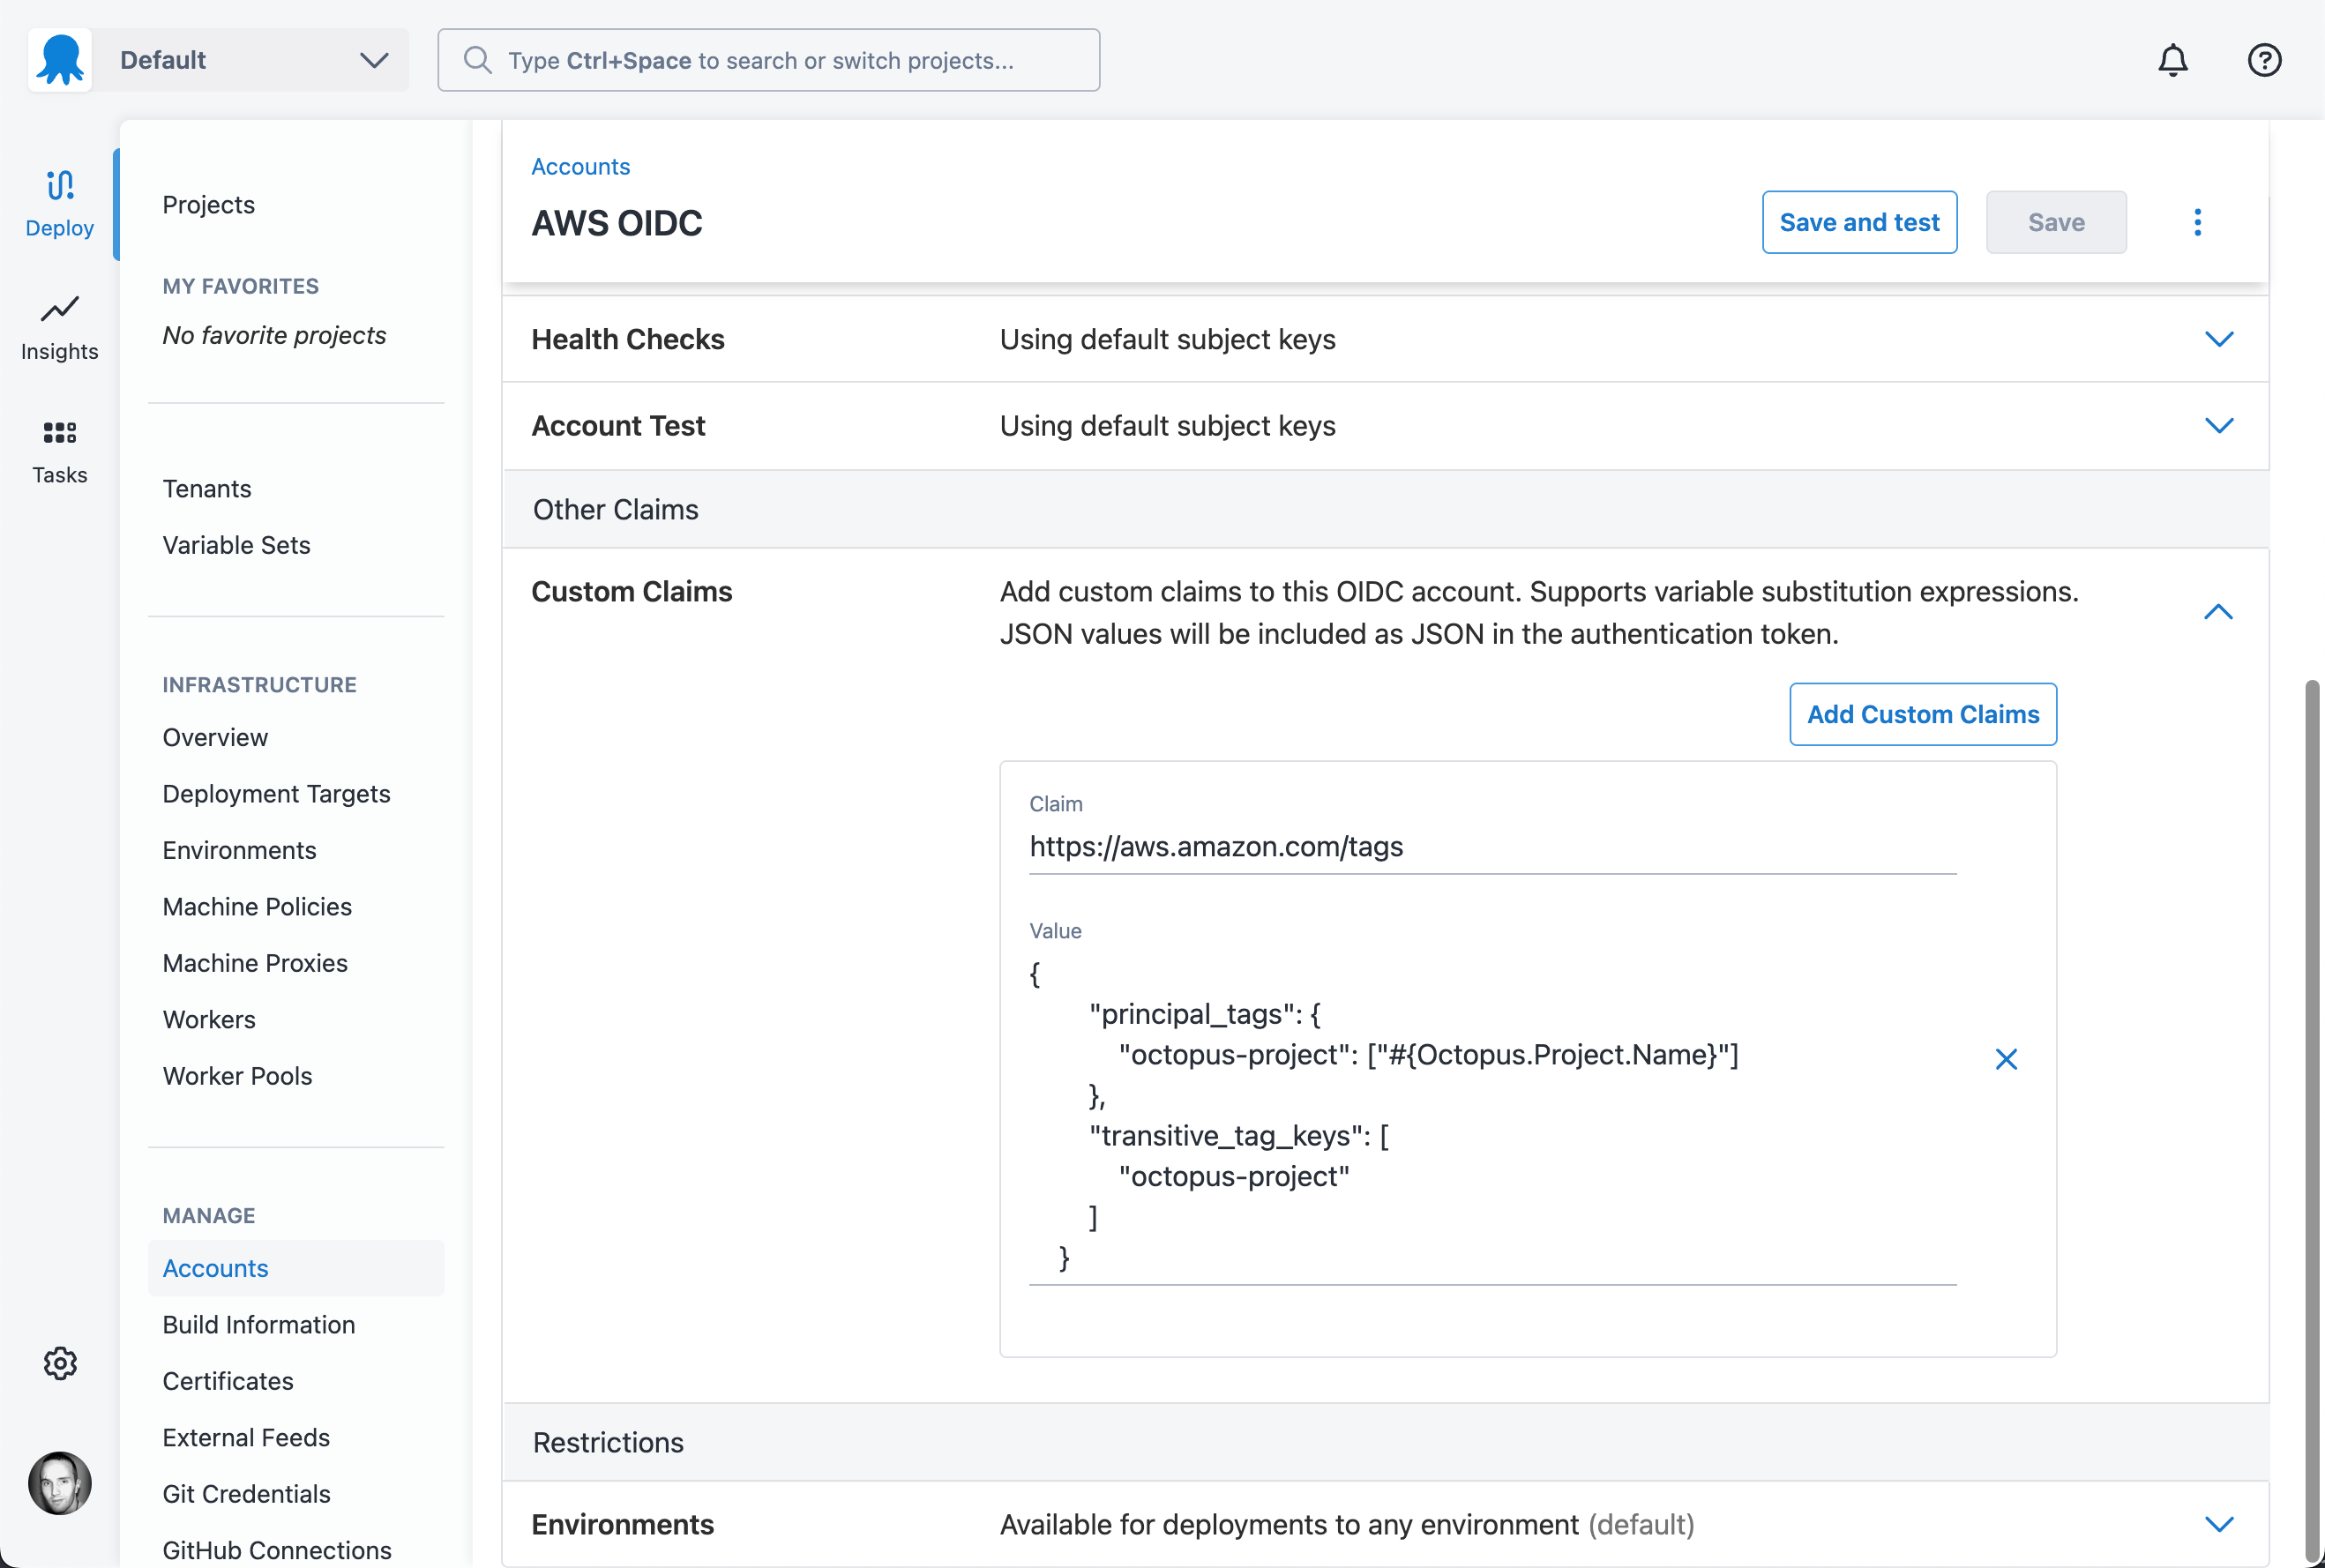
Passing Session Tags
AWS Accounts can be configured to pass session tags when assuming the AWS IAM role. This can be a useful tactic to allow using a single Octopus AWS Account and AWS IAM Role across many projects or environments, reducing configuration sprawl.
To pass session tags, use the Custom Claims field on the AWS OIDC Account.
The Claim should be https://aws.amazon.com/tags, and the Value should be a JSON object with a principal_tags property as documented in the AWS docs.
The example below demonstrates supplying a session tag with a key of octopus-project and a value of the project name.
{
    "principal_tags": {
        "octopus-project": ["#{Octopus.Project.Name}"]
    },
    "transitive_tag_keys": [
        "octopus-project"
    ]
}
You will need to allow the sts
{
    "Version": "2012-10-17",
    "Statement": [
        {
            "Effect": "Allow",
            "Principal": {
                "Federated": "arn:aws:iam::133577414924:oidc-provider/acme.octopus.app"
            },
            "Action": [
                "sts:AssumeRoleWithWebIdentity",
                "sts:TagSession"],
            "Condition": {
                "StringEquals": {
                    "acme.octopus.app:aud": "acme.octopus.app"
                }
            }
        }
    ]
}
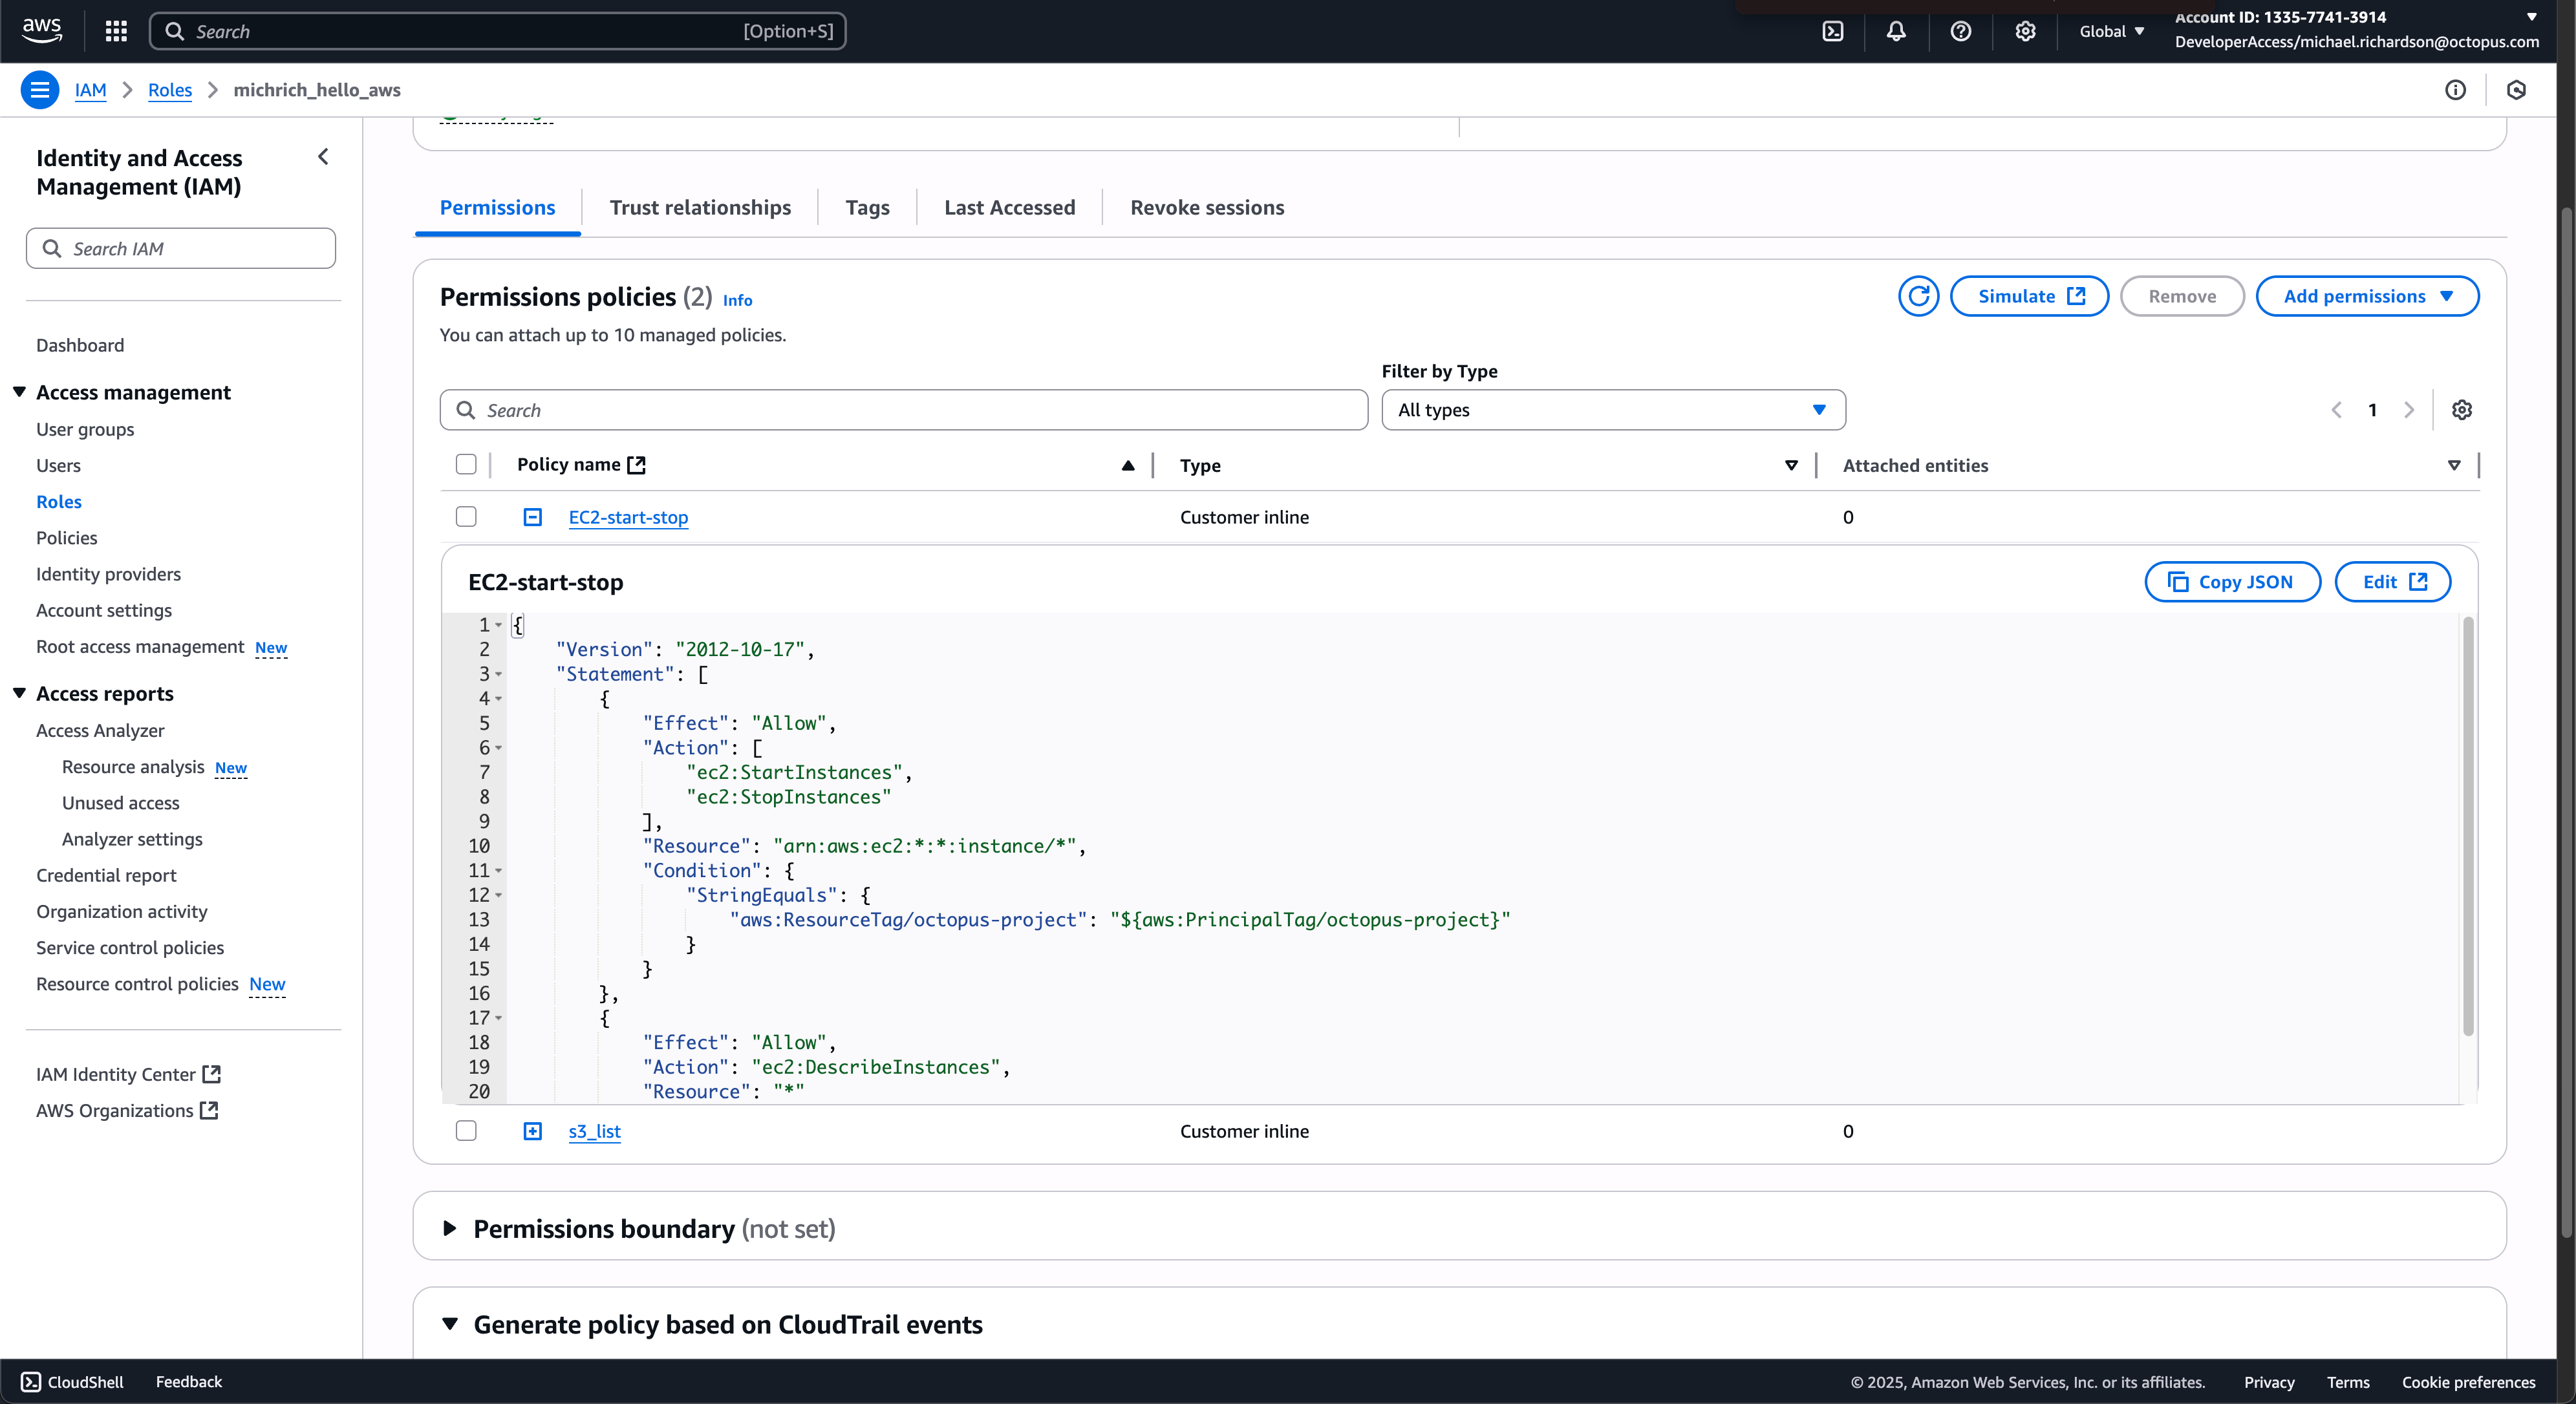
These session tags can then be used to control access to AWS resources by tagging the AWS resources.
For example, the policy below allows starting and stopping EC2 instances which are tagged with a key of octopus-project and a value matching the project supplied in the session tags supplied as shown above.
{
    "Version": "2012-10-17",
    "Statement": [
        {
            "Effect": "Allow",
            "Action": [
                "ec2:StartInstances",
                "ec2:StopInstances"
            ],
            "Resource": "arn:aws:ec2:*:*:instance/*",
            "Condition": {
                "StringEquals": {"aws:ResourceTag/octopus-project": "${aws:PrincipalTag/octopus-project}"}
            }
        },
        {
            "Effect": "Allow",
            "Action": "ec2:DescribeInstances",
            "Resource": "*"
        }
    ]
}
AWS account variables
You can access your AWS account from within projects through a variable of type AWS Account Variable. Learn more about AWS Account Variables
Using AWS Service roles for an EC2 instance
AWS allows you to assign a role to an EC2 instance, referred to as an AWS service role for an EC2 instance, and that role can be accessed to generate the credentials that are used to deploy AWS resources and run scripts.
All AWS steps execute on a worker. By default, that will be the built-in worker in the Octopus Server. As such, Octopus Server itself would need to be run on an EC2 instance with an IAM role applied to take advantage of this feature.
If you use external workers which are their own EC2 instances, they can have their own IAM roles that apply when running AWS steps.
When using the IAM role assigned to either the built-in worker or external worker EC2 instances, there is no need to create an AWS account in Octopus.
How Octopus workers inherit AWS IAM roles
AWS provides many solutions to inherit IAM roles depending on the platform where the Octopus worker is run. The worker runs through a series of login processes to attempt to inherit an IAM role, assuming the first role that succeeds.
The first login process attempts to inherit the role from a web identity token. EKS clusters can host pods that use service accounts linked to IAM roles, and these pods expose an environment variable called AWS_WEB_IDENTITY_TOKEN_FILE containing the path to a token file mounted in the pod. If this environment variable is defined, the worker will assume the role associated with the web identity token file.
When the Execute using the AWS service role for an EC2 instance option is enabled, a worker will first attempt to inherit a pod web identity.
The second login process queries the Instance Metadata Service (IMDS), made available to EC2 instances. IMDS is exposed as an HTTP API accessed via http://169.254.169.254. The keys required to assume a service role associated with an EC2 instance are generated by calling the IMDS HTTP API.
IMDS has two versions, v1, and v2. IMDSv2 is available to all EC2 instances and is optionally required over IMDSv1. Octopus uses IMDSv2 to inherit IAM roles. The worker assumes that IAM role if the request to generate account tokens from the IMDSv2 HTTP API succeeds.
IMDSv2 adds a security measure limiting the network hops a request can make when accessing the HTTP API to one. This means requests made from a worker running on an EC2 instance will work as expected, as there is one hop from the worker to the IMDS HTTP API. However, if the Octopus worker is running in an EKS pod hosted on an EC2 node, requests to the IMDSv2 HTTP API will fail by default, as these requests make two hops: one from the worker to the pod and a second from the pod to the EC2 node. You can adjust the hop limit using the modify-instance-metadata-options to allow requests with more than one hop.
Manually using AWS account details in a step
A number of steps in Octopus use the AWS account directly. For example, in the CloudFormation steps, you define the AWS account variable that will be used to execute the template deployment, and the step will take care of passing along the access and secret keys defined in the account.
It is also possible to use the keys defined in the AWS account manually, such as in script steps.
First, add the AWS Account as a variable. In the screenshot below, the account has been assigned to the AWS Account variable.
The OctopusPrintVariables has been set to true to print the variables to the output logs. This is a handy way to view the available variables that can be consumed by a custom script. You can find more information on debugging variables at Debug problems with Octopus variables.
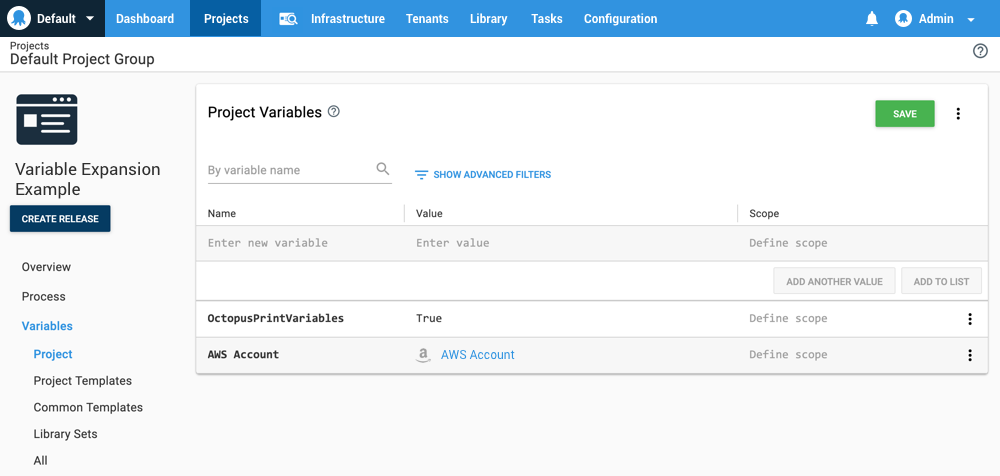
When running a step, the available variables will be printed to the log. In this example, the following variables are shown:
For a Access Key Account:
[AWS Account] = 'amazon-web-services-account'
[AWS Account.AccessKey] = 'YOUR_ACCESS_KEY'
[AWS Account.SecretKey] = '********'
For a OpenID Connect Account:
[AWS Account] = 'amazon-web-services-account'
[AWS Account.RoleArn] = 'arn:aws:iam::123456789012:role/test-role'
[AWS Account.SessionDuration] = '3600'
[AWS Account.OpenIdConnect.Jwt] = '********'
AWS Account.AccessKey is the access key associated with the AWS account, and AWS Account.SecretKey is the secret key. The secret key is hidden as asterisks in the log because it is a sensitive value, but the complete key is available to your script.
You can then use these variables in your scripts or other step types. For example, the following PowerShell script would print the access key to the console.
Write-Host "$($OctopusParameters["AWS Account.AccessKey"])"Known AWS connection issue
If you are experiencing SSL/TLS connection errors when connecting to AWS from your Octopus Server, you may be missing the Amazon Root CA on your Windows Server. The certificates can be downloaded from the Amazon Trust Repository.
AWS deployments
Learn more about AWS deployments.
Help us continuously improve
Please let us know if you have any feedback about this page.
Page updated on Monday, April 27, 2026