What is a software deployment pipeline?
A software deployment pipeline is an automated process, typically powered by CI/CD tools, that moves code from version control to production. It enables developers to build, test, and deploy applications reliably and quickly. It reduces manual errors by automating steps such as testing, packaging, and deploying to staging and production environments.
The goal of software deployment pipelines is to reduce manual work, catch issues early, and deliver changes quickly. Effective pipelines often use practices like canary releases or blue-green deployments to minimize downtime and ensure easy rollbacks if issues arise.
Key stages of a deployment pipeline:
- Commit: Developers push changes to a Version Control System (VCS), such as GitHub, triggering the pipeline.
- Build: The source code is compiled and packaged into deployable artifacts (e.g., binaries, Docker images).
- Test: Automated tests, including unit and integration tests, verify functionality and quality.
- Staging: The application is deployed to a production-like environment for final validation, user acceptance testing (UAT), or security checks.
- Production: The validated code is automatically or with manual approval deployed to the end users.
- Monitoring & feedback: The deployed code is monitored for performance issues and stability.
This is part of a series of articles about software deployment.
Get insights into the culture and methods of modern software delivery
Sign up for our fortnightly Continuously Delivered email series to learn from our experiences with Continuous Delivery, Agile, Lean, DevOps, and more.
Sign upBenefits of automated deployment pipelines
A deployment pipeline improves both the speed and reliability of software delivery. By automating key steps, it reduces manual effort and ensures that every change follows the same process.
- Faster releases: Automation reduces the time between writing code and deploying it. Teams can ship updates more frequently.
- Early bug detection: Automated tests catch issues during the pipeline, before they reach production.
- Consistent process: Every change goes through the same steps, which reduces variability and human error.
- Improved collaboration: Developers, testers, and operations teams work within a shared workflow, making handoffs smoother.
- Reduced risk: Smaller, frequent changes are easier to test and roll back if needed.
- Better visibility: Pipelines provide clear logs and status updates, making it easier to track progress and diagnose failures.
- Scalability: As projects grow, pipelines handle increased complexity without requiring proportional manual effort.
Build pipelines versus deployment pipelines
The word ‘pipeline’ gets used in many different contexts in DevOps, so it’s understandable if there’s confusion about the different uses. This is especially true of ‘build pipelines’ and ‘deployment pipelines’, which share overlap even without the word ‘pipeline’.
A build pipeline is what happens between a developer committing code and the creation of a deployable artifact. As part of Continuous Integration, a build pipeline will help you:
- Compile code
- Test
- Create (or trigger the creation of) a deployable package
A deployment pipeline starts at the same place, with a developer committing code, but ends much later with a release in your users’ hands.
It not only includes the commit, testing, and building of your code, but also the packaging, and deployment through your environments.
A deployment pipeline is the result of adopting Continuous Integration and Continuous Delivery.
The stages of a deployment pipeline
Commit
The pipeline begins when a developer pushes code to a version control system such as Git. This push triggers the pipeline automatically through a webhook or built-in integration. Each commit should be small and focused, which makes it easier to review, test, and debug. Large commits increase the chance of hidden issues and make rollbacks harder.
Good commit practices improve pipeline reliability. Developers often run local tests before pushing to avoid breaking the pipeline. Branching strategies, such as feature branches or trunk-based development, also affect how often pipelines run. The commit stage establishes traceability, since every pipeline run is tied to a specific version of the code.
Teams may also enforce checks at this stage, such as commit message rules or pre-commit hooks. These can validate code style, run quick linting, or prevent sensitive data from being committed. This early validation reduces failures later in the pipeline and keeps the codebase clean.
Build
In the build stage, the system compiles source code and resolves all dependencies. This may involve package managers, build tools, or containerization systems. The output is a deployable artifact, such as a JAR file, Docker image, or compiled binary. This artifact is stored in a registry or artifact repository for later use.
A key goal of the build stage is reproducibility. Builds should produce the same result every time when given the same input. This often requires strict versioning of dependencies and isolation of the build environment. Many teams use containerized builds to ensure consistency across different machines and environments.
Build optimization is also important as pipelines scale. Techniques such as caching dependencies, parallel builds, and incremental compilation reduce build time. Faster builds lead to quicker feedback for developers, which improves overall development speed.
Test
The test stage validates that the application behaves as expected. It usually starts with unit tests, which check small pieces of logic in isolation. Integration tests follow, verifying how components interact with each other or with external systems like databases and APIs.
More advanced pipelines include additional checks such as static code analysis, security scans, and performance tests. These help catch vulnerabilities, code quality issues, and bottlenecks early. Test results are reported in detail, and failures stop the pipeline immediately. This prevents unstable code from progressing to later stages.
Test environments are often isolated and reset between runs to ensure consistent results. Flaky tests, which sometimes pass and sometimes fail, are a common issue and need to be addressed quickly. Reliable tests are critical, since teams depend on them to make deployment decisions automatically.
Staging
The staging stage deploys the application to an environment that closely matches production. This includes similar infrastructure, configurations, and data patterns where possible. The goal is to simulate real-world conditions without affecting actual users.
Teams use staging to run user acceptance tests, smoke tests, and exploratory testing. It is also a place to validate deployment scripts, database migrations, and configuration changes. Issues found here are usually cheaper to fix than in production. A stable staging process increases confidence in the final release.
In some setups, staging includes production-like traffic using mirrored or synthetic requests. This helps identify performance issues and edge cases that are hard to detect in isolated tests. The closer staging is to production, the more reliable the final deployment will be.
Production
The production stage delivers the application to end users. This step often uses controlled deployment strategies to reduce risk. Common approaches include blue-green deployments, where traffic is switched between environments, and canary releases, where changes are rolled out gradually to a subset of users.
Production deployments may include approval steps, automated health checks, and rollback mechanisms. If something goes wrong, the system should quickly revert to a previous stable version. The focus in this stage is on stability, availability, and minimizing user impact during releases.
Automation continues to play a role even in production. Infrastructure provisioning, configuration management, and scaling policies are often handled automatically. This reduces human error and ensures that production environments remain consistent over time.
Monitoring and feedback
After deployment, monitoring systems collect data about application performance and behavior. This includes metrics like response time, error rates, and resource usage. Logs and traces provide detailed insights into how requests move through the system.
Alerts are configured to notify teams when something goes wrong, such as a spike in errors or degraded performance. Feedback also comes from users, support teams, and business metrics. This information feeds back into the development cycle, helping teams prioritize fixes and improvements.
Over time, monitoring data is used to refine the pipeline itself. Teams may add new tests, improve deployment strategies, or adjust thresholds based on real-world behavior. This closes the loop between development and operations, making the pipeline a continuous improvement system rather than a one-time setup.
Related content: Read our guide to blue/green deployments.
How is CI/CD used in software deployment pipelines?
Continuous Integration (CI) and Continuous Delivery/Deployment (CD) are practices that are implemented through a deployment pipeline. The pipeline is the mechanism that makes CI/CD work in a consistent and automated way.
Continuous Integration focuses on frequently merging code changes into a shared repository. Each commit triggers the early stages of the pipeline, such as build and automated tests. The goal is to detect issues quickly and ensure that the codebase remains in a working state.
Continuous Delivery extends this by ensuring that every successful change can be deployed to production at any time. The pipeline handles packaging, environment promotion, and validation steps. Deployment to production may still require manual approval.
Continuous Deployment goes one step further by automating the release to production. If all stages of the pipeline pass, the change is deployed without human intervention. In this model, the deployment pipeline becomes the fully automated path from commit to live software.
The components of deployment pipeline automation
Of course, to meet DevOps best practices, it’s vital to automate almost everything in your deployment pipeline.
Let’s look at some tools to help you achieve that.
Build server or CI platform
A build server is the biggest time-saver you can add to your deployment pipeline.
Whenever a developer commits code, a build server will automatically complete everything in the build phase, including:
- Compiling code
- Testing according to your software’s needs
- Passing or failing the code (and feeding back to the developer if failed)
- Merging code if it passes testing
- Packaging the code into a deployable artifact (or handing off to a packaging system, depending on your team’s tools)
Traditionally, the only option for build servers was self-hosted options, like the open-source and still-popular Jenkins. Jenkins remains a popular option due to its customization options and scalability.
With new technology comes new choices, however. Increasing in popularity is what we call ‘Continuous Integration as a service.’ This means build functions found in cloud-based build platforms, removing the need for hosting your own infrastructure for builds.
In fact, even most Git repository services now offer build features. GitHub, for example, offers GitHub Actions, which can run build tasks directly from your repo.
Your choice of build server or service should reflect the needs of your software delivery. If your organization enforces location-based cloud storage or insists on on-premises tools, a self-hosted build server is your only option.
Packaging
Packaging tools can automatically turn your successful code into a deployable artifact.
The packaging tool you should use can depend on the language you code in and the target you deploy to. If deploying to containers, for example, you want a tool that creates container images, and usually in Docker’s OCI format.
Given most build tools’ extensibility, many can package your code for you (or at least trigger a build with a dedicated packaging service). However, you also need to think about image storage.
Most packaging options, like Docker Hub, offer registries to catalog and store your images. This way, your team and deployment tools can find what they need easily.
Deployments
There are a few things to consider when choosing your deployment automation tool.
Firstly, what you need might depend on what you’re deploying to and the complexity involved. If deploying a simple app to a single container, most build server solutions can manage your deployment.
Deploying through a build server may not be suitable if you have a complex set of targets or use environments.
Secondly, managing deployments rarely means deploying to one hosting target. Instead, you would deploy to many targets within your environment structure.
Even without DevOps, most developers know the practice of promoting releases through at least 3 environments (though many teams use many more). A minimal environment structure may look like this:
- Development (or ‘dev’): Where developers can quickly deploy and test their updates
- Test (or ‘QA’): For QA teams to test the software as users would experience it
- Production (or ‘prod’): The live environment where people use or access your software
Each environment could have countless different deployment targets within them. For example, you could have:
- Servers in each region you market to, to help with worldwide performance
- Load balancing or high-availability setups
- A mixture of cloud and physical servers to account for the different ways people use or get your software
Build servers don’t see deployment targets in the big picture of your environments. That can make it hard to tell which release has deployed where. A dedicated deployment tool will solve that problem for you.
Related content: Read our guide to canary deployments.
6 tips for successfully implementing deployment pipelines
Keep pipelines fast
A slow pipeline delays feedback and reduces developer productivity. Aim to keep the build and test stages as short as possible. Use parallel execution for independent steps, and cache dependencies to avoid repeated work.
Split large test suites into smaller groups and run them concurrently. For example, run unit tests on every commit, but trigger full integration or end-to-end tests only on merge or scheduled runs. This keeps the common path fast while still maintaining coverage.
You can also optimize by detecting changes and running only the necessary steps. If a commit only affects frontend code, there is no need to rebuild backend services. Incremental builds and selective testing can significantly reduce execution time.
Finally, monitor pipeline duration over time. If build times increase, treat it as a performance regression. Set thresholds and alerts so teams address slowdowns early instead of letting them accumulate.
Treat pipeline configuration as code
Store pipeline definitions in version control alongside your application code. This makes changes traceable, reviewable, and consistent across environments.
Use the same development practices for pipeline code as you do for application code. This includes code reviews, testing changes in isolated branches, and maintaining clear commit history.
Parameterize configurations instead of duplicating them. For example, use variables for environment-specific values rather than maintaining separate pipeline files for each environment. This reduces duplication and configuration drift.
Versioning pipeline configuration also enables reproducibility. If a past deployment needs investigation, you can inspect the exact pipeline logic used at that time.
Use the same artifact across environments
Build your artifact once and promote the same version through all environments. Do not rebuild for staging or production, as this can introduce inconsistencies.
Store artifacts in a central registry or repository. Each artifact should have a unique version or digest that can be traced back to a specific commit. This creates a clear link between code and deployment.
Avoid environment-specific modifications during the build phase. Instead, inject configuration at runtime using environment variables or configuration services. This keeps the artifact identical across environments.
This approach simplifies debugging. If an issue appears in production, you can deploy the exact same artifact to a test environment to reproduce and investigate the problem.
Design for safe deployments
Deployments should minimize risk to users. Use strategies like blue/green, canary, or rolling deployments to limit exposure when releasing changes.
Incorporate health checks and automated verification after deployment. For example, validate service availability, response times, and error rates before completing a rollout.
Gradual rollouts are especially useful in large systems. Start by exposing changes to a small percentage of users, then increase traffic as confidence grows. This limits the blast radius of potential issues.
Rollback should be fast and reliable. Store previous versions and ensure the system can revert without complex manual steps. Test rollback procedures regularly to confirm they work as expected.
Monitor and provide feedback
A pipeline should not end at deployment. Monitor applications in production for errors, performance issues, and user impact.
Collect metrics such as latency, error rates, and resource usage. Combine these with logs and traces to get a full picture of system behavior. Observability tools help teams quickly identify and diagnose issues.
Integrate monitoring with alerting systems. Alerts should be actionable and tied to meaningful thresholds. Avoid excessive noise, which can lead to alert fatigue and missed incidents.
Feed production insights back into development. If certain types of failures occur often, adjust tests or pipeline checks to catch them earlier.
Secure the pipeline
Pipelines often have access to sensitive systems and credentials. Use secure storage for secrets and avoid hardcoding them in configuration files.
Apply the principle of least privilege. Each pipeline step should only have access to the resources it needs. This limits the impact if credentials are compromised.
Scan dependencies and artifacts for vulnerabilities as part of the pipeline. This helps prevent known security issues from reaching production.
Audit pipeline activity regularly. Logs should capture who triggered deployments, what changes were made, and which artifacts were used. This improves traceability and supports incident investigation.
Summary
We explored:
- The definition and goals of a deployment pipeline
- The different phases of a deployment pipeline and what they do
- Ways to help you automate your deployment pipeline and why they’re a good idea
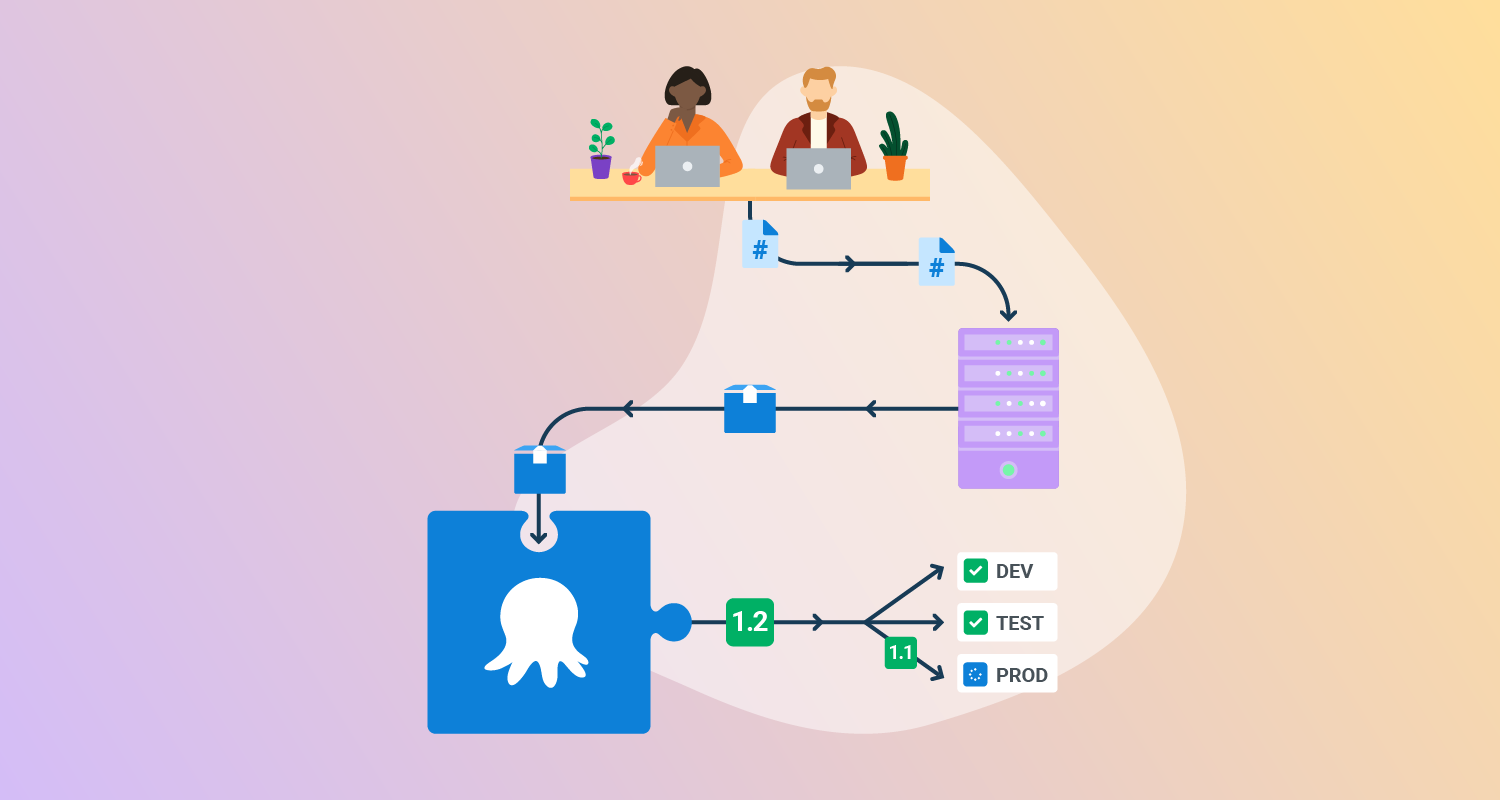
Now you know what a deployment pipeline is, why not create one? Octopus recently developed the Octopus Workflow Builder, which can create a full deployment pipeline in minutes. It:
- Creates a GitHub repository with a sample microservice application.
- Sets up GitHub Actions Workflows to build the sample application and push the artifacts to an Octopus instance.
- Populates an Octopus instance with:
- Environments
- Lifecycles
- Accounts
- Feeds
- Deployment Projects
- Deploys to cloud platforms like EKS, ECS, and Lambdas using Octopus.
Help us continuously improve
Please let us know if you have any feedback about this page.