What is Jenkins deployment?
Jenkins deployment is the process of installing, configuring, and maintaining a Jenkins server to automate software build, test, and deployment tasks. Jenkins, as a widely used open-source automation server, orchestrates Continuous Integration (CI) and Continuous Delivery (CD) pipelines, helping teams deliver code more reliably.
Deployment covers the initial setup of Jenkins as well as ensuring its security, availability, and scalability for the hosted pipelines and jobs. Deploying Jenkins correctly is critical for achieving automation goals in modern software development. Proper deployment decisions affect how efficiently teams can run CI/CD, integrate tools, and manage build resources.
The deployment strategy chosen (single server, Docker, Kubernetes, Jenkins Operator, or managed service) impacts scalability, operational complexity, and the ability to support concurrent builds. Understanding the deployment landscape helps DevOps teams align Jenkins with infrastructure requirements and development workflows.
In this article:
- Ways to deploy Jenkins
- Tutorial: Deploying Jenkins on Kubernetes
- Best practices for deploying Jenkins
Ways to deploy Jenkins
1. Single server (VM / bare-metal)
Deploying Jenkins on a single server, either virtualized (VM) or on bare-metal hardware, is the simplest and most traditional approach. In this model, Jenkins runs as a standalone service on an operating system like Ubuntu or CentOS. Administrators install Jenkins via a package manager or as a Java application, configure it through its web UI, and manually handle backup, plugin management, and upgrades.
However, running Jenkins on a single server introduces limitations in reliability and scalability. The failure of the server means complete CI/CD downtime, and scaling often requires manual resource upgrades or migration. Maintenance tasks, such as patching the OS or cleaning up disk space, fall entirely on the administrator. In production settings, single-server Jenkins is best for organizations with basic automation needs or those just starting to adopt CI/CD practices.
2. Docker
Running Jenkins in a Docker container provides a lightweight, portable deployment method that standardizes the Jenkins runtime across environments. Using the official Jenkins image from Docker Hub, teams can rapidly start or stop Jenkins instances and control configuration through environment variables and mounted volumes. Containerization reduces “it works on my machine” inconsistencies, making it easier to test Jenkins configurations locally before deploying to production.
Docker-based Jenkins deployments simplify dependency management by isolating Jenkins from host system libraries. Administrators can maintain Jenkins updates and plugins by rebuilding container images and use compose files to version infrastructure. However, this approach still relies on underlying host management and does not offer automatic scaling or high availability by default.
3. Kubernetes
Jenkins on Kubernetes brings scalability, fault tolerance, and dynamic resource management. Using Kubernetes manifests or Helm charts, teams can declaratively define Jenkins master and agent pods, persistent storage, and service networking. Kubernetes automatically restarts failed pods, schedules agents on-demand, and enables rolling updates. Declarative infrastructure ensures consistent, repeatable deployments across environments.
Operating Jenkins on Kubernetes unlocks dynamic agent provisioning, allowing workloads to scale in response to build queues and reducing resource waste. Integration with cloud-native storage, ingress, and secret management brings improved reliability and security. However, this approach requires expertise in Kubernetes concepts and resource tuning to avoid performance bottlenecks or security misconfigurations.
4. Jenkins Operator
The Jenkins Operator is a Kubernetes-native solution that automates the deployment and management of Jenkins instances. Operators encapsulate domain knowledge, so the Jenkins Operator automatically handles setup, scaling, backup, upgrades, and plugin management, reducing manual intervention. Users describe desired Jenkins state in custom resource definitions (CRDs), and the operator reconciles the running system with that intent.
The Jenkins Operator brings self-healing capabilities and simplifies multi-instance management, making it easier to run dedicated Jenkins servers for different teams or projects. Automated upgrades and backup scheduling minimize downtime and reduce administrative overhead, while built-in monitoring and status reporting ensure visibility. This deployment model is best for organizations already invested in Kubernetes and looking to standardize Jenkins management.
5. Managed Jenkins
Managed Jenkins platforms deliver Jenkins as a cloud service, abstracting operational complexity by handling all aspects of hosting, scaling, upgrades, and backups. Popular providers include CloudBees CI, Jenkins X on cloud, and offerings from major cloud vendors. Managed services typically offer integration with cloud storage, identity, and network management, letting teams focus exclusively on creating and running CI/CD pipelines rather than maintaining the Jenkins infrastructure.
Choosing managed Jenkins is ideal for organizations prioritizing developer productivity and reliability without dedicating resources to infrastructure management. While this approach comes with added costs and some loss of customization, it reduces risks from misconfiguration, simplifies compliance, and enables teams to scale rapidly in response to workload changes.
Tutorial: Deploying Jenkins on Kubernetes
To deploy Jenkins on Kubernetes manually (without Helm), you follow a sequence of steps that create a dedicated namespace, service account, persistent storage, a deployment for the Jenkins server, and a service to expose it. Below is a step-by-step guide to set up Jenkins using YAML manifests. Instructions are adapted from the Jenkins documentation.
Step 1: Create a namespace
Start by creating a separate namespace for Jenkins to keep its resources isolated from other applications:
kubectl create namespace devops-tools
Step 2: Create a service account
Jenkins requires permissions to interact with Kubernetes. Create a ClusterRole, ServiceAccount, and ClusterRoleBinding.
Save the following YAML as jenkins-01-serviceAccount.yaml:
---
apiVersion: rbac.authorization.k8s.io/v1
kind: ClusterRole
metadata:
  name: jenkins-admin
rules:
  - apiGroups: [""]
    resources: ["*"]
    verbs: ["*"]
---
apiVersion: v1
kind: ServiceAccount
metadata:
  name: jenkins-admin
  namespace: devops-tools
---
apiVersion: rbac.authorization.k8s.io/v1
kind: ClusterRoleBinding
metadata:
  name: jenkins-admin
roleRef:
  apiGroup: rbac.authorization.k8s.io
  kind: ClusterRole
  name: jenkins-admin
subjects:
  - kind: ServiceAccount
    name: jenkins-admin
    namespace: devops-tools
Apply the file:
kubectl apply -f jenkins-01-serviceAccount.yaml
Step 3: Set up persistent storage
Create a persistent volume and claim to store Jenkins data across pod restarts. Save the following as jenkins-02-volume.yaml:
kind: StorageClass
apiVersion: storage.k8s.io/v1
metadata:
  name: local-storage
provisioner: kubernetes.io/no-provisioner
volumeBindingMode: WaitForFirstConsumer
---
apiVersion: v1
kind: PersistentVolume
metadata:
  name: jenkins-pv-volume
  labels:
    type: local
spec:
  storageClassName: local-storage
  claimRef:
    name: jenkins-pv-claim
    namespace: devops-tools
  capacity:
    storage: 10Gi
  accessModes:
    - ReadWriteOnce
  local:
    path: /mnt
  nodeAffinity:
    required:
      nodeSelectorTerms:
        - matchExpressions:
            - key: kubernetes.io/hostname
              operator: In
              values:
                - worker-node01  # Replace with your actual node name
---
apiVersion: v1
kind: PersistentVolumeClaim
metadata:
  name: jenkins-pv-claim
  namespace: devops-tools
spec:
  storageClassName: local-storage
  accessModes:
    - ReadWriteOnce
  resources:
    requests:
      storage: 3Gi
Apply it:
kubectl apply -f jenkins-02-volume.yaml
Note: Replace worker-node01 with your actual worker node hostname. Use kubectl get nodes to find it.
Step 4: Create the Jenkins deployment
Save the following as jenkins-03-deployment.yaml:
apiVersion: apps/v1
kind: Deployment
metadata:
  name: jenkins
  namespace: devops-tools
spec:
  replicas: 1
  selector:
    matchLabels:
      app: jenkins-server
  strategy:
    type: Recreate
  template:
    metadata:
      labels:
        app: jenkins-server
    spec:
      securityContext:
        fsGroup: 1000
        runAsUser: 1000
      serviceAccountName: jenkins-admin
      containers:
        - name: jenkins
          image: jenkins/jenkins:lts
          imagePullPolicy: Always
          resources:
            limits:
              memory: "2Gi"
              cpu: "1000m"
            requests:
              memory: "500Mi"
              cpu: "500m"
          ports:
            - name: httpport
              containerPort: 8080
            - name: jnlpport
              containerPort: 50000
          livenessProbe:
            httpGet:
              path: "/login"
              port: 8080
            initialDelaySeconds: 90
            periodSeconds: 10
            timeoutSeconds: 5
            failureThreshold: 5
          readinessProbe:
            httpGet:
              path: "/login"
              port: 8080
            initialDelaySeconds: 60
            periodSeconds: 10
            timeoutSeconds: 5
            failureThreshold: 3
          volumeMounts:
            - name: jenkins-data
              mountPath: /var/jenkins_home
      volumes:
        - name: jenkins-data
          persistentVolumeClaim:
            claimName: jenkins-pv-claim
Deploy it:
kubectl apply -f jenkins-03-deployment.yaml
Check deployment status:
kubectl get deployments -n devops-tools
Step 5: Expose Jenkins via a service
Create a service to access Jenkins externally. Save the following as jenkins-04-service.yaml:
apiVersion: v1
kind: Service
metadata:
  name: jenkins-service
  namespace: devops-tools
  annotations:
    prometheus.io/scrape: 'true'
    prometheus.io/path: /
    prometheus.io/port: '8080'
spec:
  selector:
    app: jenkins-server
  type: NodePort
  ports:
    - port: 8080
      targetPort: 8080
      nodePort: 32000
Apply it:
kubectl apply -f jenkins-04-service.yaml
Now, you can access Jenkins via:
http://<node-ip>:32000Use minikube ip or kubectl get nodes -o wide to get the node IP.

Step 6: Retrieve the admin password
To unlock Jenkins for the first time, get the admin password:
kubectl get pods -n devops-tools
Get the logs of the Jenkins pod:
kubectl logs <pod-name> -n devops-tools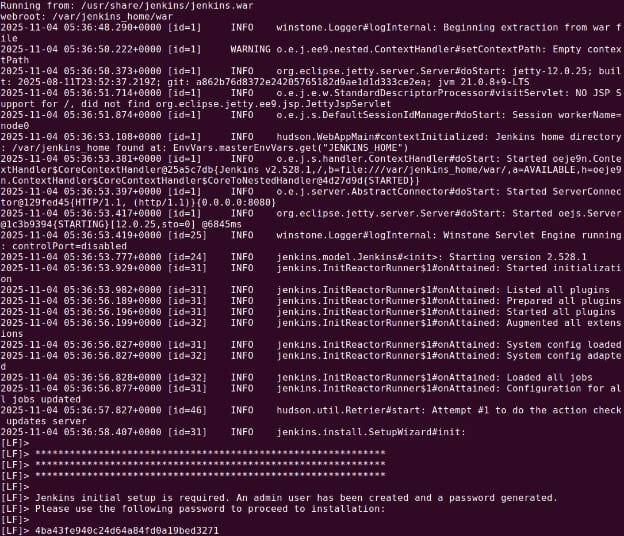
Look for the password in the logs, or run:
kubectl exec -it deployment/jenkins -n devops-tools -- cat /var/jenkins_home/secrets/initialAdminPassword
Final step: Complete Jenkins setup
Visit the Jenkins dashboard in your browser, enter the password, install suggested plugins, and create your admin user. Jenkins is now ready to use on your Kubernetes cluster.
Best practices for deploying Jenkins
Here are some important steps to consider when deploying Jenkins.
1. Keep pipelines modular and reusable
Breaking down Jenkins pipelines into smaller, self-contained stages or shared libraries improves maintainability and adaptability. By defining common steps as reusable functions or pipeline templates, teams can reduce duplication and ensure consistent standards across projects. Modular pipelines ease refactoring, testing, and onboarding new team members, making it easier to update automation logic as requirements evolve.
Using pipeline libraries, whether declarative or scripted, enables better version control and encourages the sharing of best practices across teams. Parameterization allows different jobs or projects to use the same pipeline logic with environment-specific inputs. This approach shortens pipeline development time and helps enforce quality and security policies systematically.
2. Use Infrastructure as Code for environment consistency
Defining infrastructure, including Jenkins setup, agents, plugins, and dependencies, as code ensures consistency across environments from development to production. With tools like Kubernetes manifests, teams can version-control and review infrastructure changes, reducing the risk of misconfiguration or manual drift. Infrastructure as Code (IaC) also makes recoveries and migrations more reliable through re-deployment rather than ad-hoc manual steps.
Adopting IaC principles lets teams swiftly spin up new Jenkins environments, maintain detailed audit trails of changes, and standardize rollout processes across cloud, on-premises, or hybrid deployments. Automated checks and integration with CI/CD pipelines further increase deployment reliability, simplify compliance, and reduce operational overhead related to manual configuration management.
3. Automate testing in deployment pipelines
Integrating automated testing throughout Jenkins deployment pipelines improves confidence and reliability in production releases. By running unit, integration, and end-to-end tests as pipeline stages, teams can catch defects early and ensure that changes meet defined quality standards. Automatically blocking deployments on test failures or regressions reduces the likelihood of broken builds or downtime in production environments.
Advanced Jenkins pipelines can enforce code quality gates, perform static analysis, and trigger security scans as part of the build process. These measures provide immediate feedback to developers, shorten feedback loops, and make Continuous Delivery achievable with minimal manual intervention.
4. Monitor deployments with observability tools
Deploying Jenkins without robust monitoring is risky, as undetected issues can lead to downtime or incomplete builds. Integrating observability tools like Prometheus, Grafana, or ELK Stack into the Jenkins environment enables continuous collection and visualization of system metrics, logs, and events. This visibility helps administrators detect bottlenecks, resource exhaustion, security incidents, or failures before they impact development workflows.
Monitoring key performance indicators, including build times, agent use, queue length, and plugin health, supports proactive troubleshooting and capacity planning. Alerting mechanisms can notify teams about anomalies, slowdowns, or outages so they can act quickly to restore service.
5. Implement reliable rollback mechanisms
Not every Jenkins deployment is successful; failures can occur during upgrades, plugin installations, or configuration changes. Implementing reliable rollback procedures, such as frequent automated backups of Jenkins home, configuration-as-code repositories, or versioned Docker images, ensures that teams can restore service rapidly in the event of an incident. Rollbacks reduce downtime and minimize the risk of data loss or pipeline disruption.
Testing rollback strategies in staging environments validates the effectiveness of recovery procedures and uncovers gaps before they affect production. Keeping detailed logs, change records, and a well-documented playbook enables consistent and confident rollback execution under pressure.
Help us continuously improve
Please let us know if you have any feedback about this page.