What is Jenkins?
Jenkins is an open-source automation server that helps developers integrate changes into their projects. As part of a Continuous Integration/Continuous Delivery (CI/CD) pipeline, it automates important aspects of the software development process. Jenkins is widely used because of its versatility and ability to integrate with a broad DevOps toolset.
Jenkins is famous for its extensibility, relying on plugins to support every stage of the software development lifecycle, from building and testing to deployment and monitoring. The Jenkins community provides over 2,000 plugins to meet varied requirements. Jenkins can be set up on different operating systems, useful for developers working on Windows, macOS, or Linux.
History of Jenkins
Jenkins originated from the Hudson project, which was created by Kohsuke Kawaguchi at Sun Microsystems in 2004. Due to a disagreement with Oracle, following Oracle’s acquisition of Sun, the project was forked into Jenkins by its community in 2011. This divergence allowed Jenkins to become a leading automation server for CI/CD, breaking away from Hudson’s corporate governance.
Over the years, Jenkins has evolved significantly, adapting to changing software development practices. It has maintained its relevance through constant updates and improvements, driven by an active community of over 700 contributors. Today, Jenkins retains a vast user base, estimated at over 1 million active users.
Jenkins tutorial for beginners: Using Jenkins for CI and simple deployments
This tutorial provides an overview of how to set up Jenkins and create a pipeline. The instructions are adapted from the Jenkins documentation.
Prerequisites
Before installing Jenkins, make sure your system meets the following minimum requirements:
- Memory: At least 256 MB of RAM, though it is recommended to have more than 2 GB for optimal performance.
- Storage: A minimum of 10 GB of free disk space to accommodate Jenkins and the Docker image.
Additionally, you need the following software installed on your machine:
- Java: Jenkins requires Java 11, 17, or 21 to run.
- Docker: If you plan to use Docker with Jenkins, ensure Docker is installed. You can download Docker for your specific platform from the official Docker website.
Downloading and running Jenkins
To install Jenkins, follow these steps:
-
Download Jenkins: Go to the official Jenkins website and download the Generic Java
.warpackage. -
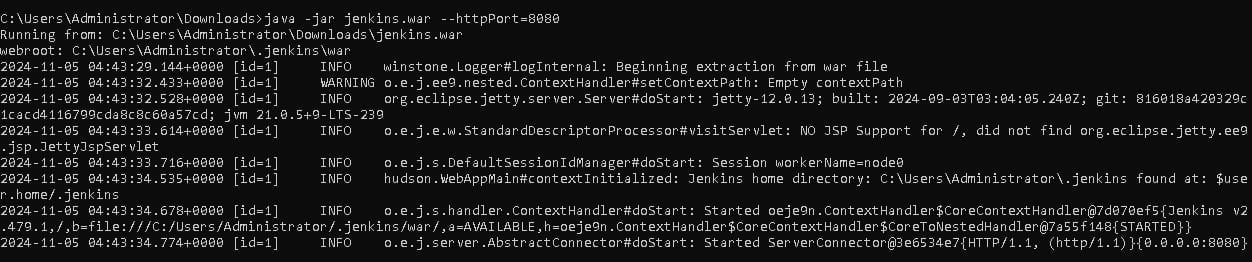
Run Jenkins: Open a terminal and navigate to the directory where you downloaded the
.warfile. Start Jenkins by executing the following command:java -jar jenkins.war --httpPort=8080
- Access Jenkins: Once Jenkins is running, open your browser and navigate to
http://localhost:8080.
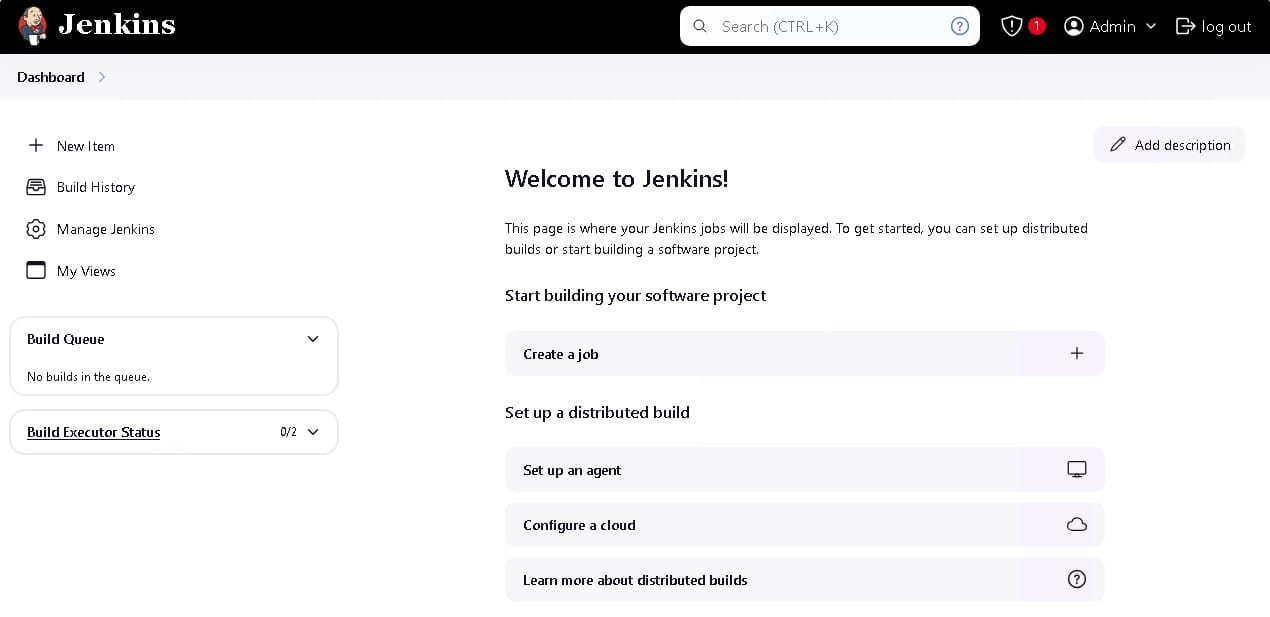
- Follow installation instructions: The setup wizard will guide you through the installation process. Follow the prompts to complete the installation.
- After installation, Jenkins is ready for use, and you can start configuring your first pipeline.
Creating a Jenkins pipeline
A Jenkins pipeline automates the process of building, testing, and deploying your software. Pipelines are defined in a text file called a Jenkinsfile, which is stored in the version control system along with your project. Here’s how to create your first Jenkins pipeline:
- Install the Docker Pipeline plugin: Go to
Manage Jenkins, thenPluginsand install the Docker pipeline plugin. - Restart Jenkins after the installation.
- Create a Jenkinsfile: Create a new text file in your project repository and name it
Jenkinsfile. This file will define your pipeline. - Set up a new Pipeline job: In the Jenkins UI, click on
New Itemin the left-hand column. - Give your new job a name (e.g., “My-Pipeline”) and select Multi-branch Pipeline.
- Add your repository by clicking the
Add Sourcebutton and filling in the details. - Save and run: Click
Save, and Jenkins will detect new branches and pull requests in your repository, automatically triggering the pipeline.
Example Pipeline for Java
Here’s an example of a basic Jenkinsfile for a Java project. This script defines a declarative pipeline that uses a Docker image with Maven installed to build the project.
pipeline {
  agent {
    docker {
        image 'maven:3.9.9-eclipse-temurin-21-alpine'
    }
  }
  stages {
    stage('build') {
        steps {
        sh 'mvn --version'
        }
    }
  }
}
In this pipeline:
- Jenkins runs inside a Docker container using the
maven:3.9.9-eclipse-temurin-21-alpineimage. - The
buildstage checks the Maven version by running themvn --versioncommand.
Example Pipeline for Python
Here’s an example Jenkinsfile for a Python project:
pipeline {
  agent {
    docker {
        image 'python:3.12.6-alpine3.20'
    }
  }
  stages {
    stage('build') {
        steps {
        sh 'python --version'
        }
    }
  }
}
In this Python pipeline:
- Jenkins runs inside a Docker container using the
python:3.12.6-alpine3.20image. - The
buildstage checks the Python version using thepython --versioncommand.
You can customize the sh command in both examples to execute the specific build commands your project needs.

Tony Kelly is a DevOps marketing leader who drives innovation and awareness of the latest trends in Continuous Delivery.
Using Jenkins with Octopus for full CI/CD pipelines
Octopus is a deployment automation platform that integrates tightly with Jenkins. Here are some of the benefits of using Jenkins with Octopus:
- Enhanced deployment automation: Octopus Deploy specializes in deployment automation, making it a powerful addition to Jenkins’ CI/CD capabilities. While Jenkins can handle the CI aspects, integrating it with Octopus allows for more complex, multi-step deployments across various environments.
- Simplified release management: Octopus allows developers to create structured, consistent releases and deploy them to different environments with minimal manual intervention. This integration enables a smoother release management process, reducing the chance of errors in production.
- Multi-environment compatibility: Jenkins paired with Octopus makes deploying to multiple environments easier by allowing seamless transitions from development to testing, staging, and production. Octopus handles environment-specific configurations, making deployment consistent across varied setups.
- Streamlined rollbacks and versioning: With Octopus, rolling back to a previous version is straightforward. This feature is essential for CI/CD pipelines, where deployments need to be quickly reversible to maintain stability.
- Secure deployment options: Octopus supports secure deployments by managing sensitive variables (e.g., API keys, passwords) and access controls, making it suitable for production-level security requirements. This level of security complements Jenkins’ capabilities in CI, making the combined setup secure for enterprise use.
Installing the Octopus Jenkins plugin
Here’s a step-by-step guide on how to install and configure the Octopus plugin to get advanced deployment capabilities for your Jenkins pipelines.
Prerequisite plugins
Before installing the Octopus Jenkins plugin, certain other plugins may need to be installed based on the type of projects you’re working on:
- MSBuild plugin: If you’re working on .NET projects, this plugin is required to compile Visual Studio solutions.
- Maven plugin: For Java projects, you will need the Maven plugin to build your project.
Configuring the Octopus Deploy plugin
After installing the plugin, you need to configure it to communicate with your Octopus Deploy server:
-
Set up the Octopus CLI. The Octopus Jenkins Plugin uses the Octopus CLI (command line interface) for most of its operations. You can install the CLI in one of two ways:
- Install via .NET Tool: Run the following command on your Jenkins server:
dotnet tool install --global Octopus.DotNet.Cli- Download the Octopus CLI: Download the CLI from the Octopus website and extract it to a folder like
C:\Tools\Octoon Windows or/usr/local/binon Linux.
-
Once installed, navigate to
Manage Jenkins, thenGlobal Tool Configuration. Here, provide the path to the Octopus CLI installation under the Octopus CLI section. This ensures Jenkins can run the CLI during builds.

- To connect Jenkins to Octopus Deploy, go to
Manage Jenkins, thenConfigure System. - Under the Octopus Server Settings, add a new Octopus server. Provide the URL of your Octopus Deploy server and an API key (generated in Octopus Deploy) to authenticate.
- Optionally, you can add multiple Octopus servers if your organization uses more than one.
Using the Octopus Jenkins plugin in build jobs
After configuration, the plugin provides several build steps for integrating Jenkins and Octopus Deploy. These can be added to your Jenkins jobs. The following are some key steps you can add to your Jenkins pipeline or freestyle project:
- Octopus deploy: package application: This step creates a NuGet or Zip package for deployment.
- Octopus deploy: push packages: This step uploads the generated packages to the Octopus Deploy repository.
- Octopus deploy: create release: This step creates a new release in Octopus, using the packages built in the previous steps.
- Octopus deploy: deploy release: Optionally, deploys the release to a specified environment.
Example Jenkinsfile with Octopus steps
Here is an example of how to incorporate Octopus steps into a Jenkins pipeline for a .NET project:
pipeline {
    agent any
    stages {

    stage('Build') {
        steps {
        sh 'dotnet build MyProject.sln'
        }
    }


    stage('Package') {
        steps {
        octopusDeployPackage packageId: 'MyApp', packageVersion: "1.0.${BUILD_NUMBER}", sourcePath: 'path/to/package', outFolder: <OUTPUT FOLDER>
        }
    }


    stage('Push Package') {
        steps {
        octopusPushPackage packagePaths: "path/to/package/MyApp.1.0.${BUILD_NUMBER}.nupkg", serverId: '<https://<YOUR-APP-Name>.octous.app/>', toolId: '<The Octopus Deploy Command Line executable>', overwriteMode: '<FailIfExists, OverwriteExisting, IgnoreIfExists>'
        }
    }


    stage('Create Release') {
        steps {
        octopusCreateRelease releaseVersion: "1.0.${BUILD_NUMBER}", project: 'MyProject',serverId: '<https://<YOUR-APP-Name>.octous.app/>', toolId: '<The Octopus Deploy Command Line executable>', overwriteMode: '<FailIfExists, OverwriteExisting, IgnoreIfExists>'
        }
    }


    stage('Deploy Release') {
        steps {
        octopusDeployRelease releaseVersion: "1.0.${BUILD_NUMBER}", project: 'MyProject', environment: 'Test',
serverId: '<https://<YOUR-APP-Name>.octous.app/>', toolId: '<The Octopus Deploy Command Line executable>', overwriteMode: '<FailIfExists, OverwriteExisting, IgnoreIfExists>'
        }
    }

}
In this example:
- Package: Jenkins uses the Octopus plugin to create a package for deployment.
- Push package: The package is pushed to Octopus Deploy’s repository.
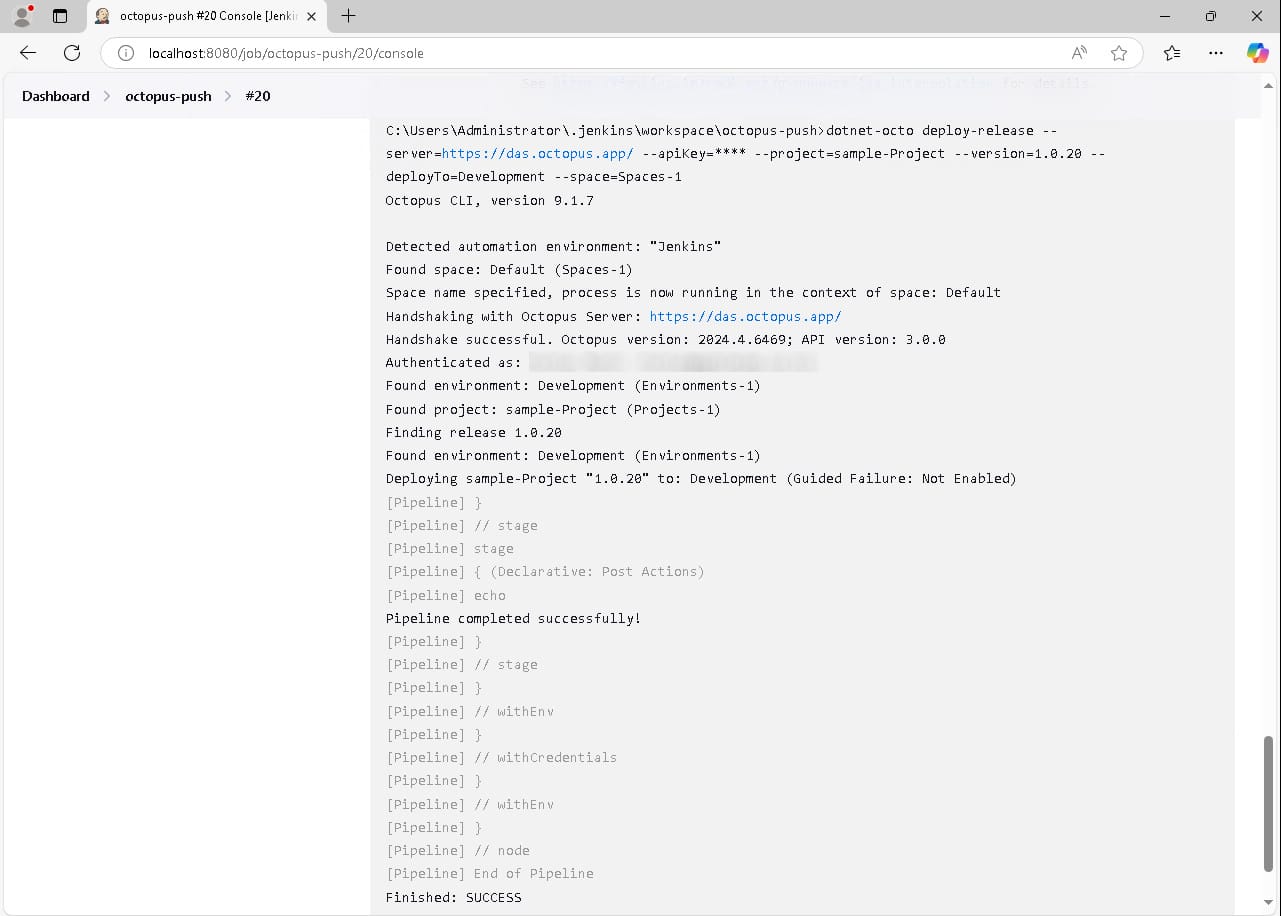
- Create release: A new release is created using the current build number.
- Deploy release: The release is deployed to the “Test” environment.
Taking Jenkins to the next level with Octopus
At Octopus Deploy, we’re all about making Continuous Delivery (CD) easier and faster for software teams. Get fast, repeatable, and reliable deployments to improve software delivery performance and provide faster turnaround times for feedback on new features or experiments.
Octopus seamlessly handles software delivery across multi-cloud, Kubernetes, data centers, and hybrid setups. We’re also big on governance, risk, and compliance (GRC), helping Platform Engineering teams enhance the Developer Experience (DevEx).
With the Octopus built-in and community steps, you can manage fully-featured deployment pipelines without generating costly custom scripts. You can also reduce the audit burden with role-based access control, complete audit trails, and IT service management integrations.
Get started with Octopus
Make complex deployments simple
Help us continuously improve
Please let us know if you have any feedback about this page.