What is Node.js application deployment?
Node.js application deployment is the process of making a Node.js application available for use by end-users, typically on servers, platforms, or cloud environments. Deployment involves transferring application code from the development environment to one or more production servers, configuring necessary infrastructure components, and ensuring the application is accessible over the network.
Here are several common methods to deploy a Node.js application:
- On-premises servers: Deploying on your own physical servers gives you complete control over the environment. This requires significant expertise in server administration, network configuration, and security.
- Containerization with Docker: Docker allows you to package your Node.js application and its dependencies into self-contained units called containers. These containers can then be deployed across various environments, including cloud platforms (e.g., AWS ECS, Google Kubernetes Engine, Azure Kubernetes Service) or on-premises servers.
- Infrastructure as a Service (IaaS) / virtual machines: Providers like AWS EC2, Google Cloud Compute Engine, or Azure Virtual Machines allow you to provision and manage your own virtual servers. You install Node.js, your application dependencies, and a process manager (like PM2) to keep your application running.
- Platform as a Service (PaaS): Platforms like Heroku, Render, Railway, or AWS Elastic Beanstalk simplify deployment by abstracting away server management. You typically connect your code repository, and the platform handles building, deploying, and scaling your application.
- Serverless computing: Platforms like AWS Lambda or Azure Functions enable you to run your Node.js code without provisioning or managing servers. Your code is executed in response to events (e.g., API requests, database changes), and you only pay for the compute time consumed.
This is part of a series of articles about software deployment.
5 ways to deploy Node.js applications
Here are the main infrastructure options for deploying Node.js applications.
1. On-premises servers
Deploying Node.js applications on on-premises servers means hosting the app on hardware owned and managed by the organization. This setup provides full control over the software stack, network configuration, and physical security. It’s often used in small scale deployments or in environments with strict compliance requirements, legacy system dependencies, or limited internet connectivity. Deployment usually involves configuring the OS, installing Node.js and necessary dependencies, setting up a web server like Nginx, and using a process manager like PM2 to run the application.
However, on-premises deployment comes with operational challenges. Teams are responsible for hardware maintenance, power redundancy, cooling, backups, and security patches. Scaling requires procuring and provisioning additional servers, which adds cost and delays. Monitoring and logging must be configured manually, and disaster recovery plans must be in place.
2. Containerization with Docker
Containerization packages applications and their dependencies into containers, lightweight, reproducible, and portable units, using tools like Docker. Containers isolate application code, OS libraries, and runtime components from the host environment, ensuring consistent behavior across development, staging, and production. By defining application infrastructure in code (Dockerfiles and Compose), teams avoid “works on my machine” issues and simplify migration between environments.
Deploying Node.js via containers also supports modern orchestration platforms like Kubernetes, enabling automated scaling, rolling updates, self-healing, and cluster management. This approach enhances scalability and reliability for production applications, especially those using microservices architectures. However, containerization does add complexity, as teams must handle container lifecycle management, orchestration setup, persistent storage, and network security considerations alongside application development.
3. Infrastructure as a Service (IaaS)
IaaS providers such as AWS EC2, Google Compute Engine, and Azure Virtual Machines offer virtualized hardware resources, VMs, networking, and storage, enabling full control over the deployment stack. With IaaS, teams install their chosen OS, configure dependencies, and handle web server and network configurations. This option suits applications requiring custom configurations, security policies, or complex networking not feasible in PaaS. The flexibility and power of IaaS also bring operational complexity.
Development teams must manage patching, scaling, load balancing, monitoring, security, and recovery processes, which significantly increases the maintenance burden. Automation with configuration management tools (like Ansible, Puppet, or Terraform) can help, but more expertise and discipline are necessary to ensure secure, reliable deployments. IaaS is ideal for organizations with specialized needs, in-house DevOps skills, or those prioritizing granular control over managed convenience.
4. Platform as a Service (PaaS)
Platform as a Service solutions simplify Node.js deployment by providing pre-configured environments that manage infrastructure, runtime, scaling, and monitoring. Services like Heroku, Google App Engine, and Azure App Service let developers focus on writing code, uploading their application, and specifying configuration files, leaving much of the operational work, such as server provisioning and OS updates, to the provider. PaaS platforms usually feature built-in CI/CD pipelines and offer a marketplace for add-ons like managed databases, caching, and logging services.
Despite their simplicity, PaaS offerings come with trade-offs. Customization and low-level control are limited, which may impact performance tuning or special infrastructure requirements. PaaS typically charges by consumption or application instance, and these costs can scale up quickly with traffic or add-on use. Teams must weigh the speed and maintenance benefits against potential limitations in flexibility and increased long-term expense, particularly at higher scale.
5. Serverless computing
Serverless platforms like AWS Lambda, Google Cloud Functions, and Azure Functions allow deployment of Node.js applications without provisioning or managing servers. Code executes in stateless containers triggered by events, such as HTTP requests, file uploads, or CRON schedules, and resources scale automatically based on event volume. Developers pay only for actual execution time, optimizing cost, especially for infrequent or spiky workloads.
The serverless model shifts certain patterns in application design: each function must be stateless, execution duration is limited, and cold starts can impact latency. Debugging and local emulation may be less straightforward than full-stack deployments. While well-suited for APIs, scheduled tasks, and event-driven architectures, serverless can become unwieldy for complex, tightly-coupled applications requiring persistent state or high-throughput networking.
Related content: Read our guide to application deployment
General Node.js application deployment steps
Deploying a Node.js application typically involves several steps to ensure the code runs reliably in production. Below is a general process followed across most deployment environments:
- Prepare the application: Ensure the code is production-ready by cleaning up development artifacts, minimizing dependencies, and securing environment variables. Build assets if using frontend tooling, and configure production-specific settings (e.g., logging level, caching).
- Set up environment configuration: Use environment variables for settings like database credentials, API keys, and runtime options. A .env file and tools like dotenv or configuration management systems can help manage these securely.
- Install dependencies: Run
npm install --production(or pnpm, yarn, etc.) on the deployment server to install only the necessary modules, reducing attack surface and memory usage. - Choose and set up hosting infrastructure: Select a deployment option (e.g., PaaS, IaaS, containers, serverless, on-premises). Provision required resources, such as compute instances, databases, load balancers, and storage.
- Deploy the code: Transfer application files to the server or container. Use Git, FTP/SCP, or CI/CD pipelines for automated deployment. Version control helps track changes and roll back if needed.
- Configure process management: Use a process manager like PM2 or systemd to ensure the Node.js app runs in the background, restarts on failure, and handles logs properly.
- Set up reverse proxy: Configure a web server like Nginx or Apache as a reverse proxy to forward HTTP(S) traffic to the Node.js app and handle SSL termination, caching, or compression.
- Enable monitoring and logging: Implement monitoring (e.g., Prometheus, Datadog) and centralized logging (e.g., ELK stack, Loggly) to track application performance and troubleshoot issues.
- Run tests and health checks: Validate the deployment with automated or manual tests, and configure health check endpoints to support load balancers or orchestration systems.
- Scale as needed: Configure horizontal or vertical scaling policies based on traffic patterns. Use container orchestration or cloud scaling features to adjust capacity dynamically.

Tony Kelly is a DevOps marketing leader who drives innovation and awareness of the latest trends in Continuous Delivery.
Node.js application deployment tutorials
Deploy Node.js with Docker
Docker provides a consistent environment for developing and deploying Node.js applications by packaging the app and its dependencies into containers. This eliminates issues caused by differences between development and production systems. Below is a simple workflow to containerize and run a Node.js app with Docker.
1. Set up the application
Create a new project directory and initialize it with npm. Install dependencies and add a simple index.js server file. For example, using Express to serve a basic route is enough to verify the setup works.
2. Create a Dockerfile
In the project root, define a Dockerfile that specifies the Node.js base image, sets the working directory, copies package files, installs dependencies, copies the source code, exposes port 3000, and starts the app with node index.js. This file describes how Docker should build the container image.
FROM node:18-alpine
WORKDIR /app
COPY package*.json ./
RUN npm install
COPY . .
EXPOSE 3000
CMD ["node", "index.js"]
3. Use Docker Compose
To manage containers more easily, add a docker-compose.yml file. This file builds the container, maps port 3000 from the host to the container, mounts volumes for live development, and sets the environment variable NODE_ENV=development.
version: '3.8'
services:
node-app:
build: .
ports:
- '3000:3000'
volumes:
- .:/app
- /app/node_modules
environment:
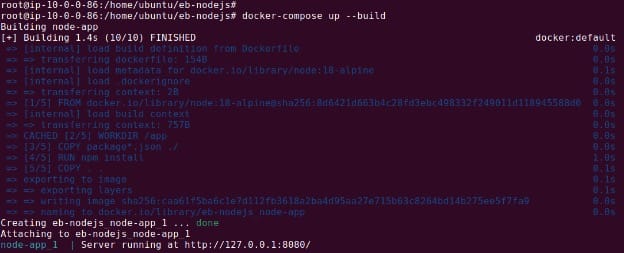
- NODE_ENV=development4. Build and run the container
Run docker compose up --build to build and start the container. Docker will reuse cached layers for faster rebuilds unless you explicitly force a full rebuild with --no-cache. In most cases, the default caching mechanism is efficient enough. Once running, the app is available at http://localhost:3000.
Note: You will need to add package.json in order for the above to succeed. Here is the minimal package.json:
{
  "name": "nodejs-tutorial",
  "version": "1.0.0",
  "description": "Simple Node.js app for Elastic Beanstalk",
  "main": "app.js",
  "scripts": {
    "start": "node index.js"
  },
  "engines": {
    "node": ">=18.x"
  },
  "author": "Your Name",
  "license": "MIT"
}
5. Deploy to production
For production, update the environment to NODE_ENV=production in your compose configuration or create a separate production file. Start the container in detached mode with docker compose up -d to keep it running in the background.
Using Docker for Node.js deployments ensures reproducible builds and smooth transitions from local development to production, improving reliability and reducing environment-related issues.
Deploy a Node.js application to Elastic Beanstalk
Elastic Beanstalk offers a managed way to deploy Node.js applications on AWS, handling provisioning, load balancing, scaling, and monitoring. This tutorial walks through deploying a basic Node.js app using the Elastic Beanstalk Command Line Interface (EB CLI).
1. Prerequisites
Start by creating an AWS account if you don’t already have one. Then, secure the root user with multi-factor authentication and set up an administrative IAM Identity Center user. Use this user for managing your Elastic Beanstalk environment.
Install Node.js on your machine and verify the installation with node -v. You’ll also need the EB CLI, which simplifies deployment from the terminal. On Linux or macOS, you can use a native shell; on Windows, use the Windows Subsystem for Linux.
2. Create the Node.js application
Create a new project directory:
mkdir eb-nodejs
cd eb-nodejs
Inside this directory, create a file named server.js with a simple HTTP server:
const http = require('node:http');

const hostname = '0.0.0.0';
const port = process.env.PORT || 8080;

const server = http.createServer((req, res) => {
  res.statusCode = 200;
  res.setHeader('Content-Type', 'text/plain');
  res.end('Hello Elastic Beanstalk!\n');
});

server.listen(port, hostname, () => {
  console.log(`Server running at http://${hostname}:${port}/`);
});
Run it locally with:
node server.js
Visit http://127.0.0.1:8080 in your browser to verify the output.
3. Initialize and configure Elastic Beanstalk
Initialize the Elastic Beanstalk project:
eb init -p node.js nodejs-tutorial --region us-east-1![]()
This creates an EB configuration tied to your project and selects the Node.js platform. You’ll be prompted to choose a key pair if you want SSH access:
eb init
# Do you want to set up SSH for your instances? (y/n): y
Select an existing key pair or create a new one as instructed.
4. Deploy the application
Deploy your app by creating an environment:
eb create nodejs-env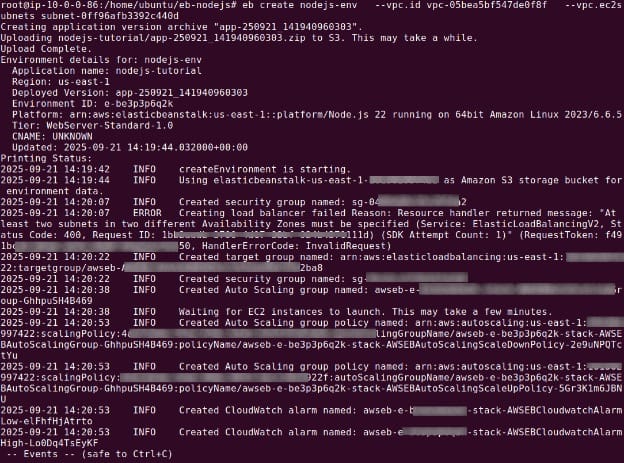
This takes a few minutes. Once complete, launch your app in the browser:
eb openYou’ll be redirected to the auto-generated domain hosting your Node.js app, running on AWS infrastructure managed by Elastic Beanstalk.
5. Clean up resources
When you’re done, remove the environment to avoid unnecessary charges:
eb terminateIf you want to terminate application versions, saved configurations, and the application, use the --all switch as shown in the following command:
eb terminate --all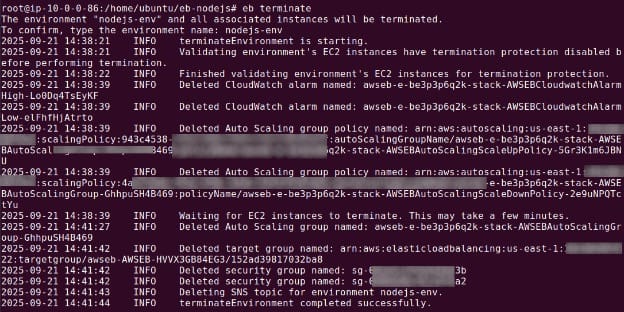
This deletes all AWS resources tied to the environment. Elastic Beanstalk provides a balance between control and convenience, making it suitable for teams that want to deploy quickly without managing low-level infrastructure.
Best practices for Node.js application deployment
Developers should consider the following practices when deploying Node.js applications.
1. Simplified Continuous Deployment
Automate your deployment pipeline using CI/CD tools such as GitHub Actions, GitLab CI, or Jenkins. Automating build, test, and deployment steps reduces manual errors and accelerates release cycles. Ensure the pipeline runs tests, checks for linting or security issues, and only promotes code to production if all checks pass.
Use environment-specific configuration files and secrets management to isolate production variables from development. Tag releases and maintain a changelog to track deployments. Automating rollbacks for failed deployments further improves resilience and operational efficiency.
2. Use a process manager
A process manager ensures your Node.js app runs continuously in production, restarts on crashes, and logs output. PM2 is a popular choice that supports monitoring, log aggregation, cluster mode, and automatic startup scripts.
Configure PM2 to run the app with environment-specific settings and keep logs persistent. For OS-level integration, generate and register a startup script so the app restarts on system reboot. Using a process manager also simplifies load balancing and managing multiple instances on a single host.
3. Optimize dependency management
Limit production dependencies to what’s strictly needed. Use --production when installing packages and audit for vulnerabilities with tools like npm audit or snyk. Remove unused or obsolete packages to reduce attack surface and startup time.
Lock dependency versions with a lock file (package-lock.json or pnpm-lock.yaml) to ensure consistent installs across environments. Avoid relying on globally installed packages—include all build tools and scripts locally to keep the environment reproducible.
4. Set secure HTTP headers
Use middleware like helmet to set HTTP headers that protect against common web vulnerabilities. These include protections for XSS, clickjacking, MIME-sniffing, and content security policies.
While Helmet provides a secure default configuration, tailor individual headers (like Content-Security-Policy or Strict-Transport-Security) to your app’s requirements. Enforce HTTPS where possible, and ensure cookies are sent securely with appropriate flags (HttpOnly, Secure, SameSite).
5. Use clustering
Node.js runs on a single thread by default. To take advantage of multi-core CPUs, use the cluster module or enable clustering in PM2. This allows multiple worker processes to handle requests concurrently, improving throughput and reliability.
Each worker runs a separate instance of the app. If one crashes, the master process can restart it. Be cautious with shared in-memory state across workers—use external stores like Redis for shared data. Clustering can dramatically boost performance under load when combined with proper load balancing.
Help us continuously improve
Please let us know if you have any feedback about this page.