Why deploy Node.js applications on Google Cloud?
Node.js applications are programs written in JavaScript that run on the Node.js runtime. They are based on a non-blocking, event-driven architecture, allowing for high concurrency and making Node.js a strong choice for I/O-heavy operations, such as web servers, APIs, and real-time chat services.
Deploying a Node.js application to Google Cloud can be achieved using various services, depending on the application’s architecture and scaling requirements. Here are the typical deployment steps (applicable to most options):
- Set up a Google Cloud project: Create or select a Google Cloud project in the Google Cloud Console.
- Install and configure Google Cloud SDK: This command-line tool allows you to interact with Google Cloud services.
- Develop your Node.js application: Create your Node.js application and ensure it’s ready for deployment.
- Prepare for deployment: For App Engine, create an
app.yamlfile to configure your application’s environment. For Cloud Run, create a Dockerfile to containerize your application. - Deploy your application: Use the gcloud command-line tool to deploy your application to the chosen service (e.g.,
gcloud app deployfor App Engine,gcloud run deployfor Cloud Run). - Test and monitor: Verify your application’s functionality and monitor its performance using Google Cloud Observability tools.
Key benefits of Node.js on Google Cloud include:
- Scalable infrastructure: Google Cloud offers autoscaling compute options (like Cloud Run and App Engine) that match Node.js’s asynchronous nature, handling large volumes of concurrent connections without over-provisioning.
- Integration with Google services: Node.js apps can easily integrate with Firebase, BigQuery, Cloud Storage, Pub/Sub, and other Google Cloud services, enabling rapid development of complex applications.
- Global deployment: Google Cloud’s global network allows developers to deploy Node.js applications closer to users, reducing latency and improving performance.
- Developer tools and CI/CD support: Native support for Cloud Build, Cloud Source Repositories, and GitHub integrations simplify Continuous Integration and Delivery pipelines for Node.js projects.
- Managed environments: Fully managed platforms like App Engine and Cloud Functions reduce operational overhead by handling infrastructure, scaling, monitoring, and security patches automatically.
- Cost efficiency: Pay-as-you-go pricing and autoscaling help teams control costs while still supporting dynamic workloads effectively.
- Security and compliance: Built-in identity and access management, along with VPC configurations and compliance certifications, make it easier to build secure Node.js applications.
This is part of a series of articles about software deployment.
3 ways to deploy Node.js on Google Cloud
1. App Engine
Google App Engine is a fully managed platform-as-a-service (PaaS) solution that simplifies deployment for Node.js applications. With App Engine, developers need only provide their code and configuration, and the platform handles the provisioning of resources, scaling, and infrastructure updates automatically. This approach removes the need for system administration tasks and allows for quick deployment cycles, making it ideal for web apps, APIs, and mobile back ends where rapid iteration is critical.
App Engine supports both Standard and Flexible environments. The Standard environment offers quick startup times and automatic scaling for lightweight apps, while the Flexible environment provides more control over the runtime, including custom dependencies and system packages. Applications on App Engine can benefit from built-in load balancing, integration with Google Cloud services, and zero-downtime deployments, catering to both small prototypes and large, production-grade applications.
2. Cloud Run
Cloud Run is Google Cloud’s serverless platform for containerized applications. It enables developers to deploy Node.js applications packaged in containers without managing underlying virtual machines. With Cloud Run, scaling is handled automatically from zero to thousands of instances, based on incoming traffic. There is no need for infrastructure configuration, making it suitable for microservices, APIs, and event-driven workloads.
Cloud Run’s flexible model allows applications to run consistently across environments since containers encapsulate all dependencies. Furthermore, services deployed on Cloud Run can benefit from custom domains, integrated authentication, traffic splitting for canary releases, and user-friendly pricing based on actual usage. This makes Cloud Run an attractive option for teams seeking fast development cycles, predictable performance, and simplified deployment processes.
3. Google Kubernetes Engine (GKE)
Google Kubernetes Engine (GKE) provides a managed Kubernetes environment for deploying, managing, and scaling containerized Node.js applications. GKE automates cluster provisioning, maintenance, and upgrade, reducing operational complexity for teams that want to use Kubernetes’ orchestration capabilities. With GKE, applications can run in isolated containers, benefiting from Kubernetes’ features such as rolling updates, health checks, and self-healing nodes.
Node.js applications on GKE can be coupled with advanced networking, persistent storage, and extensive monitoring capabilities. GKE is well-suited for enterprises needing granular control over workloads, custom resource configurations, and hybrid or multi-cloud architectures. Developers can take advantage of autoscaling, multi-zone clusters, declarative infrastructure management, and integrations with Google Cloud’s CI/CD tooling for flexible, production-grade deployments.

Tony Kelly is a DevOps marketing leader who drives innovation and awareness of the latest trends in Continuous Delivery.
Tutorial: build and deploy a Node.js app on Google App Engine
In this tutorial, you’ll learn to deploy your first Node.js app to Google App Engine. Instructions are adapted from the Google Cloud documentation.
Create your project
To get started with deploying a Node.js app on App Engine, first create a Google Cloud project. This project acts as a container for your App Engine app and any other Google Cloud services it may use. If you’re experimenting or following a tutorial, it’s best to create a new project so you can easily delete all associated resources afterward.
-
In the Google Cloud Console, go to the project selector and either choose an existing project or create a new one. Ensure billing is enabled for the project, as App Engine requires billing to deploy applications.
-
Next, enable the Cloud Build API, which is required for deploying applications through App Engine.
-
You’ll also need the Google Cloud CLI (gcloud). After installing it, initialize the CLI by running:
gcloud init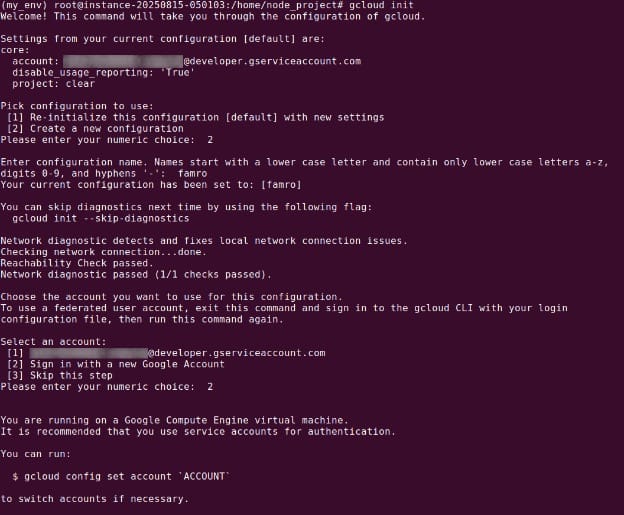
This command sets up authentication, configures your project, and selects a default region.
-
Once the CLI is ready, create your App Engine application in the Google Cloud Console. Choose the region where the app will run. This region cannot be changed later, so select one close to your target users to reduce latency.
Write your web service with Node.js
To build your Node.js web service for App Engine, start by setting up a basic project structure using Express.js, a popular web framework for handling HTTP requests.
-
First, create a new folder for your service, such as
node-project, and navigate into it from your terminal. Initialize the project with:npm init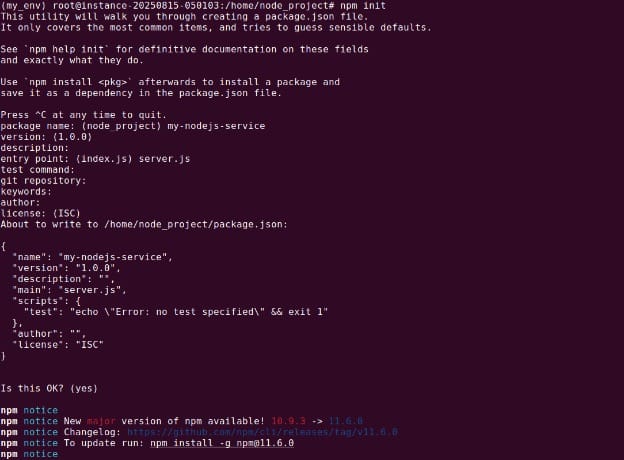
-
When prompted, fill out the project details or press Enter to accept the defaults. Once initialized, install Express:
npm install express
This adds Express as a dependency and updates the
package.jsonfile accordingly. Confirm that Express appears under thedependenciessection. -
Next, define how your application should start by adding a
startscript to thescriptssection ofpackage.json:"scripts": { "start": "node server.js" } -
Now, create a file named
server.jsin the same folder and add the following code:const express = require('express'); const app = express(); app.get('/', (req, res) => { res.send('Hello from App Engine!'); }); const PORT = process.env.PORT || 8080; app.listen(PORT, () => { console.log(`Server listening on port ${PORT}...`); });This script starts a simple HTTP server that listens on the port defined by
process.env.PORT—an environment variable provided by App Engine at runtime. If this variable isn’t set (e.g., when testing locally), it falls back to port 8080. -
To verify the setup locally, run:
npm start
-
Then open a browser and navigate to
http://localhost:8080. You should see the message “Hello from App Engine!” -
Before deploying, create an
app.yamlfile in your project directory. This file tells App Engine which runtime to use:runtime: nodejs20 -
Your project folder should now contain:
node-project/
├── app.yaml
├── package.json
└── server.js
This completes the setup for a basic Node.js web service ready to deploy on App Engine.
Note: Ensure the file is named app.yaml, as gcloud looks specifically for this file. Its extension also needs to match — you can’t use app.yml.
Deploy your web service
Once your Node.js application is ready and your app.yaml file is in place, you can deploy the service to App Engine using the gcloud CLI.
-
First, open your terminal and navigate to the project directory that contains the
app.yamlfile (e.g.,my-nodejs-service). From there, run:gcloud app deployThis command uploads your source code to Google Cloud Storage, builds your application using Cloud Build, and deploys it to App Engine. During this process, files listed in
.gcloudignoreare excluded from the upload—this typically includesnode_modules, which are installed in the cloud using yourpackage.jsonandpackage-lock.jsonfiles.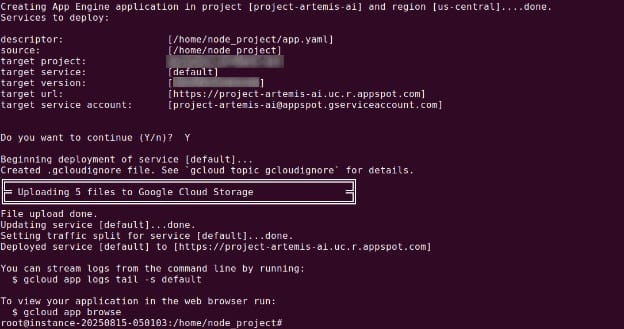
-
The service is launched using the
npm startscript defined in yourpackage.json. To ensure fast instance startup, keep your start script lightweight. -
To verify that the deployment succeeded and to open your app in the browser, run:
gcloud app browseThis will open the public URL for your service, which follows the format
https://PROJECT_ID.REGION_ID.r.appspot.com. -
If you’re deploying multiple services, each service must have its own
app.yamlfile, and you should include aservice:field in each file to assign unique names. The first service you deploy must be the default service; subsequent services will get their own URLs. -
Each deployment creates a new version of your service. Google Cloud automatically routes traffic to the latest version, but you can manage versions and traffic routing manually in the Cloud Console.
-
To view your deployed services and their versions, use the App Engine section of the Google Cloud Console. You should see one service (named
defaultif not otherwise specified) and a timestamped version linked to your deployment.
Best practices for deploying Node.js on Google Cloud
Here are some useful practices to keep in mind when working with Node.js on Google Cloud.
1. Minimize cold starts with proper service selection
Cold starts can introduce latency when serverless platforms spin up new instances to handle requests. To reduce this impact, choose the service that best matches your application’s workload profile. Google App Engine Standard offers quick instance initialization, which benefits apps with variable or bursty traffic. Cloud Run, while versatile, may exhibit longer cold starts due to container startup times, especially if images are large or dependencies are heavy. For critical APIs or latency-sensitive workloads, consider services that provide options for keeping a minimum number of instances warm.
Proactively managing instance concurrency and scaling parameters can also help. For example, in App Engine, setting min-instances ensures a baseline level of readiness, at the cost of maintaining some always-on resources. With Cloud Run, developers can configure concurrency and request processing options to balance cost and responsiveness. Measuring and tuning these parameters based on real-world usage data is key to reducing user-facing delays.
2. Optimize Docker images for faster deployment
When deploying to Cloud Run or Google Kubernetes Engine, optimizing Docker images reduces startup times and resource consumption. Start by using minimal base images, such as Alpine or Node.js slim variants, to avoid bundling unnecessary packages and binaries. Multi-stage builds further improve efficiency by separating development dependencies from production artifacts, ensuring only what’s needed for runtime is included in the final image. This reduces attack surface and accelerates downloads and deployments.
Additionally, pay attention to Docker layer caching by strategically ordering commands—place seldom-changed steps earlier in the Dockerfile. Remove build caches, unnecessary files, and documentation from the image to shrink size further. Use vulnerability scanning tools integrated with Google Cloud Artifact Registry to identify and remediate risks early. By focusing on small, secure, and efficient images, teams can achieve faster rollouts and minimize downtime during automatic or manual deployments.
3. Secure secrets with Secret Manager
Managing application secrets—such as API keys, credentials, and tokens—should not rely on hardcoding them in the source code or version control. Google Cloud’s Secret Manager offers a secure way to store, manage, and access sensitive data. Node.js applications can be configured to fetch secrets at runtime, using service account permissions to restrict and audit access. This approach centralizes secret storage, enables easy rotation, and reduces the risk of credential leakage.
Integrating Secret Manager is straightforward: reference secrets in your application via environment variables or dedicated API calls. Access can be fine-tuned using IAM policies, ensuring only authorized services and users can retrieve or manage secrets. Automating secret rotation and monitoring access logs are further recommended practices, bolstering defenses against unauthorized use and minimizing blast radius in case of compromise.
4. Use Infrastructure as Code
Defining cloud resources with infrastructure as code (IaC) tools, such as Terraform or Google Cloud Deployment Manager, brings repeatability and consistency to deployments. Storing configuration files in version control enables teams to track changes, peer review updates, and rollback infrastructure changes efficiently. IaC minimizes manual configuration drift, which is a common source of production issues and security vulnerabilities.
Automation through IaC also accelerates the setup of new environments, making it easy to replicate staging, development, and production stacks. Teams can use modular templates and parameterized configurations to standardize setups and enforce best practices. Integrating IaC workflows into CI/CD pipelines further ensures that infrastructure is provisioned and updated in sync with application releases, reducing deployment errors and downtime.
5. Apply continuous testing in the deployment pipeline
Continuous testing ensures that Node.js applications remain reliable as they evolve. Integrate unit, integration, and end-to-end tests into your CI/CD pipeline to catch regressions early. Automated testing can be set up using open-source tools like Mocha, Jest, or Cypress, triggered on every push or pull request. This approach helps maintain code quality and application stability, particularly as deployment frequency increases.
Pair automated testing with Google Cloud’s deployment tools to enable safe rollouts and rapid rollback on failure. Use test coverage and static analysis reports to enforce code quality gates during builds. Incorporate canary deployments, traffic splitting, and monitoring with tools like Cloud Monitoring and Error Reporting to catch issues in production quickly. Together, these practices create a reliable defense against downtime and defects, enabling confident, iterative releases of Node.js applications on Google Cloud.
Help us continuously improve
Please let us know if you have any feedback about this page.