Why deploy Node.js apps to AWS?
Node.js is an open-source, cross-platform JavaScript runtime environment to execute JavaScript code outside of a web browser. Built on the V8 JavaScript engine, Node.js allows developers to build scalable, high-performance server-side and networking applications using JavaScript.
Here are three ways to deploy Node.js apps to AWS.
1. Deploying on EC2 with manual configuration
Amazon EC2 provides a flexible environment where you control the virtual servers running your Node.js applications. With manual configuration, you select the operating system, install Node.js and any required libraries, and configure the web server and networking settings to suit your application. This method provides the most control but requires manual setup.
- Launch an EC2 instance: Choose an Amazon Machine Image (AMI) with a compatible operating system (e.g., Amazon Linux, Ubuntu).
- SSH into the instance: Connect to your EC2 instance using SSH.
- Install Node.js and npm: Use the appropriate package manager for your chosen OS to install Node.js and npm.
- Transfer your Node.js application: Copy your application files to the EC2 instance using tools like SCP or Git.
- Install dependencies and run: Navigate to your application directory, install dependencies using npm install, and start your application (e.g., node app.js or using a process manager like PM2 for production).
- Configure security groups and Elastic IP: Ensure your EC2 instance’s security group allows inbound traffic on the necessary ports (e.g., 80 for HTTP, 443 for HTTPS), and consider assigning an Elastic IP for a static public IP address.
2. Deploying with Elastic Beanstalk
AWS Elastic Beanstalk simplifies the process of deploying, managing, and scaling Node.js applications. Developers simply upload their Node.js application, and Elastic Beanstalk automatically handles the provisioning of the necessary resources, including load balancers, EC2 instances, security groups, and monitoring tools.
- Create a Node.js application: Develop your Node.js application.
- Prepare for deployment: Ensure your package.json correctly defines dependencies and start scripts.
- Create an Elastic Beanstalk environment: Select the Node.js platform and configure your environment settings (e.g., instance type, database).
- Deploy your application: Upload your application code (e.g., a .zip file) directly through the Elastic Beanstalk console or use the EB CLI. Elastic Beanstalk handles the environment setup, deployment, and scaling.
3. AWS App Runner
AWS App Runner offers a managed service for deploying containerized Node.js applications directly from source code repositories or container registries. App Runner abstracts away infrastructure, automatically handling deployment, scaling, and load balancing, allowing developers to focus solely on application logic and business requirements.
- Containerize your Node.js application: Create a Dockerfile to define your application’s environment and dependencies.
- Push to Amazon ECR: Build your Docker image and push it to Amazon Elastic Container Registry (ECR).
- Create an App Runner service: Configure an App Runner service, specifying your ECR image, environment variables, and scaling settings. App Runner automatically builds, deploys, and scales your containerized application.
This is part of a series of articles about software deployment.
Setting up your Node.js development environment for Elastic Beanstalk
Before deploying to AWS Elastic Beanstalk, it’s important to set up a local Node.js development environment. This allows you to build, test, and troubleshoot your application before pushing it to the cloud.
The following steps guide you through installing the necessary tools and configuring a simple Express server locally. Instructions are adapted from the AWS documentation.
1. Install Node.js
Start by downloading and installing Node.js from the official site at nodejs.org. Choose a version that is supported by Elastic Beanstalk to ensure compatibility during deployment.
Once installed, verify Node.js is available by running:
node -v![]()
This should return the installed version.
2. Confirm npm installation
The Node.js installation also includes the npm package manager. Confirm it’s installed by running:
npm -v![]()
npm is used to manage application dependencies, including frameworks and AWS SDKs.
3. Create the sample Node.js application
Start by creating a project folder and adding a basic server script:
mkdir eb-nodejs
cd eb-nodejs
Create a file named server.js with the following content:
const http = require('node:http');

const hostname = '0.0.0.0';
const port = process.env.PORT || 8080;

const server = http.createServer((req, res) => {
  res.statusCode = 200;
  res.setHeader('Content-Type', 'text/plain');
  res.end('Hello Elastic Beanstalk!\n');
});

server.listen(port, hostname, () => {
  console.log(`Server running at http://${hostname}:${port}/`);
});
Create a file named package.json with the following content:
{
  "name": "hello-eb",
  "version": "1.0.0",
  "private": true,
  "scripts": {
    "start": "node server.js"
  },
  "engines": {
    "node": ">=20"
  }
}
4. Run a quick test
Serve the application using the following command:
npm start
Using your favorite browser, open the following URL: http://<YOUR-IP-Address>:8080
To stop the server, press Ctrl+C.
This local setup mirrors the environment used in AWS Elastic Beanstalk, making it easier to identify and fix issues before deployment. Once your application works locally, you’re ready to deploy it to the cloud.

Tony Kelly is a DevOps marketing leader who drives innovation and awareness of the latest trends in Continuous Delivery.
Quick tutorial: deploy a Node.js application to Elastic Beanstalk
This section walks through the process of deploying a simple Node.js application created in the previous section to AWS Elastic Beanstalk using the EB CLI. It assumes you already have an AWS account and administrative access configured. These instructions are adapted from the AWS quick start guide.
Step 1: install the EB CLI
In order to deploy our Node.js application, we need to install the Elastic Beanstalk CLI. Use the appropriate commands for your operating system.
Ubuntu/Debian
sudo apt update
sudo apt install -y python3-pip
python3 -m pip install --user awsebcli
echo 'export PATH="$HOME/.local/bin:$PATH"' >> ~/.bashrc
source ~/.bashrc
eb --version
Amazon Linux 2023/2
sudo dnf -y install python3-pip || sudo yum -y install python3-pip
python3 -m pip install --user awsebcli
echo 'export PATH="$HOME/.local/bin:$PATH"' >> ~/.bash_profile
source ~/.bash_profile
eb --version
macOS (Homebrew)
brew install awsebcli
eb --version
Step 2: initialize the EB CLI
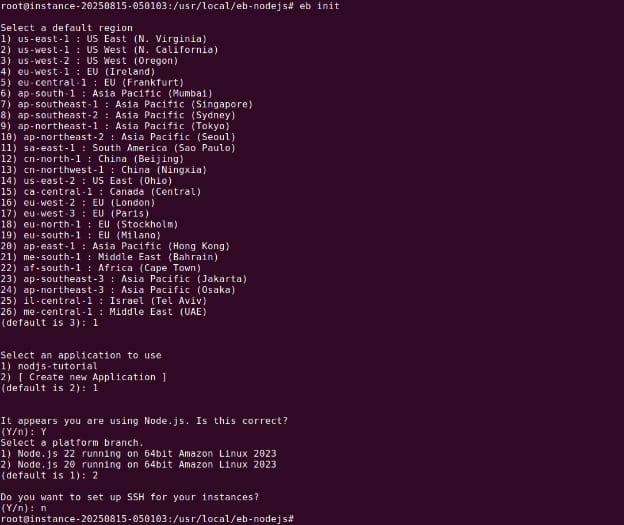
Inside your project directory, initialize Elastic Beanstalk using the interactive option:
eb initYou can now select relevant information in a series of CLI screens. Here is the final screen with all of the options selected:
Step 3: deploy the application
Create a new Elastic Beanstalk environment (single instance without load balancing) and deploy your app:
eb create nodejs-env \
  --region us-east-1 \
  --single \
  --vpc.id vpc-ABCD \
  --vpc.ec2subnets subnet-ABCD \
  --vpc.securitygroups sg-ABCD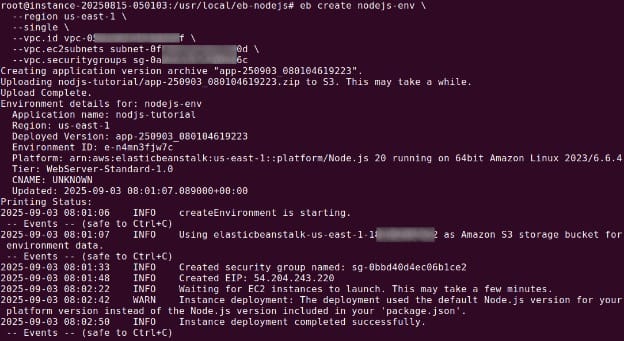
The CLI packages your app and launches a single-instance environment. This process typically takes a few minutes.
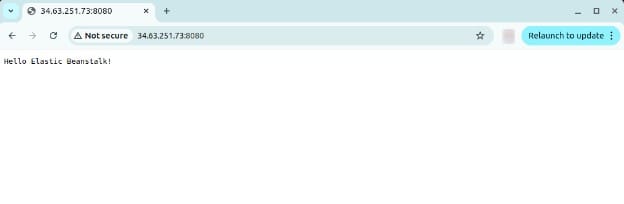
Once deployment is complete, look for Created EIP: x.x.x.x in the output, then copy the IP address and open the app in a browser:

You should see your “Hello Elastic Beanstalk!” message live on the web.
Step 4: terminate the environment
When you’re done, clean up by terminating the environment:
eb terminate
Elastic Beanstalk will delete the associated AWS resources, including EC2, S3, and CloudWatch configurations.
Best practices for deploying Node.js on AWS
Deployment teams should consider the following practices when working with Node.js on AWS.
1. Use Infrastructure as Code (IaC) tools
Using Infrastructure as Code (IaC) tools like AWS CloudFormation or Terraform is essential for consistent and repeatable deployment of Node.js applications. IaC automates the creation, modification, and deletion of AWS resources through version-controlled templates, eliminating manual errors and simplifying the management of complex environments. Developers can spin up identical test, development, and production environments quickly, which aids in thorough testing and faster recovery from incidents.
With IaC, the deployment process becomes more transparent and auditable, as changes to infrastructure are tracked just like code. Automated rollbacks and policy enforcement are also easier to implement, supporting compliance and security requirements. Using these tools not only enhances productivity but also enables organizations to adopt DevOps practices, simplify CI/CD pipelines, and scale their applications confidently on AWS.
2. Use blue/green deployments
Blue/green deployments are a proven strategy for minimizing downtime and reducing deployment risk for Node.js applications. This approach involves maintaining two identical environments: “Blue” (current production) and “Green” (new release). When deploying a new version, traffic is redirected to the Green environment, which is fully tested and ready to serve. If any issues occur, it is simple to switch traffic back to the Blue environment, ensuring a seamless rollback.
Implementing blue/green deployments on AWS can be managed with services like Elastic Beanstalk or CodeDeploy, which support environment swaps and automated lifecycle hooks. This method greatly reduces the risk of failed releases impacting end users, enabling thorough validation before new code goes live.
3. Ensure stateless application design
Stateless application design is critical for scalable and robust Node.js deployments on AWS. In a stateless architecture, each instance of your application operates independently and does not rely on data stored locally or session state tied to a specific server. Instead, application state and session information are externalized through managed services like Amazon ElastiCache or DynamoDB. This facilitates horizontal scaling and fault tolerance, as any instance can handle any request at any time.
Adopting stateless design enables AWS features like Elastic Load Balancing and Auto Scaling to function optimally, distributing traffic efficiently and replacing unhealthy instances without manual intervention. Stateless applications are also easier to update, as rolling deployments and version replacements do not interfere with user sessions or cached data. For Node.js applications expected to scale dynamically or run in distributed environments, stateless design is a best practice that supports both performance and resiliency.
4. Regularly patch Node.js and dependencies
Keeping Node.js and its dependencies up to date is crucial for security and stability when running applications on AWS. Vulnerabilities in the Node.js runtime or third-party packages can expose applications to attacks or reliability issues, so it is important to establish automated processes for detecting and applying patches. Monitoring trusted sources like the Node.js Foundation and npm Advisory helps teams stay informed about critical updates or security advisories relevant to their stack.
On AWS, updating dependencies can be streamlined with CI/CD pipelines that incorporate tools such as npm-audit or Dependabot. Automated testing environments ensure new patches do not break application functionality before being deployed to production. By implementing a routine update schedule and continuous monitoring, organizations can reduce the risk of exploit, maintain compliance, and ensure their Node.js applications remain performant.
5. Use multiple environments
Using multiple environments, such as development, staging, and production, is essential for mitigating risk in Node.js deployments on AWS. Each environment should closely mirror production in terms of configuration and resources, allowing developers to catch issues early and perform thorough testing. By separating development from user-facing production systems, teams can deploy experimental features, run integration tests, and validate infrastructure changes without affecting end users.
AWS supports environment isolation through tools like Elastic Beanstalk’s environment tiers or AWS Organizations, facilitating resource segregation and access controls. Automating the promotion of code between environments as part of the CI/CD workflow ensures consistency and reliability. This layered approach to deployment helps improve software quality, accelerate delivery cycles, and minimize the likelihood of critical failures reaching production.
Help us continuously improve
Please let us know if you have any feedback about this page.