What is a Kubernetes Deployment?
In Kubernetes, a Deployment is an object used to manage and scale the lifecycle of applications on Kubernetes clusters. It abstracts the complexity of configuring, deploying, and managing containerized applications. Deployments ensure that a specified number of pod replicas are running at any time.
By using controlled rollouts, deployments allow updates to an application without downtime, providing resilience and high availability. Deployments handle updates to containerized applications efficiently by orchestrating the rolling out of changes across the pods.
This process includes scaling applications, pausing rollouts, and ensuring each part of the application is in the desired state. The self-healing mechanism automatically replaces failed or terminated pods to maintain the desired state defined by the user’s deployment configuration.
This is part of a series of articles about Kubernetes deployment
Understanding Kubernetes Deployment objects
A deployment object in Kubernetes is a YAML or JSON configuration that defines how an application should be deployed and managed. It specifies details such as the number of replicas, the container image, and update strategies. The deployment controller ensures the actual state of the application matches the desired state defined in this object.
Here is an example Deployment object. This example and other code below is adapted from the Kubernetes documentation:
apiVersion: apps/v1
kind: Deployment
metadata:
  name: nginx-deployment
  labels:
    app: nginx
spec:
  replicas: 3
  selector:
    matchLabels:
      app: nginx
  template:
    metadata:
      labels:
        app: nginx
    spec:
      containers:
      - name: nginx
        image: nginx:1.14.2
        ports:
        - containerPort: 80
Key fields in this deployment object:
- apiVersion: Defines the Kubernetes API version used (e.g.,
apps/v1). - kind: Specifies the type of object (
Deployment). - metadata: Contains information like the deployment’s name and labels.
- metadata.labels: Ensures pods are correctly identified (
app: nginx). - spec.containers: Defines container settings such as:
name: Name of the container (nginx).image: Specifies the container image version (nginx:1.14.2).ports: Exposes port 80 inside the container.
Deployment objects can also include these fields:
- spec.replicas: The number of pod instances.
- spec.selector: Identifies the pods managed by the deployment.
- spec.template: Specifies the pod definition, including containers, images, and environment variables.
- spec.strategy: Defines how updates are applied (e.g., RollingUpdate or Recreate).
Related content: Read our guide to Kubernetes deployment strategy
Kubernetes Deployment usage examples
1. Creating a Kubernetes Deployment
To create the deployment in the example above, run the following command:
kubectl apply -f https://k8s.io/examples/controllers/nginx-deployment.yaml![]()
To check the status of the deployment run:
kubectl get deploymentsExpected output:
NAME               READY   UP-TO-DATE   AVAILABLE   AGE
nginx-deployment 3/3 3 3 10s![]()
The READY column confirms that all three pods are running.
To see the created ReplicaSet, run:
kubectl get rsExpected output:
NAME                          DESIRED   CURRENT   READY   AGE
nginx-deployment-75675f5897 3 3 3 10s![]()
To inspect the pods:
kubectl get pods --show-labels
Expected output:
NAME                                READY   STATUS    RESTARTS   AGE    LABELS
nginx-deployment-75675f5897-7ci7o   1/1     Running   0          10s    app=nginx,pod-template-hash=75675f5897
nginx-deployment-75675f5897-kzszj   1/1     Running   0          10s    app=nginx,pod-template-hash=75675f5897
nginx-deployment-75675f5897-qqcnn   1/1     Running   0          10s    app=nginx,pod-template-hash=75675f5897
This confirms that Kubernetes has created three nginx pods, all managed by the deployment.
2. Updating a Kubernetes Deployment
Updating a deployment allows you to roll out new changes, such as modifying the container image version.
You can update the deployment to use a newer nginx version (1.16.1) using:
kubectl set image deployment/nginx-deployment nginx=nginx:1.16.1Expected output:
deployment.apps/nginx-deployment image updated![]()
Alternatively, you can manually edit the deployment:
kubectl edit deployment/nginx-deployment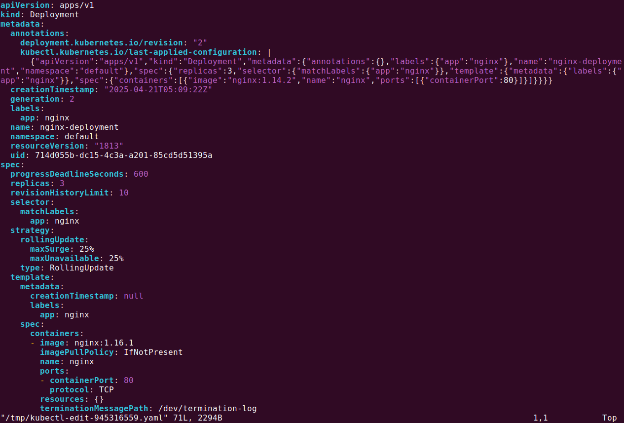
For example, change:
image: nginx:1.14.2To:
image: nginx:1.16.1Save and exit the editor.
![]()
To verify the update, check the rollout status:
kubectl rollout status deployment/nginx-deploymentExpected output:
Waiting for rollout to finish: 2 out of 3 new replicas have been updated...
deployment "nginx-deployment" successfully rolled out![]()
Check the updated deployment:
kubectl get deploymentsExpected output:
NAME               READY   UP-TO-DATE   AVAILABLE   AGE
nginx-deployment 3/3 3 3 48s![]()
Check the ReplicaSets to confirm the new version is active:
kubectl get rsExpected output:
NAME                          DESIRED   CURRENT   READY   AGE
nginx-deployment-1465182306   3         3         3       8s
nginx-deployment-2534380213 0 0 0 48s![]()
The new ReplicaSet (1465182306) is running three pods, and the old ReplicaSet (2035384211) is scaled down to zero.
3. Rolling back a Kubernetes Deployment
If an update introduces issues, you can roll back the deployment to a previous version.
To check rollout history, run:
kubectl rollout history deployment/nginx-deploymentExpected output:
deployments "nginx-deployment"
REVISION    CHANGE-CAUSE
1           kubectl apply --filename=https://k8s.io/tutorial/controllers/nginx-deployment.yaml
2           kubectl set image deployment/nginx-deployment nginx=nginx:2.14.1
To rollback to the last working revision:
kubectl rollout undo deployment/nginx-deployment![]()
To rollback to a specific revision:
kubectl rollout undo deployment/nginx-deployment --to-revision=1![]()
Check if the rollback was successful:
kubectl get deployment nginx-deploymentExpected output:
NAME               READY   UP-TO-DATE   AVAILABLE   AGE
nginx-deployment 3/3 3 3 45m![]()
4. Scaling a Kubernetes Deployment
Scaling a deployment increases or decreases the number of running pods.
Manually scaling
Increase replicas to 20:
kubectl scale deployment/nginx-deployment --replicas=6Expected output:
deployment.apps/nginx-deployment scaled![]()
Check the updated deployment:
kubectl get deploymentsExpected output:
NAME               READY   UP-TO-DATE   AVAILABLE   AGE
nginx-deployment 6/6 6 6 13m![]()
Autoscaling a Deployment
Enable autoscaling based on CPU usage:
kubectl autoscale deployment/nginx-deployment --min=5 --max=20 --cpu-percent=80Expected output:
horizontalpodautoscaler.autoscaling/nginx-deployment autoscaled![]()
5. Kubernetes Deployment with multiple replicas
To ensure high availability and load distribution, you can deploy multiple replicas of a pod. The following YAML creates a deployment with 5 replicas of an nginx container:
apiVersion: apps/v1
kind: Deployment
metadata:
  name: nginx-deployment
  labels:
    app: web
spec:
  replicas: 5
  selector:
    matchLabels:
      app: web
  strategy:
    type: RollingUpdate
  template:
    metadata:
      labels:
        app: web
    spec:
      containers:
      - name: nginx
        image: nginx
        ports:
        - containerPort: 80
Explanation
- replicas: 5 → Ensures 5 pods are running.
- strategy.type: RollingUpdate → Updates pods gradually to prevent downtime.
- template.spec.containers → Defines the container, its image, and exposed ports.
To apply this deployment, run:
kubectl apply -f deployment.yaml![]()
To check running replicas:
kubectl get deployments![]()

Tony Kelly is a DevOps marketing leader who drives innovation and awareness of the latest trends in Continuous Delivery.
Advanced Kubernetes Deployment examples
6. Kubernetes Deployment with resource limits
Setting resource limits ensures pods do not consume excessive CPU or memory, preventing resource exhaustion.
apiVersion: apps/v1
kind: Deployment
metadata:
  name: nginx-deployment
  labels:
    app: web
spec:
  replicas: 5
  selector:
    matchLabels:
      app: web
  strategy:
    type: RollingUpdate
  template:
    metadata:
      labels:
        app: web
    spec:
      containers:
      - name: nginx
        image: nginx
        resources:
          limits:
            memory: 200Mi
          requests:
            cpu: 100m
            memory: 200Mi
        ports:
- containerPort: 80![]()
Explanation:
- limits.memory: 200Mi → The container cannot use more than 200MiB of memory.
- requests.cpu: 100m → The container requests 100 milliCPU to schedule.
- requests.memory: 200Mi → The container initially requests 200MiB of memory.
First get the list of running pods:
kubectl get pods
To verify resource usage, run:
kubectl describe pod <pod-name>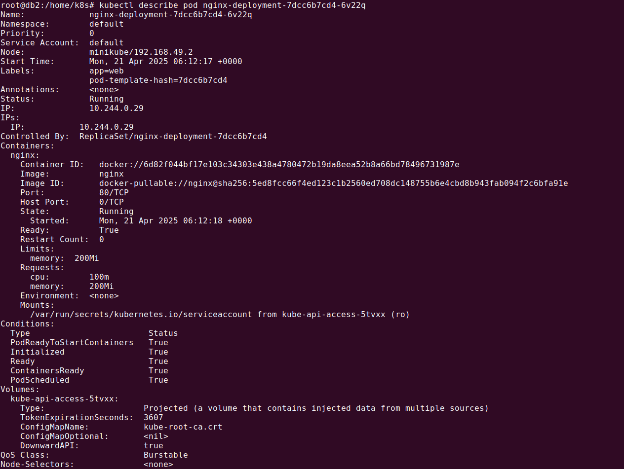
7. Kubernetes Deployment with health checks
Health checks ensure that Kubernetes restarts unresponsive containers automatically.
apiVersion: apps/v1
kind: Deployment
metadata:
  name: nginx-deployment
  labels:
    app: web
spec:
  replicas: 5
  selector:
    matchLabels:
      app: web
  strategy:
    type: RollingUpdate
  template:
    metadata:
      labels:
        app: web
    spec:
      containers:
      - name: nginx
        image: nginx
        ports:
        - containerPort: 80
        livenessProbe:
          httpGet:
            path: /
            port: 80
          initialDelaySeconds: 5
          periodSeconds: 5
Explanation:
- livenessProbe → Kubernetes checks if the container is alive.
- httpGet.path: ”/” → Sends an HTTP request to / to check pod health.
- initialDelaySeconds: 5 → Waits 5 seconds before the first health check.
- periodSeconds: 5 → Checks health every 5 seconds.
To check probe status:
kubectl describe pod <pod-name>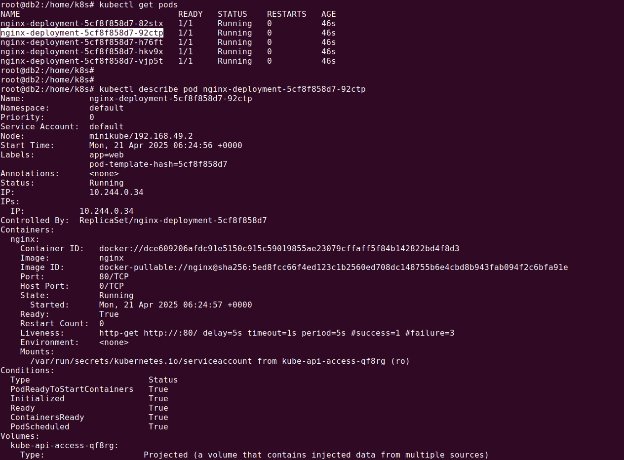
8. Kubernetes Deployment with persistent volumes
Persistent Volumes (PVs) allow containers to retain data even when they restart. This deployment mounts a PersistentVolumeClaim (PVC) inside the container.
apiVersion: apps/v1
kind: Deployment
metadata:
  name: nginx-deployment
  labels:
    app: web
spec:
  replicas: 5
  selector:
    matchLabels:
      app: web
  strategy:
    type: RollingUpdate
  template:
    metadata:
      labels:
        app: web
    spec:
      volumes:
        - name: my-pv-storage
          persistentVolumeClaim:
            claimName: my-pv-claim
      containers:
        - name: nginx
          image: nginx
          ports:
            - containerPort: 80
          volumeMounts:
            - mountPath: "/usr/share/nginx/html"
              name: my-pv-storage
Save above code as deployment.yaml.
We can create PV storage using the following YAML:
apiVersion: v1
kind: PersistentVolumeClaim
metadata:
  name: my-pv-claim
spec:
  accessModes:
    - ReadWriteOnce
  resources:
    requests:
      storage: 1Gi
Save above code as my-pvc.yaml.
Explanation:
- volumes.persistentVolumeClaim.claimName: my-pv-claim → References a predefined PVC.
- volumeMounts.mountPath: “/usr/share/nginx/html” → Mounts storage inside the container.
To create the PVC before applying this deployment:
kubectl apply -f my-pvc.yaml
kubectl apply -f deployment.yaml
9. Kubernetes Deployment with affinity settings
Affinity rules define how pods are scheduled on nodes, optimizing resource distribution.
apiVersion: apps/v1
kind: Deployment
metadata:
  name: nginx-deployment
  labels:
    app: web
spec:
  replicas: 5
  selector:
    matchLabels:
      app: web
  strategy:
    type: RollingUpdate
  template:
    metadata:
      labels:
        app: web
    spec:
      affinity:
        nodeAffinity:
          requiredDuringSchedulingIgnoredDuringExecution:
            nodeSelectorTerms:
              - matchExpressions:
                  - key: disktype
                    operator: In
                    values:
                      - ssd
      containers:
        - name: nginx
          image: nginx
          ports:
            - containerPort: 80
Explanation:
- nodeAffinity → Controls where pods are scheduled.
- requiredDuringScheduling → Ensures pod scheduling respects affinity but does not evict running pods.
- matchExpressions → Filters nodes based on key-value pairs (e.g.,
disktype: ssd).
To check pod scheduling, run:
kubectl get pods -o wide
Automating Kubernetes Deployments with Octopus Deploy
Octopus Deploy is an advanced CD tool. While Kubernetes clusters are responsible for achieving and maintaining this desired state, Octopus handles the configuration and application at the right time, streamlining deployment pipelines. It also provides real-time visibility into application health and configuration by monitoring the cluster’s progress in achieving the desired state, thus simplifying deployment verification.
For organizations new to Kubernetes, Octopus offers a UI to configure deployment manifests from scratch. As organizations mature, we recommend moving towards storing configurations as code. For these scenarios, Octopus supports creating configuration templates that can be adjusted on the fly with environment or project-specific parameters before being applied to a cluster.
Help us continuously improve
Please let us know if you have any feedback about this page.