Octopus integrates with Jira issues. The integration includes the ability to:
- Automatically add links to Jira issues in your Octopus releases and deployments.
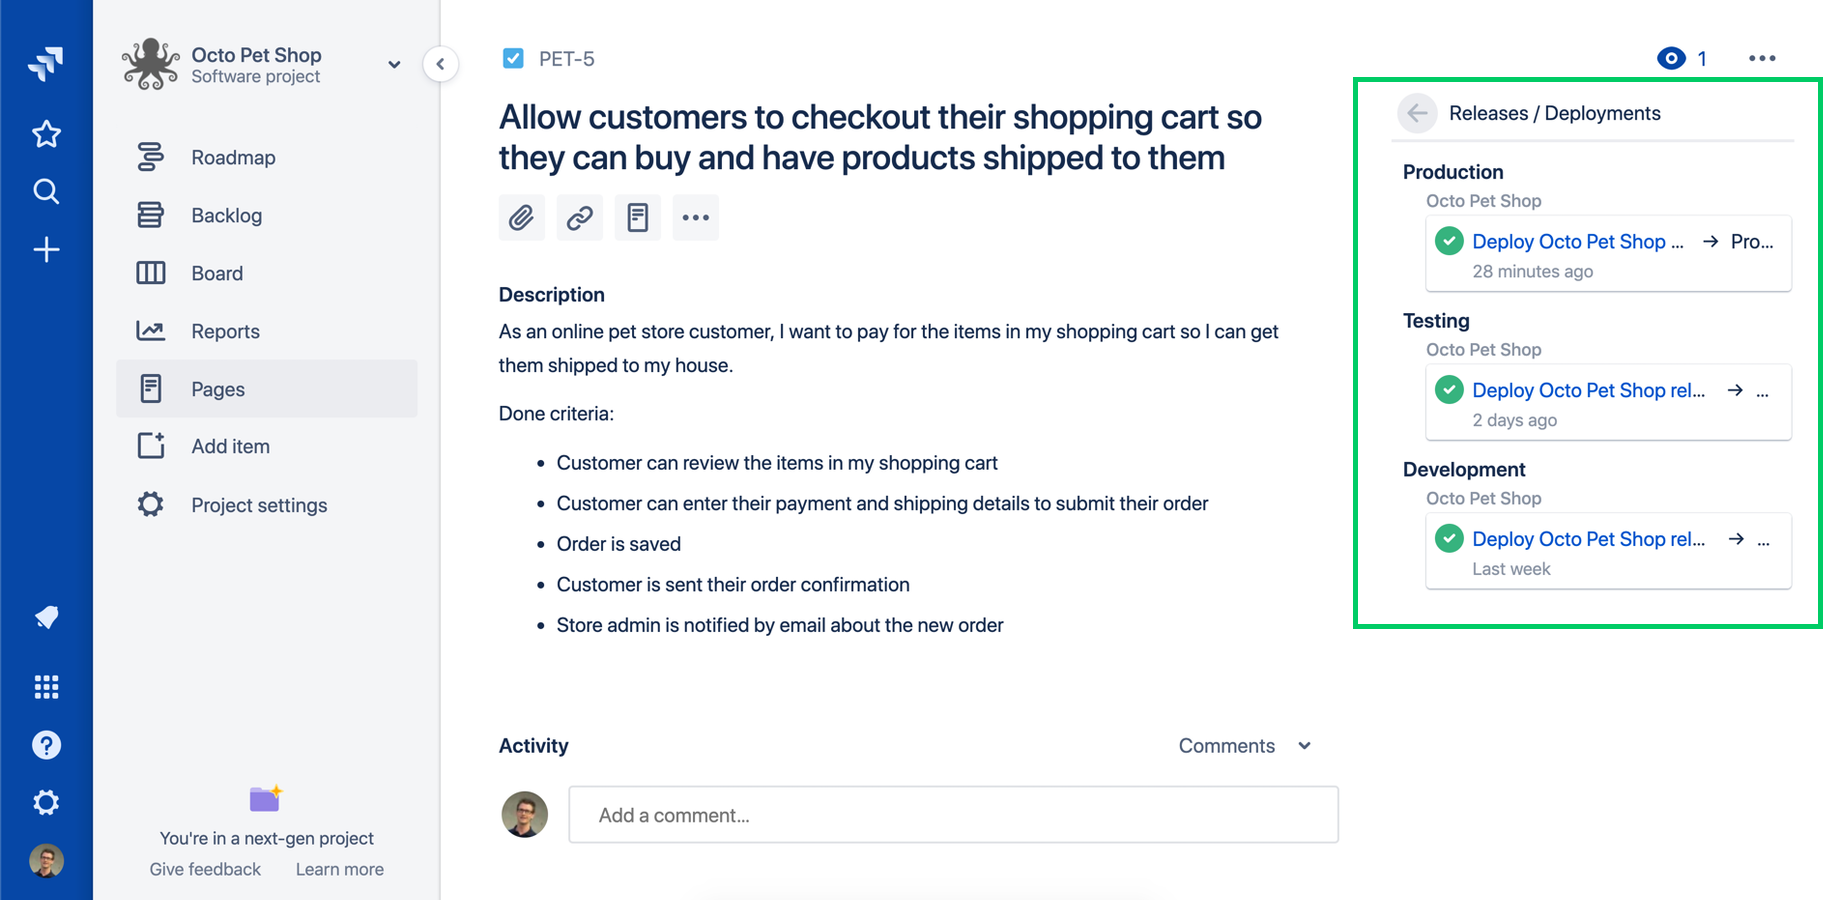
- View release and deployment details from Jira issues (Jira Cloud only).
How Jira integration works
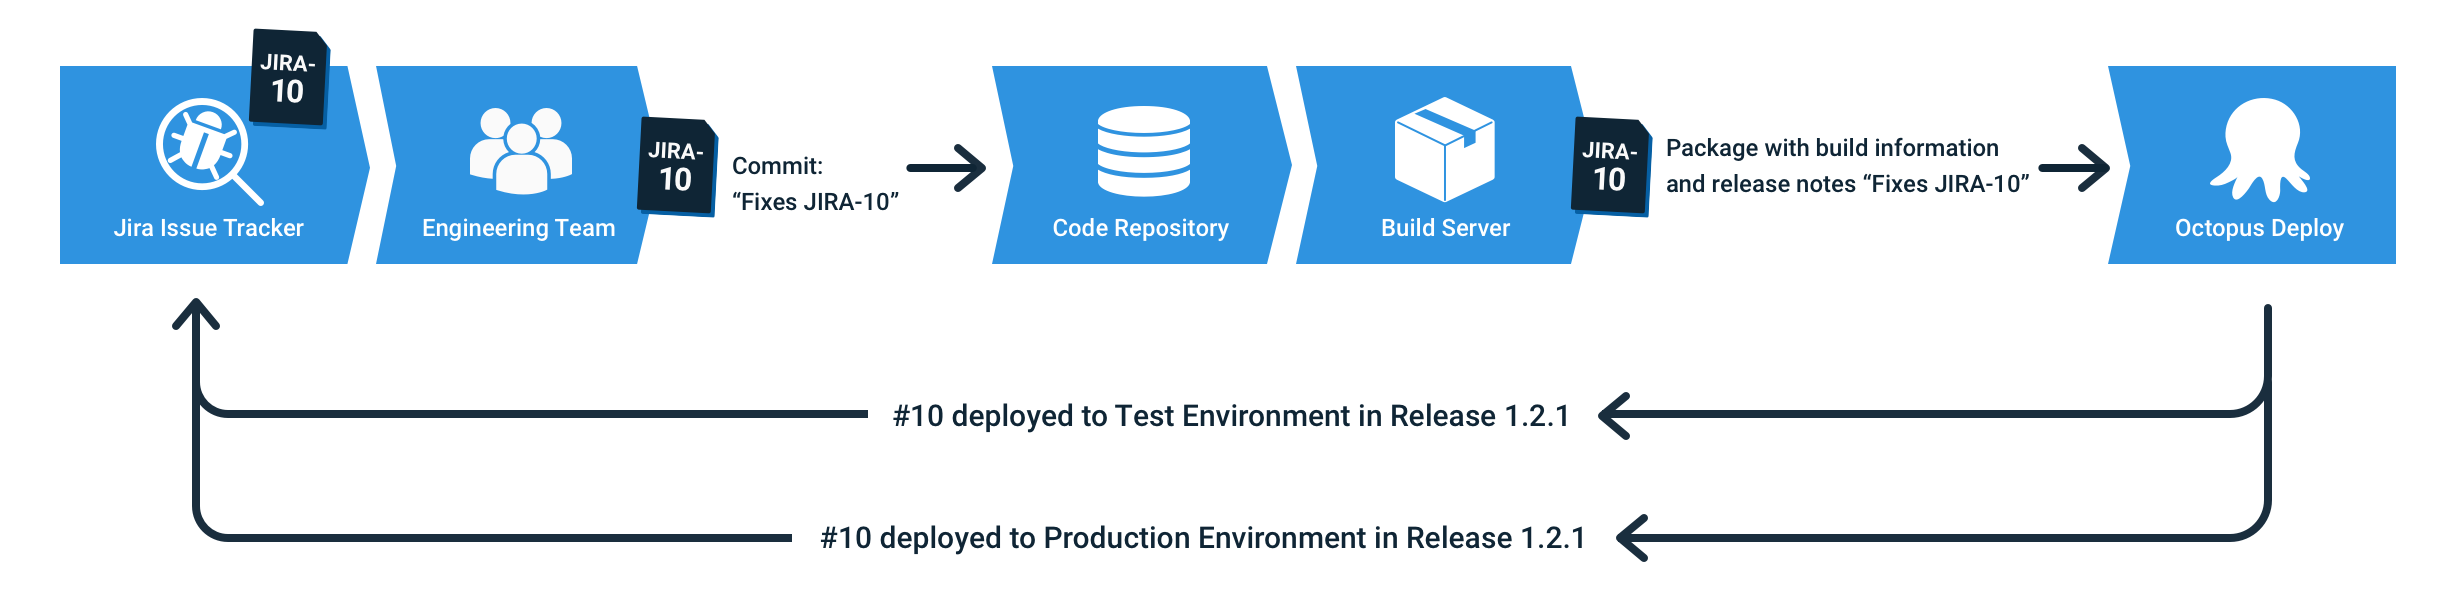
- When you commit code, add a commit message containing one or more Jira issue references.
- The Octopus Deploy plugin for your build server pushes the commits to Octopus. These are associated with a package ID and version (The package can be in the built-in Octopus repository or an external repository).
- The Jira issue-tracker extension in Octopus parses the commit messages and recognizes the issue references.
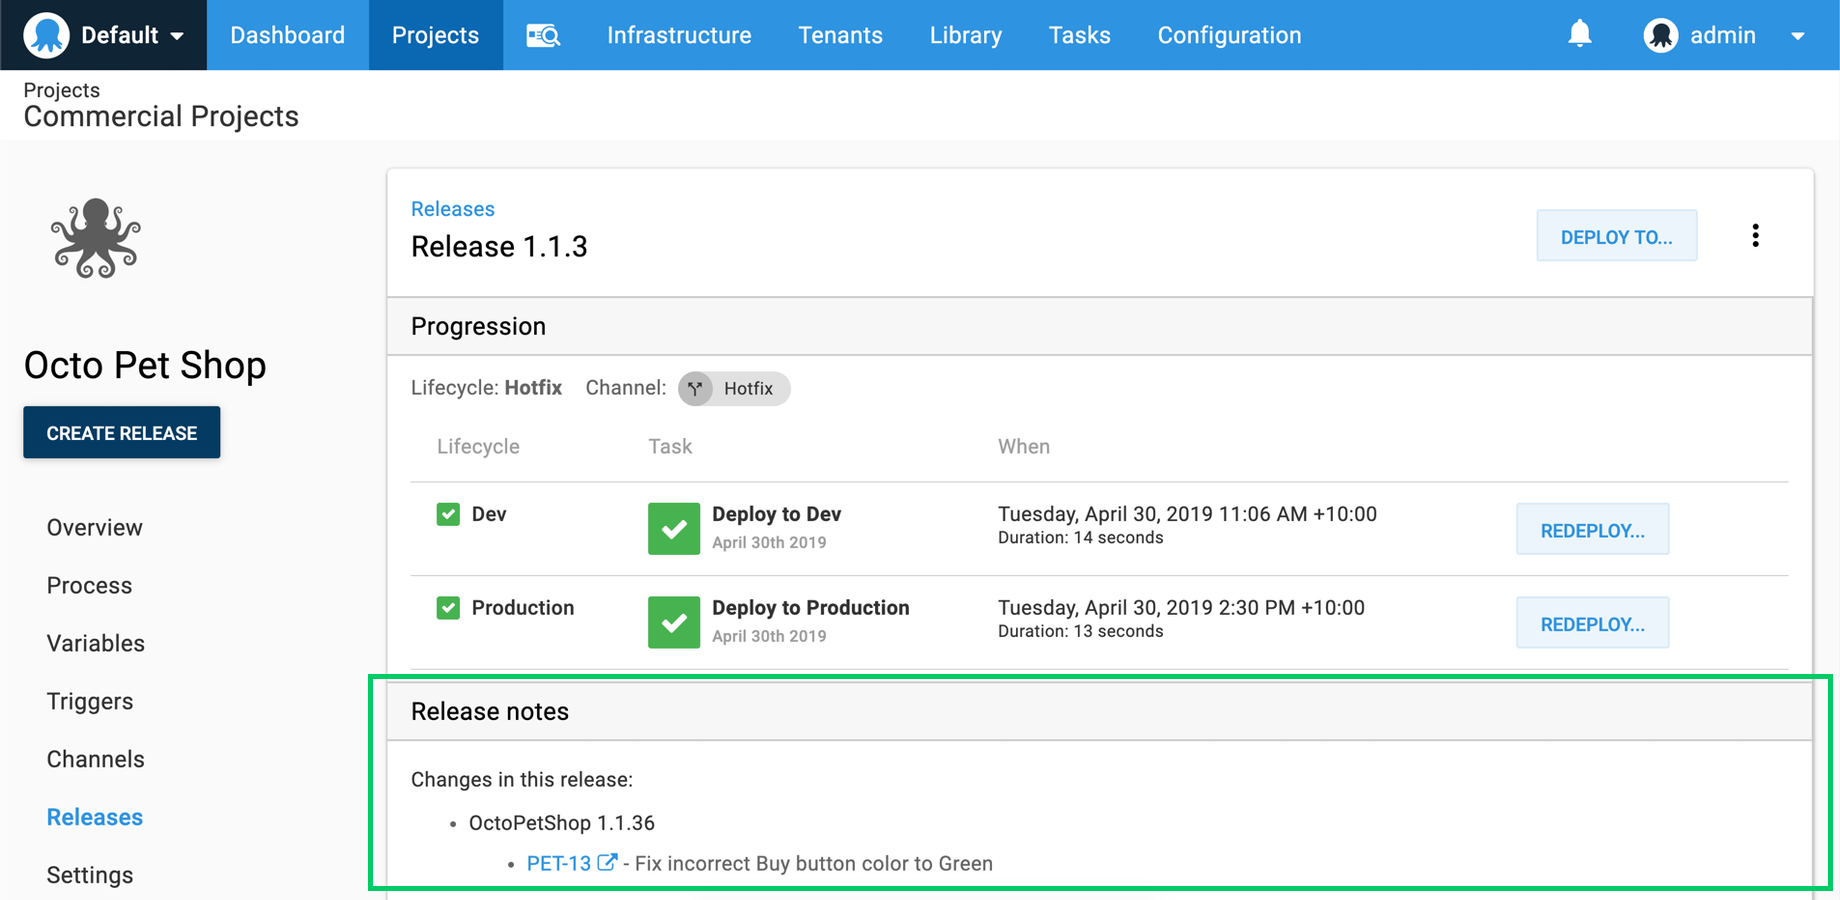
- When creating the release which contains the package version, the issues are associated with the release. These are available for use in release notes, and will be visible on deployments.
- As the release is deployed to each environment, Octopus notifies Jira to update the issue.
From 2025.3 the Jira issue-tracker extension in Octopus will parse both commit messages and branch names for Jira issue references.
Availability
The ability to push the build information to Octopus, which is required for Jira integration, is currently only available in the official Octopus plugins:
Jira Cloud only
The ability to update Jira issues with deployment information (i.e. step 5 above) is only available for Jira Cloud. This is a Jira limitation; the deployment module is not available for Jira Server.
Configuring Jira integration
The following steps explain how to integrate Octopus with Jira.
- Configure your build server to push build information to Octopus. This is required to allow Octopus to know which issues are associated with a release.
- Configure the Jira connection in Octopus Deploy.
Configure your build server to push build information to Octopus
To integrate with Jira issues, Octopus needs to understand which issues are associated with a release. Octopus does this by inspecting commit messages and branch names associated with any packages contained in the release.
To supply the commit messages:
-
Install one of our official build server plugins with support for our build information step.
-
Update your build process to add and configure the Octopus Build Information step.
Connect Octopus to Jira
This section describes how to configure Octopus Deploy to connect to Jira.
Any Octopus instance, self-hosted or cloud-hosted, can be configured to use the Jira integration. The only network connectivity requirements are that your Octopus Server and your browser can connect to the Jira instance. Jira will never actively attempt to connect to Octopus.
The process is slightly different depending on whether you are connecting to Jira Cloud or Jira Server.
Connecting Jira Cloud and Octopus Deploy
If you are using Jira Cloud, you can use the Octopus Deploy plugin for Jira, available from the Atlassian Marketplace, to enable teams to view release and deployment details from Octopus directly in Jira issues. This section and the following steps describe how to configure the plugin.
This process is for Jira Cloud, if you are using Jira Server, see Connecting Jira Server and Octopus Deploy.
-
Install the Octopus Deploy plugin in your Jira Cloud instance.
From the Atlassian Marketplace, add the Octopus Deploy for Jira app and click ‘Get Started’ to configure it. Alternately, the app is also available in Jira by navigating to Jira Settings ➜ Find new apps.
Safari and third-party cookies in an
iframePlease note: The Octopus Deploy for Jira plugin uses cookies, and Safari, by default, discards cookies set in an
iframeunless the host that’s serving theiframehas set a cookie before, outside theiframe. In our case, this does not happen. As a result, attempting to configure our plugin using Safari will fail with a blank screen and a HTTP 400 error in the network tab. Due to this limitation, we recommend using a different browser that allows third-party cookies in aniframe.Note: Keep this configuration page open while you complete the next steps as you need to copy values between Octopus and Jira.
-
Configure the Jira extension in Octopus Deploy.
In the Octopus Web Portal, navigate to Configuration ➜ Settings ➜ Jira Integration and copy the following values from the Jira App configuration page:
- Jira Base URL. This tells Octopus where your Jira instance is located and enables Octopus to render the links back to Jira issues. i.e.,
https://your-jira-instance.atlassian.net. - Jira Connect App Password.
Ensure the Is Enabled property is set.
- Jira Base URL. This tells Octopus where your Jira instance is located and enables Octopus to render the links back to Jira issues. i.e.,
-
In Octopus Deploy Configure the Release Note Options.
-
Jira username/password: Set these values to allow Octopus to connect to Jira and retrieve the Jira issue (work item) title when viewing packages or creating releases. If these are not provided, work items will not be displayed when viewing packages or creating releases.
Jira Cloud only supports API tokens Please note: Jira Cloud only supports an API Token for authentication. An API token should be entered, rather than an actual password. You can create one from an Atlassian account in the Security area.
Scoped (granular) API tokens are not supported Octopus only supports classic (unscoped) Jira API tokens. Jira Cloud scoped API tokens use a different API base URL (
https://api.atlassian.com/ex/jira/<cloudid>/rest/api) and authentication method that Octopus does not currently handle. When creating your API token, ensure you create a classic API token without granular scopes. -
Release Note Prefix (optional): If specified, Octopus will look for a comment that starts with the given prefix text and use whatever text appears after the prefix as the release note, which will be available in the build information as the issue’s description. If no comment is found with the prefix then Octopus will default back to using the title for that issue.
For example, a prefix of
Release note:can be used to identify a customer friendly issue title vs a technical feature or bug fix title. -
-
Ensure the Octopus Server URL is set.
If you are using Octopus Cloud, this value is automatically set for you. If you are not using Octopus Cloud, navigate to the Configuration ➜ Nodes page and ensure you have set the Server URI field to your Octopus Server’s base URL. i.e.,
https://my-company.octopus.apporhttps://my-company-internal-nameNote: Octopus passes this value to Jira so it can build hyperlinks back to the deployments from the Jira UI. It never actually tries to connect to this URL itself. -
Configure the Octopus plugin in Jira.
Navigate to the Configuration ➜ Settings ➜ Jira Integration page in Octopus, copy the Octopus InstallationID, and add it to Jira App configuration.
-
In Octopus Deploy update your environment settings.
Navigate to Infrastructure ➜ Environments to map your Octopus environments to Jira environment types. This is required so Jira can understand Octopus environments and track issue progress.
Note: Jira environment types are a fixed list that cannot be edited.
When configured, this integration will provide Jira with updates about the progress of Jira issues (work items) through the pipeline.
Connecting Jira Server and Octopus Deploy
This process is for Jira Server, if you are using Jira Cloud, see Connecting Jira Cloud and Octopus Deploy.
-
Configure the Jira extension in Octopus Deploy.
In the Octopus Web Portal, navigate to Configuration ➜ Settings ➜ Jira Integration and enter the following values for your Jira instance:
- Jira Base URL. This tells Octopus where your Jira instance is located and enables Octopus to render the links back to Jira issues. i.e.,
https://your-internal-jira-instance/
Ensure the Is Enabled property is set.
- Jira Base URL. This tells Octopus where your Jira instance is located and enables Octopus to render the links back to Jira issues. i.e.,
-
In Octopus Deploy Configure the Release Note Options.
-
Jira username/password: Set these values to allow Octopus to connect to Jira and retrieve the Jira issue (work item) title when viewing packages or creating releases. Note that if these credentials are not provided, work items will not be displayed when viewing packages or creating releases.
Jira Server does not support API tokens Please note: Jira Server does not support API tokens, so a username and password must be entered.
-
Release Note Prefix (optional): If specified, Octopus will look for a comment that starts with the given prefix text and use whatever text appears after the prefix as the release note, which will be available in the build information as the issue’s description. If no comment is found with the prefix then Octopus will default back to using the title for that issue.
For example, a prefix of
Release note:can be used to identify a customer friendly issue title vs a technical feature or bug fix title. -
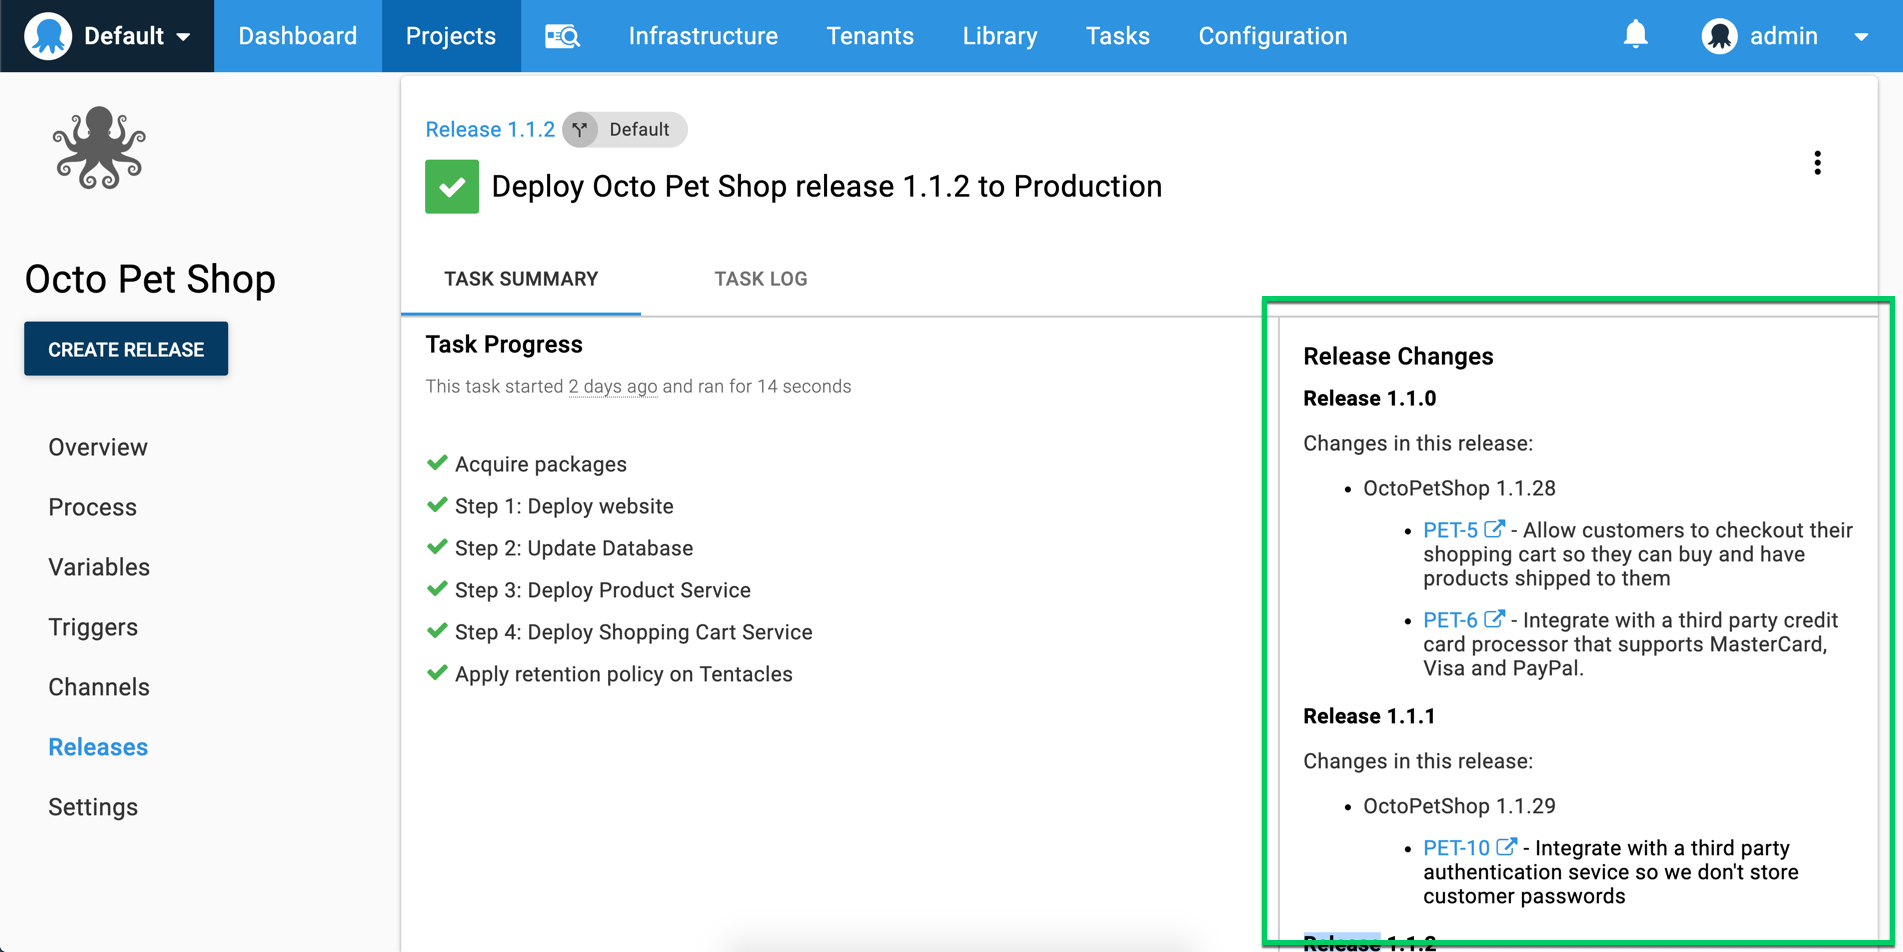
When configured, this integration will retrieve Jira issue details and add details to your releases and deployments and generate release notes automatically.
Test the integration
You can verify a connection can be made successfully between the Octopus Server and your Jira Cloud/Server instance.
The Connect App Test button (found under Jira Connect App Password) checks the connectivity for pushing deployment data to your Jira Cloud instance.

For this connectivity test to succeed the Octopus Server must be able to connect to both your Jira Cloud instance’s URL, and to https://jiraconnectapp.octopus.com, which hosts our Jira plugin.
The Release Notes Test button (found under Jira Password) checks the connectivity to your Jira Cloud/Server instance for retrieving work item information.

For this connectivity test to succeed the Octopus Server must be able to connect to your Jira Cloud/Server instance’s URL.
Deployments
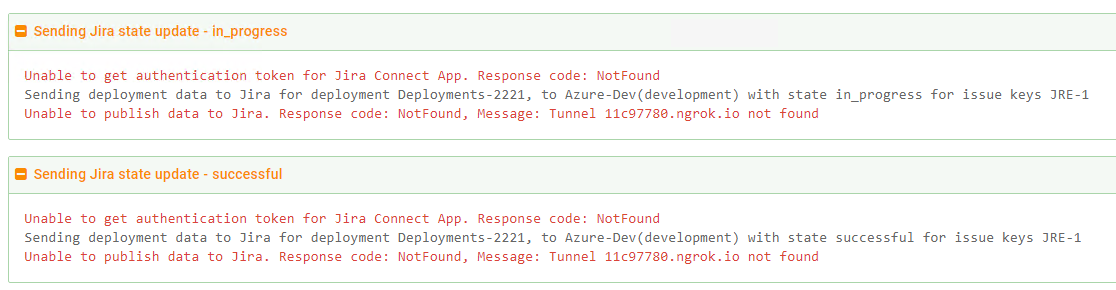
When the Jira Integration is enabled and configured with Connect App settings, you will see blocks similar to the following appear in the log during your deployments. These show the state updates Octopus is sending through to Jira, and if you expand them the details include information about the Jira issues for traceability.

You must configure your build server to push commit information to Octopus. Without this, Octopus will not attempt to update Jira issues.
The following illustrates Octopus attempting to send an in_progress, and then a successful, state change to Jira. In this example, Octopus was unable to connect to Jira or send the state change, however, this does not impact the Octopus deployment itself, the deployment will still be considered a successful deployment.
Troubleshooting
If you’re running into issues with the Jira Integration, it’s possible it could be one of the common problems we get asked about here. If it’s still not working quite right, we are here to help!
Issues after upgrading the Jira Plugin
Change of functionality resulting in Data Loss Please note: The reinstallation of the plugin has worked in the past to restore functionality of the integration. From April 2022 performing the below step will remove all Historical Deployment Information from Jira Cloud. We are waiting on information from Atlassian to confirm if this is a permanent or temporary feature. Please contact support@octopus.com for the latest information regarding this issue.
If you find a previously working Jira integration has stopped working after upgrading the Jira plugin, then you may need to uninstall and reinstall the Jira plugin from the Atlassian marketplace. During configuration of the reinstalled Jira plugin, you will be provided with a new Jira Connect Password which will need to be entered into the Jira Settings page on your Octopus Server.
Map Jira environments to Octopus environments
If your deployments aren’t being displayed in Jira, this likely means you will need to double-check that your Octopus environments are correctly mapped to your Jira environments.
Navigate to Infrastructure ➜ Environments, and next to each environment click on the overflow menu (...) and click Edit. From here, you can map each Octopus environment to your corresponding Jira environment.
Ensure casing on issue/work item IDs match
The commits that are pushed to Octopus as build information need to have the exact same case as the issue/work item found in Jira. For example, if the work item in Jira is OBJ-123, but your commit message or branch name includes the work item as obj-123 (notice the lower-case value) you will need to remediate the case in your commits. This will allow the deployment status update to appear in Jira successfully.
Push build information before creating a release
If you push build information to Octopus after a release is created, the build information won’t be included in the release. This is because the information is included in the release snapshot. To ensure your release contains any build information, push the build information before you create a release.
If you have a built-in package repository trigger (formerly Automatic release creation) enabled for a specific package step, you will need to push build information before you push the configured package to the built-in repository.
Check the entire package ID
If you find your work items or other build information aren’t showing up in your releases, make sure your package ID as shown in the release is the exact same as it is found in the Library ➜ Build Information section. Some package ID values, particularly those found in external feeds must include the repository. For example, if you were pushing build information for the Docker image octopusdeploy/worker-tools, the value for the package ID needs to include the repository name of octopusdeploy/ as well as the name of the Docker image, not just worker-tools.
Check the package ID is not dynamically generated
Build information and work items may not appear in a release or deployment if you dynamically select a package ID at deployment time.
See the dynamic package tradeoffs section for more information.
Learn more
Help us continuously improve
Please let us know if you have any feedback about this page.
Page updated on Friday, June 6, 2025