As of December 2025 the Octopus Deploy add-on for Bamboo has reached end of life (EOL), in line with Atlassian’s end of life timeline plans for Data Center products.
Alternative features to flow artifacts from your CI system into Octopus are; external feed triggers and Built-in package repository triggers.
If you are an Atlassian Data Center user and Octopus customer and need help reach out to Octopus Support.
The Octopus Deploy add-on for Bamboo allowed packages to be uploaded to an Octopus Server, as well as creating, deploying and promoting releases to your Octopus Deploy environments. The add-on does this by running the Octopus CLI.
Getting started
The plugin relies on a local copy of the Octopus CLI being available to the build agent. The command line tool can be downloaded from the Octopus Deploy Download page.
Note that while the command line tool package is largely self-contained, some Linux distributions require additional libraries to be installed before .NET Core applications will run. These packages are documented at the Get started with .NET Core website.
To verify that the command line tool can be run, execute it from a terminal. When run with no arguments, the Octo executable will display a list of available commands.
Installing the add-on
Follow the instructions at Installing add-ons to install the Octopus Deploy Bamboo add-on.
A typical workflow for pushing packages and deploying releases
There are a number of typical steps that are required to push a package to Octopus Deploy and deploy a release:
- Build the application with Bamboo.
- Create a package that contains the application files.
- Push the package to Octopus Deploy.
- Create a release in Octopus Deploy.
- Deploy a release with Octopus Deploy.
1. Build the application
We’ll assume that there is already a Bamboo build plan in place that successfully builds an application.
2. Create the package
With the application built, we need to add it to an archive that complies with the Octopus Deploy versioning requirements. In this example we will stick to a simple AppName.Major.Minor.Patch SemVer format.
Creating the package is done with the Octopus Deploy: Pack Packages task. In addition to the common configuration fields, this task requires the name of the package, the type of package to create, the version number of the package, the base folder containing the files to be packaged, paths to be included in the package, and enabling any existing package files to be overwritten.
This steps runs the pack command on the command line tool.
If you are building .NET applications on an instance of Bamboo hosted on Windows, you may prefer to use OctoPack to build a package instead of manually packaging the application with the Octopus Deploy: Pack Packages task.
Package ID
The Package ID field defines the name or ID of the package to be created. In this example we will use the ID myapplication.
Version number
The Version number fields defines the version of the package to create. This field is optional, but it is highly recommended that the version be generated from the Bamboo build number. We will set the version to 0.0.${bamboo.buildNumber}.
Package format
The Package format options allow you to build either a ZIP or a NUGET file. ZIP is the recommended format.
Package base folder
The Package base folder option defines the base folder that contains the files that are to be packed up.
For a Java application built by Maven, the files will typically be found under the folder ${bamboo.build.working.directory}/target.
For a Java application built by Gradle, the files will typically be found under the folder ${bamboo.build.working.directory}/build/libs.
For a .NET application the files will typically be found under a folder like ${bamboo.build.working.directory}/myapplication/bin/Release/netcoreapp1.1.
Package include paths
The Package include paths field lists the files that are to be packed into the package.
For a Java web application you would typically pack the WAR file, which can be included with the path *.war.
For .NET applications you would typically be packing all application files like executables, config files and DLLs so leave this blank unless you wish to specify a specific set of files.
Overwrite existing package
Selecting the Overwrite existing package option means that any existing local packages will be overwritten. It is useful to select this option because it means that packages can be repacked without error if the Bamboo build plan is rerun.

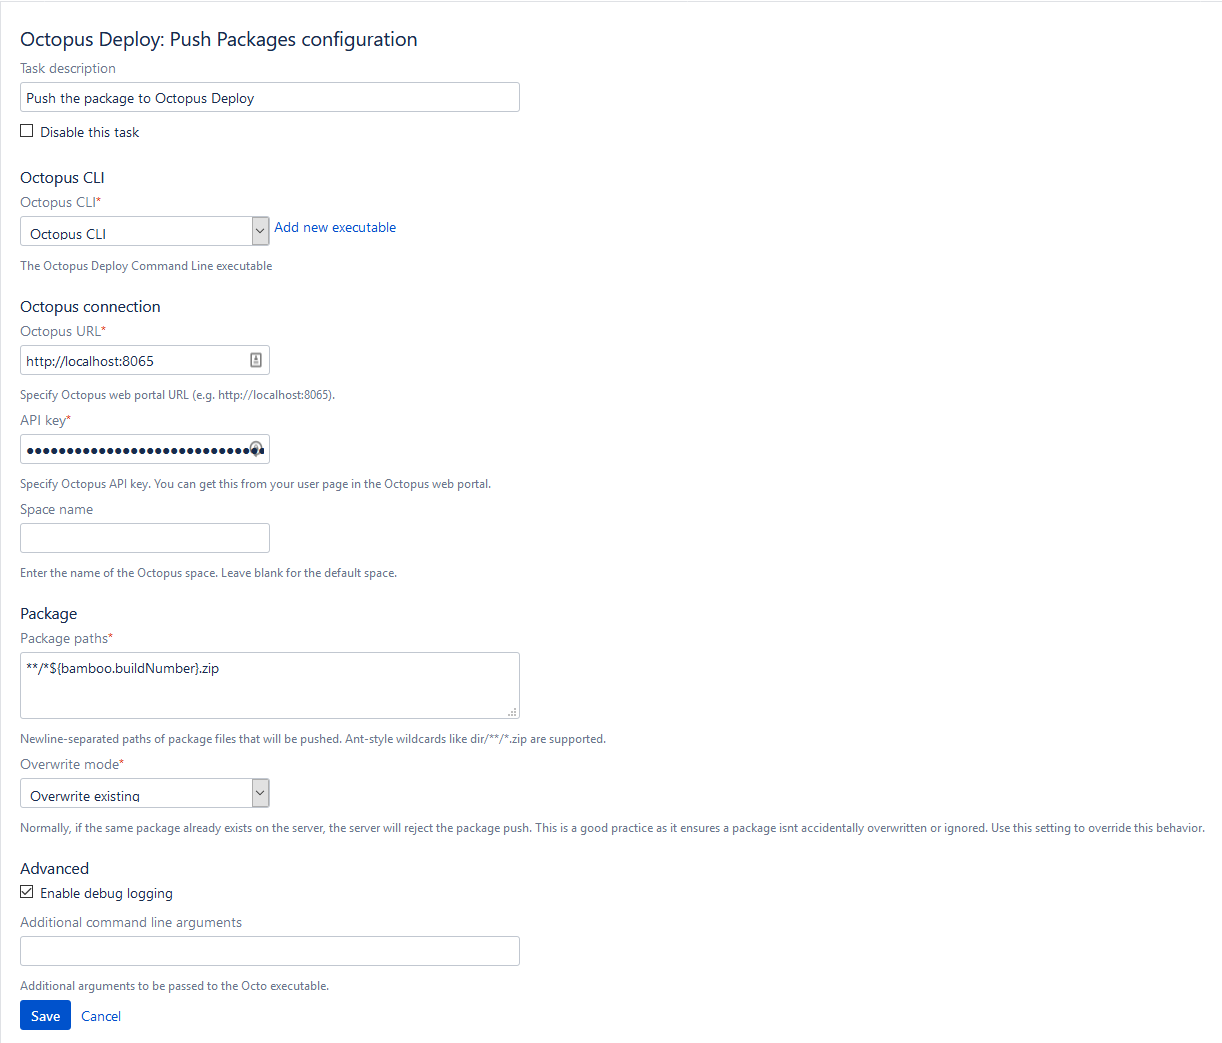
3. Push the packages
Pushing the package to Octopus Deploy is done with the Octopus Deploy: Push Packages task. In addition to the common configuration fields, this task requires the paths to the packages to be pushed and forcing package uploads.
This step runs the push command on the command line tool.
Package paths
The Package paths field defines the Ant paths that are used to match packages to be pushed to Octopus Deploy. The Ant path **/*${bamboo.buildNumber}.zip matches the zip file created with during the previous step.
Note that it is recommended that the package paths defined here are specific to the build. While the Ant path **/*.zip does match the package, it also match any old packages that might have been created in previous builds and not cleaned up. This means these less specific paths can result in old packages being uploaded, which is usually not the desired result.
Overwrite mode
The Overwrite mode option can be used to control what should happen if the package already exists in the repository; the default behavior is to reject the new package being pushed (FailIfExists). You can override this behavior by using either the OverwriteExisting or IgnoreIfExists overwrite mode.
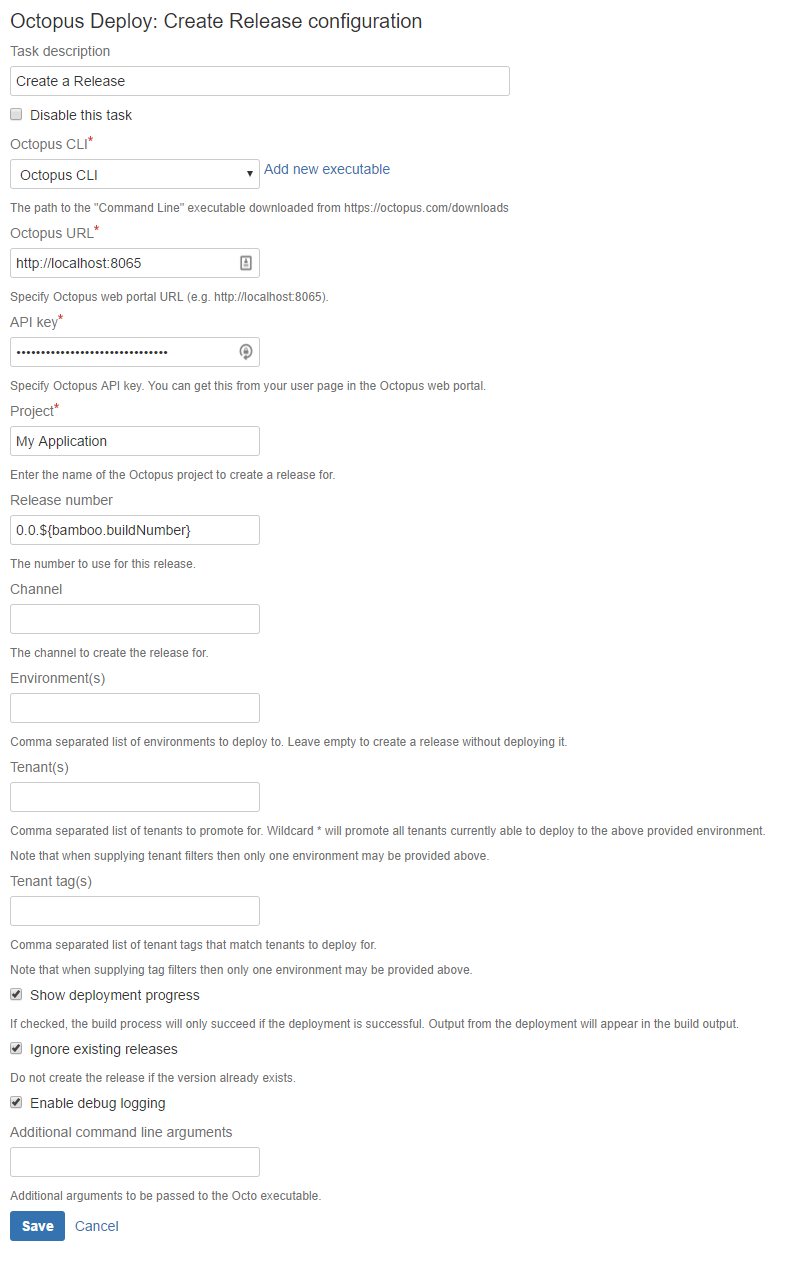
4. Create a release
Creating a release is done with the Octopus Deploy: Create Release task. In addition to the common configuration fields, this task requires the Octopus Deploy project to create the release for and the version number of the release.
This steps runs the create-release command on the command line tool.
Project
The Project field defines the name of the Octopus Deploy project that the release will be created for.
Release number
The Release Number field defines the version number for the release.
Although this field is optional, it is highly recommended that the release number be tied to the Bamboo build number e.g. 0.0.${bamboo.buildNumber}. The reason for this is Bamboo allows you to rebuild old builds, and if the Release number is not defined it will be assigned a default version number in Octopus Deploy. This can lead to a situation where build number 10 in Bamboo is rebuilt, and release number like 0.0.128 is created in Octopus Deploy, which is almost certainly not the desired result.
Environment(s)
The Environment(s) field defines the Octopus Deploy environments that the new release is to be deployed to.
It is recommended that this field be left blank, because the Ignore existing releases option needs to be enabled to allow builds to be rebuilt, and if the environment already exists and the Ignore existing releases option is enabled no deployments will take place. We’ll use a dedicated step to handle deployments.
Ignore existing releases
The Ignore existing releases option can be selected to skip the create release step if the release version already exists.
Tick this option, as it allows builds to be rebuilt. Otherwise, rebuilds will attempt to recreate an existing environment and the step will fail.
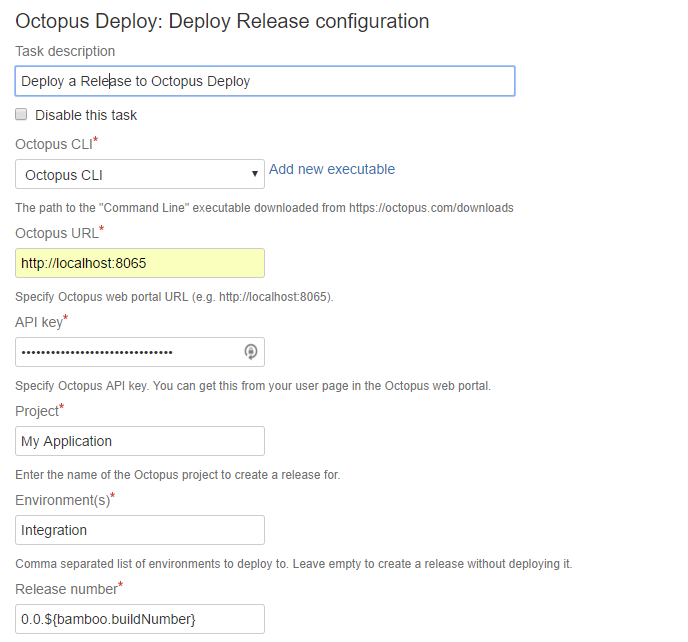
5. Deploy a release
Releases can be deployed with the Octopus Deploy: Deploy Release task. In addition to the common configuration fields, this task requires the Octopus Deploy project to deploy, the environments to deploy to, and the release number to deploy.
This steps runs the deploy-release command on the command line tool.
Project
The Project field defines the name of the Octopus Deploy project that the deployment will be done for.
Environment(s)
The Environment(s) field defines the Octopus Deploy environments that the release is to be deployed to.
Release number
The Release Number field defines the release version number to deploy. This should match the release number from the create release step i.e. 0.0.${bamboo.buildNumber}.
Promote a release (optional, and not recommended)
Releases can be promoted to new environments with the Octopus Deploy: Promote Release task. In addition to the common configuration fields, this task requires the Octopus Deploy project to deploy, the environment to promote from, and the environment to promote to.
This steps runs the promote-release command on the command line tool.
Because the promotion from one environment to another is not tied to any particular release number, adding this task to a Bamboo build plan means every time the plan is run (or more importantly rerun), releases will be promoted between environments. This is almost certainly not the desired result, and so it is not recommended that promotions be done as part of a Bamboo build plan.
Project
The Project field defines the name of the Octopus Deploy project that the deployment will be done for.
Promote from
This Promote from field defines the environment whose release will be promoted to the Promote to environment.
Promote to
This Promote to field defines the environment whose release will be promoted from the Promote from environment.
Common configuration
All Octopus Deploy tasks share a number of common configuration fields.
Octopus URL
The Octopus URL field defines the URL of the Octopus Server that the package will be pushed to. This URL must include the scheme http:\\ or https:\\, and also include the port if it is not the default of 80 or 443.
API key
The API key field defines the API key that is used to authenticate with the Octopus Server. See How to create an API key for more information.
Octopus CLI
The Octopus CLI field references a Bamboo capability that defines the path to the Octopus Deploy Command Line tool.
Click the Add new executable link to specify the location of the command line tool. The Executable label can be anything you want, and the Path is the full path to the command line tool executable file.

Enable debug logging
The Enable debug logging option is used to enable detailed logging from the command line tool.
Additional command line arguments
The Additional command line arguments field is used to specify additional arguments to pass to the command line tool.
You can find more information on the arguments accepted by the command line tool on the
Octopus CLI page.
Using Bamboo deployment plans
The Octopus Deploy add-on tasks can be used either in Bamboo build or deployment plans. Where you use these tasks is up to you.
If you already have a number of environments set up in Bamboo, it may make sense to create and deploy Octopus Deploy releases from the Bamboo deployment plan. Doing so allows you to retain the familiar Bamboo build and deployment workflow, while having Octopus Deploy do the actual deployment.
The recommended task sequence for a deployment project in Bamboo is this:
- A
Octopus Deploy: Push Packagestask in the Bamboo build plan with a package version number linked to the Bamboo build number and theForce overwrite existing packagesselected. - A
Octopus Deploy: Create Releasetask in the Bamboo deployment plan with aRelease numberlinked to the Bamboo build number, theIgnore existing releasesoption selected, and noEnvironments(s)set to deploy to. - A
Octopus Deploy: Deploy Releasetask in the Bamboo deployment plan with aRelease numberlinked to the Bamboo build number.
These steps will allow packages to be pushed and re-pushed, and new releases to be created, deployed and rolled back to previous releases.
Troubleshooting
Unexpected behavior in deployment plans
There are some issues to keep in mind when using the Octopus Deploy add-on tasks from a Bamboo deployment project.
The first issue is that the Octopus Deploy: Create Release task is only suitable for creating and optionally deploying new releases, not rolling back to previous releases. Consider these following scenarios:
- The create release task is defined with no release number. Each time it is run, or rerun via a rollback initiated via the Bamboo deployment project, this task will create a new release in Octopus Deploy. This is not appropriate behavior for a Bamboo deployment project.
- The create release task is defined with a fixed release number related to the Bamboo build. To allow this task to be rerun without error, the
Ignore existing releasesoption needs to be selected. WhenIgnore existing releasesis selected, the create release task is essentially skipped during a rerun, meaning no deployment is done. This is not the expected behavior of a rollback initiated via the Bamboo deployment project.
The second issue is that the Octopus Deploy: Promote Release task may not work as you expect when used with a Bamboo deployment plan. Because the promotion from one environment to another is not dependent on any release versions, every time this step is run it will attempt to promote a release forward in Octopus Deploy, even if the task was run as part of a rollback.
For this reason it is recommended that the promote release task not be used as part of either a Bamboo build or deployment plan.
Octopus command line tool failed to run in Linux
The Octopus Command Line tool packages for Linux are relatively self-contained, but depending on your Linux distribution you may need to install some additional dependencies for the command line tool to run.
For example, in Centos 7 you might see this error:
Failed to load /tmp/libcoreclr.so, error: libunwind.so.8: cannot open shared object file: No such file or directory
Failed to bind to CoreCLR at '/tmp/libcoreclr.so'
The solution is to install the packages detailed at the Get started with .NET Core website.
sudo yum install libunwind libicuManually running the command line tool
The Bamboo build logs show how the command line tool is run. Look for log messages like this:
running command line: \n/opt/octocli/Octo push --server http://localhost --apiKey API-....................XXXXXX --replace-existing --debug --package /opt/atlassian-bamboo-6.0.0/xml-data/build-dir/BPT-TBD-JOB1/myapplication.0.0.5.tar.gzThis is the command that was run to perform the actual interaction with the Octopus Server, with the exception of the redacted API key. You can take this command and run it manually to help diagnose any issues.
Bamboo variables
A number of the Bamboo step fields in this document have used Bamboo variables to reference build numbers and local paths.
You can find a list of variables exposed by Bamboo at the Bamboo Variables page.
Error codes
Error conditions encountered by the add-on have unique error codes, which are listed here.
| Error Code | Description |
|---|---|
| OCTOPUS-BAMBOO-INPUT-ERROR-0001 | No matching files could be found to push to Octopus Deploy. Check that the file pattern matches a file in the Bamboo working directory. |
| OCTOPUS-BAMBOO-INPUT-ERROR-0002 | A required field was empty. |
| OCTOPUS-BAMBOO-INPUT-ERROR-0003 | The server capability that defines the path to the Octopus CLI has an incorrect path. Make sure The path you assigned to the Octopus CLI is correct. |
Learn more
- Generate an Octopus guide for Bamboo and the rest of your CI/CD pipeline.
Help us continuously improve
Please let us know if you have any feedback about this page.
Page updated on Monday, December 1, 2025