Octoterra exports Octopus projects, runbooks, and spaces to a Terraform module. Octoterra can be used to migrate resources between spaces and instances.
Octoterra Wizard prepares a source space to allow the space and project level resources to be migrated to a destination space or instance. It configures runbooks on the source space to run Octoterra and to apply the Terraform modules created by Octoterra.
This documentation provides details on using the Octoterra Wizard to migrate a space from one instance to another as well as noting the limitations of the tooling and any post-migration steps that must be implemented.
This process is experimental and is only to be used when directed by the support or sales team.
Choosing between Octoterra and the Import/Export tool
The Import/Export tool is built into Octopus and provides much of the same functionality as the Octoterra Wizard.
Typically, you would choose the Import/Export tool to perform a migration. However, there are cases where the Import/Export tool is not suitable:
- You wish to migrate Config-as-Code (CaC) projects, as the Import/Export tool does not support CaC projects.
- You wish to recreate targets, as the Import/Export tool does not migrate targets.
- You wish to “own” or modify the intermediate format used for the migration, as the Import/Export tool uses an undocumented JSON format.
Limitations of Octoterra and migrating projects between instances
There are limitations that must be accounted for as part of a migration managed by the Octoterra Wizard.
Sensitive values
Sensitive values are not exposed by the Octopus API and are therefore not captured in the Terraform modules created by Octoterra.
However, sensitive variables can be passed to the Terraform module when the source Octopus instance deploys Terraform configuration, as Octopus exposes sensitive values to a deployment process or runbook. The core purpose of the Octoterra Wizard is to configure the source Octopus server to execute the Terraform modules created by Octoterra in order to expose the sensitive values held by Octopus.
In order to ensure sensitive variables can be passed to the Terraform configuration, all sensitive variables must be unscoped and have a unique name. Existing sensitive variables can be modified to fulfil these requirements by spreading them. See the section “Spreading sensitive variables” for more information.
The sensitive values associated with feed, account, and Git credentials, the contents of certificates, sensitive values embedded in steps (such as the Deploy to IIS step), and sensitive values defined as parameters on step templates can not be captured by Octoterra. These values are replaced with placeholder values and must be manually reentered on the destination instance once the space has been migrated. See the “Post-migration steps” for more details.
New step framework
Some steps rely on a new steps framework. Steps that use the new steps framework are not currently supported by the Terraform provider, meaning these steps can not be exported by Octoterra.
Octoterra will display an error like this when an unsupported step is encountered:
Action <step name> has the "Items" property, which indicates that it is from the new step framework. These steps are not supported and are not exported.Config-as-Code (CaC) repositories
Octoterra converts CaC projects back to regular projects as part of the migration. The project can be converted back to CaC on the destination space once the migration is complete.
However, be aware that Octopus does not support sharing project CaC configuration between two projects. You are prevented from doing so with multiple CaC projects on a single Octopus instance. While you are not prevented from configuring two projects against a shared CaC project configuration from multiple Octopus instances, there are cases where the CaC configuration references space specific resource IDs, such as step templates, which have unique (and incompatible) IDs across spaces and instances. This means you can not assume you can configure a new project in a new space or on a new instance against an existing project CaC configuration hosted in Git.
The recommended solution is to convert the projects in the destination space to a new directory or Git repository. This ensures that the new projects have valid CaC configuration.
Other settings
The following is a non-exhaustive list of settings that are not exported by Octoterra:
- Users, teams, and roles
- Authentication settings
- Packages in the built-in feed
- Audit logs
- Releases and deployments
- Runbook runs
- Subscriptions
- API Keys
- SEIM settings
- ITSM settings
- GitHub app connections
- License details
- Node configuration
- SMTP settings
- Insights dashboards
- OIDC accounts
Prerequisites
These are the prerequisites for migrating an Octopus space with the Octoterra Wizard:
- Backup and update your Octopus instance.
- Backup your Octopus instance again before the migration.
- Download the Octoterra Wizard from GitHub.
- Install Terraform on your local workstation.
- Create an API key for the source Octopus instance.
- Create an API key for the destination Octopus instance.
- Create a remote Terraform backend to maintain the state of the Terraform resources. AWS S3 and Azure Storage Accounts are supported.
- Install any required local tools. See the “Local Tools vs Container Images” section for more details.
Running the wizard
The Octoterra Wizard presents a sequence of prompts for the details of your source Octopus space, the destination Octopus space, and the Terraform backend.
The wizard also prompts you to spread sensitive variables after confirming that you understand the implications of modifying variables in this manner. See the “Spreading sensitive variables” section for more details on the implications of this step.
You are given the choice to use local tools or container images when running the runbooks to create and apply the Terraform modules. See the “Local Tools vs Container Images” section for more information on making this choice.
The final prompts do not involve any input. They automate the process of installing the required community step template steps into the source space, creating runbooks to export the space level resources and projects, and finally running the runbooks. See the “Space vs project level resources” section for more information on the distinction between these types of resources.
Spreading sensitive variables
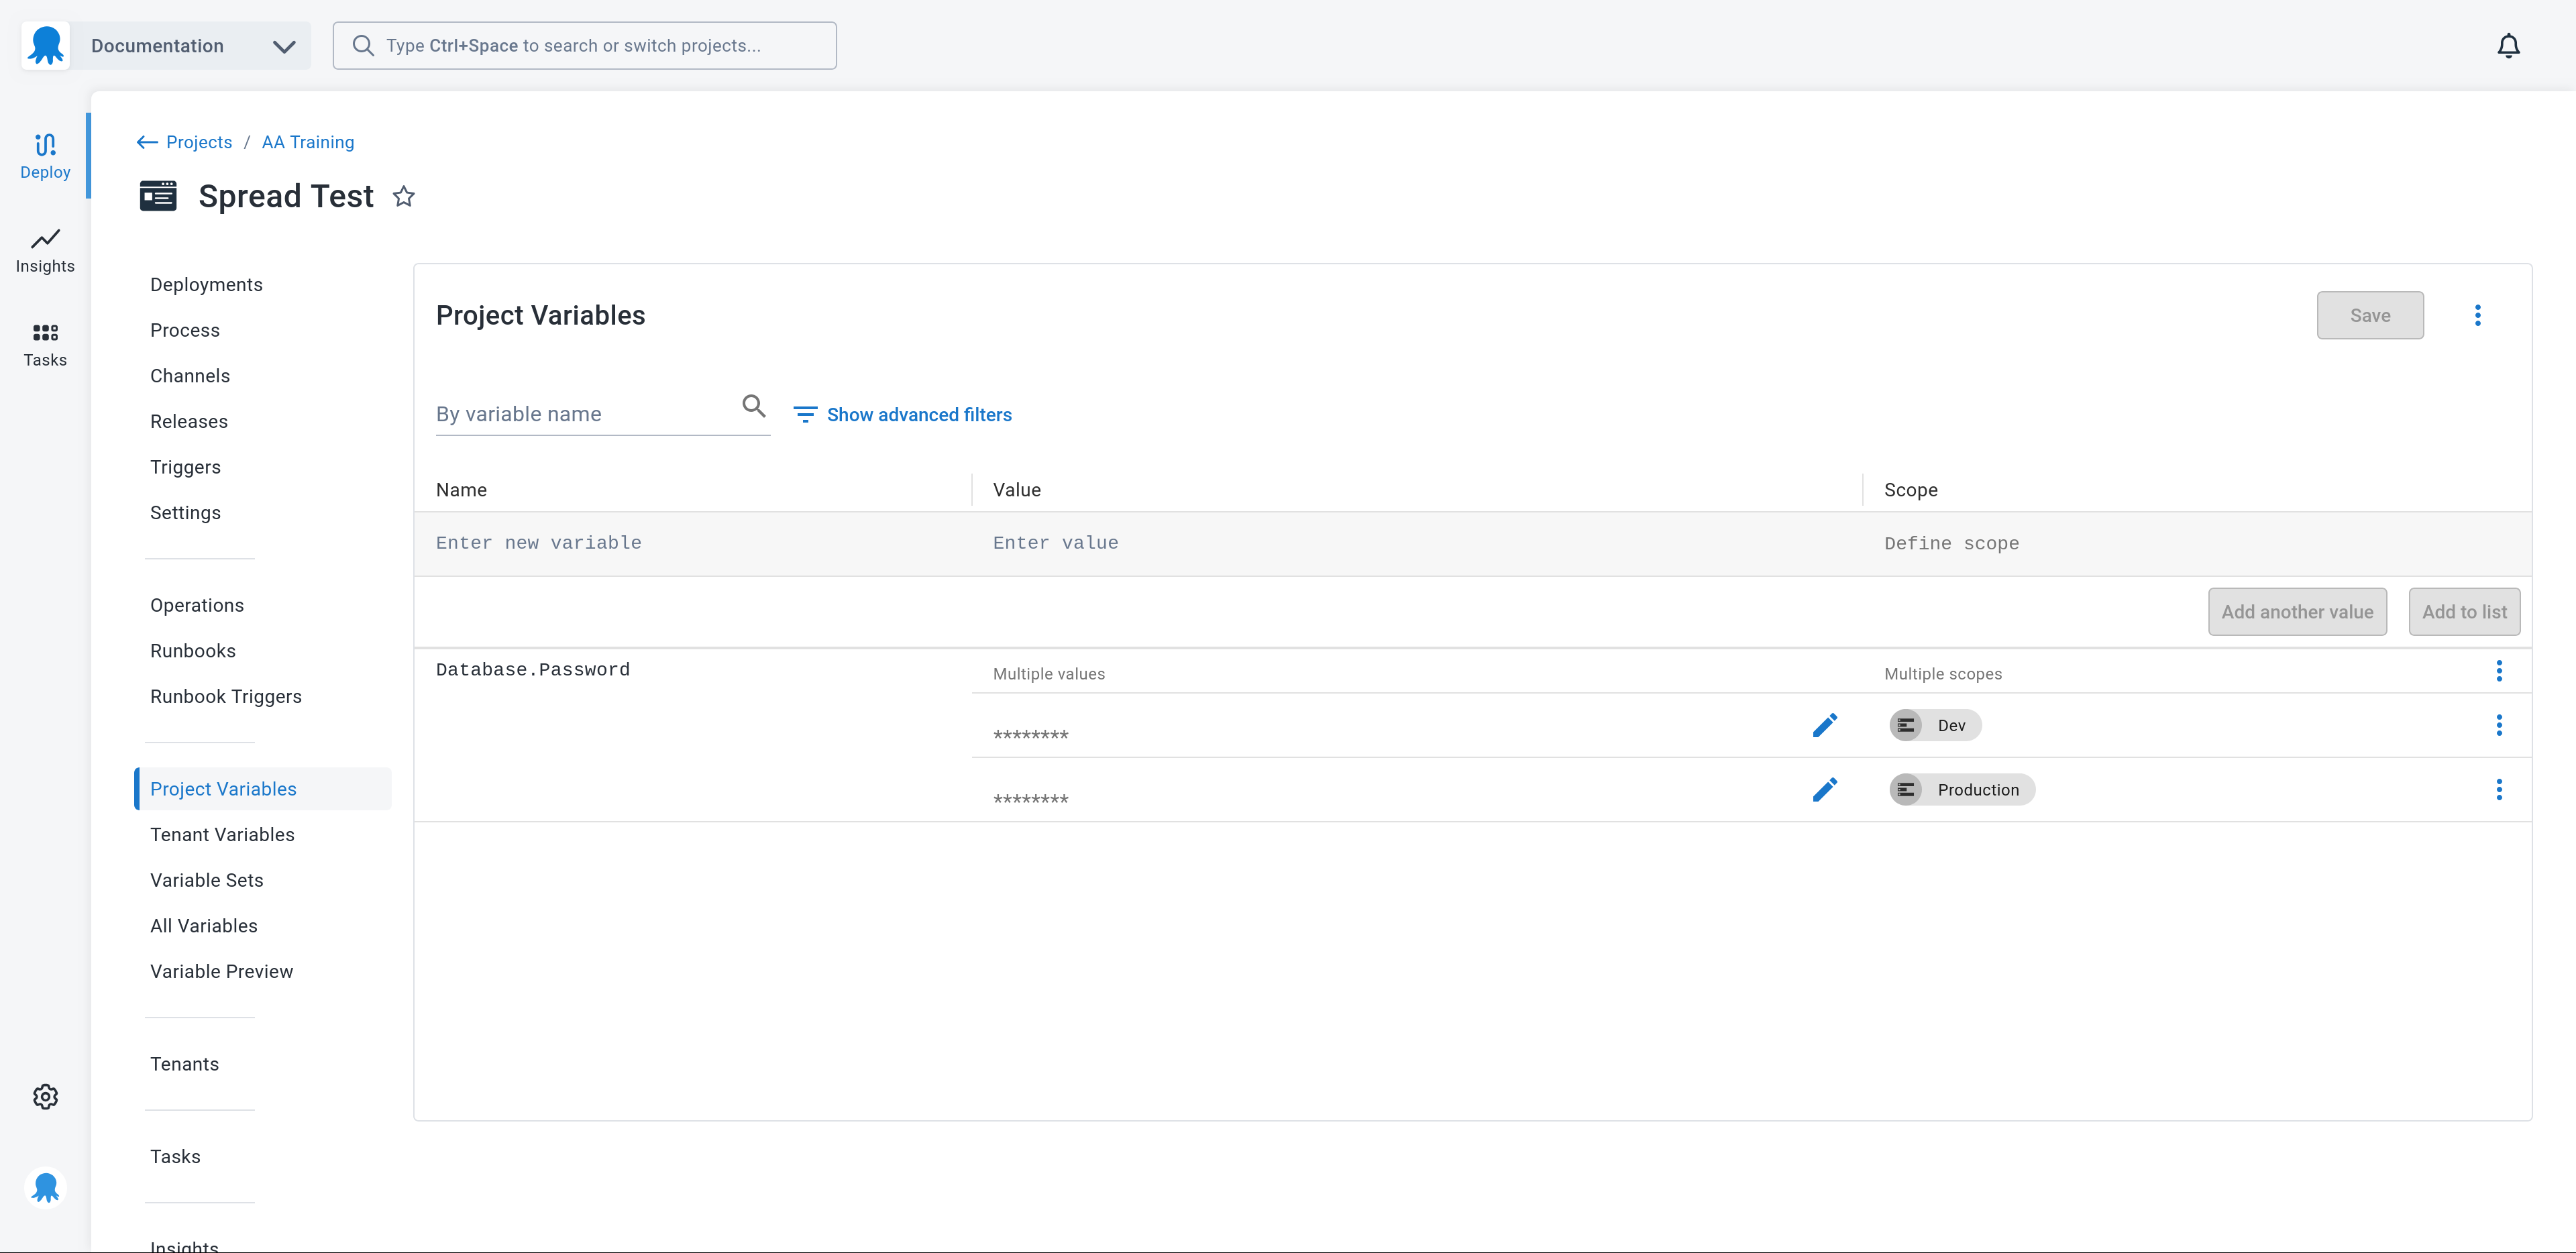
Each sensitive variable must have a unique name and no scopes in order for Octopus to expose sensitive variables defined in the project and in library variable sets to the Terraform module created by Octoterra.
However, it is common for sensitive variables to share a name and use scopes to define unique values for different contexts. For example, you may have two sensitive variables called Database.Password, with the first variable scoped to the Dev environment, and the second scoped to the Production environment. This is demonstrated in the screenshot below:
The process of renaming sensitive variables, removing their scopes, and recursively referencing them via regular variables that have the names and scopes of the original sensitive variables is called “variable spreading”.
Here is a screenshot that shows the spread variables:
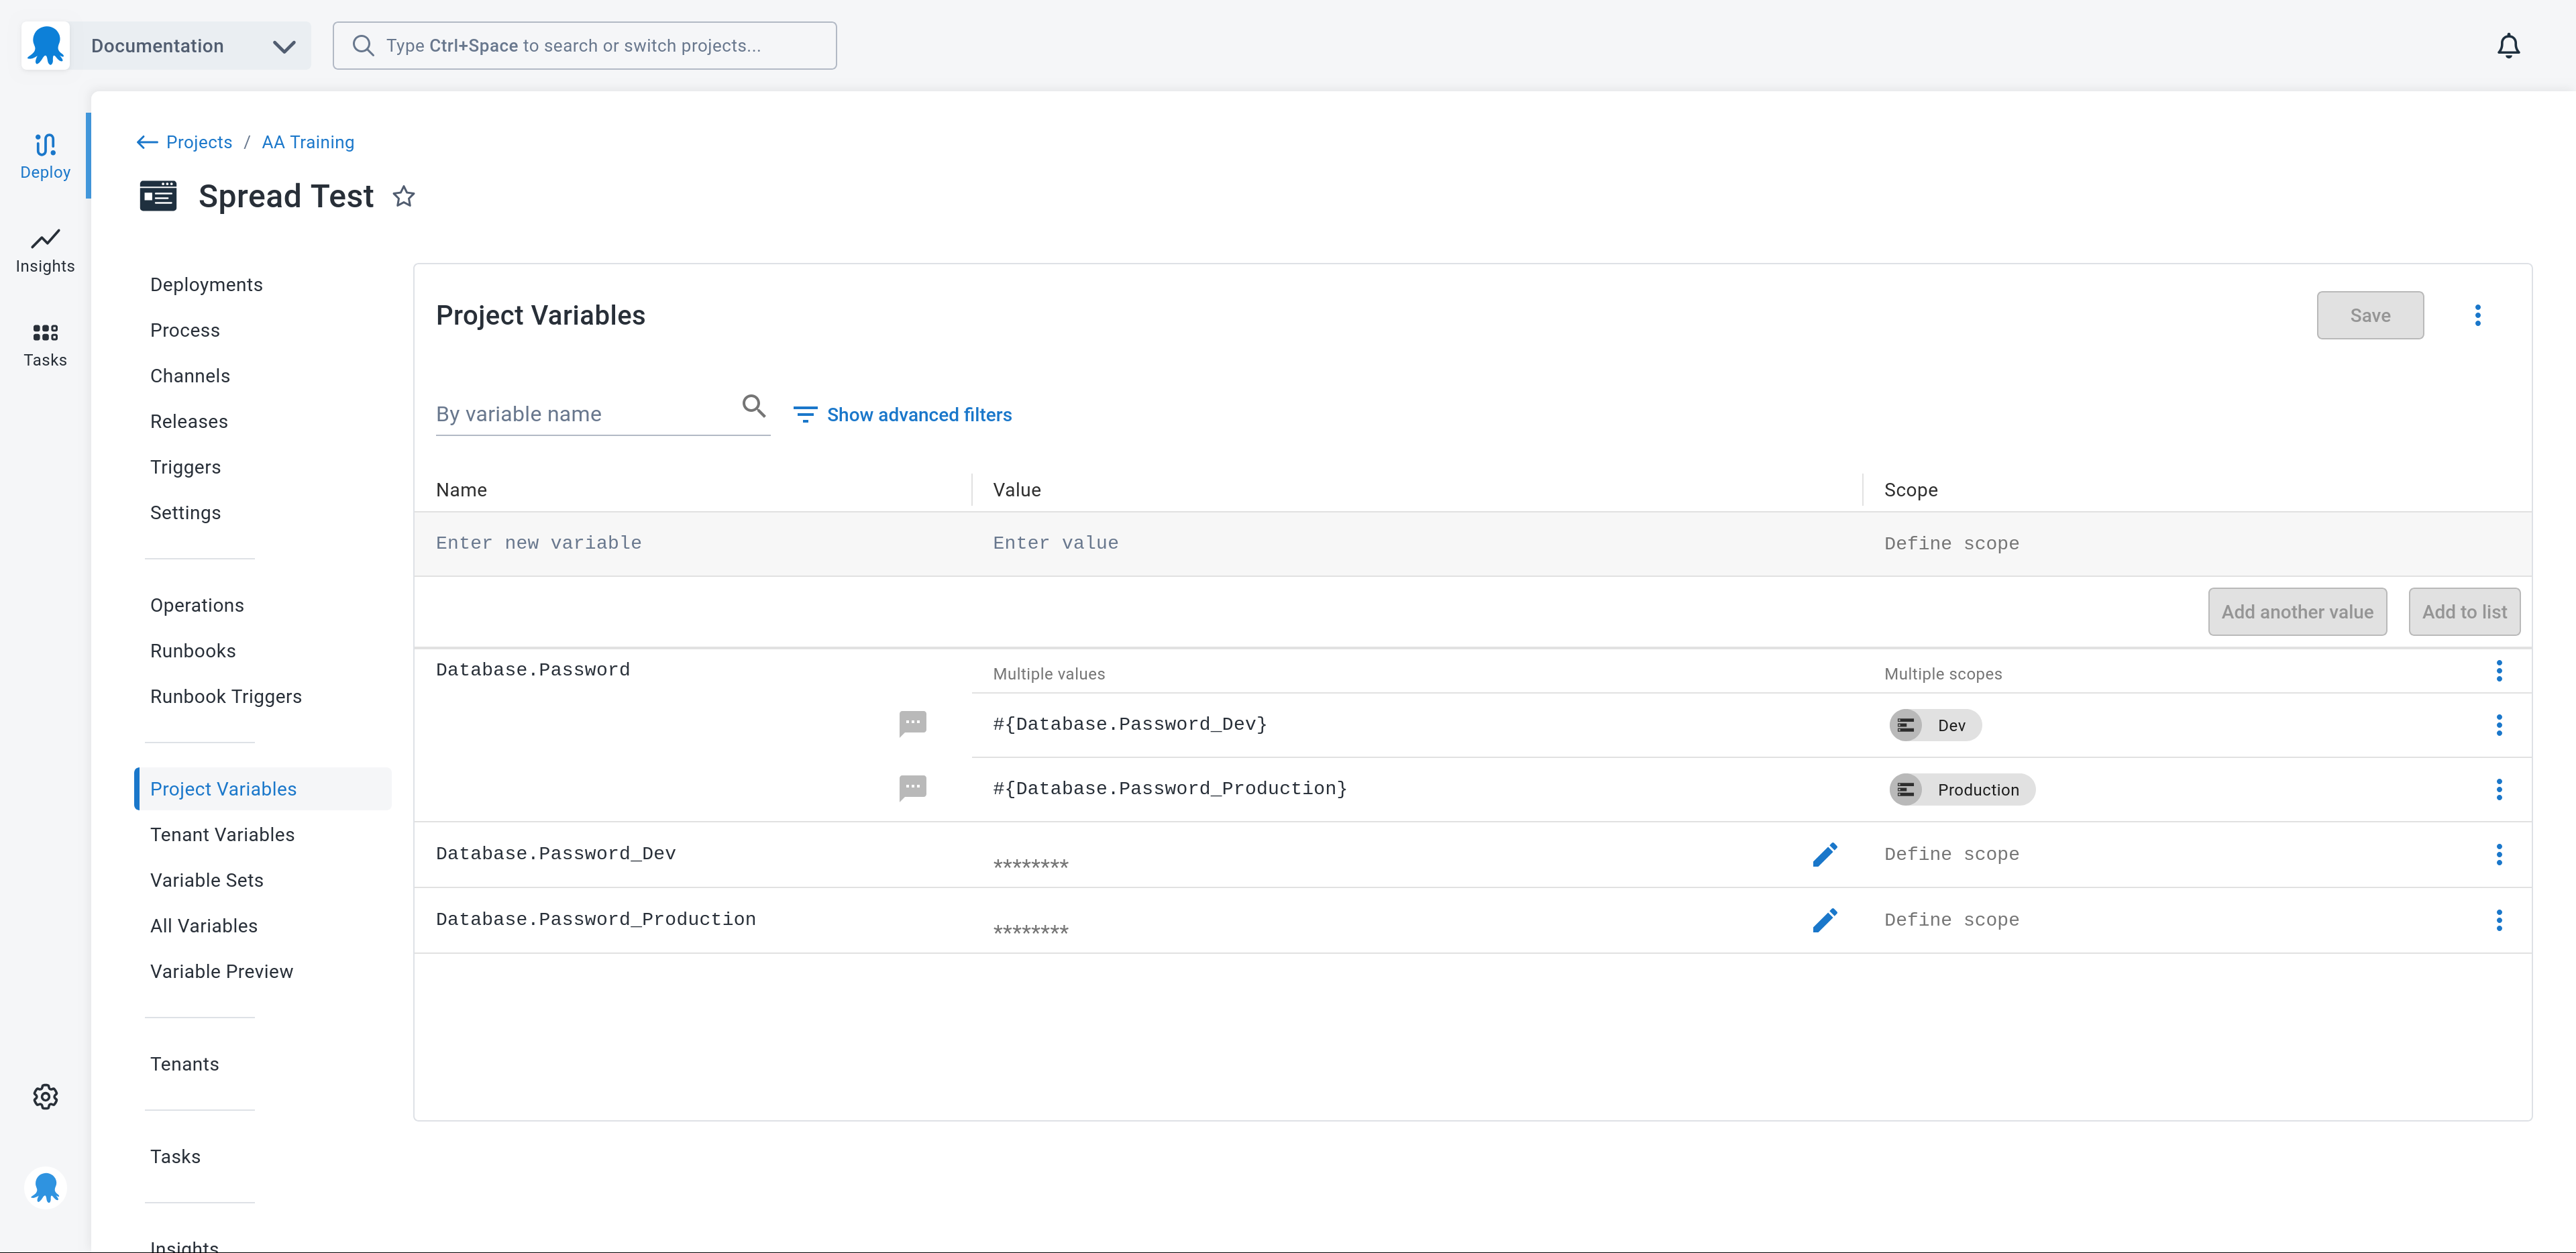
Existing steps that referenced the variable Database.Password continue to function, as the value of that variable is recursively resolved from the Octostache template syntax in the regular variable to return the value held by the referenced sensitive variable.
Because each sensitive variable now has a unique name and no scope, the value of sensitive variables can be reliably passed to a Terraform module applied by Octopus, effectively allowing sensitive variables to be migrated.
Note there are security considerations to take into account with variable spreading. Notably, every sensitive variable is exposed to every deployment or runbook run because they have no scope.
Also note that there is no automated process to collapse spread variables back to their original configuration. This can be done by hand if necessary.
It is important to understand the implications of variable spreading before migrating projects with the Octoterra Wizard.
Local Tools vs Container Images
The runbooks created by the Octoterra Wizard have the option to use locally installed tools or run the runbooks from a container image that provides the required tools.
Container images require that the source server or the default worker pool used by the source server have Docker installed. This is common on Linux servers (especially as Octopus is distributed as a Linux container for on-premises Linux users), and is available on the dynamic workers provided by cloud Octopus instances, but is less common on on-premises Windows servers.
Local tools are locally installed versions of the tools listed in the “Required local tools” section. Using this option does not require Docker to be installed on the source server.
If you are migrating from an on-premises Windows Server, you will likely select the Local tools options.
Required local tools
If you select the Local tools option, your on-premises server or default worker pool must have the following tools installed:
Space vs project level resources
Octoterra distinguishes between space and project level resources. Broadly speaking, project level resources include deployment projects and everything directly attached to projects such as project variables, runbooks, triggers, channels, and project settings.
Octoterra does not export releases or deployments.
Space level resources include everything else including feeds, accounts, tenants, library variable sets, certificates, workers, worker pools, project groups etc.
The relationship between a tenant and a project, including project level tenant variables, are considered to be project level resources.
Migrating a space involves:
- Serializing space level resources
- Deploying space level resources
- Serializing individual projects
- Deploying individual projects
- Reestablishing the link between a tenant and a project
- Recreating project tenant variables
Projects can typically be migrated independently of each other. However, some steps, such as the Deploy a release step, reference other projects. The projects referenced by Deploy a release steps must be migrated before the project that defines the step.
Migration strategies
Because the Octoterra Wizard serializes Octopus resources to Terraform modules, we can use Terraform’s functionality to implement a number of strategies for migrating spaces:
- Big bang migration, where the migration is done all at once.
- Incremental migration, where projects are migrated over time.
- Continual migration, where the destination server is updated as changes are made to the source server.
Big bang migration
This is conceptually the easiest migration as it means migrating Octopus resources from the source server to the destination server once, shutting down the source server, and immediately switching to the destination server.
To perform a big bang migration, run the wizard to completion. This will migrate the space level resources and all projects for you.
Consider a big bang migration strategy when:
- You can migrate the space and project level resources in one operation.
- You are confident that the migrated resources work as expected.
- You can perform all the post-migration steps before the destination server is put into operation.
Incremental migration
Incremental migrations require the space level resources to be migrated from the source server to the destination server.
To perform an incremental migration, complete the Migrate Space Level Resources step and then exit the wizard. This ensures that the space level resources are migrated and the runbooks required to migrate individual projects are created.
Then, when a project is ready to be migrated, run its associated __ 1. Serialize Project runbook, followed by the __ 2. Deploy Project runbook. This will serialize and then migrate a single project.
You may consider disabling the project on the source server once it has been migrated to prevent deployments taking place on both the source and the destination server.
Consider an incremental migration strategy when:
- You need to break down the migration into multiple steps.
- Your projects have different risk profiles i.e. you have low risk projects you can migrate first, and only when they are successful can you migrate high risk projects.
- You wish to delegate the process of migrating projects to different teams who will perform the migration on their own schedule.
Continual migration
Continual migration means updating projects on the destination server with any changes from the source server after the initial migration.
Continual migrations are useful when both the source and destination servers must run side by side for some time. A typical scenario is testing the migrated projects on the destination server while the associated projects on the source server are still in active use, and then redeploying the projects to update the destination server with any changes made to the source server.
The source server is considered the source of truth for space and project level resources until the source server is decommissioned. The configuration of the destination server will be replaced each time space and project level resources are redeployed.
Consider a continual migration strategy when:
- You wish to perform the bulk of the migration up front.
- You need to test the destination server while the source server is still actively used.
- You need to update the destination server with any changes made to the source server while testing the migration.
Limitations of continual migration
The fundamental idea behind a continual migration strategy is the ability to make changes on the source server and reflect those changes on the destination server. This process works well for small tweaks to space level resources and project settings.
However, some care must be taken when changing the source server, as certain changes can not be immediately deployed to the destination server. Notably, any change to the source server that deletes space level resources and updates project level resources to no longer use them will be very difficult to deploy to the destination server.
For example, creating a new project group, moving a project, and deleting the old project group on the source server is very difficult to replicate on the destination server. This is because the change involved deleting a space level resource (the old project group) and changing a project level resources (the project group that the project belongs to). Attempting to synchronize these changes to the destination server will fail because:
- The space level resources are serialized to Terraform, and no longer include the deleted project group.
- The space level resources are applied to the destination server.
- Terraform compares the new Terraform configuration to the existing state and determines that the project group must be removed.
- The Octopus API fails to remove the project group because it contains a project.
This limitation applies to many other space level resources like library variable sets, git credentials, accounts, feeds etc.
The first approach is to apply these changes in multiple steps:
- On the source server, create the new space level resources and update projects to point to them. Do not delete any resources.
- Deploy both the space and project level changes to the destination server.
- At this point no projects on either the source or destination server refer to the old space level resources.
- Delete the old space level resources on the source server.
- Deploy the space level changes to the destination server.
The second approach is to delete any projects on the destination server and recreate them with the new settings:
- On the source server, create the new space level resources and update projects to point to them.
- On the destination server, delete any projects that were modified on the source server.
- At this point no projects on either the source or destination server refer to the old space level resources.
- Deploy both the space and project level changes to the destination server.
Projects are configured to ignore changes to the project_group_id and name with the following lifecycle meta-argument:
  lifecycle {
    ignore_changes = ["`project_group_id`", "name"]
  }
This allows projects on the destination server to be moved to a new project group and have their name updated while allowing other settings to be updated. This means you must do one of the following to reflect a change to a project group or project name on the source server:
- Manually move the projects on the destination server to reflect the changes on the source server.
- Manually update the project name to reflect the changes on the source server.
- Use the second approach where the project on the destination server is deleted and recreated.
- Manually edit the Terraform module to remove
project_group_idfrom the list of ignored changes.
Considerations when running multiple instances
Some deployment strategies involve running multiple Octopus instances in parallel while performing testing or completing a migration. There are implications that you must consider for these migration strategies.
Task locking
By default, Octopus will only run one process on each deployment target at a time, queuing the rest.
This task blocking is not available when two independent servers share deployment targets, as may be the case when implementing the incremental or continuous migration strategies.
Depending on the target type and how deployments are configured, there may be no issue with concurrent deployments. Unfortunately, there is no simple rule for determining if a target or deployment process supports concurrent deployments.
You must determine if concurrent deployments have the potential to cause issues, and if so, manually ensure that multiple Octopus servers do not attempt to deploy to the same target at the same time.
There are a number of strategies you can implement to prevent or manage concurrent deployments:
- Use a named mutex.
- Disable projects to ensure only the source or destination server can run a migrated project.
- Disable targets to ensure only the source or destination server can interact with a migrated target.
Duplicated triggers
Project and runbook triggers are duplicated on the destination server as part of the migration. It is likely that you only want these triggers to run on either the source or destination servers, but not both. Triggers can be stopped by disabling the individual triggers or disabling the projects.
Post-migration steps
The migration of space and project level resources will transfer most, but not all, configuration from the source to the destination server. There are a number of post-migration steps that must be completed before the destination server is fully operational.
Update sensitive values
A number of sensitive values can not be migrated by Octoterra including:
- Account credentials
- Feed credentials
- Git credentials
- Certificates
- Secret values define in steps such as the
Deploy to IISandDeploy to Tomcatsteps - Sensitive values defined for sensitive step templates parameters
All these values must be manually reconfigured on the destination server.
Convert projects back to CaC
CaC projects are converted back to regular projects during the migration. These projects must be manually converted back to CaC on the destination server.
You can not assume that you can point the projects back to their original configuration stored in Git. Values like step template IDs are hard coded in CaC configuration but are different between servers. Octopus also does not support pointing two projects to the same directory in a Git repository, so the source and destination servers can not reference the same Git repository and directory at the same time.
Migrate packages from built-in feed
Packages must be manually copied from the source to the destination server. The documentation for the import/export tool includes a link to a script that copies packages between servers.
Reconfigure firewalls
Any firewall rules relating to the Octopus server must be updated to reflect the new address of the destination server.
Regenerate API keys
Any external scripts and platforms to connect to the destination Octopus server must make use of a new API key.
Reconfigure polling tentacles
Polling tentacles must be configured with the address of the Octopus server they connect to. This means that any polling tentacles must be reconfigured to point to the destination server.
The poll-server command is used to configure a tentacle with a new server.
You also need to deregister polling tentacles from the source server. The deregister-from command is used to deregister a tentacle from a server.
A polling tentacle can be configured against both the source and destination servers when performing an incremental or continual migration, and deregistered from the source server when the migration is complete.
Updating polling tentacles in bulk
It is possible to use the script console on the source server to update polling tentacles in bulk. Running one of the commands below against all the individual targets reconfigures them to poll a new Octopus server.
Here is a sample bash command for Linux tentacles:
# TentacleExecutablePath is an environment variable pointing to the tentacle executable
# The server url in the command below (i.e. the value passed to --server) and the API key
# (i.e. the value passed to --apiKey) replaced with the value specific to your server
"${TentacleExecutablePath}" poll-server --server="https://your-octopus-url" --apiKey="API-YOUR-KEY"
Here is a sample PowerShell command for Windows tentacles (or Linux tentacles where PowerShell Core is installed):
# TentacleExecutablePath is an environment variable pointing to the tentacle executable
# The server url in the command below (i.e. the value passed to --server) and the API key
# (i.e. the value passed to --apiKey) replaced with the value specific to your server
& "${TentacleExecutablePath}" poll-server --server="https://your-octopus-url" --apiKey="API-YOUR-KEY"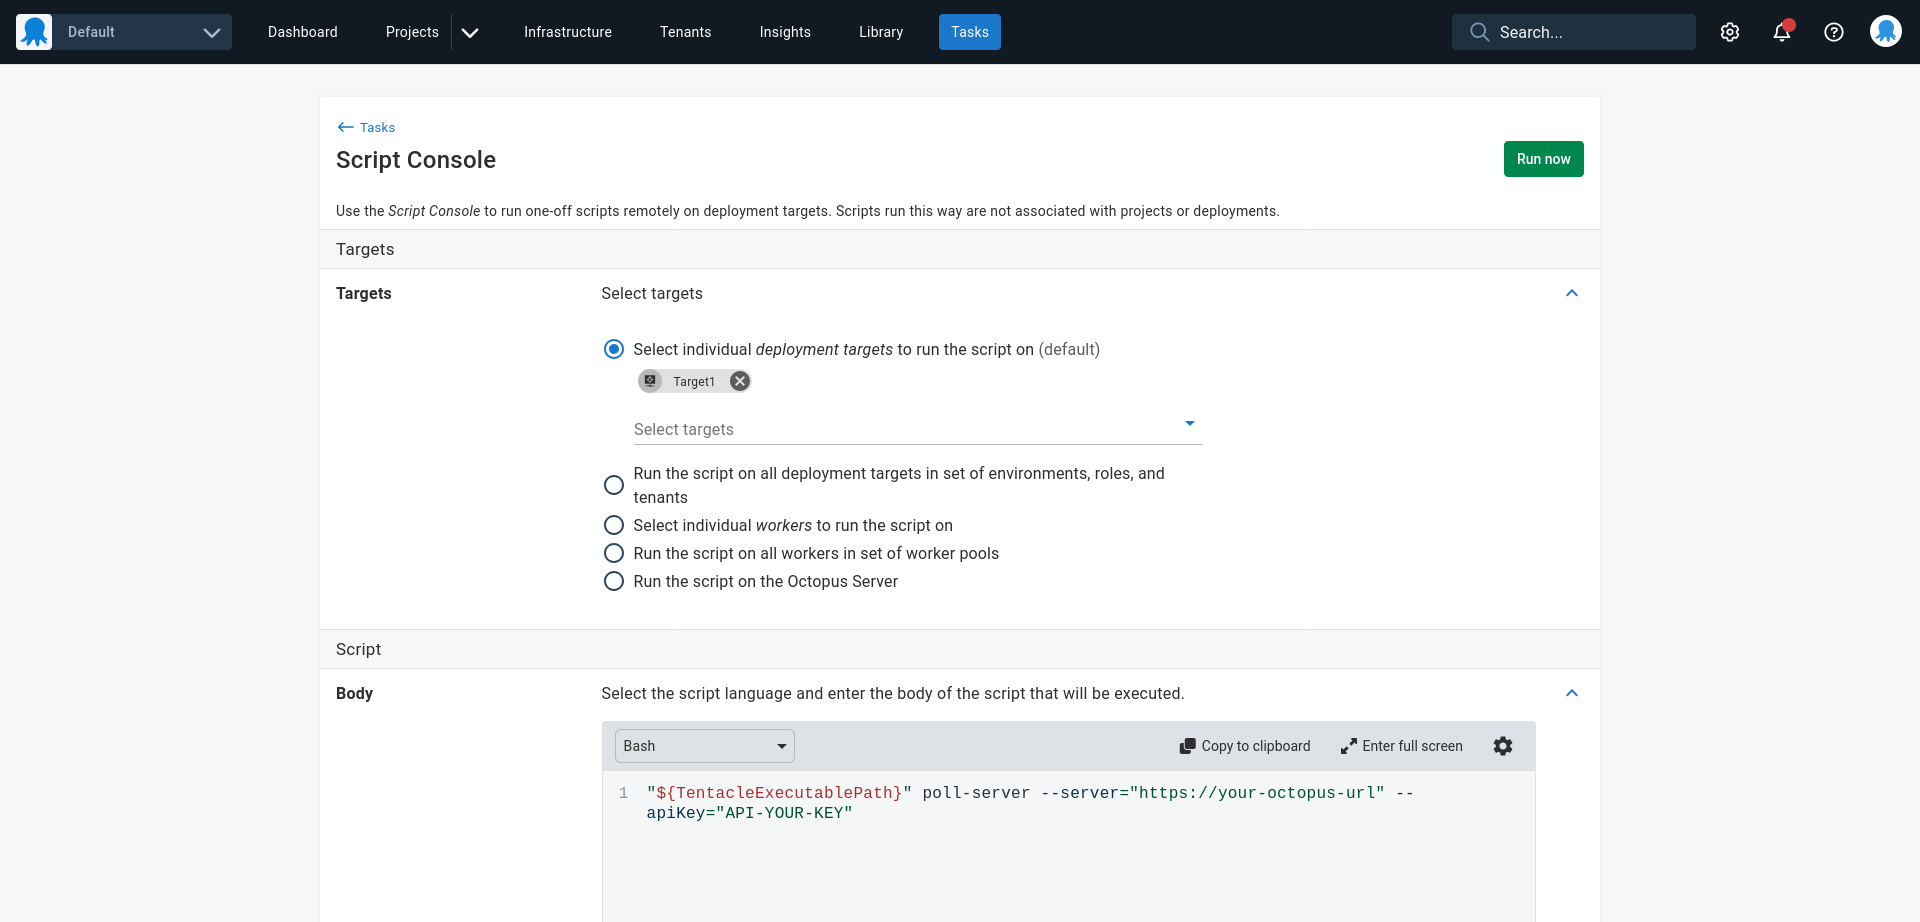
Reconfigure listening tentacles
Listening tentacles are configured to trust a certificate that is unique to each Octopus server.
It is possible to export the certificate from an on-premises Octopus server and import it into another on-premises server using these instructions.
It is not possible to change the certificate used by an Octopus cloud instance. Each listening tentacle must be updated to trust the new certificate of the Octopus cloud instance using the configure command with the --trust argument.
Listening tentacles cen be configured to trust both the source and destination servers when performing an incremental or continual migration, and the trust removed from the source server when the migration is complete.
Updating listening tentacles in bulk
It is possible to use the script console on the source server to update listening tentacles in bulk. Running one of the commands below against all the individual targets reconfigures them to trust a new Octopus server.
Here is a sample bash command for Linux tentacles:
# TentacleExecutablePath is an environment variable pointing to the tentacle executable
# The thumbprint in the command below (i.e. the value passed to the --trust argument) is an example
# and must be replaced with the value specific to your server
"${TentacleExecutablePath}" configure --trust=D21887C5EB73D21DDC3DEAB3E8840A47E6279F21
Here is a sample PowerShell command for Windows tentacles (or Linux tentacles where PowerShell Core is installed):
# TentacleExecutablePath is an environment variable pointing to the tentacle executable
# The thumbprint in the command below (i.e. the value passed to the --trust argument) is an example
# and must be replaced with the value specific to your server
& "${TentacleExecutablePath}" configure --trust=D21887C5EB73D21DDC3DEAB3E8840A47E6279F21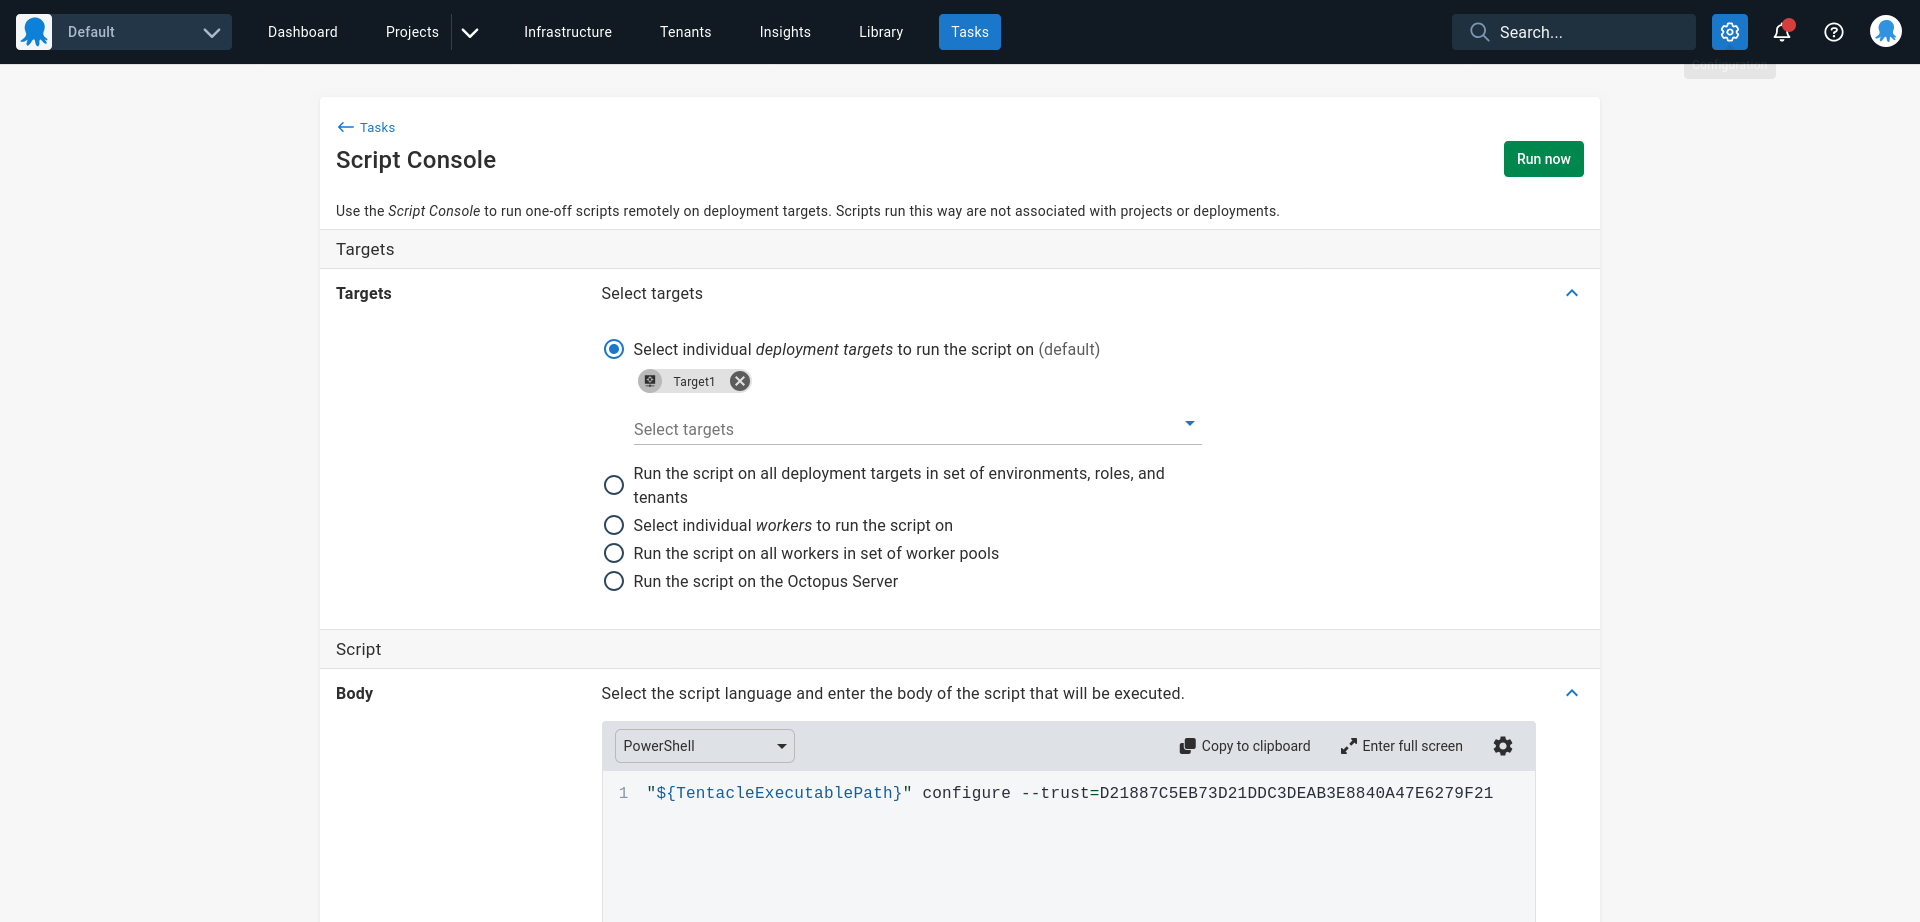
Update CI servers
Any CI servers must be reconfigured to point to the destination Octopus server.
You will likely configure your CI server to push packages to the built-in feed for both the source and destination Octopus servers when performing an incremental or continual migration, and remove the steps that interact with the source Octopus server when the migration is complete.
Reconfigure subscriptions
Subscriptions must be manually recreated on the destination Octopus server.
If subscriptions are used to trigger external events based on project events, you must take care to incrementally migrate subscriptions as part of a incremental or continual migration.
Reconfigure SEIM connections
You must manually configure the audit stream to SEIM tools like Sumo or Splunk on the destination Octopus server.
Reconfigure ITSM connection
You must manually configure the link to ITSM tools like Service Now and Jira Service Management on the destination Octopus server.
Recreate Insights dashboards
You must manually recreate any Insights dashboards on the destination Octopus server.
Reconfigure Users and teams
You must manually recreate any users and teams on the destination Octopus server.
Reconfigure SMTP settings
You must manually configure the SMTP settings on the destination Octopus server.
Licensing considerations
You will increase the count of resources that impact licensing during the migration, including projects, tenants, and machines.
Contact sales@octopus.com to discuss any impacts to licensing while performing a migration.
FAQ
Q: Can I edit the Terraform configuration files generated by Octoterra?
A: Yes, these files are standard Terraform files. You can use the provider documentation to learn more about the Terraform resources exposed by the Octopus Terraform provider.
Q: Can spread variables be automatically collapsed after being created on the destination server?
A: No, reversing variable spreading is not an automated process. You can edit these variables by hand though if required.
Q: Can Octoterra be used to merge spaces together?
A: It is unlikely that two spaces can be automatically merged together, as the names of resources in multiple spaces may conflict. However, you can manually edit the Terraform generated by Octoterra to resolve any conflicts or to merge the resources of two spaces.
Q: Can I mix the Import/Export tool with the Octoterra Wizard?
A: Yes. You may create a placeholder project on the source server, link all library variable sets, certificates, accounts, and feeds to the project, export the project and import it on the destination server. This has the benefit of migrating sensitive values that Octoterra can not export. You can then migrate individual projects using the runbooks created by the Octoterra Wizard.
Q: Does the source and destination server need to be the same Octopus version?
A: Technically no, but it is recommended that the two servers be updated to the latest version of Octopus before migrating to minimize the chance that Octoterra and the generated Terraform configuration files are incompatible with either server.
Q: Can I migrate previous Octopus versions with the Octoterra Wizard?
A: No, Octoterra only supports the supported LTS versions of Octopus.
Q: How do I fix the unexpected token while parsing list: IDENT error when applying Terraform modules.
A: This is most likely caused by running an old version of Terraform. In particular, you will see this error if you rely on the version of Terraform bundled with Octopus (version 0.11.15) which is too old to apply the Terraform modules created by Octoterra. The Octopus logs capture the Terraform version used for the deployment and will display a message like Your version of Terraform is out of date! if using an old Terraform version.
Help us continuously improve
Please let us know if you have any feedback about this page.
Page updated on Thursday, January 1, 2099